Sign In
Upload
Manuals
Brands
SolarEdge Manuals
Inverter
SE7600A-US
SolarEdge SE7600A-US Manuals
Manuals and User Guides for SolarEdge SE7600A-US. We have
2
SolarEdge SE7600A-US manuals available for free PDF download: Installation Manual
SolarEdge SE7600A-US Installation Manual (120 pages)
Brand:
SolarEdge
| Category:
Inverter
| Size: 5.79 MB
Table of Contents
Disclaimers
2
FCC Compliance
2
Important Notice
2
Contents
3
Table of Contents
3
Handling and Safety Instructions
6
Safety Information
6
Important Inverter Safety Instructions
7
Chapter 1: Overview
10
The Storedge Solution Components
10
About this Guide
11
Installation Workflow
12
Installation Equipment List
13
Inverter Transport and Storage
13
Chapter 2: Installing the Power Optimizers
14
Safety
14
Package Contents
15
Installation Guidelines
16
Step 1: Mounting and Grounding the Power Optimizers
17
Step 2: Connecting a PV Module to a Power Optimizer
19
Step 3: Connecting Power Optimizers in Strings
19
Step 4: Verifying Proper Power Optimizer Connection
21
Chapter 3: Installing the Inverter
22
Inverter Package Contents
22
Identifying the Inverter
22
Inverter Interfaces
23
Storedge Connection Unit
24
Internal AC Breaker and Bypass Switch
25
Mounting the Inverter
26
Chapter 4: Auto-Transformer and Backed-Up Loads Panel Installation (for Backup)
29
Mounting the Auto-Transformer
30
Installing the Backed-Up Loads Panel
30
Chapter 4: Meter Installation
31
Chapter 5: Storedge Inverter Connections
32
Installing the 9V Battery and Fuses
33
Connecting the Strings to the Inverter
34
Connecting to the Battery
35
DIP Switch Setup
39
DIP Switch Setup in Meter and Inverter
39
DIP Switch Setup in the Storedge Connection Unit
40
Connecting Communication to the Meter
41
Connecting to AC
42
Connecting to the Auto-Transformer
42
Connecting to the Grid and to Backed-Up Loads
44
Chapter 6: Commissioning the Installation
45
Removing the Inverter Cover
45
Step 1: Activating the System
46
Step 2: Pairing Power Optimizers to the Inverter
48
Step 3: Verifying Proper Activation
50
Step 4: Reporting and Monitoring Installation Data
50
The Solaredge Monitoring System
50
Providing Installation Information
52
Site Mapper Application
52
Creating a Site in the Solaredge Monitoring Platform
52
Paper Template
52
Chapter 7: User Interface
53
LCD User Buttons
53
Inverter Configuration - Setup Mode
54
Configuring the Inverter Using the LCD User Buttons
54
Configuring the Inverter Using the LCD Light Button
56
Configuration Menu Options
59
Country and Grid
59
Language
59
Communication
59
Power Control
61
Display
61
Maintenance
62
Information
62
Status Screens - Operational Mode
63
Initial Status
63
Main Inverter Status
63
Energy Meter Status
64
Telemetry Status
64
ID Status
65
Server Communication Status
65
IP Status
65
Zigbee Status
66
Cellular Status
66
GSM Status
66
Communication Ports Status
67
Smart Energy Management Status
67
Power Control Status
68
Battery Status
68
Charge/ Discharge Profile Programming Status
69
Chapter 8: Setting up Communication to the Monitoring Platform
70
Communication Options
71
Ethernet
71
Rs485
71
Zigbee
71
Gsm
71
Cdma/Cellular
71
Communication Connectors
72
Creating an Ethernet (LAN) Connection
73
Creating an RS485 Bus Connection
75
Verifying the Connection
78
Chapter 9: System Configuration
79
Configuring the RS485 Bus for Battery and Meter Connection
79
Configuring Storedge Application
82
Backup Power Applications
82
System Basic Configuration
82
Setting Backup-Only
83
Setting MSC + Backup Power
84
Setting Charge/Discharge Profile + Backup Power
85
Verifying Storedge Components Functionality
86
Appendix A: Troubleshooting
88
Communication Troubleshooting
88
Device Type, Number and Protocol Are Displayed Incorrectly
88
Troubleshooting Ethernet Communication
88
Meter Troubleshooting
89
<OK> Is Not Displayed
89
An Error Message Is Displayed
89
Power [Wh] Import Value Is Not Advancing
89
Battery Troubleshooting
90
Power Optimizer Troubleshooting
91
Storedge Connection Unit Leds
92
Additional Storedge Troubleshooting
93
Storedge-Related Errors Codes
95
System Warnings
96
Appendix B: Opening Conduit Knockouts
97
Appendix C: Replacing and Adding System Components
99
Replacing an Inverter
99
9V Battery Replacement
100
Fuse Replacement
101
Storedge Connection Unit Replacement
101
Removing the Existing Storedge Connection Unit
101
Installing a New Storedge Connection Unit
102
Appendix D: Inverter Arc Detection and Interruption
103
Appendix E: Additional Battery Connections
105
Connection with One Battery
105
LG Chem RESU10H (Storedge Connection Unit with 2 DIP Switches)
105
Tesla Powerwall1
106
Connections with Two Batteries
108
Two Tesla Powerwall1 Batteries
108
DIP-Switch Setup - Two Powerwall1 Batteries
112
Single Phase Inverter with Connection Unit for High Power Specifications
115
Auto-Transformer Technical Specification
118
Advertisement
SolarEdge SE7600A-US Installation Manual (116 pages)
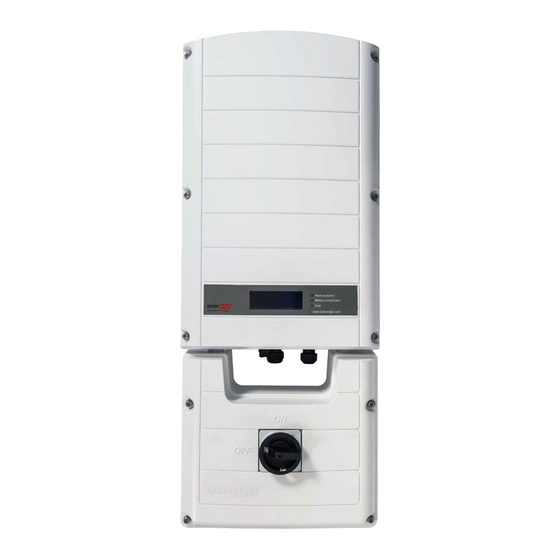
StorEdge Solution with Backup
Brand:
SolarEdge
| Category:
Inverter
| Size: 4.67 MB
Table of Contents
Revision History
2
Disclaimers
3
Important Notice
3
FCC Compliance
3
Table of Contents
4
Version 1.3 (Oct. 2017)
4
Contents
4
Handling and Safety Instructions
7
Safety Symbols Information
7
Important Inverter Safety Instructions
8
Chapter 1: Overview
11
The Storedge Solution Components
11
Installation Workflow
13
Installation Equipment List
14
Inverter Transport and Storage
14
Chapter 2: Installing the Power Optimizers
15
Safety
15
Package Contents
16
Installation Guidelines
16
Step 1: Mounting and Grounding the Power Optimizers
17
Step 2: Connecting a PV Module to a Power Optimizer
19
Step 3: Connecting Power Optimizers in Strings
20
Step 4: Verifying Proper Power Optimizer Connection
21
Chapter 3: Installing the Inverter
22
Inverter Package Contents
22
Identifying the Inverter
22
Inverter Interfaces
23
Connection Unit
24
Internal AC Breaker and Bypass Switch
25
Mounting the Inverter
25
Chapter 4: Auto-Transformer and Backed-Up Loads Panel Installation (for Backup)
29
Mounting the Auto-Transformer
30
Installing the Backed-Up Loads Panel
30
Chapter 5: Meter Installation
31
Chapter 6: Storedge Inverter Connections
32
Installing the 9V Battery and Fuses
34
Connecting the Strings to the Inverter
35
Connecting to the Battery
36
DIP Switch Setup
40
DIP Switch Setup in Meter and Inverter
40
DIP Switch Setup in the Connection Unit
41
Connecting Communication to the Meter
42
Connecting to AC
43
Connecting to the Auto-Transformer
43
Connecting to the Grid and to Backed-Up Loads
45
Chapter 7: Commissioning the Installation
46
Removing the Inverter Cover
46
Step 1: Activating the System
48
Step 2: Pairing Power Optimizers to the Inverter
51
Step 3: Verifying Proper Activation
52
Step 4: Reporting and Monitoring Installation Data
52
The Solaredge Monitoring System
52
Providing Installation Information
53
Site Mapper Application
53
Creating a Site in the Solaredge Monitoring Platform
54
Paper Template
54
Chapter 8: User Interface
55
LCD User Buttons
55
Inverter Configuration - Setup Mode
56
Configuring the Inverter Using the LCD User Buttons
56
Configuring the Inverter Using the LCD Light Button
59
Configuration Menu Options
62
Country and Grid
62
Language
62
Communication
62
Power Control
64
Display
65
Maintenance
65
Information
66
Status Screens - Operational Mode
67
Initial Status
67
Main Inverter Status
67
Energy Meter Status
67
Telemetry Status
68
ID Status
68
Server Communication Status
69
IP Status
69
Zigbee Status
70
Cellular Status
70
GSM Status
70
Communication Ports Status
71
Smart Energy Management Status
71
Power Control Status
72
Battery Status
72
Charge/ Discharge Profile Programming Status
73
Chapter 9: Setting up Communication to the Monitoring Platform
74
Communication Options
75
Ethernet
75
Rs485
75
Zigbee
75
Gsm
75
Cdma
75
Communication Connectors
76
Creating an Ethernet (LAN) Connection
77
Creating an RS485 Bus Connection
79
Verifying the Connection
82
Chapter 10: System Configuration
83
Upgrading the Inverter Firmware Version
83
Configuring the RS485 Bus for Battery and Meter Connection
84
Configuring Storedge Applications
88
Backup Power Applications
88
System Basic Configuration
88
Setting Backup-Only
90
Setting MSC + Backup Power
90
Setting Charge/ Discharge Profile + Backup Power
91
Verifying Storedge Components Functionality
92
Appendix A: Troubleshooting
95
Communication Troubleshooting
95
Device Type, Number and Protocol Are Displayed Incorrectly
95
Troubleshooting Ethernet Communication
95
Meter Troubleshooting
96
<OK> Is Not Displayed
96
An Error Message Is Displayed
96
Power [Wh] Import Value Is Not Advancing
96
Battery Troubleshooting
97
Power Optimizer Troubleshooting
98
Connection Unit Leds
99
Additional Storedge Troubleshooting
100
Storedge-Related Errors Codes
102
System Warnings
103
Appendix B: Opening Conduit Drill Guides
104
Appendix C: Replacing and Adding System Components
106
Replacing an Inverter
106
9V Battery Replacement
106
Fuse Replacement
108
Battery Replacement
108
Appendix D: Mechanical Specifications
110
Inverter Dimensions
110
Auto-Transformer Dimensions
111
Storedge Single Phase Inverter with Connection Unit for High Power - Technical Specifications
112
Storedge Inverter
112
Auto-Transformer Technical Specifications
115
Advertisement
Related Products
SolarEdge SE7600H-US
SolarEdge StorEdge SE7600A-US1
SolarEdge StorEdge SE7600A-USS
SolarEdge SE7k
SolarEdge SE7000US
SolarEdge StorEdge SE7K-RWS
SolarEdge SE75K
SolarEdge SE7K-N4
SolarEdge SE6000
SolarEdge StorEdge SE5000H-O4
SolarEdge Categories
Inverter
Measuring Instruments
Recording Equipment
UPS
Control Unit
More SolarEdge Manuals
Login
Sign In
OR
Sign in with Facebook
Sign in with Google
Upload manual
Upload from disk
Upload from URL