Sign In
Upload
Manuals
Brands
PANHANS Manuals
Control Unit
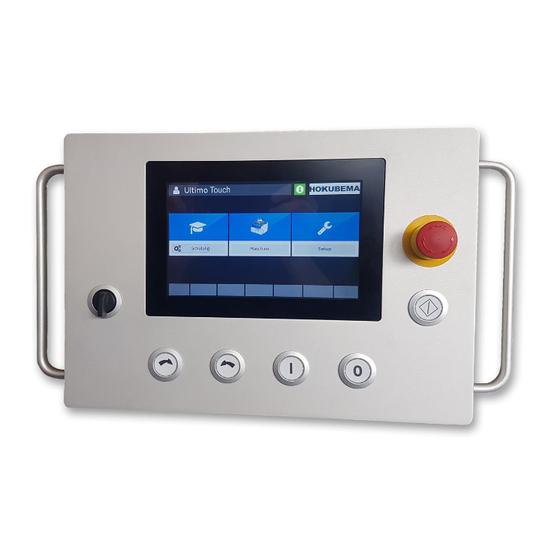
Ultimo-Touch 300
PANHANS Ultimo-Touch 300 Manuals
Manuals and User Guides for PANHANS Ultimo-Touch 300. We have
2
PANHANS Ultimo-Touch 300 manuals available for free PDF download: Operation Manual
PANHANS Ultimo-Touch 300 Operation Manual (48 pages)
Four-Axis Touchscreen Control for Tilting Spindle Moulders
Brand:
PANHANS
| Category:
Control Unit
| Size: 2 MB
Table of Contents
Table of Contents
2
General Information
5
Legal Notice
5
Illustrations
5
Front Switches and Push Buttons
5
Menu Button Overview
6
Start Screen
7
Figure 1: Start Screen
7
Machine Access (Only with Option TM300)
8
User Registration
8
Figure 2: Machine Access: no Key
8
Figure 3: Machine Access: Username
8
Machine Access in the Absence of Instruction
9
Figure 4: Machine Access: Training Time Exceeded
9
Figure 5: Warning Message "Overdue Instruction
9
General Information on Axis Positioning
10
Positioning Sequence
10
Actual Values / Target Values
10
Manual Mode (Step Positioning)
10
Figure 6: Coloured Background of the Actual Values
10
Machine Overview
11
Figure 7: Machine Overview Mask with Tools, Axis Positions and Speed (Example 245|300)
11
Speed Settings
12
Speed Setting with Types 245|200 and 245|300
12
Speed Setting with Version 245|100
12
Figure 8: Speed Setting for Milling Cutter
12
Figure 9: Software Limit in the Speed Window
12
Figure 10: Info Screen for Milling Spindle
12
Height and Angle Positioning
13
Height (Offset)
13
9.1.1 Zeromaster
13
Figure 11: Effective Height (Incremental)
13
9.1.2 Calibrate the Tool Height with the Zeromaster
14
Figure 12: Calibrate the Tool Height with the Zeromaster
14
Height (Absolute)
15
Figure 13: Absolute Height
15
Angle
16
Figure 14: Swivel Angle for the Milling Spindle
16
Fence Positioning
17
Fence 301
17
Fence Type 301 (Absolute)
17
Figure 15: Fence Type 301 (Absolute)
17
Fence Type 301 (Incremental)
18
Figure 16: Fence Type 301 (Incremental)
18
Fence 302
19
Fence Type 302 (Absolute)
19
Figure 17: Fence Type 302 (Absolute)
19
Fence Type 302 (Incremental)
20
Figure 18: Fence Type 302 (Incremental)
20
Calibration Value "Spindle Type" for Fences 301 and 302
21
Figure 18: Spindle Selection Button
21
Fence 311
22
Fence Type 311 (Absolute)
22
Figure 19: Fence Type 311 (Absolute)
22
Fence Type 311 (Incremental)
23
Figure 20: Fence Type 311 (Incremental)
23
Fence 320
24
Fence Type 320 (Absolute)
24
Figure 21: Fence Type 320 (Absolute)
24
Fence Type 320 (Incremental)
25
Figure 22: Fence Type 320 (Incremental)
25
Swivel-Away Devices (Option)
26
10.6.1 Fence Types 301, 302, 311 and 320
26
10.6.2 Remove Fence Type 320 Without Swivel-Away Device
26
Figure 23: Messages "Swivel-Away Device
26
Tools and Program Memory
27
List of Tools
27
Figure 24: Open the Tool and Program Memory in the Machine Overview
27
Figure 25: Tool Overview
27
Create a Tool
28
Figure 26: Creating a Tool
28
Edit an Existing Tool
29
Figure 27: Edit an Existing Tool / Select Line
29
Create a Program for a Tool
30
Figure 28: Select the Tool for Program Creation
30
Figure 29: Empty Program List
30
Figure 30: Program Settings for Tool
31
Figure 31: Program Creation: Assign Feed Rate
31
11.4.1 Load Program
32
Figure 32: Program List with a Stored Program
32
Figure 33: Pop-Up Window "Correct Tool
32
Correct Loaded Program
33
Digital Clipboard
33
Figure 34: Note on Changed Program
33
Figure 35: Query Window "Save Program
33
Figure 36: Digital Clipboard with Program Details
33
Info Window with Status Messages
34
Figure 37: Info Window with Status Messages
34
Setup Menu (Without Machine Access Control TM 300)
35
Figure 38: Main Screen with "Setup Menu
35
Figure 39: Setup Menu: Password
35
Error Messages and Troubleshooting
36
Advertisement
PANHANS Ultimo-Touch 300 Operation Manual (32 pages)
Brand:
PANHANS
| Category:
Controller
| Size: 1 MB
Table of Contents
Table of Contents
2
General Information
5
Front Switches and Push-Buttons
5
Menu Icon Overview
6
Start Screen
7
Figure 1: Start Screen
7
Machine Access (Only with Option TM300)
8
User Registration
8
Figure 2: Machine Access: no Key
8
Figure 3: Machine Access: Username
8
Machine Access in the Absence of Instruction
9
Figure 4: Machine Access: Training Time Exceeded
9
Figure 5: Warning Message "Overdue Instruction
9
Positioning
10
Positioning Sequence
10
Actual Values / Target Values
10
Manual Mode (Step Positioning)
10
Figure 6: Colored Background of the Actual Values
10
Machine Fences
11
Fence 302 (Machine Type 245/100 and 245/200)
11
Fence 311 (Machine Type 245/100 and 245/200)
11
Fence 320 (Machine Type 245/300)
11
Additional Position Indicator with Fence 302
11
Button Functions of the Additional Indicator
11
Battery Buffering
11
How to Change the Battery
12
Figure 7: Position Indicator - Battery Change
12
Setup Menu (Only for Machines Without Optional Access Control)
13
Figure 8: Main Screen with "Setup Menu
13
Figure 9: Setup Menu: Password
13
Positioning Parameters
14
Speed
14
Figure 10: Speed Setting for Milling Cutter
14
Figure 11: „Software Limit" in the "Speed Window
14
Height Offset
15
Zeromaster
15
Figure 12: Effective Height (Incremental)
15
Height Abs
16
Figure 13: Absolute Height
16
Angle
17
Figure 14: Swivel Angle for the Milling Spindle
17
Fence Abs
18
Figure 15: Absolute Fence
18
Fence Inc
19
Figure 16: Incremental Fence
19
Swivel-Away Devices (Option)
20
Fence Types 302, 311 and 320
20
Figure 17: Swivel-Away Device Dialog (Example Type 320)
20
Machine Parameters
21
Figure 18: Main Menu of Machine Parameters
21
List of Tools
22
Figure 19: Tool Overview
22
Create a Tool
23
Figure 20: Creating a Tool
23
Edit an Existing Tool
24
Figure 21: Edit an Existing Tool / Select Line
24
Create a Program for a Tool
25
Figure 22: Select the Tool for Program Creation
25
Figure 23: Empty Program List
25
Figure 24: Program Settings for Tool
26
Figure 25: Program Creation: Assign Feed Rate
26
Load Program
27
Figure 26: Program List with a Stored Program
27
Handwheel for Fence Type 301 - Commissioning
28
Wut Com Server
28
DIP Switch Settings
28
IP Settings
28
Figure 27: DIP Switch Settings
28
Figure 28: Search Network for Wut Com Servers
28
Figure 29: Open Network Parameters
29
Figure 30: Set Network Parameters
29
Bus Settings
30
Figure 31: Server Restart
30
Figure 32: Perform a New Scan
30
Figure 33: Log in to Com Server
30
Figure 34: Open Serial Parameters
31
Figure 35: Serial Parameter Settings 1
31
Figure 36: Serial Parameter Settings 2
31
Advertisement
Related Products
PANHANS 334|20
PANHANS 335|20
PANHANS 336|20
PANHANS 3V
PANHANS Ultimo-Touch 245/100
PANHANS Ultimo-Touch 245/200
PANHANS Ultimo-Touch 245/300
PANHANS Categories
Saw
Power Tool
Planer
Control Unit
Controller
More PANHANS Manuals
Login
Sign In
OR
Sign in with Facebook
Sign in with Google
Upload manual
Upload from disk
Upload from URL