Sign In
Upload
Manuals
Brands
Original Prusa Manuals
3D Printers
MINI+
Original Prusa MINI+ Manuals
Manuals and User Guides for Original Prusa MINI+. We have
2
Original Prusa MINI+ manuals available for free PDF download: Instruction Manual, Manual
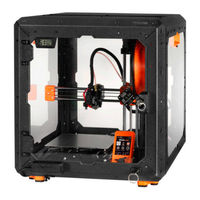
Original Prusa MINI+ Instruction Manual (72 pages)
Enclosure
Brand:
Original Prusa
| Category:
3D Printers
| Size: 11 MB
Table of Contents
Table of Contents
1
1 Introduction
5
STEP 1 Introduction
6
STEP 2 Printer Compatibility
6
STEP 3 Tools Included for the Enclosure Assembly
7
STEP 4 Additional Tools
7
STEP 5 Labels Guide
8
STEP 6 Use Labels for Reference
8
STEP 7 View High Resolution Images
9
STEP 9 How to Successfully Finish the Assembly
10
Step 10 - Upgrade Your Parts
11
Step 11 - Optional Parts
12
STEP 12 Add-Ons
12
STEP 13 We Are here for You
13
2 Assembling the Enclosure
13
STEP 1 Tools Necessary for this Chapter
15
STEP 2 Base & Feet: Parts Preparation
15
STEP 3 Preparing the Foot-Brackets
16
STEP 4 Attaching the Anti-Vibration Pads
16
STEP 5 Attaching the Foot-Brackets
17
STEP 6 Mounting the Foot-Brackets
17
STEP 7 Anti-Slip Dampers: Parts Preparation
18
STEP 8 Preparing the Anti-Slip Dampers
18
STEP 9 Mounting the Anti-Slip Dampers
19
STEP 10 Profiles: Parts Preparation
19
Step 11 - Installing the Profiles
20
STEP 13 Fire Suppression System (Add-On): Parts Preparation
21
STEP 14 Preparing the Fire Suppression System Tube (Add-On)
21
STEP 15 Attaching the Fire Suppression System Tube (Add-On)
22
STEP 16 Securing the Fire Suppression System Tube (Add-On): Right Side
22
STEP 17 Securing the Fire Suppression System Tube (Add-On): Left Side
23
STEP 18 Installing the Top Panel
23
STEP 19 Preparing the Top Window Panel
24
STEP 20 Mounting the Top Window Panel
24
STEP 21 MINI Back Panel: Parts Preparation
25
STEP 22 Installing the Back Panel
25
STEP 23 Advanced Filtration System (Add-On): Parts Preparation
26
STEP 24 Assembling the Filtration: Parts Preparation (Add-On)
26
Step 25 - Assembling the Filtration (Add-On)
27
Step 26 - Assembling the Filtration (Add-On)
27
STEP 27 Assembling the Filtration (Add-On)
28
STEP 28 Installing the Blower (Add-On)
28
STEP 29 Inserting the HEPA Filter (Add-On)
29
STEP 30 Inserting the HEPA Filter (Add-On)
29
STEP 31 Installing the Filtration (Add-On)
30
STEP 32 Side Panels: Parts Preparation
30
STEP 33 Installing the Side Panel
31
STEP 34 Transport Handle (Optional): Parts Preparation
31
STEP 35 Installing the Transport Handle (Optional)
32
STEP 36 Mounting the Transport Handle (Optional)
32
STEP 37 White LED Strip (Add-On): Parts Preparation
33
STEP 38 Assembling the LED Strip (Add-On)
33
STEP 39 Assembling the LED Strip (Add-On)
34
STEP 40 Mounting the LED Strip (Add-On)
34
STEP 41 LED Cable: Parts Preparation (Add-On)
35
STEP 42 Guiding the LED Cable (Add-On)
35
STEP 43 Guiding the Filtration Cable: Parts Preparation (Add-On)
36
STEP 44 Guiding the Add-On Cables: Filtration Cable (Add-On)
36
STEP 45 Delta PSU: Parts Preparation (Add-On)
37
STEP 46 Guiding the PSU Cable (Add-On)
37
STEP 47 Releasing the Rear Foot (Add-On)
38
STEP 48 Securing the PSU Cable (Add-On)
38
STEP 49 Releasing the Front Foot (Add-On)
39
STEP 50 Securing the Front Foot (Add-On)
39
STEP 52 Installing the Basic Board (Add-On)
40
STEP 53 Installing the Basic Board (Add-On)
41
STEP 54 Assembling the Basic Board (Add-On)
41
STEP 55 Mounting the Basic Board (Add-On)
42
STEP 56 Connecting the Basic Board (Add-On)
42
STEP 57 Door Hinges: Parts Preparation
43
STEP 59 Mounting the Hinges
44
STEP 60 Mechanical Lock (Add-On): Parts Preparation
44
STEP 61 Assembling the Lock Insert (Add-On): Parts Preparation
45
STEP 62 Assembling the Lock Housing (Add-On)
45
STEP 63 Securing the Lock Housing (Add-On)
46
STEP 64 Assembling the Lock Mechanism (Add-On): Parts Preparation
46
STEP 65 Assembling the Lock Mechanism (Add-On)
47
STEP 66 Securing the Lock Mechanism (Add-On)
47
STEP 67 Installing the Door Panel (Add-On): Parts Preparation
48
STEP 68 Installing the Door Panel (Add-On)
48
STEP 69 Door Assembly: Parts Preparation
49
STEP 70 Installing the Door Panel
49
STEP 71 Assembling the Door Handle
50
STEP 72 Haribo Time
50
STEP 73 Good Job
51
3 Installing the Printer
52
STEP 1 Tools Necessary for this Chapter
53
STEP 3 Removing the Input PTFE Tube (Optional)
54
STEP 4 Removing the Filament Sensor (Optional)
54
STEP 5 Input PTFE Tube: Parts Preparation (Optional)
55
STEP 6 Inserting the PTFE Tube
55
STEP 7 Filament Sensor Installation (Optional)
56
STEP 8 USB Cable: Parts Preparation
56
STEP 9 Inserting the USB Cable
57
STEP 10 Preparing the Printer
57
Step 11 - Installing the Printer
58
STEP 12 Connecting the Cables
58
STEP 13 Adjusting Printer Position
59
STEP 14 Thermometer: Parts Preparation
59
STEP 16 Spool Holder: Parts Preparation
60
STEP 17 Installing Spool Holder
61
STEP 18 Mounting the Side Arm
61
STEP 19 Sticking the Label
62
STEP 20 Haribo Time
62
Manual Changelog MINI Enclosure
64
Advertisement
Original Prusa MINI+ Manual (28 pages)
Brand:
Original Prusa
| Category:
3D Printers
| Size: 5 MB
Table of Contents
Table of Contents
1
Step 15 - Joining the Parts Together - Phase
1
Step 16 - Joining the Parts Together - Phase
2
Building Your MINI
3
Step 4 - Changes to the Manual
3
STEP 1 Preassembled Vs Kit Version
4
STEP 2 Different Hardware Revisions
4
STEP 3 All the Required Tools Are Included
4
Step 5 - Changes to the Manual
4
STEP 4 Use Labels for Reference
5
STEP 5 We Are here for You
5
STEP 6 XYZ-Axes Parts Preparation
5
STEP 7 XYZ-Axes Parts Preparation
6
STEP 9 Foam Pads Installation
6
STEP 10 Opening the Box with the Electronics
7
STEP 11 Connecting the LCD Cable
7
STEP 12 Connecting the y and XZ-Axis Assembly
7
STEP 13 Joining the Parts Together - Preparation
8
STEP 14 Protecting the LCD Cable
8
Step 17 - Joining the Parts Together - Phase
8
STEP 18 Aligning the XZ-Axis Assembly
9
STEP 19 Final Tightening
10
STEP 20 Haribo Time
10
STEP 21 LCD Parts Preparation
10
STEP 22 Mounting the LCD
11
STEP 23 Connecting the LCD
11
STEP 24 Guiding the LCD Cable
11
STEP 25 Connecting the Y-Axis Motor
12
STEP 26 Connecting the Heatbed Cable
12
STEP 27 Filament Sensor (Optional)
12
STEP 28 Filament Sensor Installation (Optional)
13
STEP 29 Connecting the Filament Sensor (Optional)
13
STEP 30 Covering the Electronics
13
STEP 31 Haribo Time
14
STEP 32 Spool Holder Parts Preparation
14
Step 33 - Spool Holder Parts Preparation
14
STEP 34 Assembling the Spool Holder Base(S)
15
STEP 35 Adding the Spool Holder Rails
15
STEP 36 Adjusting the Spool Holder Width
15
STEP 37 Attaching Anti-Slip Pads
16
STEP 38 Haribo Time
16
STEP 39 Finalising the Assembly
16
STEP 40 Connecting the PSU
17
STEP 41 What Is Next
17
Manual Changelog MINI+ Semi-Assembly
18
STEP 1 Version History
19
Step 2 - Changes to the Manual (1)
19
Step 3 - Changes to the Manual
20
Step 6 - Changes to the Manual (5)
20
Advertisement
Related Products
Original Prusa MK3S
Original Prusa MINI
Original Prusa MK4
Original Prusa MK3.9
Original Prusa MK4S
Original Prusa MK3.9S
Original Prusa MK4S kit
Original Prusa MMU3
Original Prusa CORE One
Original Prusa Dual-Head
Original Prusa Categories
3D Printers
Enclosure
More Original Prusa Manuals
Login
Sign In
OR
Sign in with Facebook
Sign in with Google
Upload manual
Upload from disk
Upload from URL