Sign In
Upload
Manuals
Brands
MREL Manuals
Camcorder
Blaster's Ranger II Lt
MREL Blaster's Ranger II Lt Manuals
Manuals and User Guides for MREL Blaster's Ranger II Lt. We have
2
MREL Blaster's Ranger II Lt manuals available for free PDF download: Operation Manual, Quick Start Manual
MREL Blaster's Ranger II Lt Operation Manual (78 pages)
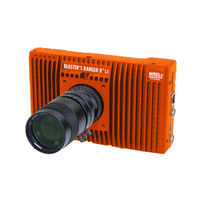
high speed digital video camera
Brand:
MREL
| Category:
Camcorder
| Size: 2 MB
Table of Contents
Copyright Information
2
Table of Contents
3
Chapter 1 Introduction
7
Introduction
8
High Speed Photography
8
High Speed Photography of Blasts
8
Chapter 2 Hardware
11
Blaster's Ranger II™ Lt High Speed Digital Video Camera
12
Over View
12
Blaster's Ranger II™ Lt Accessories
13
Protective Carry Case
13
Zoom Lens
13
Tripod and Grip Ball Head
13
Blaster's Ranger II™ Lt DC Power Cable
13
Blaster's Ranger II™ Lt I/O Cable
13
Blaster's Ranger II™ Lt AC Adapter
14
Trigger Switch Cable with Button
14
SD Card
14
USB Communication Cable
14
Proanalyst® Introductory Edition Software
14
Chapter 3 Getting Started
15
Introduction
16
Powering up
16
Attaching the External DC Power Supply
16
Camera Setup
16
Blaster's Ranger II™ Lt Setup
17
Mount the C-Mount Zoom Lens to the Camera
17
Blaster's Ranger II™ Lt I/O Cable and Trigger Switch Cable
17
DC Power Connection
18
Chapter 4: Fasmotion
19
Install Fasmotion Control Software on PC or Mac
20
To Install Fasmotion on a Windows PC
20
To Install Fasmotion on Your Mac
20
Language Selection in Fasmotion
21
Connect the Camera to a Wired Network
21
Managing Camera Network Settings in Fasmotion
21
Wifi Setup
22
Wifi Setup for an Existing Network
22
Wifi Setup for an Ad Hoc Network
22
Connecting to the Camera Via Wifi
22
Fasmotion Application Window
23
Controlling the Image Displays
23
Setting Default Gamma
23
Display Rate for Live Images
24
Setting up the HDMI Display
24
Name the Camera
24
Camera Time and Date
25
Connect to the Camera Outside Fasmotion
25
To Open the Networked Camera in a Web Browser in the
25
To Open the Networked Camera in a Windows Explorer Menu
25
Usb Otg
25
Storage Setup
26
Configure Session (Standard Mode)
26
Formatting the SSD
26
Formatting SD Cards and USB Drives
26
Exploring Camera Media
26
Configurations
27
To Save the Current Configuration
27
To Load a Saved Configuration
27
To Load the Factory Configuration
27
Reboot and Power down
27
Camera Information
28
Chapter 5: Recording
29
Long Record and Standard Modes
30
Switching from Standard Mode to Long Record Mode
30
Switching Back to Standard Mode
30
Setting Frame Rate and Resolution
30
To Set the Resolution of the Camera
31
To Set the Frame Rate of the Camera
31
Offset Control
31
Setting Shutter Speed
31
Setting the Shutter Speed
32
Low Light Mode
32
Setting Bit Depth
33
Configuring the Trigger
33
To Set the Trigger Position in the Camera
33
Enabling the External Trigger
33
Configuring Sync and Arm I/O
34
IRIG Enable
34
Enable Sync in / Sync out
34
Enable Arm in / Arm out
34
Black Level Calibration
34
Calibrate Black Level
35
To Calibrate the Camera
35
Record: Arm and Trigger
35
Take a Still JPEG
35
Standard Basic Mode Recording
36
To End Recording, Click the Trigger Button
36
Autosave
36
To Set up Autosave
37
Fasfire
37
Entering Fasfire Via Fasmotion
37
Cancelling Fasfire
37
Video Review with Multiple Partitions
38
Long Recording Modes
38
Reviewing Captured Imagery: Playback
39
Searching for Interesting Parts
39
Using the Slider
39
Setting the Start Clip and End Clip Points
40
Jumping to a Frame by Time
40
Jumping to Markers
40
Setting up Event Markers
40
Using the I/O Graph Display
41
Zooming in on the Timeline
41
To Zoom in
41
Viewing Per Frame Metadata in Fasmotion
41
To View Per Frame Metadata
41
Image Processing
42
Image Processing Pipeline
42
User Control of Image Processor
43
Custom Color Correction
43
Using RGB Gain Controls
44
Saving Images to Mass Storage
44
Transfers, Batch Transfers and Conversions
46
Move
46
Convert JPEG or BMP Stacks to Avis
46
Batch Copy and Convert CAP Files
46
Chapter 6: Using the Web App
47
Web App Overview
48
Camera Tab
48
Storage Settings Tab
49
Formatting
50
Setting the Session Length
50
Long Recording Mode
50
Record Settings
50
Setting ROI
51
Setting the Frame Rate
51
Setting the Shutter Speed
51
Low Light
51
Select Bit Depth for Recording
51
Select FPN Setting
51
Record Controls
52
Setting the Trigger Position
52
Sync in and Sync out
52
Display Settings Tab
52
Arm, Trigger, Live, and Review Buttons
52
Review Tab
53
To Save a Video Clip
53
Chapter 7: Field Operations
55
Introduction
56
Selecting a Camera Position
58
Field Setup
58
System Setup
58
Power Supply Option
59
Camera Setup
59
Chapter 8: Proanalyst ® Introductor y Edition Software
61
About Proanalyst ® Introductory Edition
62
Example Demonstration File Explanation - Mining Example
62
Image Processing
63
Multi-Plane Calibration
63
Display Layers
64
Notes
64
Annotations
64
Feature Tracking
64
Under the Tracking Box
66
Save All Toolkits
66
Excel Spreadsheet - Mining_Demo.xls
66
Explanation of the Unshaded Cells
67
Example Demonstration File Explanation - Disrupter Example
68
Image Processing
69
Multi-Plane Calibration
69
Display Layers
70
Notes
70
Annotations
70
Feature Tracking
70
Under the Tracking Box
71
Save All Toolkits
72
Excel Spreadsheet - Proanalyst_Demo.xls
72
Explanation of the Unshaded Cells
72
Chapter 9: Contacting MREL for Technical Support
75
Contacting MREL
76
Advertisement
MREL Blaster's Ranger II Lt Quick Start Manual (2 pages)
high speed camera
Brand:
MREL
| Category:
Digital Camera
| Size: 1 MB
Advertisement
Related Products
MREL Blaster's Ranger II
MREL Categories
Digital Camera
Measuring Instruments
Camcorder
Voice Recorder
Analytical Instruments
More MREL Manuals
Login
Sign In
OR
Sign in with Facebook
Sign in with Google
Upload manual
Upload from disk
Upload from URL