Sign In
Upload
Manuals
Brands
Komatsu Manuals
Front End Loaders
WA70-7
Komatsu WA70-7 Manuals
Manuals and User Guides for Komatsu WA70-7. We have
1
Komatsu WA70-7 manual available for free PDF download: Operation And Maintenance Manual
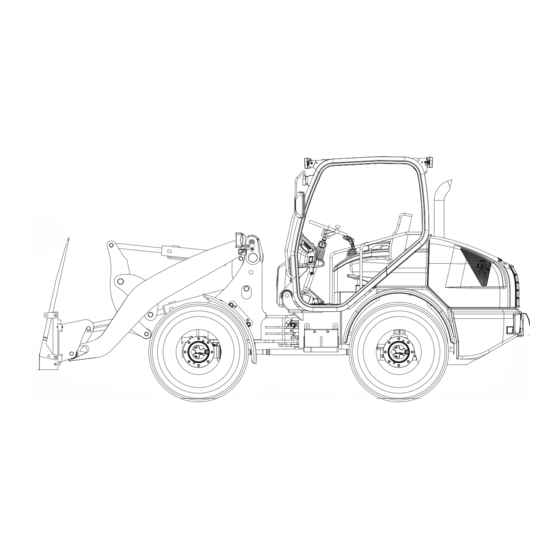
Komatsu WA70-7 Operation And Maintenance Manual (303 pages)
WHEEL LOADER
Brand:
Komatsu
| Category:
Front End Loaders
| Size: 18.57 MB
Table of Contents
1 Foreword
3
Foreword
4
EU Directives
6
Safety Information
7
Signal Words
7
Other Signal Words
8
Safety Labels
9
Safety Labels Using Pictograms
9
Intended Use
10
Introduction
10
Breaking in the Machine
11
Key Data of the Machine
12
Machine Serial No. Plate and Its Position
12
Product Identification Number (PIN)
12
Axle Serial No. Plate
13
Engine Serial No. Plate
13
Transmission Serial No. Plate
13
Fluorinated Greenhouse Gases
14
Operator's Seat Serial No. Plate
14
ROPS/FOPS Cab Serial No. Plate
14
Retrofitting by Third-Party Suppliers
15
Serial Number and Distributor
15
Declaration of Conformity
16
Table of Contents
17
Dimensions, Weights, and Operating Data
24
Equipment - Part 1
26
Equipment - Part 2
27
2 Safety
29
Position of the Safety Labels
30
General Precautions
37
Safety Rules
37
Getting to Know the Machine
37
If Abnormalities Are Found
37
Fire Extinguisher and First Aid Kit
38
Safety Features
38
Keeping the Machine Clean
38
In the Operator's Cab
39
Before Leaving the Machine
39
Mounting and Dismounting
39
Protection against Injuries
40
Prevention of Burns
40
Hot Coolant
40
Hot Oil
40
Fire Prevention
41
Fire Caused by Fuel or Oil
41
Fire Caused by Accumulation of Combustible Material
41
Cable Fires
42
Fire in the Hydraulic System
42
Explosion Caused by Lighting Equipment
42
Procedure in Case of Fire
42
ROPS (Roll-Over Protection System)
43
Fops
43
Precautions for Attachments, Options
43
Unauthorised Modification
44
Worksite Safety
44
Working on Loose Ground
45
Working Near High-Voltage Cables
45
Ensuring Good Visibility
46
Precautions Related to Exhaust Gas
46
Gas, Dust and Flammable Vapours
47
Signals and Signs from the Signalman
47
Emergency Exit
47
Protection against Asbestos Dust
48
Precautions During Operation
49
Starting the Engine
49
Checks before Starting the Engine
49
Precautions in Cold Areas
50
Operation
51
Checks before Operation
51
Precautions When Travelling in Forward or Reverse
51
Driving on Slopes
52
Impermissible Work
53
Emergency Lowering
54
Braking
55
While Loading
55
Working on Snow
56
Working with the Forklift Attachment
57
Parking the Machine
58
Transport
59
Loading and Unloading the Machine
59
Battery
60
Battery Main Switch
60
Handling Batteries
60
Before Connecting Two Machines with Booster Cables
61
Starting the Engine with Booster Cables
61
Precautions for Maintenance
62
Personnel
62
Warning Tag
62
Tools
62
Safety Relevant Parts
63
Keeping the Worksite Clean
63
Before Executing the Inspection and Maintenance
64
Ensure Steady Positioning
64
Guards
64
Securing the Articulated Steering
65
Working under the Raised Boom
66
Tipping up the Operator's Cab
67
Attachments
68
Working Beneath the Machine
68
Adding Fuel or Oil
69
Coolant
69
Application of Lighting
70
High-Pressure Hoses
70
Handling High Pressure Oil
70
Handling the Pressure Accumulator
71
Fan and Belt
71
Salvage
71
Sources of Chemical Hazards
72
Waste Material
72
Maintaining the Air Conditioner
72
Pressurised Air
72
Precautions When Handling Tyres
73
Handling Tyres
73
Precautions When Storing Tyres
74
3 Operation
75
General View of the Machine
76
Controls
78
General View
78
Machine Monitor
80
General View
80
Switches
82
General View
82
Descriptions of the Individual Elements
84
Machine Monitor
84
Caution Lamps
85
Gauges
85
Water Separator Caution Lamp
85
Air Cleaner Caution Lamp
86
Battery Charge Circuit Caution Lamp
86
Parking Brake Caution Lamp
86
Seat Belt Caution Lamp
86
Engine Oil Pressure Caution Lamp
87
Pilot Lamps
88
Intake Air Pre-Heater Pilot Lamp
89
Speed Range 2 Pilot Lamp
89
Direction Pilot Lamps
90
E.C.S.S. Pilot Lamp
90
High-Beam Pilot Lamp
90
Turn Signal Pilot Lamp
90
Auto-Inch Function
91
Hazard Warning Light Pilot Lamp
91
Rear Window Defroster Pilot Lamp
91
Fuel Gauge
92
Coolant Temperature Gauge
93
Service Meter
93
Speedometer
93
Pilot Lamps
84
Switches
94
Hazard Warning Light Switch with Pilot Lamp
96
Programming Button
96
Rear Window Wiper and Washer Switch
96
Windshield Wiper and Washer Switch
96
Rear Window Defroster Switch
97
Save Button
97
Warning Beacon Switch
97
Work Light Switch
97
Horn Button
98
Light Switch
98
Turn Signal Lever
98
Blower Switch
99
Electrical Quick Coupler Button
99
Reversing Light Switch
99
Sweeper Switch
99
100 % Differential Lock Switch
100
Air Conditioner Switch
100
Speed Range 2 Switch
100
Temperature Switch
100
Auto-Inch
101
Direction Selector Switch
101
E.C.S.S. Switch with Pilot Lamp
101
'OFF' Position
102
'ON' Position
102
'START' Position
102
Starting Switch
102
Cigarette Lighter
103
Speed Regulator
103
Cab Light Switch
105
Engine Shutdown Secondary Switch
105
Control Levers and Pedals
106
Brake Pedal
107
Parking Brake
107
Steering Column Adjustment
107
Accelerator Pedal
108
Multi-Function Lever
108
Control Lever for Special Equipment and Additional Function
109
Multi-Purpose Bucket
109
Sweeper, Snowblower
109
Work Equipment Lock Lever
110
Steering Lock
111
Tow Hitch
111
Back-Up Alarm
112
Door Unlocking
112
Power Outlet
112
Fuses
113
Fuse Allocation
114
Slow-Blow Fuses
116
Adjusting the Ventilation System
117
Relays
117
Setting the Heating and Ventilation System
117
Adjusting the Heating System
118
Air Conditioner
119
Turning on the Air Conditioner
119
Checks before Starting
120
Before Starting the Engine
120
Before Starting to Work
120
Visual Inspection
120
Operation
120
Check Coolant Level – Add Coolant
123
Checks before Starting the Engine
123
Radiator – Clean Radiator Fins
124
Removable Fan Grille
125
V-Belt – Check Condition
125
Check Engine Oil Level – Add Engine Oil
126
Draining Engine Oil
127
Check the Fuel Level – Add Fuel
128
Additional Water Separator
129
Check Electrical Connections
131
Check Gauges and Indicators
131
Heating/Air Conditioner – Check Airflow
132
Other Maintenance Tasks to Perform before Starting
132
Adjusting the Operator's Seat
133
Adjustments before Starting
133
Height Adjustment
133
Vertical and Angle Adjustment
133
Adjusting the Backrest
134
Adjusting the Armrest
136
Adjusting the Rear-View Mirrors
136
Adjusting the Steering Column
136
Fastening the Seat Belt
137
Taking off the Seat Belt
137
Starting the Engine
138
Ambient Temperature for Operation and Storage
139
Checks after Starting the Engine
140
Driving the Machine
141
Starting
141
Limiting the Maximum Speed
142
Starting on an Incline
143
Changing Direction
144
Driving in Reverse
144
Turning and Steering
145
Turning on Slopes, Ridges, or Embankments
145
Braking with the Service Brake
146
Disengaging the Parking Brake
146
Braking on Slopes
147
If the Service Brake Fails
147
Parking the Machine on a Slope
148
Stopping and Parking the Machine
148
Operating the Work Equipment
149
Multi-Function Lever
149
Return to Dig
150
Saving the Tyres
151
Working with the Wheel Loader
151
Engaging the 100 % Differential Lock
152
Digging
153
Loading
153
Excavating
155
Dragging
156
Filling in
156
Levelling
156
Scraping
156
Carrying
157
Cross-Loading
158
V-Shape Loading
158
Stockpiling
159
Picking up the Load
160
Operating Precautions
161
Permissible Water Depth
161
Precautions for Driving Uphill or Downhill
162
Precautions When Driving
162
Adjusting the Work Equipment
163
Attaching the Work Equipment
163
Selecting the Work Equipment
163
Attaching the Multi-Purpose Bucket
165
Removing the Work Equipment
166
Bucket Level Indicator
167
Removing the Multi-Purpose Bucket
167
Checks after Switching off the Engine
168
Switching off the Engine
168
Locking
169
Tyre Pressure
170
Standard Tyres
171
Loading the Machine
172
Transporting Procedure
172
Securing the Machine
174
Unloading the Machine
176
Lifting the Machine
177
Standard Machines
178
Operation in Cold Weather
179
Precautions for Operation in Cold Weather
179
After the Cold Weather Period
180
Precautions after Work
180
Before Storage
181
Long-Term Storage
181
After Storage
182
During Storage
182
Basic Precautions
183
Machines Equipped with KOMTRAX
183
Troubleshooting
185
Before Towing
186
Towing the Machine
186
After Towing
188
Towing a Machine with Defective Brakes
189
Precautions for Connecting and Disconnecting the Booster Cables
190
Connection of the Booster Cable
191
Disconnecting the Booster Cables
192
Checking the Parking Brake
193
Checking the Service Brake
193
In Case of Insufficient Brake Power
193
Emergency Steering Properties
194
Electrical System
196
Other Troubles
196
Engine
197
Hydraulic System
199
Hydrostatic Drive Unit
199
Work Equipment
200
Axles
202
Operator's Cab
202
Steering
202
Maintenance
203
Maintenance Guide
204
Always Use Clean Washer Fluid
208
Checking the Service Meter
208
Komatsu Genuine Oils
208
Komatsu Genuine Replacement Parts
208
Dusty Worksites
209
Welding Instructions
209
Bleeding Air from the Hydraulic Circuit
210
Precautions When Installing Hydraulic Hoses
210
Checks after Inspection and Maintenance
211
Checks after Operation (with Engine Off)
211
Checks with the Engine Running
211
Basic Maintenance Guidelines
212
Fuel, Coolant and Lubricant Specifications
213
Oil
213
Fuel
214
Grease
216
Storing Oil and Fuel
216
Biodegradable Hydraulic Oil and Lubricants
217
Filters
217
Outlines of the Electrical System
218
Wear Parts List
219
Fuel, Lubricants, and Coolants; Quantities
220
Lubrication Table
220
List of Required Tools
224
Periodic Replacement of Safety-Critical Parts
225
Maintenance Schedule
226
Maintenance Procedure
228
Additional Water Separator (Fuel Prefilter) – Change Filter Insert
229
When Required
229
Checking the Air Conditioner
230
Checking the Refrigerant Level (Gas)
230
Cleaning the Condenser of the Air Conditioner
230
Operating the Air Conditioner Off-Season
231
Battery – Charging the Built-In Battery
232
Checking the Window Washer Fluid Level – Adding Fluid
232
Cleaning the Air Grille
233
Cleaning the Radiator Fins
233
Air Cleaner – Check, Clean the Filter Insert
234
Design of the Air Cleaner
234
Required Maintenance
234
Removing the Filter Insert
235
Cleaning the Filter Insert
236
Cleaning with Pressurised Air
236
Cleaning with Water and Detergent
236
Checking the Filter Insert
237
Installing the Filter Insert
237
Changing the Filter Insert
238
Changing the Safety Filter
238
Hydraulic System – Change Filter Insert
239
Maintenance after the First 50 Service Hours
239
Wheel Nuts – Check and Retighten
239
Lubrication – Rear Axle
240
Front and Rear Axle – Change Oil
241
Maintenance after the First 250 Service Hours
241
Maintenance after the First 500 Service Hours
241
Valve Clearance – Check and Adjust
241
Lubrication – Articulated Steering
242
Maintenance Every 10 Service Hours
242
Battery – Check Fluid Level
243
Maintenance Every 50 Service Hours
243
Lubrication – Work Equipment
244
Check Central Lubrication System, Add Grease
246
General Function Check
246
Permitted Lubricants
246
Maintenance Every 250 Service Hours
247
Service Brake – Check the Brake Pads
247
Alternator V-Belt – Check and Adjust Tension
248
Lubrication – Steering Cylinder
249
Maintenance Every 500 Service Hours
252
Manual Pump – Check Oil Level
252
Service Brake – Check Brake Pads and Brake Disc, Check Oil Level
253
Engine – Change Engine Oil
254
Changing the Oil Filter Cartridge
255
Fuel Filter – Change Filter Cartridge
256
Bleeding the Fuel System
257
Cleaning the Filter Cloth in the Heater/Air Conditioner
258
Heating/Air Conditioner – Clean/Renew Filter Cloth, Clean Condenser
258
Checking Gas Pressure in Pressure Accumulator for Multi-Function Lever
259
E.C.S.S. Pressure Accumulator – Check Gas Pressure
259
Differential
260
Epicyclic Gearing
260
Front and Rear Axle – Check Oil Level
260
Transfer Case – Check Oil Level, Add Oil
261
Maintenance Every 1000 Service Hours
262
Service Brake – Check, Change Brake Fluid
263
Hydraulic System – Change Venting Filters
264
Maintenance Every 1500 Service Hours
266
Transfer Case – Change Oil
268
Cooling System – Change Coolant and Clean Cooling System
269
Maintenance Every 2000 Service Hours
269
Cleaning the Cooling System
271
Draining the Coolant
271
Filling Coolant
272
Hydraulic System – Change Hydraulic Oil
273
Check Fuel Pump
275
Checking the Water Pump
275
Fuel and Coolant Hoses – Check
275
Technical Data
277
Noise Emission Levels
279
Guide to Reduce Vibration Levels on Machine
280
Operating Conditions
280
Vibration Levels
280
Limit Values for Slopes
282
Tipping Angle, Theoretically
282
Special Equipment, Attachments
283
Design and Functional Principle of the E.C.S.S.
284
E.C.s.s.
284
Precautions When Switching on the E.C.S.S.
284
Operating the E.C.S.S.
285
Switching off the E.C.S.S.
285
Switching on the E.C.S.S.
285
Bucket Position Indicator
286
Central Lubrication System
287
Changing the Lubrication Intervals and Duration
287
Operating the Central Lubrication System
288
Position of the Lubrication Pump
288
To the Left on the Front Frame
288
Buttons
289
Display and Operating Unit
289
LED Display
289
Three-Digit LED Display
290
Index
291
Advertisement
Advertisement
Related Products
Komatsu WA70-5
Komatsu WA380-6
Komatsu WA150PZ-5
Komatsu WA470-8
Komatsu WA470-6 2006
Komatsu WA320-8
Komatsu GALEO WA250PTL-5
Komatsu WA250-3
Komatsu WA150-5H
Komatsu WA380-5
Komatsu Categories
Excavators
Trucks
Compact Loader
Construction Equipment
Tractor
More Komatsu Manuals
Login
Sign In
OR
Sign in with Facebook
Sign in with Google
Upload manual
Upload from disk
Upload from URL