Sign In
Upload
Manuals
Brands
HP Manuals
Laptop
ELITEBOOK 2740P
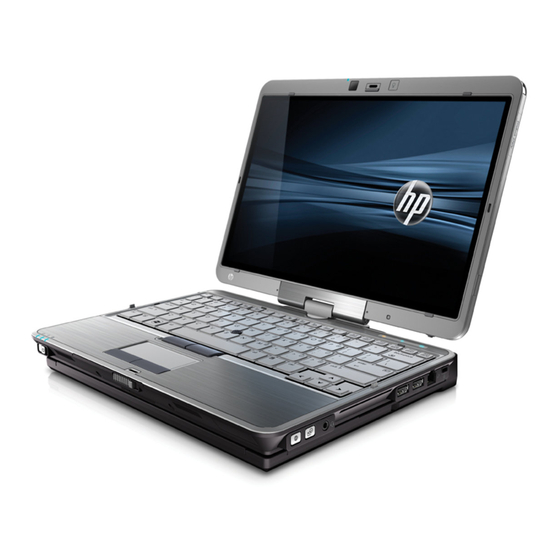
HP ELITEBOOK 2740P Manuals
Manuals and User Guides for HP ELITEBOOK 2740P. We have
4
HP ELITEBOOK 2740P manuals available for free PDF download: User Manual, Maintenance And Service Manual, Driver Installation, Overview
HP ELITEBOOK 2740P User Manual (179 pages)
Brand:
HP
| Category:
Laptop
| Size: 6 MB
Table of Contents
Table of Contents
5
1 Features
13
Identifying Hardware
13
Top Components
13
Pointing Devices
13
Lights
15
Buttons and Switches
16
Keys
17
Front Components
18
Right-Side Components
19
Left-Side Components
20
Rear Components
21
Bottom Components
22
Display
23
Wireless Antennas (Select Models Only)
24
Additional Hardware Components
25
Identifying the Labels
25
2 Using the Tablet
27
Tablet Display Components
27
Rotating the Display
28
Tablet Mode
28
Notebook Mode
30
3 Networking
32
Using Wireless Devices (Select Models Only)
32
Identifying Wireless and Network Icons
32
Using the Wireless Controls
33
Using the Wireless Button
33
Using Wireless Assistant Software (Select Models Only)
33
Using HP Connection Manager (Select Models Only)
34
Using Operating System Controls
34
Using a WLAN
35
Setting up a WLAN
35
Protecting Your WLAN
35
Connecting to a WLAN
37
Roaming to Another Network
37
Using HP Mobile Broadband (Select Models Only)
38
Inserting a SIM
38
Removing a SIM
39
Using Bluetooth Wireless Devices (Select Models Only)
41
Bluetooth and Internet Connection Sharing (ICS)
41
Troubleshooting Wireless Connection Problems
42
Cannot Create a WLAN Connection
42
Cannot Connect to a Preferred Network
43
Network Icon Is Not Displayed
43
Current Network Security Codes Are Unavailable
43
WLAN Connection Is very Weak
44
Cannot Connect to the Wireless Router
44
Using the Modem (Select Models Only)
45
Connecting a Modem Cable
45
Connecting a Country-Specific Modem Cable Adapter
45
Selecting a Location Setting
46
Viewing the Current Location Selection
46
Adding New Locations When Traveling
47
Solving Travel Connection Problems
48
Using Preinstalled Communication Software
49
Connecting to a Local Area Network (LAN)
50
4 Pointing Devices, Touch Screen, and Keyboard
51
Using Pointing Devices
51
Setting Pointing Device Preferences
51
Using the Touchpad
51
Turning the Touchpad on and off
51
Using Touchpad Gestures
51
Pinching/Zooming
52
Scrolling
52
Setting Touchpad Preferences
53
Three Finger Flick
53
Using the Pointing Stick
54
Connecting an External Mouse
54
Using the Pen
55
Identifying the Pen Components
55
Holding the Pen
55
Performing Mouse Clicks with the Pen
56
Performing Other Procedures with the Pen
56
Pressure Sensitivity
56
Calibrating the Pen
57
Using the Pen Holder
57
Setting Pen Preferences
58
Using the Touch Screen (Select Models Only)
58
Tapping (or Clicking)
58
Flicking
58
Dragging
59
Scrolling
59
Rotating
60
Pinching
61
Setting Touch Screen Preferences
62
Using Touch Screen Settings
62
Using the Keyboard
63
Using the Keyboard Light
63
Using Hotkeys
65
Displaying System Information
65
Initiating Standby
67
Activating the Ambient Light Sensor
68
Decreasing Screen Brightness
68
Enabling/Disabling the Touchpad (Fn+F5)
68
Increasing Screen Brightness
68
Switching the Screen Image
68
Viewing Battery Charge Information
68
Using HP Quick Launch Buttons
69
Opening the Quick Launch Buttons Control Panel
70
Using HP Quicklook
71
Using HP Quickweb
72
Using the Embedded Numeric Keypad
72
Enabling and Disabling the Embedded Numeric Keypad
72
Switching Key Functions on the Embedded Numeric Keypad
72
Using an Optional External Numeric Keypad
72
5 Multimedia
73
Multimedia Features
73
Adjusting the Volume
73
Multimedia Software
74
Accessing Your Preinstalled Multimedia Software
75
Installing Your Preloaded Multimedia Software
75
Installing Multimedia Software from a Disc
75
Audio
76
Connecting External Audio Devices
76
Checking Your Audio Functions
76
Video
78
Connecting an External Monitor or Projector
78
Using the External Monitor Port
78
Webcam
79
Webcam Tips
79
Adjusting Webcam Properties
79
Capturing Business Card Images
80
6 Power Management
83
Setting Power Options
83
Using Power-Saving States
83
Initiating and Exiting Standby
83
Initiating and Exiting Hibernation
84
Using the Power Meter
84
Using Power Schemes
85
Selecting a Different Power Scheme
85
Viewing the Current Scheme
85
Customizing Power Schemes
86
Setting Password Protection Upon Exiting Standby
86
Using External AC Power
87
Connecting the AC Adapter
87
Using Battery Power
88
Finding Battery Information in Help and Support
88
Using Battery Check
88
Displaying the Remaining Battery Charge
89
Inserting or Removing the Battery
89
Charging a Battery
90
Maximizing Battery Discharge Time
91
Managing Low Battery Levels
91
Identifying Low Battery Levels
91
Resolving a Low Battery Level
92
Resolving a Low Battery Level When a Charged Battery Is Available
92
Resolving a Low Battery Level When External Power Is Available
92
Resolving a Low Battery Level When no Power Source Is Available
92
Resolving a Low Battery Level When the Computer Cannot Exit Hibernation
92
Calibrating a Battery
92
Step 1: Fully Charge the Battery
92
Step 2: Disable Hibernation and Standby
93
Step 3: Discharge the Battery
93
Step 4: Fully Recharge the Battery
94
Step 5: Reenable Hibernation and Standby
94
Conserving Battery Power
94
Storing a Battery
94
Disposing of a Used Battery
95
Replacing the Battery
95
Testing an AC Adapter
96
Shutting down the Computer
96
7 Drives
98
Identifying Installed Drives
98
Handling Drives
98
Improving Hard Drive Performance
100
Using Disk Defragmenter
100
Using Disk Cleanup
100
Using HP 3D Driveguard
101
Identifying HP 3D Driveguard Status
101
Using HP 3D Driveguard Software
101
Replacing the Hard Drive in the Hard Drive Bay
103
8 External Devices
107
Using a USB Device
107
Connecting a USB Device
107
Stopping and Removing a USB Device
107
Using USB Legacy Support
108
Using a 1394 Device
109
Connecting a 1394 Device
109
Stopping and Removing a 1394 Device
109
Using External Drives
111
Using Optional External Devices
111
Using the Docking Connector
112
9 External Media Cards
113
Using Media Card Reader Cards
113
Inserting a Digital Card
113
Stopping and Removing a Digital Card
114
Using Expresscards (Select Models Only)
115
Configuring an Expresscard
115
Inserting an Expresscard
115
Stopping and Removing an Expresscard
116
Using Smart Cards (Select Models Only)
117
Inserting a Smart Card
117
Removing a Smart Card
118
10 Memory Modules
119
Adding or Replacing a Memory Module
119
Increasing Hard Drive Space for the Hibernation File
123
11 Security
124
Protecting the Computer
124
Using Passwords
125
Setting Passwords in Windows
125
Setting Passwords in Computer Setup
125
BIOS Administrator Password
126
Managing a BIOS Administrator Password
127
Entering a BIOS Administrator Password
128
Using Computer Setup Drivelock
128
Changing a Drivelock Password
129
Entering a Drivelock Password
129
Setting a Drivelock Password
129
Removing Drivelock Protection
131
Using Computer Setup Auto Drivelock
131
Entering an Automatic Drivelock Password
131
Removing Automatic Drivelock Protection
132
Using Computer Setup Security Features
133
Securing System Devices
133
Viewing Computer Setup System Information
133
Using Computer Setup System Ids
134
Using Antivirus Software
135
Using Firewall Software
136
Installing Critical Updates
137
Using HP Protecttools Security Manager (Select Models Only)
138
Installing a Security Cable
139
12 Software Updates
140
Updating Software
140
Updating the BIOS
142
Determining the BIOS Version
142
Downloading a BIOS Update
143
Updating Programs and Drivers
145
13 Backup and Recovery
146
Backing up Your Information
147
Performing a Recovery
148
Recovering Your Information
148
Recovering the Operating System and Programs
148
14 Computer Setup
149
Starting Computer Setup
149
Using Computer Setup
149
Navigating and Selecting in Computer Setup
149
Restoring Factory Settings in Computer Setup
150
Computer Setup Menus
150
File Menu
151
Security Menu
151
System Configuration Menu
152
15 Multiboot
157
About the Boot Device Order
157
Enabling Boot Devices in Computer Setup
159
Considering Boot Order Changes
160
Choosing Multiboot Preferences
161
Setting a New Boot Order in Computer Setup
161
Dynamically Choosing a Boot Device Using the F9 Prompt
161
Setting a Multiboot Express Prompt
162
Entering Multiboot Express Preferences
162
16 Management and Printing
163
Using Client Management Solutions
163
Configuring and Deploying a Software Image
163
Managing and Updating Software
164
HP Client Manager for Altiris (Select Models Only)
164
HP CCM (Client Configuration Manager) (Select Models Only)
166
HP SSM (System Software Manager)
167
Using Intel Active Management Technology (Select Models Only)
168
Enabling the Iamt Solution
168
Using the Mebx Setup Utility Menus
168
Using the HP Universal Print Driver (Select Models Only)
170
17 Cleaning Guidelines
171
Cleaning Products
171
Cleaning Procedures
172
Cleaning the Display
172
Cleaning the Sides and Cover
172
Cleaning the Touchpad and Keyboard
172
Cleaning a Tablet PC Pen and Pen Holder
172
Index
173
Advertisement
HP ELITEBOOK 2740P Maintenance And Service Manual (117 pages)
Tablet PC
Brand:
HP
| Category:
Laptop
| Size: 4 MB
Table of Contents
Table of Contents
5
1 Product Description
9
2 External Component Identification
13
Display
13
Top Components
14
Pointing Devices
14
Lights
15
Buttons and Switches
16
Keys
17
Front Components
18
Right-Side Components
19
Left-Side Components
20
Rear Components
21
Bottom Components
22
Wireless Antennas (Select Models Only)
23
3 Illustrated Parts Catalog
25
Service Tag
25
Computer Major Components
26
Plastics Kit
31
Cable Kit
32
Mass Storage Devices
32
Miscellaneous Parts
33
Sequential Part Number Listing
34
4 Removal and Replacement Procedures
39
Preliminary Replacement Requirements
39
Tools Required
39
Service Considerations
39
Plastic Parts
39
Cables and Connectors
40
Drive Handling
40
Grounding Guidelines
41
Electrostatic Discharge Damage
41
Packaging and Transporting Guidelines
42
Workstation Guidelines
42
Equipment Guidelines
43
Component Replacement Procedures
44
Service Tag
44
Computer Feet
45
Pen
46
Battery
47
Sim
48
Hard Drive
49
WLAN Module
51
WWAN Module
54
Memory Modules
55
Keyboard
56
Top Cover
59
RTC Battery
61
Audio Connector Board
62
Bluetooth Module
64
Latch Assembly
66
Speaker Assembly
68
Display Assembly
70
System Board Shield
74
Modem Module
75
Smart Card Reader
76
System Board
78
Fan/Heat Sink Assembly
81
Misc Cables
83
5 Computer Setup
85
Starting Computer Setup
85
Using Computer Setup
85
Navigating and Selecting in Computer Setup
85
Restoring Factory Settings in Computer Setup
86
Computer Setup Menus
87
File Menu
87
Security Menu
88
System Configuration Menu
89
6 Specifications
93
Computer Specifications
93
30.7-CM (12.1-In), WXGA Display Specifications
94
Hard Drive Specifications
95
7 Backup and Recovery
97
Windows 7
97
Backing up Your Information
97
Performing a Recovery
98
Using the Windows Recovery Tools
99
Using F11
99
Using a Windows 7 Operating System DVD (Purchased Separately)
100
Windows Vista
101
Backing up Your Information
101
Performing a Recovery
102
Using the Windows Recovery Tools
102
Using F11
103
Using a Windows Vista Operating System DVD (Purchased Separately)
103
Windows XP
104
Backing up Your Information
104
Performing a Recovery
105
Recovering Your Information
105
Recovering the Operating System and Programs
106
8 Connector Pin Assignments
107
Audio-Out (Headphone)
107
Audio-In (Microphone)
108
External Monitor
108
Modem)
109
Network)
109
Universal Serial Bus
110
9 Power Cord Set Requirements
111
Requirements for All Countries and Regions
111
Requirements for Specific Countries and Regions
112
Index
113
HP ELITEBOOK 2740P Driver Installation (20 pages)
Installing SATA Drivers on HP EliteBook Notebook PCs
Brand:
HP
| Category:
Laptop
| Size: 0 MB
Table of Contents
Table of Contents
1
Introduction
2
Purpose
2
Audience
2
Benefits of SATA
2
System Requirements and Prerequisites
2
System Requirements
2
System Prerequisites
2
Transitioning a Sysprep Image from IDE to SATA
3
Where These Guidelines Are Applicable
3
Steps to Add SATA Support to the Original Image
3
Adding SATA Drivers to RIS Installation Points
5
Where These Guidelines Are Applicable
5
Steps to Add SATA Drivers to the Distribution Point
5
Adding SATA Drivers to an Installation CD
7
Where These Guidelines Are Applicable
7
Steps to Add SATA Drivers to the CD
7
Using OSCDIMG (or CDIMAGE) and CDBURN (Command Line Utilities from Microsoft)
9
Adding SATA Drivers to Winpe 2005
10
Where These Guidelines Are Applicable
10
Steps to Add SATA Drivers to Winpe 2005
10
Modifying a Windows XP Installation to Support SATA Native Mode
12
Where These Guidelines Are Applicable
12
Steps to Modify a Windows XP Image to Support SATA Native Mode
12
How to Obtain SATA Device Ids
14
Where These Guidelines Are Applicable
14
Steps to Obtain the SATA Device ID from a Windows XP Image
14
Steps to Obtain the SATA Device ID from a Windows Vista Image
17
For more Information
20
Advertisement
HP ELITEBOOK 2740P Overview (16 pages)
2008 HP business notebook PC F10 Setup overview
Brand:
HP
| Category:
Laptop
| Size: 0 MB
Table of Contents
Table of Contents
1
Background
2
Supported Models
2
EFI BIOS Features
3
F10 Setup
3
BIOS Users/Passwords, and One Step Log-On
10
Password Setup (With/With-Out HP Protecttools)
11
HP Client Management Interface
11
Anomalies
13
Q & a
14
Resources
16
Advertisement
Related Products
HP 2710p - Compaq Business Notebook
HP 2730p - EliteBook - Core 2 Duo 1.86 GHz
HP EliteBook 2760p
HP SL9400 - Promo 2730P CORE2 Duo Lv Cpu
HP 2740
HP 2730p 2 1.86
HP Compaq Presario,Presario 2168
HP Compaq Presario,Presario 2581
HP Compaq Presario,Presario 2228
HP Compaq Presario,Presario 2286
HP Categories
Desktop
Laptop
Server
Monitor
Switch
More HP Manuals
Login
Sign In
OR
Sign in with Facebook
Sign in with Google
Upload manual
Upload from disk
Upload from URL