Sign In
Upload
Manuals
Brands
Gree Manuals
Air Conditioner
GWH12AAB-K3NNA4A
Gree GWH12AAB-K3NNA4A Manuals
Manuals and User Guides for Gree GWH12AAB-K3NNA4A. We have
1
Gree GWH12AAB-K3NNA4A manual available for free PDF download: Service Manual
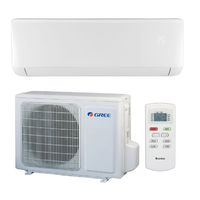
Gree GWH12AAB-K3NNA4A Service Manual (87 pages)
Refrigerant R410A
Brand:
Gree
| Category:
Air Conditioner
| Size: 27.02 MB
Table of Contents
Table of Contents
2
Part Ⅰ : Technical Information
4
Specification Sheet
6
Capacity Curve in Different Outdoor Temperature
14
Cooling and Heating Data Sheet in Rated Frequency
14
1 Summary
4
3 Outline Dimension Diagram
15
Indoor Unit
15
Outdoor Unit
16
4 Refrigerant System Diagram
17
Cooling and Heating Model
17
5 Electrical Part
18
Wiring Diagram
18
PCB Printed Diagram
21
Top View
21
Bottom View
21
6 Function and Control
22
Remote Controller Introduction of YAW1F
22
Buttons on Remote Controller
22
Icon Display on Remote Controller
22
ON/OFF Button
23
MODE Button
23
SWING Button
23
SLEEP Button
23
TEMP Button
24
TURBO Button
24
X-FAN Button
24
Function Introduction for Combination Buttons
24
WIFI Function
25
Replacement of Batteries in Remote Controller
25
Emergency Operation
25
Remote Controller Introduction of YAW1F1
26
Operation Introduction of Remote Controller
26
Temp. Display Type
26
Brief Description of Modes and Functions
29
Buzzer
29
Display
29
Temperature Parameter
29
Freeze Protection Period
30
Drying Mode
30
Locked Protection to IDU Fan Motor
30
Fan Mode
30
Heating Mode
31
Operation Condition and Process for Fan Mode
31
Protection Function
31
Overheating Prevention Protection
31
Other Control Function Introduction
32
Timer Function
32
Sleep Function
32
Turbo Function
32
Dual-8 Nixie Tube Display
33
Memory Function
33
Special Function
33
Safety Precautions
34
Electrical Safety Precautions
34
Part Ⅱ : Installation and Maintenance
34
7 Notes for Installation and Maintenance
34
Main Tools for Installation and Maintenance
36
Installation Dimension Diagram
37
Installation Procedures
38
Start Installation
38
Installation of Indoor Unit
39
Installation Parts-Checking
39
Requirements for Electric Connection
39
Selection of Installation Location
39
Connect the Pipe of Indoor Unit
40
Install Drain Hose
40
Install Wall-Mounting Frame
40
Outlet Pipe
40
Bind up Pipe
41
Connect Wire of Indoor Unit
41
Hang the Indoor Unit
41
Connect Indoor and Outdoor Pipes
42
Connect Outdoor Electric Wire
42
Installation of Outdoor Unit
42
Neaten the Pipes
42
Check after Installation and Test Operation
43
Test Operation
43
Use Vacuum Pump
43
Vacuum Pumping and Leak Detection
43
9 Maintenance
44
Error Code
44
Procedure of Troubleshooting
46
Malfunction of Temperature Sensor F1, F2
46
Malfunction of Blocked Protection of IDU Fan Motor H6
47
Malfunction of Protection of Jumper Cap C5
48
High Temperature and Overload Protection
50
Maintenance Method for Normal Malfunction
51
Air Conditioner Cant be Started up
51
Poor Cooling (Heating) for Air Conditioner
51
Horizontal Louver Cant Swing
51
ODU Fan Motor Cant Operate
52
Compressor Cant Operate
52
Abnormal Sound and Vibration
52
Air Conditioner Is Leaking
52
10 Exploded View and Parts List
53
Indoor Unit
53
Outdoor Unit
63
Removal Procedure of Indoor Unit
67
Remove Filter
67
Remove Horizontal Louver
67
Remove Panel
68
Remove Electric Box Cover 2
68
Remove Front Case Sub-Assy
68
Remove Electric Box Assy
69
Remove Evaporator Assy
70
Remove Motor and Cross Flow Blade
71
Remove Vertical Louver
71
Removal Procedure of Outdoor Unit
72
Remove Big Handle
72
Remove Top Panel
72
Remove Cabinet
72
Remove Right Side Plate
73
Remove Axial Flow Blade
73
Remove Motor
74
Remove Motor Support
74
Remove Clapboard and Soundproof Sponge
74
Remove Magnetic Coil
75
Remove Gas Valve and Liquid Valve
75
Remove 4-Way Valve Assy and Capillary Sub-Assy
75
Remove Valve Support
76
Remove Compressor
76
Remove Condenser
76
Before Disassembly
77
Remove Front Grille
78
Remove Front Panel
78
Remove Right Side Plat E
78
Remove Axial Flow Blad E
78
Remove Motor and Motor Support
79
Remove Electric Box
79
Remove Isolation Sheet
79
Remove Soundproof Sponge
79
Remove Magnet Coil
80
Remove Valves and 4-Way Valve Subassembly
80
Set Temperature
81
Ambient Temperature
81
Appendix
81
Appendix 1: Reference Sheet of Celsius and Fahrenheit
81
Appendix 2: Configuration of Connection Pipe
81
Cut the Pip
82
Remove the Burrs
82
Appendix 2: Pipe Expanding Method
82
Resistance Table of Ambient Temperature Sensor for Indoor and Outdoor
83
Appendix 4: List of Resistance for Temperature Sensor
83
Resistance Table of Tube Temperature Sensors for Outdoor and Indoor
84
Resistance Table of Discharge Temperature Sensor for Outdoor (50K)
85
Advertisement
Advertisement
Related Products
gree GWH12AAB-K6DNA3A
gree GWH12AAB-K6DNA3A/O
Gree GWH12AAB-K3NNA2A
Gree GWH12AAB-K3NNA2A/I
Gree GWH12AAB-K3NNA2A/O
Gree GWH12AAB-K3NNA1A
Gree GWH12AAB-K3NNA3A
Gree GWH12AAB-K3NNA5A
Gree GWH12AAB-K6DNA1A
Gree BORA GWH12AAB
Gree Categories
Air Conditioner
Heat Pump
Dehumidifier
Controller
Inverter
More Gree Manuals
Login
Sign In
OR
Sign in with Facebook
Sign in with Google
Upload manual
Upload from disk
Upload from URL