Sign In
Upload
Manuals
Brands
GeoSIG Manuals
Measuring Instruments
GMS plus
User Manuals: GeoSIG GMS plus Seismic Recorder
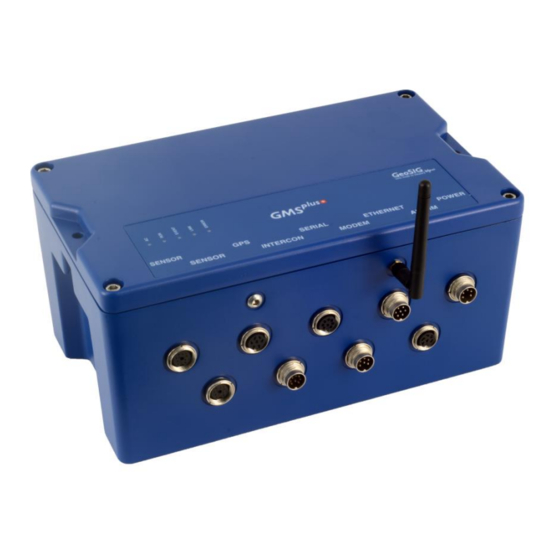
Manuals and User Guides for GeoSIG GMS plus Seismic Recorder. We have
5
GeoSIG GMS plus Seismic Recorder manuals available for free PDF download: User Manual, Faq, Quick User Manual
GeoSIG GMS plus User Manual (150 pages)
Brand:
GeoSIG
| Category:
Recording Equipment
| Size: 25 MB
Table of Contents
Table of Contents
3
Applicability of this Manual
7
Warnings and Safety
8
Geosig Cybersecurity Recommendations
11
Symbols and Abbreviations
14
Introduction
15
Incoming Inspection
16
Damage During Shipment
16
Warranty
16
Limitation of Warranty
16
Description
17
Housing
17
Housing Lid
17
Base Plate
18
Connectors
19
Standard External Connectors
19
Optional External Connectors
19
Optional External Antennas
20
Connectivity Options
20
Internal Connector
20
Visual Indicators
20
Indicators Description
21
Detail Description
22
Internal Batteries
25
Main Battery
25
Backup Battery
25
Main Battery Specification
25
Main Battery Models
25
Backup Battery Specification
25
Storage (Instrument Shelf Life)
26
Backup Battery Models
26
Storage Instruction
26
Power Supply
27
Choice of Power Supply
27
Automatic Power on and off
27
Supplied and Optional Accessories
27
Standard Supplied Accessories
27
Optional Accessories
27
Installation
28
Site Selection
28
Environmental Considerations
28
Power Supply Considerations
28
Communication Considerations
29
Installation
29
Requirements for the Instrument Foundation
29
Mounting the Instrument
29
Orientation, Leveling and Calibration of the Sensor
30
Installing Other Components, Options, Accessories
30
First Start and Communication Setup
30
Quick Start up
31
Preparation
31
Set IP Address of the Instrument
32
No Stations Configured at First Start up
34
Adding New Stations
34
Configuration of Data Server
35
Basic Configuration of the Instrument
37
Principle of Operation of the Instrument
40
Normal Operation
40
Behaviour on a Seismic Event
41
Firmware and Configuration Upgrade
43
Backup Server
43
Network Settings
44
Network Settings through the Web Interface
44
Network Settings through Geodas
46
Wired Ethernet Settings through the Local Console
47
Wireless Settings through the Local Console
47
Get IP Address from Instrument
49
The Web Interface
50
Accessing the Web Interface
50
The Home Panel and the General Navigation
51
The Overall Error States Shown in the Web Interface
51
Device Configuration
52
Data Acquisition Configuration
53
Configuration Manager
54
Network Configuration
55
Web Interface Configuration
56
State of Health
57
Error Status
57
Recording Status
58
Hardware Status
59
Software Status
60
Maintenance
61
Data Explorer
63
Help
64
Online Help
64
Contact Geosig Service
64
Detailed Configuration of the Instrument
65
Switch on and off the Instrument
65
General Comments to the Configuration
65
Change Configuration by the Web Interface
65
Change Configuration by Geodas
65
Changing Configuration by the Console
66
Explanation of the Structure in the Manual
67
Explanation Table Structure
67
Configuration of the Channels
68
In the Web Interface or by Geodas
68
Via Local Serial Console
70
Channel Configuration Menu Structure
72
Calculation of the LSB Factor
73
LSB of All Geosig Sensors
73
Channel Naming
75
Configuration of Data Streams
76
In the Web Interface or by Geodas
76
Via Local Serial Console
77
Data Streaming Configuration Menu Structure
78
Set up of Data Streams
79
Trigger Settings
81
In the Web Interface or by Geodas
81
Via Local Serial Console
83
STA/LTA Trigger
86
Trigger Weight
86
Trigger Time Frame
86
Trigger Settings Configuration Menu Structure
86
Trigger Interconnection over LAN (Example of 2 out of 3 Stations Logic)
89
Preset Trigger Settings
93
In the Web Interface or by Geodas
93
Via Local Serial Console
94
Preset Trigger Configuration Menu Structure
95
File Storage and Policy
96
In the Web Interface or by Geodas
96
Via Local Serial Console
97
File Storage and Policies Menu Structure
98
Communication Parameters
99
In the Web Interface or by Geodas
99
Via Local Serial Console
101
Communication Parameters Menu Structure
103
Connection over PPP (Cellular Modem or Analog Phone Line)
104
Miscellaneous Parameters
109
In the Web Interface or by Geodas
109
Via Local Serial Console
111
Miscellaneous Parameters Menu Structure
117
Time Synchronization
118
Time Synchronization Parameters Menu Structure
120
Sensors and Virtual Channels
121
In the Web Interface or by Geodas
121
Via Local Serial Console
122
Sensor and Virtuals Parameters Menu Structure
123
Geosig Options
124
In the Web Interface or by Geodas
124
Via Local Serial Console
125
Geosig Options Menu Structure
125
Other Options in the Instrument Main Menu
126
Other Options in the Main Menu
126
User Requests
127
User Requests
128
Test and Configuration Menu
129
Flash Images and Boot Options
131
Hardware Setup and Monitor
131
Test Functions
131
Security
131
Comparison of User Permissions
132
Comparison of Test and Configuration Menu Users
132
Firmware Upgrade
133
Appendices
135
Appendix A Connector Pinouts
136
POWER Connector
136
ETHERNET Connector
136
SERIAL Connector
136
GPS Connector
137
SENSOR Connectors
137
INTERCONNECTION Connector
137
MODEM Connector
137
ALARM Connector
138
Appendix B Remote Access to the Instrument over SSH
139
SSH Clients for Linux os
139
SSH Clients for Windows os
140
SFTP Access for Windows os
141
File Structure of the Instrument
142
Appendix C Geodas Settings
143
Configuration of Stations
143
Add a New Instrument
144
Remove an Instrument
144
Configuration of Server Parameters
145
Instrument Control in Geodas
146
More Information
146
Instrument)
146
Instrument Setup
147
Cancel Pending Request
147
Instrument Communication Interface
147
Open Recorded Miniseed Files in Geodas
148
Save Predefined Scaling Factors
149
Calculation of the Scaling Factors
150
Advertisement
GeoSIG GMS plus User Manual (124 pages)
Brand:
GeoSIG
| Category:
Measuring Instruments
| Size: 6 MB
Table of Contents
Table of Contents
3
Applicability of this Manual
7
Warnings and Safety
7
Geosig Cybersecurity Recommendations
10
Symbols and Abbreviations
12
1 Introduction
13
2 Incoming Inspection
13
Damage During Shipment
13
Warranty
13
Limitation of Warranty
13
3 Storage (Instrument Shelf Life)
14
Main Battery
14
Backup Battery
14
Table 1, Storage Instruction
14
4 Description
15
Housing
15
The Housing Lid
15
Base Plate
16
Connectors
16
Standard External Connectors
17
Optional External Connectors
18
Optional External Antennas
21
Connectivity Options
21
Seismometer
21
Internal Connector
22
Visual Indicators
22
Table 2. Indicators Description
22
Detail Description
23
Internal Batteries
25
Main Battery
25
Table 3. Main Battery Specification
25
Backup Battery
26
Power Supply
26
Choice of Power Supply
26
Automatic Power on and off
26
Table 5. Backup Battery Specification
26
Table 6. Backup Battery Models
26
Supplied and Optional Accessories
27
Standard Supplied Accessories
27
Optional Accessories
27
5 Installation
28
Site Selection
28
Environmental Considerations
28
Power Supply Considerations
28
Communication Considerations
29
Installation
29
Requirements for the Instrument Foundation
29
Mounting the Instrument
29
Orientation, Levelling and Calibration of the Sensor
30
Supply Voltage
30
Installing Other Components, Options, Accessories
30
First Start and Communication Setup
31
6 Principle of Operation of the Instrument
32
Normal Operation
32
Behaviour on a Seismic Event
32
Firmware and Configuration Upgrade
34
Backup Server
34
7 Quick Start up
35
Preparation
35
Set IP Address of the Instrument
35
No Stations Configured at First Start up
37
Adding New Stations
38
Configuration of Data Server
39
Basic Configuration of the Instrument
40
8 Network Settings
43
Network Settings through the Web Interface or Instrument Setup
43
Network Settings through Geodas
44
Wired Ethernet Settings through the Local Console
45
Wireless Settings through the Local Console
45
Get IP from Instrument
47
9 The Web Interface
48
Accessing the Web Interface
48
The Home Panel and the General Navigation
49
Table 7. the Overall Error States Shown in the Web Interface
49
Device Configuration
50
Armdas Configuration
51
Manage Armdas Configurations
52
Network Configuration
53
Web Interface Configuration
54
State of Health
54
Error Status
54
Table 8. the Overall Error States Shown in the Web Interface
55
Recording Status
56
Hard- and Software Status
57
Requests
58
Data Explorer
59
Help
60
Online Help
60
Contact Geosig Service
60
10 Detailed Configuration of the Instrument
61
Switch on and off the Instrument
61
General Comments to the Configuration
61
Change Configuration by the Web Interface
61
Change Configuration by Geodas
61
Changing Configuration by the Console
62
Explanation of the Structure in the Manual
63
Table 9. Explanation Table Structure
63
Configuration of the Channels
64
In the Web Interface or by Geodas
64
Via Local Serial Console
65
Table 10. Channel Configuration Menu Structure
66
Calculation of the LSB Factor
67
Table 11. LSB of All Geosig Sensors
67
Channel Naming
69
Configuration of Data Streams
69
In the Web Interface or by Geodas
69
Via Local Serial Console
70
Set up of Data Streams
71
Table 12. Data Streaming Configuration Menu Structure
71
Trigger Settings
74
In the Web Interface or by Geodas
74
Via Local Serial Console
75
Table 13. Trigger Configuration Menu Structure
77
STA/LTA Trigger
78
Trigger Weight
78
Trigger Time Frame
78
Trigger Interconnection over LAN
79
Preset Trigger Settings
83
In the Web Interface or by Geodas
83
Via Local Serial Console
84
File Storage and Policy
85
In the Web Interface or by Geodas
85
Table 14. Preset Trigger Configuration Menu Structure
85
Via Local Serial Console
86
Table 15. File Storage and Policies Menu Structure
87
Communication Parameters
88
In the Web Interface or by Geodas
88
Via Local Serial Console
89
Table 16. Communication Parameters Menu Structure
90
Connection over PPP (Cellular Modem or Analog Phone Line)
91
Table 17. Server Parameters Menu Structure
91
Miscellaneous Parameters
96
In the Web Interface or by Geodas
96
Via Local Serial Console
97
Time Synchronization
101
Table 18. Miscellaneous Parameters Menu Structure
101
Geosig Options
102
Via Local Serial Console
102
Other Options in the Instrument Main Menu
103
User Requests
104
11 Test and Configuration Menu
106
Flash Images and Boot Options
107
Hardware Setup and Monitor
108
Test Functions
108
Security
108
Comparison of User Permissions
108
Table 19. Comparison of Test and Configuration Menu Users
108
12 Firmware Upgrades
109
13 Remote Access to the Instrument over SSH
111
SSH Clients for Linux os
111
SSH Clients for Windows os
112
SFTP Access for Windows os
113
File Structure of the Instrument
114
14 Geodas Settings
115
Configuration of Stations
115
Add a New Instrument
116
Remove an Instrument
116
Configuration of Server Parameters
117
Instrument Control in Geodas
118
More Information
118
Instrument Setup
119
Cancel Pending Request
119
GMS Communication Interface
120
Open Recorded Miniseed Files in Geodas
121
Save Predefined Scaling Factors
122
Calculation of the Scaling Factors
122
Table 20. Scaling Factors of Different Sensors
123
Index
124
GeoSIG GMS plus Faq (4 pages)
How to Connect Serial Console with uCon
Brand:
GeoSIG
| Category:
Recording Equipment
| Size: 0 MB
Table of Contents
1. Introduction
1
2. Required Tools
1
3. Connect Gmsplus
1
4. Find COM Port in Windows
2
5. Connect with Ucon
2
6. Navigating the Console
3
7. Save and Apply Configuration Changes
4
Advertisement
GeoSIG GMS plus Faq (8 pages)
Brand:
GeoSIG
| Category:
Measuring Instruments
| Size: 1 MB
GeoSIG GMS plus Quick User Manual (2 pages)
Brand:
GeoSIG
| Category:
Measuring Instruments
| Size: 0 MB
Advertisement
Related Products
GeoSIG GMS-GPS
GeoSIG GMS-scai
GeoSIG GSR-18
GeoSIG GCR-12
GeoSIG GCR-16
GeoSIG GSR-16
GeoSIG GXR-GPS
GeoSIG GXR-GPS-485
GeoSIG GXX-3GMx Series
GeoSIG GeoSwitch
GeoSIG Categories
Measuring Instruments
Recording Equipment
Modem
Accessories
Switch
More GeoSIG Manuals
Login
Sign In
OR
Sign in with Facebook
Sign in with Google
Upload manual
Upload from disk
Upload from URL