Sign In
Upload
Manuals
Brands
DRS Technologies Manuals
Tablet
Armor X10gx
DRS Technologies Armor X10gx Manuals
Manuals and User Guides for DRS Technologies Armor X10gx. We have
1
DRS Technologies Armor X10gx manual available for free PDF download: User Manual
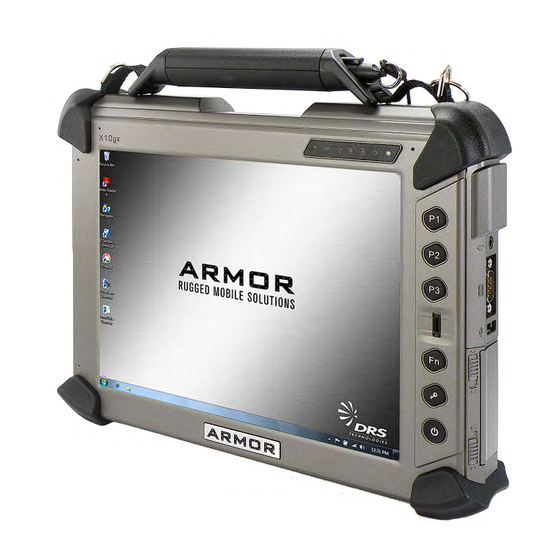
DRS Technologies Armor X10gx User Manual (233 pages)
TABLET COMPUTER
Brand:
DRS Technologies
| Category:
Tablet
| Size: 5 MB
Table of Contents
Warning Summary
9
Table of Contents
13
1 Welcome and Introduction
22
Your ARMOR X10Gx Purchase
23
About this Guide
24
Viewing, Navigating, and Printing this Guide
24
Viewing the X10Gx Quick Start Guide
24
Please Help Us Maintain Top Quality Documentation
24
2 Learning about Your Armor X10Gx
26
Front and Top Panel Features
27
Figure 1. Front Panel Features
27
Controls
28
Display
28
Figure 2. X10Gx Control Panel
28
Table 1. Power Button Actions
30
Figure 3. Indicator Panel
31
Indicator Panel
31
Ambient Light Sensor (ALS)
32
Microphones
32
Speakers
32
Rear Panel Features
33
Figure 4. Rear Panel Features
33
Battery Compartments
34
Figure 5. Battery Fuel Gauge Indicators
34
Docking Connectors
35
Figure 6. Built-In Camera
35
Figure 7. X10Gx Docking Connectors
35
Webcam
35
Left Side Panel Features
36
Figure 8. Left Side Panel Features
36
Right Side Panel Features
37
Removable Card Support
37
Figure 9. Right Side Panel Features
37
Bottom Panel Features
38
Figure 10. Bottom Panel Features
38
Included Components, Accessories and Support
39
Batteries
39
Solid State Drive (SSD)
39
Figure 11. ARMOR X10Gx Battery
39
Figure 12. X10Gx 32 GB and Optional 80 GB Solid-State Hard Drives
39
RAM Memory Module
40
Active Pen with Tether
40
Figure 13. RAM Memory Module
40
Figure 14. the ARMOR X10Gx Pen
40
AC Adapter
41
Display Cloth
41
Shoulder Strap
41
Figure 15. AC Adapter
41
Figure 16. Microfiber Display Cloth
41
Figure 17. Shoulder Strap
41
Subscriber Identity Module (SIM) Card Support
42
Secure Digital (SD) Card Reader Support
42
Smart Card Support
42
Figure 18. SIM Card Example
42
Figure 19. SD Card Example
42
Expresscard® Support
43
Figure 20. Smart Card Example
43
Figure 21. Expresscard Examples
43
Flexspace™ Expansion
44
Figure 22. X10Gx Flexspace™ Concepts
44
Figure 23. Internal Flexspace with SSD Removed
45
Figure 24. Internal Flexspace with the SSD and Flexboard Removed
46
Figure 25. Right Side Panel Flexspace
47
Optional Add-Ons and Accessories for Your X10Gx
48
Gobi® Wireless Wide Area Network (WWAN) Radio
48
U-Blox® GPS Satellite Receiver
48
PC/PCMCIA Card Support
48
Compact Keyboard
48
Two-Bay External Battery Charger
48
Vehicle Power Supplies
49
Docking Stations
50
Figure 26. ARMOR X10Gx Desk Dock
50
Figure 27. X10Gx RF Dock, Breakout Box and Cable
51
Figure 28. X10Gx Vehicle Dock on a Ball Mount Assembly
52
Figure 29. X10Gx Docking Station Attached to Ball Mount Assembly
52
Figure 30. ARMOR Legacy Vehicle Docks
53
Figure 31. X10Gx Mounted in a Universal Dock with Keyboard Tray and Keyboard
54
X10Gx Specifications
56
3 Getting S Tarted
60
Installing the Batteries
60
Figure 32. ARMOR X10Gx Battery Compartments
61
Figure 33. Battery Positioned for Insertion
62
Table 2. Installing an X10Gx Battery
62
Turning on Your X10Gx for the First Time
64
Table 3. Performing the Microsoft Out-Of-Box-Experience (OOBE)
64
Turning the X10Gx on Normally
65
Turning the Computer off Normally
65
Emergency Shutdown
65
Putting the Computer into Sleep Mode
66
Indications that Your X10Gx Is Asleep
66
Putting the Computer into Hibernate Mode
66
Indicator State Summary
67
Table 4. LED Indication Summary
67
Configuring and Controlling Your Wireless Radios
69
Configuring Your Audio System
70
Figure 34. Realtek HD Audio Manager - Speakers Main Tab
70
Table 5. Configuring the Speakers
70
Figure 35. Microphone Main Tab
71
Table 6. Configuring Your Microphones
71
Operating the X10Gx Display
72
Selecting the Display Mode
72
Figure 36. Armorutils Screen Setup
73
Adjusting Screen Brightness
74
Figure 37. Armorutils Backlight Setup Dialog Window
74
Working with the Pen Screen
76
Table 7. Pen Screen Actions
76
Working with the Touch Screen
78
Table 8. Fingertip Actions
78
Entering Data Using the Input Panel
80
Accessing Input Panel in Windows 7
80
Figure 38. Location of the Input Panel
80
Figure 39. Input Panel Keyboard Opened on Desktop
80
Accessing Input Panel in Windows XP
82
Figure 40. Input Panel with no Mode Showing (for Illustration Purposes Only)
82
Figure 41. Writing Pad Mode
82
Figure 42. Character Pad Mode
82
Entering Data Using Other Virtual Input Devices
83
Figure 43. On-Screen Keyboard Mode
83
Using the Fingerprint Sensor (FPS)
84
Installing the FPS Software
84
Using the Fingerprint Sensor
84
Using the Truesuite Application
84
Figure 44. Truesuite Application Window
84
Truesuite Options and Settings
85
Uninstalling Your Fingerprint Software
85
Using the Webcam
86
Capturing Images and Video
86
Table 9. Capturing a Still Image or Video
86
Scanning a Barcode
87
Figure 45. Picasa Application Window
87
Figure 46. Sample Linear Barcode
88
Figure 47. Webcam Barcode Scanner® Barcode Scanner Application Window
88
Table 10. Scan UPC-10, EAN-13 and ISBN Barcodes in Windows 7
88
Figure 48. Sample 2D Barcode
89
Figure 49. Quickmark® Barcode Scanner Application Window
89
Table 11. Scan Datamatrix and QR Format Barcodes in Windows 7
89
Figure 50. a Captured 2D Barcode
90
Screen Magnifier
91
Figure 51. Virtual Magnifying Glass at Work
91
Tips for Proper Use and Care of Your X10Gx
92
4 Networking
94
Managing Your Wi-Fi Connections
95
Table 12. View and Manage Network Connections
95
Figure 52. Windows Network and Sharing Center
96
Managing Your Bluetooth Connections
97
Figure 53. Currently Connected and Available Wi-Fi Networks
97
Table 13. View and Manage Bluetooth Devices
97
Figure 54. Devices and Printers Window
98
Figure 55. Bluetooth Settings Window
99
Managing Your Ethernet Connection
100
Table 14. Setting up an Ethernet Connection
100
Figure 56. Internet Service Provider Information Window
101
Activating the Optional Gobi® WWAN Radio
102
Using the Oneclickinternet Application
102
Using the Network Driver Interface Specification (NDIS)
102
Important Notes about Using NDIS
103
Table 15. Configuring the Sierra Oneclick Application to Use NDIS
103
Activating the Optional GPS Receiver
104
Table 16. Configuring the U-Center Com Port
104
Assisted GPS
105
The U-Center GPS Application Window
105
U-Center User's Guide
105
Table 17. Obtaining the AGPS Password from U-Blox
106
Enabling and Disabling Your Wireless Radios
107
Wireless Signal Quality
108
Table 18. Enabling and Disabling Your Wireless Radios
108
Using Your Radios with an RF Vehicle Dock
109
Table 19. Configuring the X10Gx to Use External Antennas
109
Using an ARMOR Legacy Dock
110
5 Your Armor X10Gx S Oftware
112
Armorutils™ Application
112
Starting Armorutils
112
Opening Armorutils
113
Exiting from Armorutils
113
Armorutils Main Window
114
Backlight Setup Dialog
115
Wireless Setup Dialog
117
Radios ON/OFF Toggle Button
117
Buttons Setup Dialog
119
Figure 66. Armorutils Programmable Button Options Menu
120
Configuration Dialog
122
Figure 68. User Access Settings Dialog
123
Figure 69. Example of the Armorutils Main Screen with Options Disabled
124
Battery Monitor Dialog
125
Figure 71. Armorutils Battery Information Window
126
Figure 72. Armorutils Charger Control Settings Window
127
Figure 73. Battery Conditioning Window
129
Screen Setup Dialog
130
Figure 75. Screen Setup Dialog with Touch Screen Only Enabled
131
Diagnostics Dialog
132
Figure 77. Armorutils Event Recorder Window
133
Figure 78. Sample Event Log File
135
Armorutils about Window
136
Getting Started with Windows 7
137
Help for Windows
137
Windows Display Utilities
138
Pen and Touch Utility
138
Figure 82. Pen and Touch Utility – Flicks Tab
140
Figure 84. Pen and Touch Utility – Touch Tab
141
Figure 85. Touch Tab Virtual Mouse Pointer
142
Tablet PC Settings Utility
143
Figure 86. Tablet PC Settings – Display Tab
144
Figure 87. Tablet PC Settings Utility – Other Tab
145
Pen Tablet Properties Utility
146
Figure 89. Settings and Options Supported by the ARMOR X10Gx Active Pen
147
Figure 90. Side Button Menu Options
148
Figure 91. Pen Tablet Properties - Advanced Settings Window
149
Figure 92. Pen Tablet Properties – Pop-Up Menu Tab
150
Figure 93. Pop-Up Menu Add Options
151
Figure 94. Pen Tablet Properties Window – Calibrate Tab
152
Tablet and Pen Settings Utility (Windows XP Only)
153
Figure 96. Tablet and Pen Settings Window – Display Tab
154
Figure 97. Tablet and Pen Settings Panel – Pen Options Tab
155
Touch Settings Utility (Windows XP Only)
156
Truesuite™ Fingerprint Recognition Software
157
Using the Truesuite Application
157
Realtek® HD Audio Manager Application
158
Picasa 3® Image Capture
159
Virtual Magnifying Glass
160
6 Troubles Hooting
162
Isolating the Problem
162
Table 20. ARMOR X10Gx Trouble Symptoms
162
Troubleshooting Flowcharts
165
TS01 Tablet will Not Power up
165
TS02 Tablet will Not Start Boot Process
166
TS03 Tablet will Not Boot into Windows
167
TS -04 Ta B Le T will N O T Re C O G N Ize a B a Tte Ry
168
TS -05 Ta B Le T Is lo C Ke D U P
169
TS -06 Ca N N O T C O N N E C T to Wire Le S S N E Two Rk
170
7 Maintaining Your Armor X10Gx
172
Replacing the Solid-State Drive (SSD)
172
Table 21. Remove and Replace the Solid-State Drive
172
Figure 103. SSD Location
173
Removing and Replacing the Batteries
174
Table 22. Remove and Replace a Battery
174
Figure 104. Battery Positioned for Insertion
175
Installing a SIM Card
176
Table 23. Installing a SIM Card
176
Figure 105. Hard Drive Compartment
177
Removing and Replacing a Memory Module
178
Table 24. Replacing a Memory Module
178
Figure 106. Memory Module Compartment
179
Figure 107. Memory Module Ready for Removal
180
Changing the BIOS Settings
181
Table 25. Access the BIOS Setup Utility
181
Table 26. Record Bios Changes here
182
Returning the BIOS to Its Default Settings
183
Setting the X10Gx for Power Operation with Legacy Docks
183
Table 27. Return the BIOS to Its Default State
183
Table 28. Setting the Dock Power Switch for Legacy Operation
184
Changing the Power Button Default Action
185
Table 29. Changing the Power Button Actions
185
Figure 108. Power Button Settings Options
186
Creating an Event Log
187
Table 30. Creating an Event Log
187
Figure 109. Diagnostics Event Recorder Window
188
Caring for the Display Screen
189
Cleaning the Tablet Case
189
8 Dis P Lay Management
190
Adjusting the Brightness
190
Automatic Brightness Adjustment
190
Manual Brightness Adjustment
190
Calibrating the Display
192
Rotating the Screen
193
Using the Intel Graphics Options
193
Using the Intel Graphics and Media Control Panel
194
Using a Keyboard "Hot Key" Combination
195
9 Battery Management
196
Safety and Handling Considerations for Your Batteries
196
When to Charge a Battery
198
New Batteries
198
Currently Installed Batteries
198
Removed Batteries
198
Depleted Batteries
198
Fully Depleted and Overly Discharged Batteries
199
Un-Recoverable Batteries
199
Avoiding Overly Discharging Your Batteries
199
What to Do for an Overly Discharged Battery
200
Table 31. Recover an Overly Discharged Battery
200
How to Charge Your Batteries
201
Charging Time
201
Charging Temperatures
201
Setting the Charging Policy
201
Table 32. Select How to Charge the Batteries
202
How to Tell When Batteries Have Finished Charging
203
Battery Operating Time
203
Operating under Low Battery Conditions
204
Low Battery Level Alarm
204
Reserved Battery Level Alarm
204
Critical Battery Level Alarm
205
What to Do if You Get a Low Battery Alert
205
Fully Depleted (Overly Discharged) Batteries
205
Avoiding Overly Discharging Your Batteries
206
Battery Capacity and Charge
206
Maximum Capacity
206
Checking Your Battery's Capacity
206
Discharge/Recharge Cycles
207
How to Optimize Energy Use
208
Selecting a Power Plan
208
Changing Power Plan Settings
209
Monitoring Battery Status
211
Using the Desktop Battery Monitor Window
211
Using the Armorutils Battery Monitor Dialog
212
Generating an Event Log
213
Battery Conditioning/Calibration
214
Table 33. Conditioning a Battery
215
When to Replace a Battery
217
Nominal Usage
217
Heavy Usage
217
Determining a Battery's Age
217
Before You Dispose of a Battery
217
Your Battery's Warranty
218
Where to Purchase Replacement Batteries
218
How to Store Batteries When Not in Use
218
Short-Term Storage
218
Long-Term Storage
218
Battery Tips for Best Performance
219
Disposing of Your Used Batteries
219
Disposal
219
Recycling
219
10 Drs Technical S up P Ort
222
Before You Contact Us
222
How to Return a Product to DRS
222
If You Need Information
224
How to Find and Interpret Your Unit's Serial Number
225
Acronyms
226
Glos S Ary
227
Warranty Information
228
General Information
228
Length of Warranty
228
Terms and Conditions
228
Additional Information
229
Explanation of Active Pen Side Button Options
230
Advertisement
Advertisement
Related Products
DRS Technologies ARMOR X7
DRS Technologies Hammerhead
DRS Technologies Hammerhead Xtreme
DRS Technologies Categories
Security Camera
IP Camera
Tablet
Desktop
More DRS Technologies Manuals
Login
Sign In
OR
Sign in with Facebook
Sign in with Google
Upload manual
Upload from disk
Upload from URL