Sign In
Upload
Manuals
Brands
DRS Technologies Manuals
Desktop
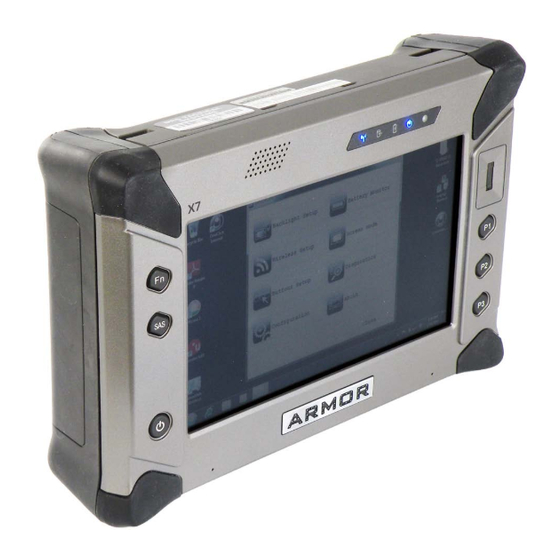
ARMOR X7
DRS Technologies ARMOR X7 Manuals
Manuals and User Guides for DRS Technologies ARMOR X7. We have
1
DRS Technologies ARMOR X7 manual available for free PDF download: User Manual
DRS Technologies ARMOR X7 User Manual (130 pages)
TABLET COMPUTER
Brand:
DRS Technologies
| Category:
Desktop
| Size: 5 MB
Table of Contents
Table of Contents
13
W Ar Ning and C Aut Ion S Ummar y
9
Table of Contents
13
Front Matter
16
Front Matter
17
Front Matter
18
List of Figures
20
Charging Times
23
1 W E L C O Me a N D in T R O du C T Io N
25
Your ARMOR X7 Purchase
26
About this Guide
27
Viewing, Navigating, and Printing this Guide
27
Please Help Us Maintain Top Quality Documentation
27
2 Learning about Your Armor X7
29
Front and Top Panel Features
30
Figure 1. ARMOR X7 Key Features - Front View
30
Display
31
Controls
31
Figure 2. X7 Control Panels
31
Table 1. Initial Power Button Actions
33
Indicator Panel
34
Figure 3. X7 Indicator Panel
34
Speaker
35
Noise Cancelling Stereo Microphones
35
Rear Panel Features
36
Figure 4. Key Features - Rear Panel
36
Cooling Register
37
Battery Bays
37
Webcam
37
Figure 5. X7 Battery Bays
37
Bottom Panel Features
38
Figure 6. X7 Webcam
38
Figure 7. Key Features - Bottom Panel
38
Included Components, Accessories and Support
39
Batteries
39
Figure 8. ARMOR X7 Battery
39
Active Pen with Tether
40
AC Adapter and Power Cord
40
Figure 9. the ARMOR X7 Pen
40
ARMOR Cloth
41
Thermal Transfer Pads
41
Figure 10. X7 AC Adapter
41
Figure 11. ARMOR Microfiber Cleaning Cloth
41
Figure 12. Thermal Transfer Pads
41
Subscriber Identity Module (SIM) Card Support
42
Secure Digital (SD) Card Reader Support
42
Figure 13. SIM Card
42
Figure 14. Micro SD Card
42
Trusted Platform Module (TPM) Support
43
Flexspace™ Expansion
43
Figure 15. X7 Internal Flexspace
44
Figure 16. ARMOR X7 Battery Adapter Flexspace Concept
44
Optional Add-Ons and Accessories for Your X7
45
Gobi® Wireless Wide Area Network (WWAN) Card
45
U-Blox® GPS Receiver Card
45
Compact Keyboard
45
External Battery Charger
45
Mini-USB Adapter
46
D-Ring Set
46
Screen Protector
46
Docking Stations
47
Figure 17. X7 Desk Dock
47
Figure 18. X7 RF Vehicle Dock
48
Figure 19. Examples of X7 Vehicle Dock Mounting Solutions
49
Figure 20. X7 Breakout Box
49
Figure 21. Industrial Vehicle Surge Suppressor
50
Figure 22. X7 Vehicle Power Supply
50
Figure 23. Sample X7 Vehicle Dock Installation Package
51
X7 Specifications
52
Figure 24. X7 Internal Block Diagram
55
Power Supply
55
3 G E T T in G S T a R T E D
57
Installing and Charging the Batteries
58
Figure 25. X7 Batteries Positioned for Installation
58
Table 2. Installing the X7 Batteries
59
Figure 26. X7 Battery
60
Turning on Your X7 for the First Time
61
Table 3. Performing the Microsoft Out-Of-Box-Experience (OOBE)
61
Turning the Computer on Normally
62
Turning the Computer off Normally
62
Emergency Shutdown
63
Putting the Computer into Sleep Mode
63
Indications that Your X7 Is Asleep
63
Putting the Computer into Hibernate Mode
63
Indicator State Summary
64
Table 4. X7 Indicator State Summary
64
Configuring and Controlling Your Wireless Radios
66
Installing a Micro SD/SDHC Card
66
Installing the Optional D-Rings
66
Table 5. Installing the D-Rings
66
Configuring Your Audio System
67
Figure 27. Realtek HD Audio Manager - Speakers Main Tab
67
Table 6. Configuring the Speaker
67
Figure 28. Microphone Main Tab
68
Table 7. Configuring Your Microphones
68
Operating the X7 Display
69
Selecting the Display Mode
69
Figure 29. Armorutils Screen Setup
69
Adjusting Screen Brightness
70
Figure 30. Armorutils Backlight Setup Dialog Window
70
Working with the Pen Screen
72
Table 8. Pen Screen Actions
72
Working with the Touch Screen
74
Table 9. Stylus Actions
74
Entering Data Using the Input Panel
76
Figure 31. Location of the Input Panel
76
Figure 32. Input Panel Keyboard Opened on Desktop
76
Using the Fingerprint Sensor (FPS)
78
Activating the FPS Software
78
Using the Fingerprint Sensor
78
Using the Truesuite Application
78
Figure 33. Truesuite Application Window
78
Truesuite Options and Settings
79
Uninstalling Your Fingerprint Software
79
Using the Webcam
80
Capturing Images and Video
80
Table 10. Capturing a Still Image or Video
80
Scanning a Barcode
81
Figure 34. Picasa Application Window
81
Figure 35. Sample Linear Barcode
81
Figure 36. Webcam Barcode Scanner® Application Window
82
Figure 37. Sample 2D Barcode
82
Table 11. Scan UPC-10, EAN-13 and ISBN Barcodes
82
Figure 38. Quickmark® Barcode Scanner Application Window
83
Figure 39. a Captured 2D Barcode
83
Table 12. Scan a 2D Barcode
83
Using the Screen Magnifier
84
Figure 40. Virtual Magnifying Glass at Work
84
Tips for Proper Use and Care of Your X7
85
4 N E T W O R K in G
87
Managing Your Wi-Fi Connections
87
Table 13. View and Manage Network Connections
87
Figure 41. Network and Sharing Center Window
88
Managing Your Bluetooth Connections
89
Figure 42. Currently Connected and Available Wi-Fi Networks
89
Table 14. View and Manage Bluetooth Devices
89
Figure 43. Devices and Printers Window
90
Additional Information
90
Figure 44. Bluetooth Settings Window
91
Managing Your Ethernet Connection
92
Table 15. Setting up an Ethernet Connection
92
Figure 45. Internet Service Provider Information Window
93
Activating the Optional Gobi® WWAN Radio
94
Using the Oneclickinternet Application
94
Using the Network Driver Interface Specification (NDIS)
94
Figure 46. Sierra® Oneclickinternet™ Connection Manager
94
Important Notes about Using NDIS
95
Table 16. Configuring the Sierra Oneclick Application to Use NDIS
95
Activating the Optional GPS Receiver
96
Table 17. Configuring the U-Center Com Port
96
The U-Center GPS Application Window
97
U-Center User's Guide
97
Assisted GPS
97
Figure 47. U-Center GPS Application Window
97
Table 18. Obtaining the AGPS Password from U-Blox
98
Enabling and Disabling Your Wireless Radios
99
Figure 48. U-Center Assistnow Online Window
99
Table 19. Enabling and Disabling Your Wireless Radios
100
Wireless Signal Quality
101
Using Your Radios with an X7 Vehicle Docking Station
101
Figure 49. Armorutils Wireless Setup Dialog
102
Table 20. Configuring the X7 to Use an External GPS Antenna
102
5 Y O U R a R Mo R X 7 S O F T W a R E
103
Armorutils™ Application
104
Starting Armorutils
104
Opening Armorutils
104
Figure 50. Systray with Overflow Menu Displayed
104
Exiting from Armorutils
105
Armorutils Main Window
105
Figure 51. Armorutils Main Window
105
Backlight Setup Dialog Window
106
Figure 52. Armorutils Backlight Setup Dialog
106
Wireless Setup Dialog Window
108
Figure 53. Armorutils Wireless Setup Dialog
108
Buttons Setup Dialog Window
110
Figure 54. Armorutils Buttons Settings Dialog
110
Figure 55. Armorutils Programmable Button Options Menu
111
Configuration Dialog Window
113
Figure 56. Armorutils Configuration Dialog
113
Figure 57. User Access Settings Dialog
114
Figure 58. Example of the Armorutils Main Screen with Options Disabled
115
Battery Monitor Dialog
116
Figure 59. Armorutils Battery Monitor Dialog
116
Figure 60. Armorutils Battery Information Window
117
Figure 61. Armorutils Charger Control Settings Window
118
Figure 62. Battery Conditioning Window
120
Screen Setup Dialog Window
121
Figure 63. Armorutils Screen Setup Dialog
121
Figure 64. Screen Setup Dialog with Touch Screen Only Enabled
122
Diagnostics Dialog Window
123
Figure 65. Armorutils Diagnostics Dialog
123
Figure 66. Armorutils Event Recorder Window
124
Figure 67. Sample Event Log File
126
Armorutils about Window
127
Figure 68. Armorutils about Window
127
Getting Started with Windows 7
128
Help for Windows
128
Figure 69. Windows 7 Welcome Page
128
Figure 70. Pen and Touch Utility - Pen Options Tab
129
Figure 71. Pen and Touch Utility - Flicks Tab
130
Pen Tablet Properties Utility
130
Advertisement
Advertisement
Related Products
DRS Technologies Armor X10gx
DRS Technologies Categories
Security Camera
IP Camera
Tablet
Desktop
More DRS Technologies Manuals
Login
Sign In
OR
Sign in with Facebook
Sign in with Google
Upload manual
Upload from disk
Upload from URL