Table of Contents
Advertisement
Quick Links
Certification Exhibit
FCC ID: UGLGOBI2
IC: 7888B-GOBI2
FCC Rule Part: 22H, 24E
IC Radio Standards Specification: RSS-132, RSS-133
ACS Project Number: 11-2044
Manufacturer: DRS Tactical Systems
Model: GOBI2000
User Manual
3998 FAU Blvd. Suite 310 Boca Raton, FL 33431 Tel: 561-961-5585 Fax: 561-961-5587
Advertisement
Table of Contents

Related Manuals for DRS Technologies Armor X10gx

Summary of Contents for DRS Technologies Armor X10gx
- Page 1 Certification Exhibit FCC ID: UGLGOBI2 IC: 7888B-GOBI2 FCC Rule Part: 22H, 24E IC Radio Standards Specification: RSS-132, RSS-133 ACS Project Number: 11-2044 Manufacturer: DRS Tactical Systems Model: GOBI2000 User Manual 3998 FAU Blvd. Suite 310 Boca Raton, FL 33431 Tel: 561-961-5585 Fax: 561-961-5587...
- Page 2 USER’S GUIDE | REVISION D MODEL X10gx TABLET COMPUTER Go to Table of Contents Copyright 2010, DRS Tactical Systems, Inc., Melbourne, Florida. All Rights Reserved.
- Page 3 FRONT MATTER CONTENT Page 2 of 234 ARMOR X10gx Tablet Computer UNIVERSAL DOCK WITH DOCK KEYBOARD TRAY BATTERY CHARGER DESK DOCK BREAKOUT BOX COMPACT VEHICLE KEYBOARD POWER SUPPLY To learn more about ARMOR accessories, please call 1-888-872-1100 9711-26020-0001 Rev D...
- Page 4 (EAR) AND MAY NOT BE EXPORTED OR TRANSFERRED TO ANY FOREIGN PERSON, FOREIGN COUNTRY OR FOREIGN ENTITY, BY ANY MEANS, WITHOUT PRIOR WRITTEN APPROVAL FROM THE U.S. DEPARTMENT OF COMMERCE, BUREAU OF INDUSTRY AND SECURITY (BIS) AND DRS TECHNOLOGIES. THE INFORMATION DISCLOSED IN THIS DOCUMENT IS PROPRIETARY DATA OF DRS TACTICAL SYSTEMS, INC., AND MAY NOT BE REPRODUCED, USED, OR DISCLOSED WITHOUT THE PRIOR WRITTEN AUTHORIZATION OF DRS TACTICAL SYSTEMS, INC.
- Page 5 FRONT MATTER CONTENT Page 4 of 234 ARMOR X10gx Tablet Computer • Cet appareil numérique de classe B est conforme à Industrie Canada ICES-003, numéro 4 Juin 7, 2004 et exempts de licence normes RSS RSS-210, Issue n ° 8 (Décembre 2010), CNR-132 fascicule n o 2 (Septembre 2005), et RSS-133 fascicule n °...
- Page 6 Protection Agency. We are dedicated to helping you conserve energy whenever you use this product. Your ARMOR X10gx has power management settings that will reduce its overall energy use. By using energy more efficiently, you will extend the life of your batteries and your computer.
- Page 7 FRONT MATTER CONTENT Page 6 of 234 ARMOR X10gx Tablet Computer 9711-26020-0001 Rev D Exp o rt Co n tro lle d – S e e P a g e 3...
- Page 8 FRONT MATTER CONTENT Page 7 of 234 ARMOR X10gx Tablet Computer NOTICE Information contained herein is for reference only and does not constitute a commitment on the part of the manufacturer or any subsequent vendor. They are in no way responsible for any loss or damage resulting from the use (or misuse) of this publication.
-
Page 9: Warning Summary
ARMOR X10gx Tablet Computer WARNING S UMMARY This device is a Class I, Division 2, Groups A-D, T5 product. The ARMOR X10gx complies with all applicable industrial health and safety requirements. However there are certain safety considerations such as battery safety that you need to be aware of. Please read and comply with all warnings and cautions in this guide and in all other X10gx documentation. - Page 10 FRONT MATTER CONTENT Page 9 of 234 ARMOR X10gx Tablet Computer WARNING! FOR HAZARDOUS LOCATIONS , US E ONLY THE 2400 MAH BATTERY P /N 0300-15663-2400 THAT CAME WITH YOUR COMP UTER WARNING! Do not drop or mishandle the batteries, immerse them in water, or subject them to high heat.
- Page 11 X10gx batteries or to the computer itself may result. CAUTION! Use only the battery originally supplied with your ARMOR X10gx or one recommended by DRS. The use of any other battery could create a hazardous condition and possibly damage your computer.
- Page 12 FRONT MATTER CONTENT Page 11 of 234 ARMOR X10gx Tablet Computer CAUTION! Recharging batteries must only be carried out in a non-hazardous area using the supplied AC adapter. The definition of hazardous areas can be found in Standard EN 60079-10.
-
Page 13: Table Of Contents
Viewing, Navigating, and Printing this Guide ..................23 Viewing the X10gx Quick Start Guide ..................... 23 Please Help Us Maintain Top Quality Documentation ................23 2. LEARNING ABOUT YOUR ARMOR X10GX ........25 Front and Top Panel Features ........................ 26 Display ..............................27 Controls .............................. - Page 14 FRONT MATTER CONTENT Page 13 of 234 ARMOR X10gx Tablet Computer Flexspace™ Expansion ........................43 Optional Add-ons and Accessories for Your X10gx ................47 Gobi® Wireless Wide Area Network (WWAN) Radio ................47 u-blox® GPS Satellite Receiver ......................47 PC/PCMCIA Card Support ........................47 Compact Keyboard ..........................
- Page 15 Wireless Signal Quality .......................... 107 Using your Radios with an RF Vehicle Dock ..................108 Using an ARMOR Legacy Dock ......................109 5. YOUR ARMOR X10GX S OFTWARE ..........111 ARMORutils™ Application........................111 Starting ARMORutils .......................... 111 Opening ARMORutils......................... 112 Exiting from ARMORutils ........................
- Page 16 TS-04 Tablet will not recognize a battery ..................167 TS-05 Tablet is locked up ........................168 TS-06 Cannot connect to wireless network ..................169 7. MAINTAINING YOUR ARMOR X10GX ..........171 Replacing the Solid-State Drive (SSD) ....................171 Removing and Replacing the Batteries ....................173 Installing a SIM Card ..........................
- Page 17 FRONT MATTER CONTENT Page 16 of 234 ARMOR X10gx Tablet Computer 9. BATTERY MANAGEMENT ............... 195 Safety and Handling Considerations for your Batteries ................ 195 When to Charge a Battery ........................197 New Batteries ............................. 197 Currently Installed Batteries ....................... 197 Removed Batteries ..........................
- Page 18 FRONT MATTER CONTENT Page 17 of 234 ARMOR X10gx Tablet Computer Determining a Battery’s Age ......................216 Before you Dispose of a Battery ......................216 Your Battery’s Warranty ........................217 Where to Purchase Replacement Batteries ..................217 How to Store Batteries When Not in Use ....................217 Short-Term Storage ...........................
- Page 19 Figure 12. X10gx 32 GB and Optional 80 GB Solid-State Hard Drives ............. 38 Figure 13. RAM Memory Module ....................... 39 Figure 14. The ARMOR X10gx Pen ......................39 Figure 15. AC Adapter ..........................40 Figure 16. Microfiber Display Cloth ......................40 Figure 17.
- Page 20 Figure 87. Tablet PC Settings Utility – Other Tab ..................144 Figure 88. WACOM Pen Tablet Properties Window – Pen Tab ............... 145 Figure 89. Settings and Options Supported by the ARMOR X10gx Active Pen ........146 Figure 90. Side Button Menu Options ....................... 147 Figure 91.
- Page 21 Figure 122. ARMORutils Battery Conditioning Window ................214 Figure 123. Battery Conditioning Start Alert Message ................215 Figure 124. ARMOR X10gx Battery Label ....................216 Figure 125. ARMOR X10gx Unit Serial Number Location ............... 224 Quick Links: Section 1 Table of Contents List of Figures Acronyms Glossary List of Tables Table 1.
-
Page 22: Welcome And Introduction
The ARMOR X10gx gives you the power of a desktop computer in a rugged portable tablet computer. The X10gx can be mounted in a vehicle or it can be used on a desktop, on the ground, held on the lap, or held in the crook of the arm. -
Page 23: Your Armor X10Gx Purchase
ACTIVE PEN WITH STRAP TETHER BATTERY (1 OR 2) AC ADAPTER ARMOR CLOTH QUICK START GUIDE ARMOR X10gx Included Components and Accessories 9711-26020-0001 Rev D Exp o rt Co n tro lle d – S e e P a g e 3... -
Page 24: About This Guide
Vie win g , Na vig a tin g , a n d P rin tin g th is Gu id e This User’s Guide is installed on your ARMOR X10gx solid-state drive in PDF format. It is primarily designed for on-screen viewing but it can also be printed in 2-sided book format. The pdf file is located in C:/Guides. - Page 25 SECTION 1 WELCOME AND INTRODUCTION Page 24 of 234 ARMOR X10gx Tablet Computer This Page Intentionally Left blank 9711-26020-0001 Rev D Exp o rt Co n tro lle d – S e e P a g e 3...
-
Page 26: Learning About Your Armor X10Gx
SECTION 2 GETTING TO KNOW YOUR ARMOR X10GX Page 25 of 234 ARMOR X10gx Tablet Computer Table of Contents List of Figures List of Tables Acronyms Glossary 2. LEARNING ABOUT YOUR ARMOR X10GX The X10gx is the latest addition to the ARMOR line of full-size rugged, reliable, and easy-to-use tablet computers. -
Page 27: Front And Top Panel Features
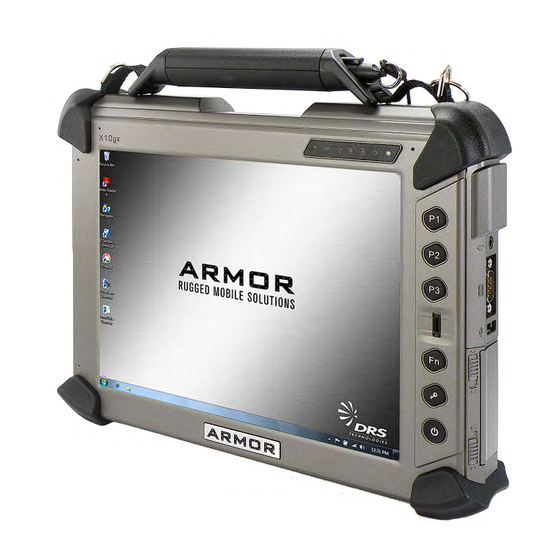
SECTION 2 GETTING TO KNOW YOUR ARMOR X10GX Page 26 of 234 ARMOR X10gx Tablet Computer Fro n t a n d To p P a n e l Fe a tu re s NOTE All references to front/back, top/bottom and left/right are relative to the face-on view as shown in Figure 1. -
Page 28: Display
SECTION 2 GETTING TO KNOW YOUR ARMOR X10GX Page 27 of 234 ARMOR X10gx Tablet Computer Dis p la y The X10gx display is a high-brightness, high-contrast LCD display with anti-glare filtering that ensures your screen can be clearly viewed even in bright sunlight. A replaceable screen protector is attached at the factory to reduce glare and protect the touch screen surface. - Page 29 SECTION 2 GETTING TO KNOW YOUR ARMOR X10GX Page 28 of 234 ARMOR X10gx Tablet Computer P ro g ra m m a b le Bu tto n s (P Bs ) P 1, P 2, P 3 The PBs can be programmed to activate different functions such as controlling brightness, changing volume level or activating an application with just a single press.
-
Page 30: Table 1. Power Button Actions
SECTION 2 GETTING TO KNOW YOUR ARMOR X10GX Page 29 of 234 ARMOR X10gx Tablet Computer Table 1. Power Button Actions Operating State Power Button Action Result Computer powered off Press and hold for at least Computer turns on and boots up 1 second and then release into new Windows session. -
Page 31: Indicator Panel
SECTION 2 GETTING TO KNOW YOUR ARMOR X10GX Page 30 of 234 ARMOR X10gx Tablet Computer In d ic a to r P a n e l There are six LED status indicators located on the indicator panel at the upper right of the... -
Page 32: Ambient Light Sensor (Als)
SECTION 2 GETTING TO KNOW YOUR ARMOR X10GX Page 31 of 234 ARMOR X10gx Tablet Computer Am b ie n t Lig h t S e n s o r (ALS ) When the X10gx display is in automatic brightness mode, the ALS senses changes in surrounding light levels and adjusts the display brightness accordingly. -
Page 33: Rear Panel Features
SECTION 2 GETTING TO KNOW YOUR ARMOR X10GX Page 32 of 234 ARMOR X10gx Tablet Computer Re a r P a n e l Fe a tu re s The rear panel of the X10gx houses compartments for two batteries, a solid-state drive, wireless and custom cards, and 1 or 2 RAM memory modules, as shown in Figure 4. -
Page 34: Battery Compartments
SECTION 2 GETTING TO KNOW YOUR ARMOR X10GX Page 33 of 234 ARMOR X10gx Tablet Computer Ba tte ry Co m p a rtm e n ts There are two battery compartments on the rear panel, as indicated in Figure 5. These compartments are sealed against moisture and dirt and provide quick and easy access for battery replacement. -
Page 35: Webcam
SECTION 2 GETTING TO KNOW YOUR ARMOR X10GX Page 34 of 234 ARMOR X10gx Tablet Computer Ma n u a lly Ac tiva tin g th e Fu e l Ga u g e s When the tablet is powered up and in a normal operating state, the fuel gauges are always active. -
Page 36: Left Side Panel Features
SECTION 2 GETTING TO KNOW YOUR ARMOR X10GX Page 35 of 234 ARMOR X10gx Tablet Computer Le ft S id e P a n e l Fe a tu re s On the left side of the tablet, support for a second display is provided with a DisplayPort®... -
Page 37: Right Side Panel Features
SECTION 2 GETTING TO KNOW YOUR ARMOR X10GX Page 36 of 234 ARMOR X10gx Tablet Computer Rig h t S id e P a n e l Fe a tu re s On the right side of the tablet, there is an audio jack that can accommodate a pair of headphones, a pair of external speakers or an external microphone. -
Page 38: Bottom Panel Features
SECTION 2 GETTING TO KNOW YOUR ARMOR X10GX Page 37 of 234 ARMOR X10gx Tablet Computer Bo tto m P a n e l Fe a tu re s The bottom panel of the tablet houses two docking station mount points and the Bluetooth antenna. -
Page 39: Included Components, Accessories And Support
Figure 11. ARMOR X10gx Battery S o lid S ta te Drive (S S D) Your ARMOR X10gx normally comes equipped with a 32 GB 1.8” solid-state drive (P/N 0000F49855-0032) that is mounted inside the sealed Flexspace compartment (see Figure 4 for location). -
Page 40: Ram Memory Module
SECTION 2 GETTING TO KNOW YOUR ARMOR X10GX Page 39 of 234 ARMOR X10gx Tablet Computer RAM Me m o ry Mo d u le Your X10gx contains 2 GB of random-access memory (RAM) in a single 2 GB 200-pin mini... -
Page 41: Ac Adapter
SECTION 2 GETTING TO KNOW YOUR ARMOR X10GX Page 40 of 234 ARMOR X10gx Tablet Computer AC Ad a p te r The AC Adapter (P/N 5700F50075-0000) is a +15 VDC, 4.8A power supply ( Figure 15) that is primarily used to recharge the batteries but can be used to power your X10gx with the batteries removed. -
Page 42: Subscriber Identity Module (Sim) Card Support
S e c u re Dig ita l (S D) Ca rd Re a d e r S u p p o rt The ARMOR X10gx also provides a card reader for a micro SD or SDHC card in capacities of 8, 16, or 32 GB. -
Page 43: Expresscard® Support
SECTION 2 GETTING TO KNOW YOUR ARMOR X10GX Page 42 of 234 ARMOR X10gx Tablet Computer Figure 20. Smart Card Example Exp re s s Ca rd ® S u p p o rt The X10gx also has a slot for an ExpressCard®. -
Page 44: Flexspace™ Expansion
SECTION 2 GETTING TO KNOW YOUR ARMOR X10GX Page 43 of 234 ARMOR X10gx Tablet Computer Fle xs p a c e ™ Exp a n s io n NOTE This section provides general information about the potential use and capabilities of the X10gx Flexspace. -
Page 45: Figure 23. Internal Flexspace With Ssd Removed
SECTION 2 GETTING TO KNOW YOUR ARMOR X10GX Page 44 of 234 ARMOR X10gx Tablet Computer The current flexspace devices are mounted on an interface board called the “flexboard.” This board has connections to accept the included and optional X10gx wireless cards or it can accept other custom cards that fit the PCI and mini-PCI connectors. -
Page 46: Figure 24. Internal Flexspace With The Ssd And Flexboard Removed
SECTION 2 GETTING TO KNOW YOUR ARMOR X10GX Page 45 of 234 ARMOR X10gx Tablet Computer Figure 24. Internal Flexspace with the SSD and Flexboard Removed Rig h t S id e P a ne l Fle xs p a c e Figure 25 shows the flexspace area inside the upper right side panel. -
Page 47: Figure 25. Right Side Panel Flexspace
SECTION 2 GETTING TO KNOW YOUR ARMOR X10GX Page 46 of 234 ARMOR X10gx Tablet Computer SECONDARY WI-FI ANTENNA CUSTOM CONNECTOR MODULE INTERFACE CONNECTOR Figure 25. Right Side Panel Flexspace 9711-26020-0001 Rev D Exp o rt Co n tro lle d – S e e P a g e 3... -
Page 48: Optional Add-Ons And Accessories For Your X10Gx
Co m p a c t Ke yb o a rd A reduced-size USB keyboard is available for use with the ARMOR X10gx computer. The keyboard is approximately half the size of a standard keyboard and can be mounted on a special platform for use with a vehicle docking station or connected to a desk docking station to conserve space on a table or desktop. -
Page 49: Vehicle Power Supplies
SECTION 2 GETTING TO KNOW YOUR ARMOR X10GX Page 48 of 234 ARMOR X10gx Tablet Computer A European power cord is available for both types, and a DC power cable is also available for use in a vehicle or other mobile environments. -
Page 50: Docking Stations
SECTION 2 GETTING TO KNOW YOUR ARMOR X10GX Page 49 of 234 ARMOR X10gx Tablet Computer Do c kin g S ta tio n s There are a number of new docking stations available to support and enhance the X10gx, either for the desktop or for use in a vehicle. -
Page 51: Figure 27. X10Gx Rf Dock, Breakout Box And Cable
SECTION 2 GETTING TO KNOW YOUR ARMOR X10GX Page 50 of 234 ARMOR X10gx Tablet Computer ARMOR X10g x Ve h ic le Do c ks Two vehicle docks are available that are specially designed for the X10gx: an RF dock (P/N 9800F26200-0000) and a Non-RF dock (P/N 9800F26200-1000). -
Page 52: Figure 28. X10Gx Vehicle Dock On A Ball Mount Assembly
SECTION 2 GETTING TO KNOW YOUR ARMOR X10GX Page 51 of 234 ARMOR X10gx Tablet Computer Figure 28. X10gx Vehicle Dock on a Ball Mount Assembly OPTIONAL MOUNTING BRACKET P/N 0410F49462-0000 BALL PLATE BALL PLATE HORIZONTAL VERTICAL Figure 29. X10gx Docking Station Attached to Ball Mount Assembly... -
Page 53: Figure 30. Armor Legacy Vehicle Docks
SECTION 2 GETTING TO KNOW YOUR ARMOR X10GX Page 52 of 234 ARMOR X10gx Tablet Computer ARMOR Le g a c y Ve h ic le Do c ks The X10gx can also be used with the Universal, Swivel and Aviation docks ( Figure 30) that were designed for the original ARMOR X10 tablet. -
Page 54: Figure 31. X10Gx Mounted In A Universal Dock With Keyboard Tray And Keyboard
ARMOR X10gx Tablet Computer Figure 31. X10gx Mounted in a Universal Dock with Keyboard Tray and Keyboard For information on these and any other ARMOR X10gx accessories, please contact your ARMOR sales representative or call DRS Tactical Systems toll free at 1-888-872-1100. - Page 55 SECTION 2 GETTING TO KNOW YOUR ARMOR X10GX Page 54 of 234 ARMOR X10gx Tablet Computer This Page Intentionally Left Blank 9711-26020-0001 Rev D Exp o rt Co n tro lle d – S e e P a g e 3...
-
Page 56: X10Gx Specifications
SECTION 2 GETTING TO KNOW YOUR ARMOR X10GX Page 55 of 234 ARMOR X10gx Tablet Computer X10g x S p e c ific a tio n s NOTE: These specifications are subject to change. Please contact DRS Tactical Systems toll free at 1-888-872-1100 for updates of a particular specification. - Page 57 Flexspace™ Flexible I/O for custom circuit cards and modules; space available in the rear flexspace Interface compartment and the right side panel. Refer to the “ARMOR X10gx Flexspace Utilization Guide”, P/N 9711-26020-0100 for detailed information. Power Internal: One or two 11.1 VDC 2400 mAh lithium-ion rechargeable batteries; approximately 4...
- Page 58 SECTION 2 GETTING TO KNOW YOUR ARMOR X10GX Page 57 of 234 ARMOR X10gx Tablet Computer hours operating time with two fully charged batteries; up to 2.5 hours with 1 battery; battery charging time is approximately three hours with two batteries, 1 year warranty External : 12 –...
- Page 59 SECTION 2 GETTING TO KNOW YOUR ARMOR X10GX Page 58 of 234 ARMOR X10gx Tablet Computer SPECIAL TEST – Tablet soaked at +40ºC, 95% RH for a period of at least 4 hours in the OFF condition. The tablet was then booted to the OS. At the completion of system boot, the tablet was removed from the high humidity environment and moved to a -10ºC environment...
-
Page 60: Getting S Tarted
SECTION 3 GETTING STARTED Page 59 of 234 ARMOR X10gx Tablet Computer Table of Contents List of Figures List of Tables Acronyms Glossary 3. GETTING S TARTED The information in this section will help you get your X10gx set up and configured for operation. -
Page 61: Figure 32. Armor X10Gx Battery Compartments
The battery compartments are located on the rear of the unit, as shown in Figure 32. Follow the procedure in Table 2 to install the batteries. BATTERY BATTERY COMPARTMENT COMPARTMENT Figure 32. ARMOR X10gx Battery Compartments 9711-26020-0001 Rev D Exp o rt Co n tro lle d – S e e P a g e 3... -
Page 62: Figure 33. Battery Positioned For Insertion
SECTION 3 GETTING STARTED Page 61 of 234 ARMOR X10gx Tablet Computer Table 2. Installing an X10gx Battery STEP ACTION COMMENTS Locate the latch between the two Battery #2’s latch is the top latch. The battery compartments on the back of... - Page 63 SECTION 3 GETTING STARTED Page 62 of 234 ARMOR X10gx Tablet Computer STEP ACTION COMMENTS Slide the latch up until the button pops out. The battery is now locked in place. If your X10gx has only one battery, go to Step 9.
-
Page 64: Turning On Your X10Gx For The First Time
SECTION 3 GETTING STARTED Page 63 of 234 ARMOR X10gx Tablet Computer Tu rn in g o n yo u r X10g x fo r th e Firs t Tim e Follow the procedure in Table 3 to configure your Windows operating system. -
Page 65: Turning The X10Gx On Normally
Turn the computer on by pressing the Power button for 1-2 seconds and releasing it. The ARMOR X10gx will perform self-checking routines during the start-up process. All units are configured at the factory to automatically boot to the Microsoft Windows desktop unless a custom configuration has been requested. -
Page 66: Putting The Computer Into Sleep Mode
SECTION 3 GETTING STARTED Page 65 of 234 ARMOR X10gx Tablet Computer This procedure should only be used in emergencies because improperly shutting down Windows may result in corruption of the operating system and/or the loss of data. P u ttin g th e Co m p u te r in to S le e p Mo d e To put the computer into Sleep mode (also called “Standby”), press and release the Power... -
Page 67: Indicator State Summary
SECTION 3 GETTING STARTED Page 66 of 234 ARMOR X10gx Tablet Computer In d ic a to r S ta te S u m m a ry Table 4 lists all states for the various X10gx indicators. NOTE: Indications involving battery power are the same for one or two batteries. - Page 68 SECTION 3 GETTING STARTED Page 67 of 234 ARMOR X10gx Tablet Computer IF THE AND THE THIS MEANS: INDICATION POWER EXTERNAL BATTERY MODE IS: POWER IS: (amb/red) On steady Connected Installed Battery is fully amber charged Flashing Connected Installed Battery is charging...
-
Page 69: Configuring And Controlling Your Wireless Radios
SECTION 3 GETTING STARTED Page 68 of 234 ARMOR X10gx Tablet Computer IF THE AND THE THIS MEANS: INDICATION POWER EXTERNAL BATTERY MODE IS: POWER IS: LED # 1 (far Power on Disconnected Installed Battery is below left) blinking 10% charge level at 1 second (depleted). -
Page 70: Configuring Your Audio System
SECTION 3 GETTING STARTED Page 69 of 234 ARMOR X10gx Tablet Computer Co n fig u rin g yo u r Au d io S ys te m Follow the procedure in Table 5 to configure your speakers. Follow the procedure in Table 6 to configure your microphones. -
Page 71: Figure 35. Microphone Main Tab
SECTION 3 GETTING STARTED Page 70 of 234 ARMOR X10gx Tablet Computer Table 6. Configuring your Microphones STEP ACTION COMMENTS Click on the Microphone main tab at The Microphone main tab opens with the the top of the page. Microphone Effects sub-tab displayed, as shown in Figure 35. -
Page 72: Operating The X10Gx Display
SECTION 3 GETTING STARTED Page 71 of 234 ARMOR X10gx Tablet Computer Op e ra tin g th e X10g x Dis p la y S e le c tin g th e Dis p la y Mo d e... -
Page 73: Figure 36. Armorutils Screen Setup
SECTION 3 GETTING STARTED Page 72 of 234 ARMOR X10gx Tablet Computer Figure 36. ARMORutils Screen Setup 9711-26020-0001 Rev D Exp o rt Co n tro lle d – S e e P a g e 3... -
Page 74: Adjusting Screen Brightness
The brightness of the LCD display is controlled by adjusting the backlight intensity either automatically or manually. When you first receive your ARMOR X10gx, the brightness mode is set to Automatic. To switch to Manual brightness control, or switch back to Automatic mode, open ARMORutils and click on the Backlight Setup option in the ARMORutils Main dialog window. - Page 75 SECTION 3 GETTING STARTED Page 74 of 234 ARMOR X10gx Tablet Computer NOTE You must keep the ALS uncovered to allow proper automatic brightness adjustment. S e le c tin g a n Au to m a tic Mo d e P ro file You can tailor the automatic brightness adjustment by selecting one of the 5 pre-configured brightness profiles.
-
Page 76: Working With The Pen Screen
GETTING STARTED Page 75 of 234 ARMOR X10gx Tablet Computer Wo rkin g with th e P e n S c re e n When the pen screen is active, you can steer the cursor and perform many functions by simply hovering close to the screen without actually touching it. - Page 77 SECTION 3 GETTING STARTED Page 76 of 234 ARMOR X10gx Tablet Computer MOUSE OBJECTIVE PEN ACTION Move an object on the desktop. Touch an object and move it with the pen. Start an application or open a folder. Tap twice Open menu options (right-click).
-
Page 78: Working With The Touch Screen
GETTING STARTED Page 77 of 234 ARMOR X10gx Tablet Computer Wo rkin g with th e To u c h S c re e n When the touch screen is active, the pressure of a stylus tip or fingertip against the screen is used to duplicate actions with a two-button mouse. - Page 79 GETTING STARTED Page 78 of 234 ARMOR X10gx Tablet Computer To u c h S c re e n Ad ju s tm e n ts You can change touch attributes related to use of the pen (e.g. touch area and tap speed.).
-
Page 80: Entering Data Using The Input Panel
GETTING STARTED Page 79 of 234 ARMOR X10gx Tablet Computer En te rin g Da ta Us in g th e In p u t P a n e l Ac c e s s in g In p u t P a n e l in Win d o ws 7 The input panel is a virtual keyboard and handwriting entry tool that is located on your desktop. - Page 81 SECTION 3 GETTING STARTED Page 80 of 234 ARMOR X10gx Tablet Computer Ed itin g Do c u m e n ts When you tap on an open text document such as a Word document, a keyboard icon will appear on the screen. Tap on this icon to open the input panel.
-
Page 82: Accessing Input Panel In Windows Xp
SECTION 3 GETTING STARTED Page 81 of 234 ARMOR X10gx Tablet Computer Ac c e s s in g In p u t P a n e l in Win d o ws XP Tap on the Input Panel icon in the task bar to open the Input Panel frame, as illustrated in Figure 40. -
Page 83: Entering Data Using Other Virtual Input Devices
SECTION 3 GETTING STARTED Page 82 of 234 ARMOR X10gx Tablet Computer On -s c re e n Ke yb o a rd Use the on-screen keyboard ( Figure 43) when you don’t want to use ink but you do want to use the pen, or when you’re using a Tablet Computer without an attached keyboard. -
Page 84: Using The Fingerprint Sensor (Fps)
GETTING STARTED Page 83 of 234 ARMOR X10gx Tablet Computer Us in g th e Fin g e rp rin t S e n s o r (FP S ) In s ta llin g th e FP S S o ftwa re To initially set up your FPS software, double-click on the TrueSuite icon on the desktop and click on Get Started to begin. -
Page 85: Truesuite Options And Settings
GETTING STARTED Page 84 of 234 ARMOR X10gx Tablet Computer Tru e S u ite Op tio n s a n d S e ttin g s A complete description of the options and settings of the TrueSuite software is beyond the scope of this user’s guide. -
Page 86: Using The Webcam
SECTION 3 GETTING STARTED Page 85 of 234 ARMOR X10gx Tablet Computer Us in g th e We b c a m Ca p tu rin g Im a g e s a n d Vid e o Image and video capture is performed using the built-in webcam and image capture software. -
Page 87: Scanning A Barcode
SECTION 3 GETTING STARTED Page 86 of 234 ARMOR X10gx Tablet Computer CAPTURE BUTTON Figure 45. Picasa Application Window S c a n n in g a Ba rc o d e The built-in webcam and application software of your choice allow you to scan various types of barcodes and incorporate them in to your documents. -
Page 88: Figure 46. Sample Linear Barcode
SECTION 3 GETTING STARTED Page 87 of 234 ARMOR X10gx Tablet Computer Figure 46. Sample Linear Barcode Table 10. Scan UPC-10, EAN-13 and ISBN Barcodes in Windows 7 STEP ACTION COMMENTS Double-click on the Webcam Barcode The application window opens as shown Scanner icon on the desktop. -
Page 89: Figure 48. Sample 2D Barcode
SECTION 3 GETTING STARTED Page 88 of 234 ARMOR X10gx Tablet Computer 2D Ba rc o d e s in Da ta m a trix o r QR fo rm a t A sample 2D barcode is shown in Figure 48. Follow the procedure in Table 11 to scan a barcode. -
Page 90: Figure 50. A Captured 2D Barcode
SECTION 3 GETTING STARTED Page 89 of 234 ARMOR X10gx Tablet Computer Figure 50. A Captured 2D Barcode 9711-26020-0001 Rev D Exp o rt Co n tro lle d – S e e P a g e 3... -
Page 91: Screen Magnifier
SECTION 3 GETTING STARTED Page 90 of 234 ARMOR X10gx Tablet Computer S c re e n Ma g n ifie r Some text and images on a tablet computer can be so small they are difficult to see clearly. -
Page 92: Tips For Proper Use And Care Of Your X10Gx
Tip s fo r P ro p e r Us e a n d Ca re Of Yo u r X10g x There are certain precautions you should take to ensure that your ARMOR X10gx Tablet Computer continues to provide you with reliable service: •... - Page 93 SECTION 3 GETTING STARTED Page 92 of 234 ARMOR X10gx Tablet Computer This Page Intentionally Left Blank 9711-26020-0001 Rev D Exp o rt Co n tro lle d – S e e P a g e 3...
-
Page 94: Networking
Table of Contents List of Figures List of Tables Acronyms Glossary 4. NETWORKING Your ARMOR X10gx comes configured with two wireless network capabilities: Wi-Fi™ (wireless fidelity) and Bluetooth®. The Wi-Fi network is primarily used for higher bandwidth connections such as Internet or a company LAN. The Bluetooth network is used for connecting wireless devices such as a wireless router, printer or scanner to your computer. -
Page 95: Managing Your Wi-Fi Connections
SECTION 4 NETWORKING Page 94 of 234 ARMOR X10gx Tablet Computer Optional Add-ons and Accessories for Your X10gx. Please contact DRS Technical Support information about installing these options. Your X10gx can be connected to a cabled LAN using the Ethernet connector on the side of the tablet or through the breakout box on a desk or vehicle dock. -
Page 96: Figure 52. Windows Network And Sharing Center
SECTION 4 NETWORKING Page 95 of 234 ARMOR X10gx Tablet Computer STEP ACTION COMMENTS For more detailed information on the options settings these windows, click on the Help icon Figure 52. Windows Network and Sharing Center 9711-26020-0001 Rev D Exp o rt Co n tro lle d – S e e P a g e 3... -
Page 97: Managing Your Bluetooth Connections
SECTION 4 NETWORKING Page 96 of 234 ARMOR X10gx Tablet Computer Figure 53. Currently Connected and Available Wi-Fi Networks Ma n a g in g yo u r Blu e to o th Co n n e c tio n s Your X10gx comes equipped with Bluetooth®... -
Page 98: Figure 54. Devices And Printers Window
SECTION 4 NETWORKING Page 97 of 234 ARMOR X10gx Tablet Computer STEP ACTION COMMENTS To add a device, click on the “Add a device” option in the toolbar. To remove a device, click on the “Remove a device” option in the toolbar. -
Page 99: Figure 55. Bluetooth Settings Window
SECTION 4 NETWORKING Page 98 of 234 ARMOR X10gx Tablet Computer Figure 55. Bluetooth Settings Window 9711-26020-0001 Rev D Exp o rt Co n tro lle d – S e e P a g e 3... -
Page 100: Managing Your Ethernet Connection
NETWORKING Page 99 of 234 ARMOR X10gx Tablet Computer Ma n a g in g yo u r Eth e rn e t Co n n e c tio n Your X10gx supports a cabled 10/100/1000 Ethernet connection through the RJ45 connector on the left side of the tablet or a 10/100 Ethernet connection through a desk dock or a vehicle dock breakout box. -
Page 101: Figure 56. Internet Service Provider Information Window
SECTION 4 NETWORKING Page 100 of 234 ARMOR X10gx Tablet Computer Click on the Broadband connection An information dialog window will open option. with entry fields for your service provider, as shown in Figure 56. Enter your user name and password in the fields provided. -
Page 102: Activating The Optional Gobi® Wwan Radio
OneClick Internet application and before you log in. However, when you first receive your ARMOR X10gx, NDIS is not automatically available and must be manually configured in order to use it. -
Page 103: Important Notes About Using Ndis
SECTION 4 NETWORKING Page 102 of 234 ARMOR X10gx Tablet Computer CAUTION! Before uninstalling the OneClickInternet application with NDIS enabled, make sure that the “Gobi NDIS Auto Connect” option is unchecked in the Settings/General tab. Otherwise module will always connect automatically on the next start up. -
Page 104: Activating The Optional Gps Receiver
NETWORKING Page 103 of 234 ARMOR X10gx Tablet Computer Ac tiva tin g th e Op tio n a l GP S Re c e ive r The u-blox ® u-center™ GPS control application is bundled with your X10gx software suite. -
Page 105: The U-Center Gps Application Window
NETWORKING Page 104 of 234 ARMOR X10gx Tablet Computer Th e u -c e n te r GP S Ap p lic a tio n Win d o w The diagram in the center shows the approximate positions of satellites relative to your location that are within range of the receiver. -
Page 106: Table 17. Obtaining The Agps Password From U-Blox
Ac tiva tin g As s is te d GP S AGPS is free with your purchase of your ARMOR X10gx but you must obtain the necessary AGPS password from u-blox by following the procedure in Table 17. -
Page 107: Enabling And Disabling Your Wireless Radios
SECTION 4 NETWORKING Page 106 of 234 ARMOR X10gx Tablet Computer ENTER YOUR ENTER YOUR EMAIL ADDRESS AGPS PASSWORD HERE HERE Figure 59. u-center AssistNow Online Window En a b lin g a n d Dis a b lin g Yo u r Wire le s s Ra d io s You may wish to turn off one or more of your radios to save power, to avoid interfering with other radio systems, or just to ensure your privacy. -
Page 108: Wireless Signal Quality
SECTION 4 NETWORKING Page 107 of 234 ARMOR X10gx Tablet Computer Table 18. Enabling and Disabling Your Wireless Radios Step Action Comment Click on the ARMORutils icon on the This will open the Wireless Setup dialog desktop and select the Wireless Setup window, as shown in Figure 64. -
Page 109: Using Your Radios With An Rf Vehicle Dock
NETWORKING Page 108 of 234 ARMOR X10gx Tablet Computer Us in g yo u r Ra d io s with a n RF Ve h ic le Do c k If you have the X10gx RF vehicle dock (DRS P/N 9800F26200-0000) and the optional GPS receiver and/or WWAN radios, you can switch to externally mounted vehicle antennas for improved operation. -
Page 110: Using An Armor Legacy Dock
SECTION 4 NETWORKING Page 109 of 234 ARMOR X10gx Tablet Computer Figure 60. ARMORutils Wireless Setup Dialog Us in g a n ARMOR Le g a c y Do c k There are also a number of legacy vehicle docks that can be used with the X10gx (see... - Page 111 SECTION 4 NETWORKING Page 110 of 234 ARMOR X10gx Tablet Computer This Page Intentionally Left Blank 9711-26020-0001 Rev D Exp o rt Co n tro lle d – S e e P a g e 3...
-
Page 112: Your Armor X10Gx S Oftware
Table of Contents List of Figures List of Tables Acronyms Glossary 5. YOUR ARMOR X10GX S OFTWARE Your ARMOR X10gx comes with a variety of software applications. Many of these are standard with your particular operating system, some are necessary to configure and operate your system, some are required for specific devices or functions and some are complementary applications provided by DRS to enhance your X10gx experience. -
Page 113: Opening Armorutils
SECTION 5 YOUR ARMOR X10GX SOFTWARE Page 112 of 234 ARMOR X10gx Tablet Computer SYSTRAY OVERFLOW MENU ARMORUTILS EXIT OPTION SYSTRAY MENU UP ARROW SYSTRAY Figure 61. Systray with Overflow Menu Displayed Op e n in g ARMORu tils To open the ARMORutils Main dialog window (Figure 62), right-click on the ARMORutils icon in the systray and select Restore (NOTE: If the icon is not visible in the systray, click on the “up”... -
Page 114: Armorutils Main Window
SECTION 5 YOUR ARMOR X10GX SOFTWARE Page 113 of 234 ARMOR X10gx Tablet Computer ARMORu tils Ma in Win d ow The ARMORutils main window is shown in Figure 62. Eight options provide access to dialog or information windows. Click on an option to access one of these windows. Those options that are not available will be grayed out. -
Page 115: Backlight Setup Dialog
SECTION 5 YOUR ARMOR X10GX SOFTWARE Page 114 of 234 ARMOR X10gx Tablet Computer Ba c klig h t S e tu p Dia lo g The Backlight Setup dialog window allows you to adjust the screen brightness manually or automatically and to select from a series of preset profiles to automatically restrict the brightness range under specific lighting conditions. - Page 116 SECTION 5 YOUR ARMOR X10GX SOFTWARE Page 115 of 234 ARMOR X10gx Tablet Computer Au to m a tic Brig h tn e s s Mo d e P ro file s Everyone’s eyes react differently to changes in light levels and there may be times when the full range of automatic brightness adjustment is uncomfortable for you.
-
Page 117: Wireless Setup Dialog
Wire le s s S e tu p Dia lo g The Wireless Setup dialog allows you to enable or disable all of the installed wireless devices in your ARMOR X10gx. It also provides controls for external antennas connected through an X10gx vehicle dock. - Page 118 There is an ON and Off button for each radio that is installed or supported. When you first start your ARMOR X10gx, all installed radios are ON or enabled (default condition). Each radio can then be disabled by pressing its OFF button and re-enabled by pressing its ON button.
-
Page 119: Buttons Setup Dialog
SECTION 5 YOUR ARMOR X10GX SOFTWARE Page 118 of 234 ARMOR X10gx Tablet Computer Bu tto n s S e tu p Dia lo g The Buttons Setup dialog window is shown in Figure 65. It allows you to assign two different functions for each programmable button (PB) labeled P1, P2 and P3. -
Page 120: Figure 66. Armorutils Programmable Button Options Menu
SECTION 5 YOUR ARMOR X10GX SOFTWARE Page 119 of 234 ARMOR X10gx Tablet Computer S e le c tin g a Fu n c tio n Click on the menu arrow next to the PB or PB combo and select the desired function, then click on the OK button to save your setting. - Page 121 SECTION 5 YOUR ARMOR X10GX SOFTWARE Page 120 of 234 ARMOR X10gx Tablet Computer • Volume Increase – Increases sound volume in steps. • Volume Decrease – Decreases sound volume in steps. • Volume Mute – Toggles volume ON or OFF.
-
Page 122: Configuration Dialog
SECTION 5 YOUR ARMOR X10GX SOFTWARE Page 121 of 234 ARMOR X10gx Tablet Computer Co n fig u ra tio n Dia lo g The Configuration Dialog window provides visual confirmation of those wireless radios that are installed in your X10gx. If a radio is installed and available, the associated icon and status will appear in dark contrast. -
Page 123: Figure 68. User Access Settings Dialog
SECTION 5 YOUR ARMOR X10GX SOFTWARE Page 122 of 234 ARMOR X10gx Tablet Computer Ad m in is tra tio n Bu tto n The Administration button is normally hidden from view. To see this button, hold down the Fn key on the right control panel and click on the Configuration option on the ARMORutils Main Menu. -
Page 124: Figure 69. Example Of The Armorutils Main Screen With Options Disabled
SECTION 5 YOUR ARMOR X10GX SOFTWARE Page 123 of 234 ARMOR X10gx Tablet Computer Figure 69. Example of the ARMORutils Main Screen with Options Disabled 9711-26020-0001 Rev D Exp o rt Co n tro lle d – S e e P a g e 3... -
Page 125: Battery Monitor Dialog
SECTION 5 YOUR ARMOR X10GX SOFTWARE Page 124 of 234 ARMOR X10gx Tablet Computer Ba tte ry Mo n ito r Dia lo g The Battery Monitor dialog window is shown in Figure 70. This window provides the following information about each battery: •... -
Page 126: Figure 71. Armorutils Battery Information Window
SECTION 5 YOUR ARMOR X10GX SOFTWARE Page 125 of 234 ARMOR X10gx Tablet Computer Ba tte ry 1 a n d Ba tte ry 2 De ta ils Bu tto n s Select a Battery Details button to open a Battery Information window. Figure 71 shows a typical window for the #1 battery. -
Page 127: Figure 72. Armorutils Charger Control Settings Window
SECTION 5 YOUR ARMOR X10GX SOFTWARE Page 126 of 234 ARMOR X10gx Tablet Computer Remaining Capacity – This is the current energy level expressed in mAh instead of % of charge. Maximum Capacity – This is the current maximum energy capacity that the battery can achieve. - Page 128 SECTION 5 YOUR ARMOR X10GX SOFTWARE Page 127 of 234 ARMOR X10gx Tablet Computer Ch a rg e Lowe s t Firs t If you choose Charge Lowest First, the battery with the lowest charge will be charged to 80%, followed by the next lowest battery. Once both are at 80%, the first charged battery will be charged to 100%, followed by the second charged battery.
-
Page 129: Figure 73. Battery Conditioning Window
SECTION 5 YOUR ARMOR X10GX SOFTWARE Page 128 of 234 ARMOR X10gx Tablet Computer Figure 73. Battery Conditioning Window S ta rt Cyc le Bu tto n Click on the START CYCLE button to begin the conditioning process. Te rm in a te Cyc le Bu tto n Click on the TERMINATE CYCLE button at any time to stop the conditioning process. -
Page 130: Screen Setup Dialog
SECTION 5 YOUR ARMOR X10GX SOFTWARE Page 129 of 234 ARMOR X10gx Tablet Computer S c re e n S e tu p Dia lo g NOTE If you have a pen screen only display, this dialog will not be accessible from the ARMORutils Main window. -
Page 131: Figure 75. Screen Setup Dialog With Touch Screen Only Enabled
SECTION 5 YOUR ARMOR X10GX SOFTWARE Page 130 of 234 ARMOR X10gx Tablet Computer The Touch Only option is grayed out because it is the mode that is enabled and is not available for selection. The Dual Mode and Pen Only options are contrasted, indicating that these two modes are available. -
Page 132: Diagnostics Dialog
SECTION 5 YOUR ARMOR X10GX SOFTWARE Page 131 of 234 ARMOR X10gx Tablet Computer Dia g n o s tic s Dia lo g The Diagnostics window displays the following internal temperatures of the X10gx tablet, as shown in the example in Figure 76: •... -
Page 133: Figure 77. Armorutils Event Recorder Window
SECTION 5 YOUR ARMOR X10GX SOFTWARE Page 132 of 234 ARMOR X10gx Tablet Computer TIME REMAINING APPEARS HERE Figure 77. ARMORUtils Event Recorder Window Lo g File n a m e The filename that appears in the Log Filename field when you first open the Event Recorder window is the default log file in the ARMORutils application folder. - Page 134 SECTION 5 YOUR ARMOR X10GX SOFTWARE Page 133 of 234 ARMOR X10gx Tablet Computer considerably by checking the Record only when data changes option. With this option selected, the recorder will only enter a line of data when any data point changes.
-
Page 135: Figure 78. Sample Event Log File
SECTION 5 YOUR ARMOR X10GX SOFTWARE Page 134 of 234 ARMOR X10gx Tablet Computer DEFINITIONS Figure 78. Sample Event Log File 9711-26020-0001 Rev D Exp o rt Co n tro lle d – S e e P a g e 3... -
Page 136: Armorutils About Window
SECTION 5 YOUR ARMOR X10GX SOFTWARE Page 135 of 234 ARMOR X10gx Tablet Computer ARMORu tils Ab o u t Win d o w The About window (Figure 79) displays the current version and release date of the ArmorUtils software. -
Page 137: Getting Started With Windows 7
SECTION 5 YOUR ARMOR X10GX SOFTWARE Page 136 of 234 ARMOR X10gx Tablet Computer Ge ttin g S ta rte d with Win d ows 7 Click on Start à Getting Started to open the Windows welcome page (Figure 80) and access a number of helpful links and resources. -
Page 138: Windows Display Utilities
SECTION 5 YOUR ARMOR X10GX SOFTWARE Page 137 of 234 ARMOR X10gx Tablet Computer Win d ows Dis p la y Utilitie s The following paragraphs provide a brief description of key Windows display utilities to help you configure and begin using your X10gx. A detailed description of all of the functions and capabilities of these and other Windows utilities is beyond the scope of this manual. - Page 139 SECTION 5 YOUR ARMOR X10GX SOFTWARE Page 138 of 234 ARMOR X10gx Tablet Computer P e n Op tio n s Ta b The Pen Options tab opens by default and provides settings that are applicable to the pen screen only.
-
Page 140: Figure 82. Pen And Touch Utility – Flicks Tab
SECTION 5 YOUR ARMOR X10GX SOFTWARE Page 139 of 234 ARMOR X10gx Tablet Computer Figure 82. Pen and Touch Utility – Flicks Tab Ha n dwritin g Ta b The Handwriting tab provides settings that are applicable to both the pen and touch screens. -
Page 141: Figure 84. Pen And Touch Utility – Touch Tab
SECTION 5 YOUR ARMOR X10GX SOFTWARE Page 140 of 234 ARMOR X10gx Tablet Computer To u c h Ta b The Touch tab provides settings that are applicable to the touch screen only. The options on this tab affect how the pen, or your finger, interacts with the touch screen. -
Page 142: Figure 85. Touch Tab Virtual Mouse Pointer
SECTION 5 YOUR ARMOR X10GX SOFTWARE Page 141 of 234 ARMOR X10gx Tablet Computer To u c h Ac tio n s Highlight a touch action and click on the Settings button to open an adjustment window. To u c h P o in te r Select this option to place a cursor at the touch point. -
Page 143: Tablet Pc Settings Utility
SECTION 5 YOUR ARMOR X10GX SOFTWARE Page 142 of 234 ARMOR X10gx Tablet Computer Ta b le t P C S e ttin g s Utility If you have a second display with a touch or pen screen, you can use this tab to calibrate or change the screen orientation. -
Page 144: Figure 86. Tablet Pc Settings – Display Tab
SECTION 5 YOUR ARMOR X10GX SOFTWARE Page 143 of 234 ARMOR X10gx Tablet Computer Figure 86. Tablet PC Settings – Display Tab 9711-26020-0001 Rev D Exp o rt Co n tro lle d – S e e P a g e 3... -
Page 145: Figure 87. Tablet Pc Settings Utility – Other Tab
SECTION 5 YOUR ARMOR X10GX SOFTWARE Page 144 of 234 ARMOR X10gx Tablet Computer Oth e r Ta b This tab allows you to change where an on-screen menu appear when you activate the pen or touch displays so that your hand does not block your view of the menu. For example, if you are left-handed, check the Left-handed option to have the menus appear to the right of the cursor. -
Page 146: Pen Tablet Properties Utility
Figure 88 (in Windows 7 Pro, click on the ISD Tablet Properties icon). Figure 88. WACOM Pen Tablet Properties Window – Pen Tab NOTE The pen that comes with your ARMOR X10gx has only one side button and no eraser (see Your X10gx Pen). -
Page 147: Figure 89. Settings And Options Supported By The Armor X10Gx Active Pen
89 and Figure 90 for illustration purposes only. They are not grayed out on the actual application screen image. Figure 89. Settings and Options Supported by the ARMOR X10gx Active Pen Clic k S o u n d Check the Click Sound option to enable a clicking sound when you perform an action with the pen. -
Page 148: Figure 90. Side Button Menu Options
SECTION 5 YOUR ARMOR X10GX SOFTWARE Page 147 of 234 ARMOR X10gx Tablet Computer S id e Bu tto n Me n u Op tio n s The side button can be set to perform different functions that are selected from the pull down menu shown in Figure 90. -
Page 149: Figure 91. Pen Tablet Properties - Advanced Settings Window
SECTION 5 YOUR ARMOR X10GX SOFTWARE Page 148 of 234 ARMOR X10gx Tablet Computer Ad va n c e d Bu tto n Click on the Advanced button to open the Advanced Settings window, as shown in Figure 91. The two options in this window allow you to set the way the side switch will be used to perform a right click action. -
Page 150: Figure 92. Pen Tablet Properties – Pop-Up Menu Tab
SECTION 5 YOUR ARMOR X10GX SOFTWARE Page 149 of 234 ARMOR X10gx Tablet Computer P o p -u p Me n u Ta b The Pop-up Menu tab is shown in Figure 92. This tab allows you to add additional functionality to the side button. -
Page 151: Figure 93. Pop-Up Menu Add Options
SECTION 5 YOUR ARMOR X10GX SOFTWARE Page 150 of 234 ARMOR X10gx Tablet Computer Click on the down arrow in the Add field to open a list of available functions then select and configure the desired function. Those functions that are selected will appear in the Pop-up Items panel to the right of the Add field. -
Page 152: Figure 94. Pen Tablet Properties Window – Calibrate Tab
SECTION 5 YOUR ARMOR X10GX SOFTWARE Page 151 of 234 ARMOR X10gx Tablet Computer Ca lib ra te Ta b The Calibrate tab is shown in Figure 94. Click on the Calibrate button to access the screen calibration routine. Follow the on-screen instructions. -
Page 153: Tablet And Pen Settings Utility (Windows Xp Only)
SECTION 5 YOUR ARMOR X10GX SOFTWARE Page 152 of 234 ARMOR X10gx Tablet Computer Ta b le t a n d P e n S e ttin g s Utility (Win d o ws XP On ly) Windows XP Tablet lets you customize the tablet and the pen settings to suit the way you work with an active pen. -
Page 154: Figure 96. Tablet And Pen Settings Window – Display Tab
SECTION 5 YOUR ARMOR X10GX SOFTWARE Page 153 of 234 ARMOR X10gx Tablet Computer Dis p la y Ta b The Display tab is shown in Figure 96. With this tab, you can preset the primary and secondary screen orientations. -
Page 155: Figure 97. Tablet And Pen Settings Panel – Pen Options Tab
SECTION 5 YOUR ARMOR X10GX SOFTWARE Page 154 of 234 ARMOR X10gx Tablet Computer P e n Op tio n s Ta b The Pen Options tab is shown in Figure 97. Use this tab to adjust pen settings such as double- click, right-click, hover, and launch Input Panel. -
Page 156: Touch Settings Utility (Windows Xp Only)
SECTION 5 YOUR ARMOR X10GX SOFTWARE Page 155 of 234 ARMOR X10gx Tablet Computer To u c h S e ttin g s Utility (Win d o ws XP On ly) The Touch Settings window is shown in Figure 98. This window provides options to enable or disable the touch screen, hide the cursor, enable a touch sound and access the screen calibration routine. -
Page 157: Truesuite™ Fingerprint Recognition Software
SECTION 5 YOUR ARMOR X10GX SOFTWARE Page 156 of 234 ARMOR X10gx Tablet Computer Tru e S u ite ™ Fin g e rp rin t Re c o g n itio n S o ftwa re Your X10gx comes pre-loaded with the AuthenTec® TrueSuite™ Premium fingerprint recognition software. -
Page 158: Realtek® Hd Audio Manager Application
SECTION 5 YOUR ARMOR X10GX SOFTWARE Page 157 of 234 ARMOR X10gx Tablet Computer Re a lte k® HD Au d io Ma n a g e r Ap p lic a tio n This application allows you to configure your speakers, adjust headset audio and microphone levels and Configuring your Audio System create sound effects. -
Page 159: Picasa 3® Image Capture
SECTION 5 YOUR ARMOR X10GX SOFTWARE Page 158 of 234 ARMOR X10gx Tablet Computer P ic a s a 3® Im a g e Ca p tu re Picasa 3 is an image capture program that allows you to use the webcam for taking still pictures and movies and for capturing barcodes. -
Page 160: Virtual Magnifying Glass
SECTION 5 YOUR ARMOR X10GX SOFTWARE Page 159 of 234 ARMOR X10gx Tablet Computer Virtu a l Ma g n ifyin g Gla s s ™ This handy utility allows you to magnify portions of the screen that are too small to see clearly. It projects a virtual magnifying glass over a portion of the screen, as shown in Figure 102. - Page 161 SECTION 5 YOUR ARMOR X10GX SOFTWARE Page 160 of 234 ARMOR X10gx Tablet Computer This Page Intentionally Left Blank 9711-26020-0001 Rev D Exp o rt Co n tro lle d – S e e P a g e 3...
-
Page 162: Troubles Hooting
Any other failure will require the tablet be returned to DRS Tactical Systems. For each problem that occurs with your ARMOR X10gx computer, there are specific steps that will isolate the problem to a failed component or to a configuration option that may be set incorrectly. - Page 163 SECTION 6 TROUBLESHOOTING Page 162 of 234 ARMOR X10gx Tablet Computer PROBLEM SYMPTOM ACTION FLOW AREA CHART Display Backlight goes on and 1. Default the BIOS. off. 2. If not fixed, flash H8. 3. If not fixed, send tablet in for repair.
- Page 164 SECTION 6 TROUBLESHOOTING Page 163 of 234 ARMOR X10gx Tablet Computer PROBLEM SYMPTOM ACTION FLOW AREA CHART Power Charging/Fault LED The red LED will turn off when the System or (indicator panel) is on fault condition is removed. Battery steady red.
-
Page 165: Troubleshooting Flowcharts
SECTION 6 TROUBLESHOOTING Page 164 of 234 ARMOR X10gx Tablet Computer Tro u b le s h o o tin g Flowc h a rts TS 01 Ta b le t will n o t P owe r Up 1. Remove both... -
Page 166: Ts02 Tablet Will Not Start Boot Process
SECTION 6 TROUBLESHOOTING Page 165 of 234 ARMOR X10gx Tablet Computer TS 02 Ta b le t Will No t S ta rt Bo o t P ro c e s s Undock tablet Is tablet Did tablet Send tablet... -
Page 167: Ts03 Tablet Will Not Boot Into Windows
SECTION 6 TROUBLESHOOTING Page 166 of 234 ARMOR X10gx Tablet Computer TS 03 Ta b le t Will No t Bo o t in to Win d o ws Does boot Verify correct process halt at Does tablet Start boot device in... -
Page 168: Ts -04 Ta B Le T Will N O T Re C O G N Ize A B A Tte Ry
SECTION 6 TROUBLESHOOTING Page 167 of 234 ARMOR X10gx Tablet Computer TS -04 Ta b le t will n o t re c o g n ize a b a tte ry Recharge/ Does tablet replace the Start recognize battery. -
Page 169: Ts -05 Ta B Le T Is Lo C Ke D U P
SECTION 6 TROUBLESHOOTING Page 168 of 234 ARMOR X10gx Tablet Computer TS -05 Ta b le t is lo c ke d u p 1. Shut down tablet. 2. Disconnect external power. 3. Remove both batteries and Does tablet allow tablet to sit un-... -
Page 170: Ts -06 Ca N N O T C O N N E C T To Wire Le S S N E Two Rk
SECTION 6 TROUBLESHOOTING Page 169 of 234 ARMOR X10gx Tablet Computer TS -06 Ca n n o t c o n n e c t to wire le s s n e two rk Shut down and Does tablet Start... - Page 171 SECTION 6 TROUBLESHOOTING Page 170 of 234 ARMOR X10gx Tablet Computer This Page Intentionally Left Blank 9711-26020-0001 Rev D Exp o rt Co n tro lle d – S e e P a g e 3...
-
Page 172: Maintaining Your Armor X10Gx
ARMOR X10gx Tablet Computer Table of Contents List of Figures List of Tables Acronyms Glossary 7. MAINTAINING YOUR ARMOR X10GX Re p la c in g th e S o lid -S ta te Drive (S S D) The SSD is located in the Flexspace compartment in the back of the tablet (see Figure 4). -
Page 173: Figure 103. Ssd Location
SECTION 7 MAINTAINING YOUR ARMOR X10GX Page 172 of 234 ARMOR X10gx Tablet Computer Figure 103. SSD Location 9711-26020-0001 Rev D Exp o rt Co n tro lle d – S e e P a g e 3... -
Page 174: Removing And Replacing The Batteries
SECTION 7 MAINTAINING YOUR ARMOR X10GX Page 173 of 234 ARMOR X10gx Tablet Computer Re m o vin g a n d Re p la c in g th e Ba tte rie s CAUTION! Only one battery at a time can be removed and replaced during operation without causing a sudden system shutdown. -
Page 175: Figure 104. Battery Positioned For Insertion
SECTION 7 MAINTAINING YOUR ARMOR X10GX Page 174 of 234 ARMOR X10gx Tablet Computer BATTERY #1 LATCH Figure 104. Battery Positioned for Insertion STEP ACTION COMMENTS Slide the latch up until the button pops out. The battery is now locked in place. -
Page 176: Installing A Sim Card
SECTION 7 MAINTAINING YOUR ARMOR X10GX Page 175 of 234 ARMOR X10gx Tablet Computer In s ta llin g a S IM Ca rd Follow the procedure in Table 23 to install your SIM card. CAUTION! Circuit boards containing electrostatic discharge (ESD) sensitive devices are exposed in this compartment. -
Page 177: Figure 105. Hard Drive Compartment
SECTION 7 MAINTAINING YOUR ARMOR X10GX Page 176 of 234 ARMOR X10gx Tablet Computer HARD SIM CARD DRIVE SOCKET Figure 105. Hard Drive Compartment STEP ACTION Place a fingertip in the notch on the left side of the cover and slide the cover to... -
Page 178: Removing And Replacing A Memory Module
SECTION 7 MAINTAINING YOUR ARMOR X10GX Page 177 of 234 ARMOR X10gx Tablet Computer Reinstall the batteries and reconnect external power if desired. Re m o vin g a n d Re p la c in g a Me m o ry Mo d u le Two 2GB memory modules are located in a sealed compartment at the lower left rear corner of the tablet, as indicated in Figure 4. -
Page 179: Figure 106. Memory Module Compartment
SECTION 7 MAINTAINING YOUR ARMOR X10GX Page 178 of 234 ARMOR X10gx Tablet Computer STEP ACTION condition or indication Spread the two spring clips securing the The module will swing up to a 45° angle, top module and lift at the outer edge, as... -
Page 180: Figure 107. Memory Module Ready For Removal
SECTION 7 MAINTAINING YOUR ARMOR X10GX Page 179 of 234 ARMOR X10gx Tablet Computer Figure 107. Memory Module Ready for Removal 9711-26020-0001 Rev D Exp o rt Co n tro lle d – S e e P a g e 3... -
Page 181: Changing The Bios Settings
SECTION 7 MAINTAINING YOUR ARMOR X10GX Page 180 of 234 ARMOR X10gx Tablet Computer Ch a n g in g th e BIOS S e ttin g s Follow the procedure in Table 25 to access the BIOS setup utility and verify settings or make changes. -
Page 182: Table 26. Record Bios Changes Here
SECTION 7 MAINTAINING YOUR ARMOR X10GX Page 181 of 234 ARMOR X10gx Tablet Computer Click again on the bracketed setting to change that option’s setting. Click repeatedly to cycle through a list of available settings. Select the Exit Submenu tab at the top of the screen. -
Page 183: Returning The Bios To Its Default Settings
SECTION 7 MAINTAINING YOUR ARMOR X10GX Page 182 of 234 ARMOR X10gx Tablet Computer Re tu rn in g th e BIOS to its De fa u lt S e ttin g s When your X10gx was shipped to you, the BIOS settings were set to a “default” state for your particular configuration. -
Page 184: Table 28. Setting The Dock Power Switch For Legacy Operation
SECTION 7 MAINTAINING YOUR ARMOR X10GX Page 183 of 234 ARMOR X10gx Tablet Computer CAUTION! With the Dock Power Sw set to “Always On”, there is a slight risk of accidentally causing an arc since the exposed power pins on the docking connector will be ‘live’... -
Page 185: Changing The Power Button Default Action
SECTION 7 MAINTAINING YOUR ARMOR X10GX Page 184 of 234 ARMOR X10gx Tablet Computer Ch a n g in g th e P owe r Bu tto n De fa u lt Ac tio n Follow the procedure in Table 29 to change the default action of the Power button. -
Page 186: Figure 108. Power Button Settings Options
SECTION 7 MAINTAINING YOUR ARMOR X10GX Page 185 of 234 ARMOR X10gx Tablet Computer Figure 108. Power Button Settings Options 9711-26020-0001 Rev D Exp o rt Co n tro lle d – S e e P a g e 3... -
Page 187: Creating An Event Log
SECTION 7 MAINTAINING YOUR ARMOR X10GX Page 186 of 234 ARMOR X10gx Tablet Computer Cre a tin g a n Eve n t Lo g If you are experiencing problems and suspect that they are temperature or battery related, you can create a log of the internal temperature and battery status of the X10gx over time using the Event Recorder function in the ARMORutils Diagnostics window. -
Page 188: Figure 109. Diagnostics Event Recorder Window
SECTION 7 MAINTAINING YOUR ARMOR X10GX Page 187 of 234 ARMOR X10gx Tablet Computer Figure 109. Diagnostics Event Recorder Window 9711-26020-0001 Rev D Exp o rt Co n tro lle d – S e e P a g e 3... -
Page 189: Caring For The Display Screen
SECTION 7 MAINTAINING YOUR ARMOR X10GX Page 188 of 234 ARMOR X10gx Tablet Computer Ca rin g Fo r th e Dis p la y S c re e n The following tips will help you keep your display clean and healthy: CAUTION! Use only canned compressed air to clean your screen. -
Page 190: Dis P Lay Management
SECTION 8 DISPLAY MANAGEMENT Page 189 of 234 ARMOR X10gx Tablet Computer Table of Contents List of Figures List of Tables Acronyms Glossary 8. DIS P LAY MANAGEMENT Ad ju s tin g th e Brig h tn e s s The brightness of an LCD display is controlled by adjusting the backlight intensity level. - Page 191 SECTION 8 DISPLAY MANAGEMENT Page 190 of 234 ARMOR X10gx Tablet Computer Figure 110. ARMORutils Backlight Setup Dialog Press the UP or DOWN buttons repeatedly or use the pen or a fingertip to move the slider and adjust the backlight level. The % brightness is displayed in a field on the right. You can also use up and down arrows next to this field to adjust the slider.
-
Page 192: Calibrating The Display
SECTION 8 DISPLAY MANAGEMENT Page 191 of 234 ARMOR X10gx Tablet Computer Ca lib ra tin g th e Dis p la y To access both touch screen and pen screen calibration routines, open ARMORutils and click on the Screen Setup option. If the display is set to Dual mode, both calibration options will be available (contrasted). -
Page 193: Rotating The Screen
Ro ta tin g th e S c re e n The ARMOR X10gx supports the Windows function of rotating the screen between Landscape and Portrait layout mode. In landscape mode (default orientation), the long axis of the screen is along the top and bottom of the display. -
Page 194: Using The Intel Graphics And Media Control Panel
DISPLAY MANAGEMENT Page 193 of 234 ARMOR X10gx Tablet Computer Us in g th e In te l Gra p h ic s a n d Me d ia Co n tro l P a n e l Right-click anywhere on the desktop or click on the Intel Graphics icon... -
Page 195: Using A Keyboard "Hot Key" Combination
DISPLAY MANAGEMENT Page 194 of 234 ARMOR X10gx Tablet Computer Us in g a Ke yb o a rd “Ho t Ke y” Co m b in a tio n Open the Intel Graphics and Media Control Panel and select Options and Support à Hot Key Manager. -
Page 196: Battery Management
ARMOR X10gx Tablet Computer 9. BATTERY MANAGEMENT The Lithium Ion batteries used in your ARMOR X10gx computer offer the best technology available today. These ‘Smart Batteries’ provide ARMOR X10gx users with the greatest power density and the most accurate “fuel gauge” possible. To achieve the best possible performance from your batteries, we recommend using and maintaining the batteries in accordance with the instructions provided in this section. - Page 197 SECTION 9 BATTERY MANAGEMENT Page 196 of 234 ARMOR X10gx Tablet Computer SECTION 8 ARMOR X10gx Tablet Computer Please use the following safety rules when handling and using lithium-Ion batteries. • Do not expose the batteries to very high temperatures such as an open flame.
-
Page 198: When To Charge A Battery
Cu rre n tly In s ta lle d Ba tte rie s Your ARMOR X10gx will alert you when your batteries need charging. When the remaining charge drops below 10%, an alert message like the one shown in Figure 114 will pop up on the desktop. -
Page 199: Fully Depleted And Overly Discharged Batteries
SECTION 9 BATTERY MANAGEMENT Page 198 of 234 ARMOR X10gx Tablet Computer SECTION 8 De p le te d Ba tte rie s Le ft in th e Co m p u te r ARMOR X10gx Tablet Computer Lithium ion batteries left in a computer with the power off will discharge at approximately 4% over a 24 hour period. -
Page 200: What To Do For An Overly Discharged Battery
SECTION 9 BATTERY MANAGEMENT Page 199 of 234 ARMOR X10gx Tablet Computer SECTION 8 Wh a t to Do fo r a n Ove rly Dis c h a rg e d Ba tte ry ARMOR X10gx Tablet Computer The X10gx has an internal Level 2 smart battery charger. One of the features of this charger is that it will attempt to recover a battery that has been too deeply discharged (<3%). -
Page 201: How To Charge Your Batteries
To recharge the batteries, plug the circular connector of the AC adapter into the DC power input jack on the left side of the ARMOR X10gx, or into the PWR connector on a desk dock unit. If your X10gx is installed in a vehicle dock, the batteries will charge whenever vehicle battery power is available. -
Page 202: Table 32. Select How To Charge The Batteries
SECTION 9 BATTERY MANAGEMENT Page 201 of 234 ARMOR X10gx Tablet Computer SECTION 8 Table 32. Select How to Charge the Batteries ARMOR X10gx Tablet Computer STEP ACTION COMMENTS Double-click on the ARMORutils icon on The Battery Monitor dialog page the desktop and select the Battery opens. -
Page 203: How To Tell When Batteries Have Finished Charging
Ba tte ry Op e ra tin g Tim e Your ARMOR X10gx can operate on one or two batteries and can operate with a single battery installed in either bay. The length of time your X10gx can operate on batteries alone before needing a recharge is primarily determined by the following: •... -
Page 204: Operating Under Low Battery Conditions
Low Ba tte ry Le ve l Ala rm Your ARMOR X10gx is designed to operate even when the battery is depleted (<10% charge). When the total charge drops below 10% (low battery level), the bottom-most LED in the fuel gauge (20% indicator) will flash and a low battery alert message will be displayed, as shown in Figure 114. -
Page 205: Critical Battery Level Alarm
SECTION 9 BATTERY MANAGEMENT Page 204 of 234 ARMOR X10gx Tablet Computer SECTION 8 ARMOR X10gx Tablet Computer Figure 115. Reserved Battery Alert message Critic a l Ba tte ry Le ve l Ala rm When the remaining charge reaches 5% (critical battery level), Windows will automatically place your computer into hibernate mode. -
Page 206: Avoiding Overly Discharging Your Batteries
SECTION 9 BATTERY MANAGEMENT Page 205 of 234 ARMOR X10gx Tablet Computer SECTION 8 What to Do for an Overly Discharged Battery). However, if the battery continues to discharge, the internal battery circuits may permanently disable the battery for safety reasons and you will ARMOR X10gx Tablet Computer not be able to recover it. -
Page 207: Discharge/Recharge Cycles
SECTION 9 BATTERY MANAGEMENT Page 206 of 234 ARMOR X10gx Tablet Computer SECTION 8 ARMOR X10gx Tablet Computer CAUTION! Permanent battery capacity loss is greatest at elevated temperatures with the batteries fully charged. Do not leave batteries installed in your X10gx in high temperature surroundings with external power connected for days or weeks at a time. -
Page 208: How To Optimize Energy Use
SECTION 9 BATTERY MANAGEMENT Page 207 of 234 ARMOR X10gx Tablet Computer SECTION 8 How to Op tim ize En e rg y Us e ARMOR X10gx Tablet Computer You can help ensure the maximum performance of your batteries and reduce energy consumption when on batteries or external power by optimizing your computer’s power... -
Page 209: Changing Power Plan Settings
SECTION 9 BATTERY MANAGEMENT Page 208 of 234 ARMOR X10gx Tablet Computer SECTION 8 Ch a n g in g P o we r P la n S e ttin g s ARMOR X10gx Tablet Computer Once you’ve selected a power plan, you can customize these plans by clicking on the Change plan settings option. - Page 210 SECTION 9 BATTERY MANAGEMENT Page 209 of 234 ARMOR X10gx Tablet Computer SECTION 8 or manage your processor power consumption. NOTE: You may need administrator privileges to access these settings. ARMOR X10gx Tablet Computer Figure 118. Advanced Power Settings Window...
-
Page 211: Monitoring Battery Status
SECTION 9 BATTERY MANAGEMENT Page 210 of 234 ARMOR X10gx Tablet Computer SECTION 8 Mo n ito rin g Ba tte ry S ta tu s ARMOR X10gx Tablet Computer You can monitor the status of each battery (current charge level, whether charging or discharging, etc.) in three ways:... -
Page 212: Using The Armorutils Battery Monitor Dialog
SECTION 9 BATTERY MANAGEMENT Page 211 of 234 ARMOR X10gx Tablet Computer SECTION 8 ARMOR X10gx Tablet Computer Figure 120. Windows Desktop Battery Window Examples – Batteries Charging NOTE There may be a slight disparity in % charge between what ARMORutils reports as fully charged and what Windows reports. -
Page 213: Generating An Event Log
SECTION 9 BATTERY MANAGEMENT Page 212 of 234 ARMOR X10gx Tablet Computer SECTION 8 ARMOR X10gx Tablet Computer Figure 121. ARMORutils Battery Monitor Dialog Ge n e ra tin g a n Eve n t Lo g The Event Log is generated from the Event Recorder option on the ARMORutils Diagnostics dialog. -
Page 214: Battery Conditioning/Calibration
Ba tte ry Co n d itio n in g /Ca lib ra tio n ARMOR X10gx Tablet Computer Your ARMOR X10gx batteries are self-calibrating and do not normally require the conditioning process. The only time DRS recommends conditioning/calibrating a battery is if you notice that the charge levels reported by Windows or ARMORutils, or displayed by the battery gauge, are consistently different from actual battery performance. -
Page 215: Table 33. Conditioning A Battery
SECTION 9 BATTERY MANAGEMENT Page 214 of 234 ARMOR X10gx Tablet Computer SECTION 8 NOTE ARMOR X10gx Tablet Computer Conditioning batteries while the computer is in use can cause excessive heating inside the X10gx. It is recommended that you decrease the screen brightness as much as possible and close any unneeded applications during the conditioning process to help reduce heat buildup. - Page 216 SECTION 9 BATTERY MANAGEMENT Page 215 of 234 ARMOR X10gx Tablet Computer SECTION 8 STEP ACTION COMMENTS ARMOR X10gx Tablet Computer Select #1 Only, #2 Only or Both NOTE: If only one battery is installed, selecting that battery will cause the START CYCLE option to appear in dark text;...
-
Page 217: When To Replace A Battery
DRS. SHIPPING DATE Figure 124. ARMOR X10gx Battery Label Be fo re yo u Dis p o s e o f a Ba tte ry If the battery is less than a year old or has less than 300 cycles, and you find that it consistently fails to perform as it should, try conditioning the battery before you send it in for warranty replacement or dispose of it. -
Page 218: Your Battery's Warranty
Wh e re to P u rc h a s e Re p la c e m e n t Ba tte rie s Your ARMOR X10gx uses long lasting Lithium Ion batteries that are custom made for DRS Tactical Systems, Inc. If you need to purchase replacement batteries, notify your sales... -
Page 219: Battery Tips For Best Performance
The battery could deteriorate more quickly when charged at high temperatures. • When operating your ARMOR X10gx on external power for extended periods of time (1 week or longer), it’s best to remove the batteries and store them in a cool place until needed. - Page 220 SECTION 9 BATTERY MANAGEMENT Page 219 of 234 ARMOR X10gx Tablet Computer SECTION 8 • Do not disassemble the batteries. • Package the batteries so that they cannot move around or make contact with each other. ARMOR X10gx Tablet Computer •...
- Page 221 SECTION 9 BATTERY MANAGEMENT Page 220 of 234 ARMOR X10gx Tablet Computer SECTION 8 ARMOR X10gx Tablet Computer This Page Intentionally Left Blank 9711-26020-0001 Rev D Exp o rt Co n tro lle d – S e e P a g e 3...
-
Page 222: 10. Drs Technical S Up P Ort
SECTION 10 DRS TECHNICAL SUPPORT Page 221 of 234 ARMOR X10gx Tablet Computer Table of Contents List of Figures List of Tables Acronyms Glossary 10. DRS TECHNICAL S UP P ORT DRS Tactical Systems is committed to providing you best product support and the fastest turn around service possible. - Page 223 SECTION 10 DRS TECHNICAL SUPPORT Page 222 of 234 ARMOR X10gx Tablet Computer 7) Select Send. 4. Include the Following Required Information with Your Product(s): • Company name, address and telephone number. • RMA number received from DRS (if applicable).
-
Page 224: If You Need Information
SECTION 10 DRS TECHNICAL SUPPORT Page 223 of 234 ARMOR X10gx Tablet Computer In Europe, ship to: DRS Tactical Systems Rathausstr. 10 53797 Lohmar, Germany ATTN: Service Center Technician Once your product(s) are repaired or replaced under the terms specified in the warranty, DRS will return your product(s), with shipping pre-paid, to the address included with your RMA. -
Page 225: How To Find And Interpret Your Unit's Serial Number
SERIAL NUMBER Figure 125. ARMOR X10gx Unit Serial Number Location The serial number is broken down as follows: 8 1 4 G M 0 1 0 0 8 G 0 2 4 0 0 8 B 0 M 0 0 0... -
Page 226: Acronyms
REAR MATTER ACRONYMS AND GLOSSARY Page 225 of 234 ARMOR X10gx Tablet Computer Table of Contents List of Figures List of Tables Glossary ACRONYMS ACRONYM DEFINITION alternating current ambient light sensor BIOS basic input/output system CD-ROM compact disk – read only memory... -
Page 227: Glos S Ary
REAR MATTER ACRONYMS AND GLOSSARY Page 226 of 234 ARMOR X10gx Tablet Computer Table of Contents List of Figures List of Tables Acronyms GLOS S ARY TERM DEFINITION ambient temperature The temperature of the air surrounding an object fully depleted battery A lithium-ion battery that has discharged to a level of 3 % or below. -
Page 228: Warranty Information
REAR MATTER ACRONYMS AND GLOSSARY Page 227 of 234 ARMOR X10gx Tablet Computer Wa rra n ty In fo rm a tio n DRS TACTICAL SYSTEMS, INC. LIMITED WARRANTY – HARDWARE ARMOR PRODUCTS Ge n e ra l In fo rm a tio n DRS Tactical Systems, Inc. -
Page 229: Additional Information
REAR MATTER ACRONYMS AND GLOSSARY Page 228 of 234 ARMOR X10gx Tablet Computer DRS is not responsible for any third-party software created for use in the integration and/or operation of any Products, Accessories and/or Replacement Products whether or not such third party software was installed by DRS. Maintenance and support service for third-party software is the sole responsibility of the creator thereof. -
Page 230: Explanation Of Active Pen Side Button Options
REAR MATTER ACRONYMS AND GLOSSARY Page 229 of 234 ARMOR X10gx Tablet Computer Table of Contents List of Figures List of Tables Acronyms Glossary AP P ENDIX A Exp la n a tio n o f Ac tive P e n S id e Bu tto n Op tio n s... - Page 231 REAR MATTER ACRONYMS AND GLOSSARY Page 230 of 234 ARMOR X10gx Tablet Computer brush stroke. Right Click Duplicates a right mouse button click. Tablet PC Defined Uses the pen settings defined in the Pen Options tab of the Pen and Touch dialog window.
- Page 232 REAR MATTER ACRONYMS AND GLOSSARY Page 231 of 234 ARMOR X10gx Tablet Computer Table of Contents List of Figures List of Tables Acronyms Glossary RECORD OF CHANGES ECO # Description Of Change 81874 Initial Release. 81995 Pg. 63, 1 sentence – Changed “WLAN” to “WWAN”; Pg 185 –...
- Page 233 REAR MATTER ACRONYMS AND GLOSSARY Page 232 of 234 ARMOR X10gx Tablet Computer This Page Intentionally Left Blank 9711-26020-0001 REV D...
Need help?
Do you have a question about the Armor X10gx and is the answer not in the manual?
Questions and answers