Sign In
Upload
Manuals
Brands
Amazone Manuals
Farm Equipment
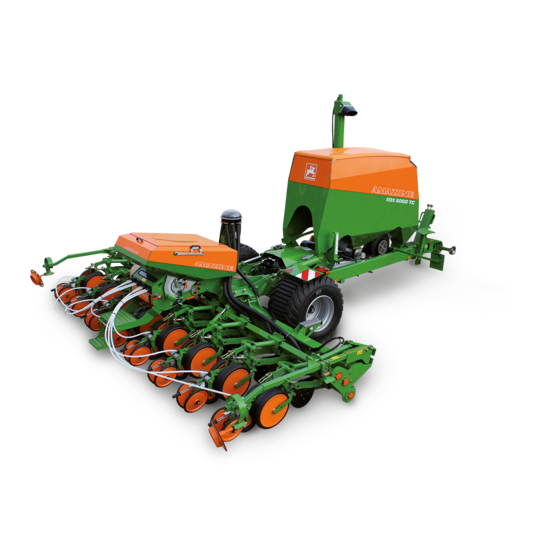
EDX 6000 TC
Amazone EDX 6000 TC Manuals
Manuals and User Guides for Amazone EDX 6000 TC. We have
2
Amazone EDX 6000 TC manuals available for free PDF download: Operating Manual, Service Manual
Amazone EDX 6000 TC Operating Manual (234 pages)
Precision airplanter
Brand:
Amazone
| Category:
Farm Equipment
| Size: 28 MB
Table of Contents
Table of Contents
5
1 User Information
10
Purpose of the Document
10
Location Information in the Operating Manual
10
Presentations Used
10
2 General Safety Instructions
11
Obligations and Liability
11
Presentation of Safety Symbols
13
Organisational Measures
14
Safety and Protective Equipment
14
Informal Safety Measures
14
User Training
15
Safety Measures in Normal Operation
16
Danger from Residual Energy
16
Maintenance and Repair Work, Fault Elimination
16
Design Changes
16
Spare and Wear Parts and Aids
17
Cleaning and Disposal
17
Workstation of the Operator
17
Warning Symbols and Other Markings on the Machine
18
Position of the Warning Signs and Other Markings
25
Dangers in Case of Non-Observance of the Safety Instructions
27
Safety-Conscious Working
27
Safety Information for Users
27
General Safety Instructions and Accident Prevention Instructions
27
Attached Implements
31
Hydraulic System
32
Electrical System
33
Brake System
34
Tyre
35
PTO Shaft Operation
35
Operation of the Precision Airplanter
36
Cleaning, Maintenance and Repair
36
3 Loading and Unloading
37
Important Information
37
Removal of Individual Implement Components in Order to Comply with the Permitted Transport Height
38
Fastening the Seed Tube Hoses
39
Loading and Unloading with a Tractor
40
Loading the Attached Implement
41
Unloading the Attached Implement
42
4 Product Description
43
Overview of Assembly Groups
43
Electronic Monitoring and Operation (Optional)
48
Camera System (Option)
49
Safety and Protective Equipment
49
Overview - Supply Lines between the Tractor and the Implement
51
Transportation Equipment
52
Proper Use
53
Danger Areas and Danger Points
54
Rating Plate and CE Mark
55
Technical Data
56
Necessary Tractor Equipment
57
Noise Production Data
58
5 Structure and Function
59
Radar
61
Service Brake System
62
Safety Chain for Implements Without Brake System (Optional)
62
Immobiliser
62
Parking Brake
63
Dual-Circuit Pneumatic Service Brake System
63
Hydraulic Service Brake System
63
Implements Without Their Own Brake System
63
AMATRON 3 Control Terminal
64
Controlling the Implement with the AMATRON 3 On-Board Computer
65
Frame and Implement Sections
66
Seed Singling and Spreading
67
Singling Drum
67
Seed Shutter
69
Air Baffle
70
Seed Scraper
71
Seed Scraper, Mechanically Adjustable
72
Seed Scraper, Electrically Adjustable
72
Baffle Plate (Optional), for Working on Slopes
73
Digital Seed Fill Level Monitoring
73
Blower Fan for Seed Singling and Fertiliser Delivery
74
Connecting the Blower Fan to the Tractor Hydraulic System
75
Connecting the Blower Fan to the On-Board Hydraulic System (Optional)
75
Double Disc Coulter
76
Seed Placement Depth
76
Coulter Pressure (Double Disc Coulter)
77
Ground Contact Pressure and Intensity of Press Rollers
78
Star Clearer (Optional)
79
Clod Clearer (Optional)
79
Carrier Roller Scraper (Optional)
80
Press Roller Scraper (Only for Fine Seeds)
80
Fertiliser Metering and Application
81
Fertiliser Hopper
81
Digital Fill Level Monitoring
82
Filling Auger (Optional)
83
Weighing System (Optional)
83
Fertiliser Metering Unit and Injector Sluice
84
Fertiliser Quantity Adjustment
85
Calibration Test
86
Distributor Head
86
Single Disc Type Fertiliser Coulter
87
Track Marker
89
Running Gear with Twin Tyres (Optional)
90
Implement Wheel Mark Eradicator (Optional)
90
Tractor Wheel Mark Eradicator (Optional)
90
Lighting of the Work Tools (Optional)
91
Pre-Emergence Marker (Option)
92
6 Start-Up
93
Checking the Suitability of the Tractor
94
Calculating the Actual Values for the Total Tractor Weight, Tractor Axle Loads and Load Capacities, as Well as the Minimum Ballast
95
Data Required for the Calculation (Hitched Implement)
96
Calculation of the Required Minimum Ballasting at the Front G
97
Min of the Tractor for Assurance
97
Calculation of the Actual Front Axle Load of the Tractor T
97
Calculation of the Actual Total Weight of the Combined Tractor and Implement
97
Tat
97
Calculation of the Actual Rear Axle Load of the Tractor T
97
Tyre Load Capacity
97
H Tat
97
Table
98
Requirements for Tractor Operation with Attached Implements
99
Implements Without Their Own Brake System
99
Securing the Tractor/Implement against Unintentional Start-Up and Rolling
100
Installation Instructions for Hydraulic Blower Fan Connection to Tractor Hydraulics
101
7 Coupling and Uncoupling the Implement
102
Dual-Circuit Pneumatic Service Brake System
103
Coupling the Brake and Supply Lines
105
Uncoupling the Supply and Brake Line
107
Control Elements of the Dual-Circuit Pneumatic Service Brake System
108
Hydraulic Service Brake System
109
Coupling the Hydraulic Service Brake System
110
Uncoupling the Hydraulic Service Brake System
112
Hydraulic Hose Lines
113
Coupling the Hydraulic Hose Lines
113
Uncoupling the Hydraulic Hose Lines
114
Coupling the Implement to the Tractor
114
Aligning a Towed Implement
120
Uncoupling the Implement
121
Coupling the Hydraulic Pump
124
Connecting the Hydraulic Pump
124
Uncoupling the Hydraulic Pump
125
8 Settings
126
Seed Metering and Application
127
Adjusting the Seeding Rate
127
Setting the Seed Shutter
127
Adjusting the Air Guide
128
Setting the Seed Scraper
129
Adjusting the Seed Placement Depth
130
Setting the Coulter Pressure
131
Closing the Seed Furrow by Adjusting the Press Roller
132
Adjusting the Star Clearers
132
Adjusting the Clod Clearers
133
Adjusting the Carrier Roller Scraper
133
Adjusting the Press Roller Scraper
133
Checking the Placement Depth and Grain Spacing
134
Fertiliser Metering and Application
135
Repositioning the Fill Level Sensor
135
Installing/Removing the Metering Roller
136
Setting the Fertilising Rate Using a Calibration Test
139
Adjusting the Fertiliser Placement Depth
140
Adjusting the Furrow Former on the Fertiliser Coulter
140
Locking the Fertiliser Coulters
141
Weighing System (Optional)
142
Taring the Weighing Equipment
142
Calibration of the Weighing Equipment (Specialist Workshop)
143
Menu Layout
145
Adjusting the Track Marker Length and Working Intensity
146
Calculating the Track Marker Length
147
Adjusting the Wheel Mark Eradicator
147
Adjusting the Tractor Wheel Mark Eradicator (Optional)
148
Adjusting Fan Speed
149
Adjusting the Fan Speed (Connection to the Tractor Hydraulic System)
150
Adjusting the Fan Speed (Connection to the Tractor PTO Shaft)
150
Adjusting the Fan Speed (Pressure Relief Valve)
151
Basic Setting (Pressure Relief Valve)
152
9 Transportation
153
Set the Implement to Road Transport Mode
156
Legal Regulations
159
10 Use of the Implement
160
Folding/Unfolding the Implement Sections and Track Markers
162
Unfolding the Implement Sections
163
Folding the Implement Sections
165
Working Without Track Markers
168
Folding/Unfolding the Tractor Wheel Mark Eradicators
169
Moving the Tractor Wheel Mark Eradicator into Working Position
169
Moving the Tractor Wheel Mark Eradicators into Transport Position
169
Filling the Hopper
170
Fill the Seed Hopper
170
Filling the Fertiliser Hopper
171
10.4.2.1 Filling the Fertiliser Hopper with the Filling Auger
172
Work Commencement
174
During Operation
176
Turning at End of the Field
176
End of Work on the Field
178
Emptying the Seed Hopper And/Or Seed Singling Unit
178
Emptying the Fertiliser Hopper and the Metering Unit
181
Emptying the Fertiliser Hopper
181
Cleaning the Metering Unit
181
Emptying the Rest of the Seeds from the Filling Funnel of the Filling Auger
184
11 Faults
186
Residual Quantity Display
186
Cleaning the Seed Tube
187
Cleaning the Seed Tube
188
Eliminating Seed Accumulations at the Sealing Lip
189
Fault Table
190
12 Cleaning, Maintenance and Repairs
191
Securing the Connected Implement
192
Keep Hopper with Pellet Filling Closed
192
Cleaning the Machine
193
Daily Fast Cleaning of the Singling Unit and the Spur Gears
194
Cleaning the Supply Hoses
195
Deep Cleaning of the Implement
196
12.3.3.1 Cleaning the Fertiliser Distributor Head
197
12.3.3.2 Cleaning the Opto-Sensor
197
Removing/Installing the Singling Drum
198
Lubrication Specifications
200
Overview of Lubrication Points
200
Maintenance Schedule - Overview
202
Checking the Seeding Coulter Discs
205
Adjusting the Spacing of the Seeding Coulter Discs
206
Adjusting the Seeding Coulter Disc Drive
206
Replacing the Seeding Coulter's Furrow Formers
207
Checking the Fertiliser Coulter's Coulter Disc
208
Checking the Fertiliser Coulter Furrow Former
209
Checking the Wear Bushing on the Support Roller Arm
209
On-Board Hydraulics Oil Filter Change
210
Visual Inspection of the Lower Link Pins
210
12.6.10 Checking the Inflation Pressure of the Running Gear Tyres
211
Check Tightening Torques of Wheel Nuts (Specialist Workshop)
212
12.6.12 Relieving the Hole Covering Rollers
213
12.6.13 Pretensioning the Hole-Covering Rollers
214
Hydraulic System (Specialist Workshop)
215
12.6.14.1 Labelling of Hydraulic Hose Lines
216
12.6.14.2 Maintenance Intervals
216
12.6.14.3 Inspection Criteria for Hydraulic Hose Lines
217
12.6.14.4 Installation and Removal of Hydraulic Hose Lines
218
Checking the Brake Drum for Dirt (Specialist Workshop)
219
Brake Lining Inspection (Specialist Workshop)
219
Adjusting the Wheel Brake on the Slack Adjuster (Specialist Workshop)
220
Checking/Adjusting the Bearing Clearance of the Wheel Hubs (Specialist Workshop)
221
12.6.19 Lubricating the Axles
222
Service Brake System (All Variants)
223
General Visual Inspection of the Service Brake System
223
Checking the Service Brake System for Safe Operating Condition (Specialist Workshop)
223
Dual-Circuit Pneumatic Service Brake System
224
Exterior Inspection of the Compressed Air Tank
224
Checking the Pressure in the Compressed Air Tank (Specialist Workshop)
224
Leak Tightness Check (Specialist Workshop)
225
Cleaning the Line Filters (Specialist Workshop)
225
Hydro-Pneumatic Pressure Reservoir (Specialist Workshop)
226
Bolt Tightening Torques
227
13 Hydraulic Diagram
228
Hydraulic Diagram for EDX 6000-TC
228
Hydraulic Diagram for EDX 6000-TC with On-Board Hydraulic System
230
14 Notes
233
Advertisement
Amazone EDX 6000 TC Service Manual (140 pages)
Precision Air Planter Xpress singling / Electronics / Hydraulics
Brand:
Amazone
| Category:
Farm Equipment
| Size: 7 MB
Table of Contents
Table of Contents
3
Xpress Singling
5
Recommended Selection of Maize Singling Drum for the EDX System
5
Presentation Xpress Grain Singling
7
Flow Bed Shutter
7
Flow Bed/Seed Shutter
8
Scraper Setting/Alignment
8
Hole Covering Rollers/Point of Delivery
9
Lip Seal
10
Dismounting the Drum
11
Dismounting the Scraper
12
Dismantling the Drum
14
Installation of the Hole Covering Rollers
16
Installation of the Scraper Unit
20
Calibrating the Remote Scraper Bar Adjustment
27
Installation of the Metering Drum
27
Factors for Distribution Along the Row
29
Electronics
30
Connection
30
Overview
31
Main Components of the Electronics - EDX 9000-TC
31
Main Components of the Electronics - EDX 6000-TC
32
Main Components of the EDX 6000-2C Electronics
33
Main Components of the EDX 6000-2FC Electronics
34
Main Components of the EDX 6000-2 Electronics
35
Opto-Sensors
36
Installation Locations of Opto-Sensors
36
Adjustment Possibilities for the Opto-Sensors
36
Setting Values in the Diagnostic Input
37
Opto-Sensor Setting Recommendation
37
Opto-Sensor Check Sequence
38
Tramline / Single Row Switching
39
Installation Locations of Positioning Units
39
Diagnosis of Positioning Units
39
Switching Correlations Positioning Units and Mini Job Computer
40
Weighing Technology EDX 6000-TC
41
Weighing Technology Setup
41
Pin Assignment Distributor Box
42
Calibrating the Weighing T Echnology
43
Sensors
44
Sensors Used / Function of EDX
44
Overview of Sensor Installation Positions - EDX 9000-TC
45
Overview of Sensor Installation Positions - EDX 6000-TC
47
Overview of Sensor EDX 6000-2C Installation Positions
49
Installation Location of Blower Speed Sensor - EDX 6000-TC
50
Installation Location of Blower Speed Sensor - EDX 6000-2C
51
Installation Location of Ha Sensor (Radar) - EDX 6000-TC
51
Installation Location of Pressure Sensor / AMFÜME Seed
52
Installation Location of Scraper Bar Turn Angle Sensor
52
Working Position Sensor (AS) EDX 9000-TC & EDX 6000-TC
53
Working Position Sensor (AS) EDX 6000-2
54
Drive of the Fertiliser Metering Unit + Speed Sensor EDX 6000-TC
54
Drive of the Fertiliser Metering Unit + Speed Sensor EDX 6000-2C
55
PWM - Pulse Width Modulation
55
Testing Sensors
56
Overview for Testing the Sensors
57
Changing to the Setup Menu
58
Difference between Diagnosis Menu Input and Output
58
Explanations of Diagnostics Function of AMATRON 3
59
Testing Sensors Using the Diagnostic Menu
60
Explanation of Terms - Diagnostic Input
61
Explanation of Terms - Diagnostic Output
62
Amatron 3
63
Setting Values for AMATRON 3
63
Detecting the Software Versions of the Machine
64
Displaying the Terminal Version
65
Troubleshooting Chart
66
Cable Harness
69
Pin Assignment of Electric Plugs
69
Contact Assignment of 42-Pin AMP Plug
70
Wiring Harness for Hydraulics NL268 EDX 9000 -TC
71
Wiring Harness for Base NL268 EDX 9000-TC
72
Wiring Harness for Pressure Adjustment NL459 EDX 9000-TC
73
Kabelbaum Druckverstellung NL269 / NL270
74
Wiring Harness for Base NL462 EDX 6000-TC
75
Wiring Harness for Hydraulics NL292 EDX 6000-TC
76
Wiring Harness for Base NL463 EDX 6000-2C
77
Wiring Harness for Base NL469 EDX 6000-2
78
Faults in the Area of the Electro-Hydraulics
79
Arrangement of the Solenoid Valves EDX 9000-TC
79
Arrangement of the Solenoid Valves EDX 6000-TC
79
Installation Location - Pressure Adjustment of the Coulter EDX 9000-TC
80
Hydraulic
81
Hydraulic Circuit of the EDX 9000-TC
81
Hydraulic Circuit of the EDX 6000-TC
87
Hydraulic Circuit of the EDX 6000-2C
92
Repair Instructions
95
Folding in the Machine in the Event of Failure of the AMATRON 3
95
Hydraulic Circuit Diagrams EDX 9000-TC
96
Hydraulic Circuit Diagrams EDX 6000-TC
110
Hydraulic Diagrams EDX 6000-2C
125
Advertisement
Related Products
Amazone EDX 6000-2
Amazone EDX 6000-2C
Amazone EDX 6000-2FC
Amazone EDX 9000-TC
Amazone ED 302
Amazone ED 452
Amazone ED 452-K
Amazone ED 602-K
Amazone ED 902-K
Amazone EDX 4500-2C
Amazone Categories
Farm Equipment
Tiller
Spreader
Paint Sprayer
Desktop
More Amazone Manuals
Login
Sign In
OR
Sign in with Facebook
Sign in with Google
Upload manual
Upload from disk
Upload from URL