Table of Contents
Advertisement
Quick Links
Download this manual
See also:
User Manual
Advertisement
Table of Contents

Subscribe to Our Youtube Channel
Related Manuals for Edimax IC-3030


Summary of Contents for Edimax IC-3030
- Page 2 ErP Announcement Product: Internet Camera (IP Camera) Purpose: 24 hour surveillance and transfer of footage for safety and health reasons as intented use. Detailed description: Health purposes: Users can pass through the Internet (from anywhere) to control the product (IP Camera). It's intended to watch and listen to people who need to be cared for at home and automatically sends e-mails and phone alerts to warn observers and ask for their attention.
- Page 3 Copyright© by Edimax Technology Co, LTD. all rights reserved. No part of this publication may be reproduced, transmitted, transcribed, stored in a retrieval system, or translated into any language or computer language, in any form or by any means, electronic, mechanical, magnetic, optical, chemical, manual or otherwise, without the prior written permission of this Company.
- Page 4 For details, see the GPL Code and LGPL Code licenses. You can download the firmware-files at http://www.edimax.com under "Download" page.
-
Page 5: Product Information
This IP camera is ideal for all kinds of video surveillance from home and office safety to child and pet monitoring purposes. This Edimax IP camera is tailor made to stream live video over your network, so you can view its footage from anywhere on your local computers. -
Page 6: Hardware Installation
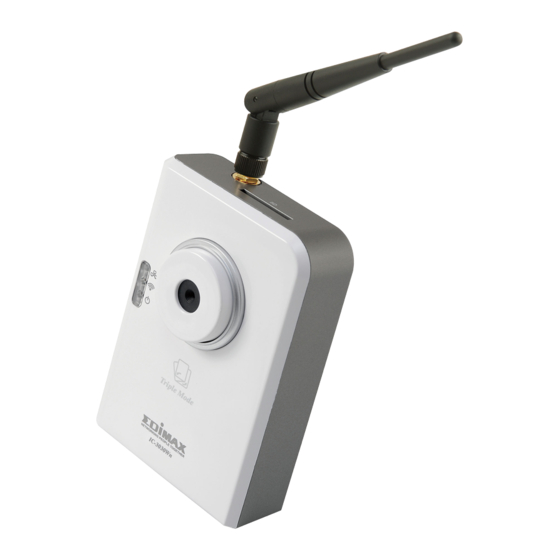
4. Hardware Installation 4.1 LED and Focusing You can change the aim and focus of the camera by adjusting the camera head's aim and adjusting the focus ring. Simply point it in your direction of choice and rotate the focus ring to your preference. Three LEDs indicate the camera's power and networking status. - Page 7 When the IP Camera is linked to a wireless network, this LED will light up. The LED will flash (IC-3030Wn while video is transmitted or received through a & IC-3030 wireless network. only) Power When the camera is powered on and ready for...
- Page 8 4.2 Camera Ports Top View IC-3030: USB Port SD Card Slot IC-3030Wn: Wireless SMA SD Card Slot Connector IC-3030PoE: SD Card Slot...
- Page 9 Audio Connector Reset to Default / WPS Microphone Power Connector Ethernet Connector Name Description USB Port* (IC-3030 Accepts USB WiFi adapter** to enable wireless only) SD Card Accepts SD / SD-HC memory card for image and Slot video storage Wireless...
- Page 10 Connects to your local area network Connector Audio Connects to external speaker for audio output Connector Microphone Built-in microphone for voice pick-up Note: The USB port only works with Edimax USB WiFi adapters. Note: Edimax EW-7711HPn, EW-7711UAn, EW-7711USN, EW-7711UMn & EW-7711UTn...
- Page 11 Unpack your Edimax IP Camera from its packaging and ensure that all the items listed in Chapter 1 are there. Connect the Edimax IP Camera to your network by attaching a network cable from your switch or router to the LAN port on the IP Camera.
-
Page 12: Software Installation
Below we tell you how to get it started up. The following example is for Windows Vista. The procedure is similar for Windows 2000/XP/7. Insert the Edimax CD into your CD-ROM drive. It should start up automatically. If it doesn't, click on “Autorun.exe” in the “Autorun” folder on the CD. - Page 13 The 'Install Wizard' should take you here. Click on ‘Next’ to continue your installation. Click on 'Next' to move to the next step. If you wish to install the program to an alternate location, click on ‘Browse’ and select a location.
- Page 14 Click ‘Next’ to move on to the next step or make your selections here.
- Page 15 Click on ‘Install’ to install the program.
- Page 16 If you have Windows Defender or other 3rd party firewall software, you may see the following or a similar message, Please click ‘Unblock’ to allow your Edimax IP camera Utility to pass through the firewall. Not doing so may cause the IP...
- Page 17 A new folder named ‘Internet Camera’ under ‘All Programs’ will be created. Click on 'IP Cam Admin Utility' to connect to the IP camera and use the camera's functions directly.
- Page 18 10. After installation, the system will automatically run the ‘Administrator Utility’. On the first page, the cameras found in your network will be listed. Select the one you wish to configure and click on the ‘Configure Camera’ icon.
- Page 19 11. You will be prompted to insert your user name and password. The default user name is ‘admin’ (unchangeable), and the default password is ‘1234’ (changeable). Click ‘OK’ to continue. 12. The program will automatically detect the IP address status of your network and suggest a free IP address for the IP Camera using DHCP.
-
Page 20: Web Management Interface
6. WEB Management Interface You can use your WEB browser (Internet Explorer 5.5 or above) to connect to the IP camera. Type the IP address (see 5.12) in the address bar of your web browser. Bookmark the address for ease of future use. - Page 22 IP camera. You should now be able to see the images and hear the sounds captured by the Edimax IP camera. For advanced functions, please refer to instructions in the user manual (also on CD-ROM).
-
Page 23: R&Tte Compliance Statement
R&TTE Compliance Statement This equipment complies with all the requirements of DIRECTIVE 1999/5/EC OF THE EUROPEAN PARLIAMENT AND THE COUNCIL of March 9, 1999 on radio equipment and telecommunication terminal Equipment and the mutual recognition of their conformity (R&TTE) The R&TTE Directive repeals and replaces in the directive 98/13/EEC (Telecommunications Terminal Equipment and Satellite Earth Station Equipment) As of April 8, 2000.
Need help?
Do you have a question about the IC-3030 and is the answer not in the manual?
Questions and answers