Advertisement
INSTRUCTION MANUAL FOR MODEL ET.1 REMOTE CIIEKil
Introduction
Congratulations on your purchase of the Remote ChekN. a programmable radio frequency food thermometer and timer. You uill nor bc able to remotely
monitor the time and temperature of food cooking outdoors frorn anywhere in your home.
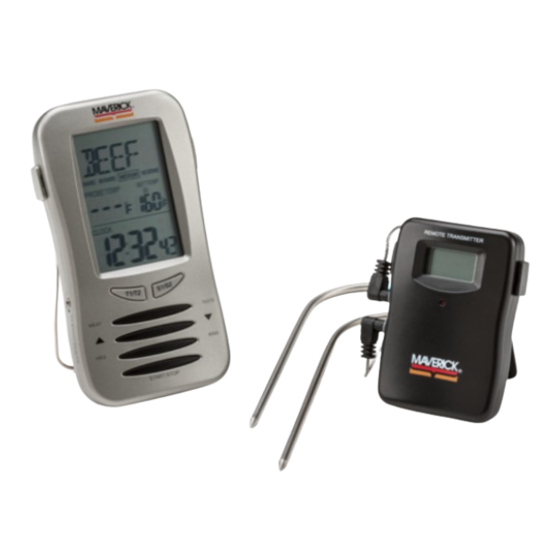
Components
l. I - silver receiver unit
2. I - black transmitter unit
3. 2 - detachable stainless steel probe sensors
4. 2 - A{and 2 - AAA batteries
Receiver Features
'/""cLlP
@
52 (Direct
Plug in)
,^,
\-'_-_---l
r----_--=-tr
- - , _ _ _
-+
-/
TAND
BATTER-\T-
COMPARTMENT
52 (Direct Plug in) - allows you to plug I detachable stainless steel probe sensor directly into the receiver unit.
LCD (Liquid Crystal Display) - Displays all icons, temperature and time. See LCD diagram for detailed information.
CLIP - Removable clip allows you to be mobile. Clip the receiver unit to belt.
BATTERY COMPARTMENT - Holds 2 AA batteries.
STAND - Swings out and allows you to stand the receiver on tabletop.
Buttons Front
l. T1n2 - selects clock, timerl, timer2
2. S1/S2 - selects probe sensor I or probe sensor 2. Press and hold for 2 seconds the display will auto scroll between probe sensor 1 and probe sensor 2 every 3 seconds.
3. MEAT - selects meat type, beef, veal, lamb, pork, chick (chicken) or turky (turkey). Press and hold for 2 seconds the display will change between table A and
table B.
4. TASTE - selects taste level, w. done (well done), medium, m. rare (medium rare) or rare. Press and hold for 2 seconds to set the temperature of table B.
5. A- raises set temperature. Press and hold for 2 seconds, the temperature increases 10 degrees per second.
6. V- lowers set temperature. Press and hold for 2 seconds, the temperature decreases 10 degrees per second.
7. HRS - sets hours. Press and hold for 2 seconds, the hours increase l0 hours per second.
8. MINS - sets minutes. Press and hold for 2 seconds, the minutes increase 10 minutes per second.
9. START/STOP - Starts or stoDs timer I and timer 2
Buttons Rear
1 . SET - starts the radio frequency registration. Press and hold for 2 seconds sets the clock.
2. 'CfF - change between Celsius and Fahrenheit. Press and hold for 2 seconds resets the unit.
3. SLIDE SWITCH
STANDBY - displays clock only. Saves battery. Stores personal programmed settings.
OPERATE - normal operation with full functions.
OFF
Tums unit off. All personal programmed settings not stored and clock stops.
@
@
\\
Maviii* tncusres. tnc Eorson rl
M e d e n C h n a
P a l e n l P e n d i n O
Advertisement
Table of Contents

Related Manuals for Maverick food thermometer


Summary of Contents for Maverick food thermometer
- Page 1 INSTRUCTION MANUAL FOR MODEL ET.1 REMOTE CIIEKil Introduction Congratulations on your purchase of the Remote ChekN. a programmable radio frequency food thermometer and timer. You uill nor bc able to remotely monitor the time and temperature of food cooking outdoors frorn anywhere in your home.
- Page 2 Transmitter Features R E I \ 4 O T E STAND (Removable I t l a v e r i c k I n d u s t r i e s , I n c . E d i s o n N J BATTERY COMPARTMENT STAND - Swings out and allows you to stand receiver on tabletop.
- Page 3 Getting started l. Open the battery compartment of receiver and insert the two AA batteries. 2. Open the battery compaflment of transmitter and insert the two AAA batteries. The Remote ChekrM needs the receiver to register the radio frequencl signal from the transminer. This needs to be done every time the unit is operated after the unit is turned off.
- Page 4 Count up Press T1/T2 to change from clock to timerl or timer2. Press START/STOP to sta( the count up. The 'l will blink. Press START/STOP to pause the count up. The 'l will be solid. When timer reaches 23:59 5e the receiver will beep for 20 seconds, the time and the f/ I will blink for 20 seconds. Press START/STOP to pause rhe count up, then HRS and MINS together to clear setting.
Need help?
Do you have a question about the food thermometer and is the answer not in the manual?
Questions and answers