Table of Contents
Advertisement
Quick Links
CONTENTS
INTRODUCTION ....................................................... 7
Letters in brackets ......................................................................7
Troubleshooting and repairs ......................................................7
SAFETY ................................................................... 7
Fundamental safety warnings ...................................................7
DESIGNATED USE ..................................................... 7
INSTRUCTION FOR USE ............................................. 7
DESCRIPTION .......................................................... 8
description of appliance .............................................................8
Description of milk container .....................................................8
Description of control panel ......................................................8
PRELIMINARY CHECKS ............................................. 8
Checking the appliance ..............................................................8
Installing the appliance .............................................................8
TURNING THE APPLIANCE ON ................................... 9
TURNING THE APPLIANCE OFF .................................. 9
MENU SETTINGS ...................................................... 9
Descaling ...................................................................................9
Setting the language ................................................................9
Energy saving ...........................................................................10
Adjust time ..............................................................................10
Auto-start ................................................................................10
Auto-off (Standby) ...................................................................10
Set coffee temperature ............................................................10
Setting water hardness ............................................................10
Statistics function ....................................................................10
Default values (reset) ...............................................................11
MAKING COFFEE .................................................... 11
Selecting the coffee taste .........................................................11
Selecting the quantity of coffee in the cup ..............................11
Customising the "MY COFFEE" quantity ...................................11
Adjusting the coffee mill ..........................................................11
Tips for a hotter coffee .............................................................11
Making coffee using coffee beans ............................................12
Making coffee using pre-ground coffee ...................................12
MAKING DRINKS WITH MILK................................... 12
Filling and attaching the milk container ..................................12
Making cappuccino ..................................................................13
Making frothed milk ................................................................13
Cleaning the milk container after use ......................................13
HOT WATER ........................................................... 13
Preparation ..............................................................................13
Changing the quantity .............................................................14
CLEANING ............................................................. 14
Cleaning the machine ..............................................................14
Cleaning the coffee grounds container .....................................14
Cleaning the drip tray ..............................................................14
Cleaning the inside of the coffee machine ...............................14
Cleaning the water tank ...........................................................14
Cleaning the coffee spouts .......................................................14
Cleaning the milk container .....................................................15
DESCALING ............................................................ 15
SETTING WATER HARDNESS .................................... 16
Measuring water hardness .......................................................16
Set water hardness ..................................................................16
TECHNICAL DATA.................................................... 16
DISPOSAL .............................................................. 17
ELECTRICAL REqUIREMENTS (UK ONLY)................... 17
DISPLAYED MESSAGES ........................................... 18
TROUBLESHOOTING ............................................... 19
6
Advertisement
Table of Contents
Troubleshooting

Related Manuals for DeLonghi ESAM5500


Summary of Contents for DeLonghi ESAM5500
-
Page 1: Table Of Contents
CONTENTS CLEANING ............. 14 Cleaning the machine ..............14 INTRODUCTION ............7 Cleaning the coffee grounds container ........14 Letters in brackets ..............7 Cleaning the drip tray ..............14 Troubleshooting and repairs ............7 Cleaning the inside of the coffee machine .......14 Cleaning the water tank ............14 SAFETY .............. -
Page 2: Introduction
• Make sure the socket used is freely accessible at all times, enabling the appliance to be unplugged when necessary. Thank you for choosing the ESAM5500 automatic coffee and • Unplug directly from the plug only. cappuccino maker. We hope you enjoy using your new applian- Never pull the power cable as you could damage it. -
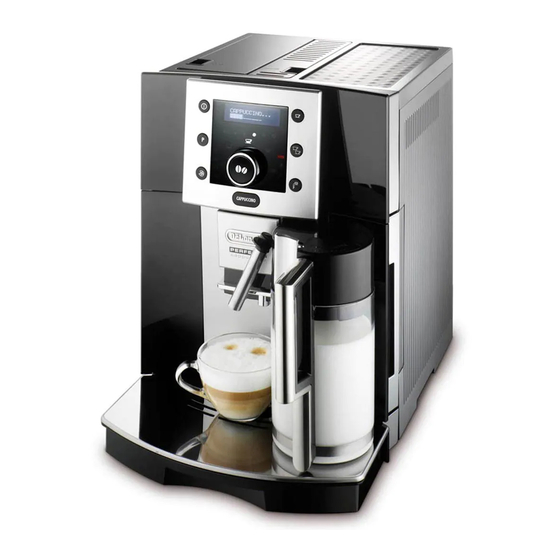
Page 3: Description
for damage deriving from failure to respect these instruc- alarm messages or need for maintenance. CAPPUCCINO button: to deliver cappuccino or fro- tions. thed milk. Please note: Selection dial: turn to select the required quantity of Keep these instructions. coffee. If the appliance is passed to other persons, they must also be (When in the settings MENU, turn to select the required provided with these instructions. -
Page 4: Turning The Appliance On
If the power socket does not match the plug on the appliance, Danger of burns! have the socket replaced with a suitable type by a qualified During rinsing, a little hot water comes out of the coffee spouts professional. and is collected in the drip tray underneath. Avoid contact with splashes of water. -
Page 5: Energy Saving
Energy saving To disable the function: Use this function to enable or disable energy saving. 1. Press the P button to enter the settings menu. This mode is active by default, reducing energy consumption in 2. Turn the selection dial until “Auto-start activated” is di- compliance with current European regulations. -
Page 6: Default Values (Reset)
Default values (reset) of “my coffee”. This resets all menu settings and programmed quantities back To modify these settings, proceed as follows: to the default values (with the exception of the language 1. Place a cup under the coffee spouts (fig. 9). which remains as set). -
Page 7: Making Coffee Using Coffee Beans
• Never use more than one level me- Danger of burns! asure or it could dirty the inside of During rinsing, a little hot water comes out of the coffee spouts the machine or block the funnel. and is collected in the drip tray underneath. Avoid contact with splashes of water. Making coffee using coffee beans Please note! If you use pre-ground coffee, you can only make one cup of... -
Page 8: Making Cappuccino
(fig. 23). • When “Press CLEAN” flashes on the display, you can still 8. Follow the instructions below for each function. prepare any type of coffee or milk. If you have to make a number of milk-based coffees, wait until you have delive- Making cappuccino red the last cup before cleaning the container. 1. -
Page 9: Changing The Quantity
Changing the quantity Important! The appliance is set by default to automatically deliver 250ml. When removing the drip tray, the grounds container must be To modify these quantities, proceed as follows: emptied, even if it contains few grounds. 1. Position a container under the spout. If this is not done, when you make the next coffees, the groun- 2. -
Page 10: Cleaning The Milk Container
Cleaning the pre-ground coffee funnel 7. Once inserted, make sure the two red buttons have snap- Check regularly (about once a month) that the pre-ground cof- ped out. fee funnel is not blocked. 8. Replace the drip tray and grounds container. If necessary, remove coffee deposits with the brush supplied. -
Page 11: Setting Water Hardness
Measuring water hardness dates the guarantee. 1. Turn the coffee maker on. 1. Remove the “ TOTAL HARDNESS TEST” indicator paper from 2. Enter the settings menu by pressing the P button. its pack. 3. Select by pressing the OK button: “Descale” is displayed. 2. Immerse the paper completely in a glass of water for one Press OK to enable the function. -
Page 12: Disposal
DISPOSAL • EMC Directive 2004/108/EC and subsequent amendments In compliance with European directive 2002/96/EC, • Materials and accessories coming into contact with food the appliance must not be disposed of with house- conform to EEC regulation 1935/2004. hold waste, but taken to an authorised waste sepa- ration and recycling centre. ELECTRICAL REqUIREMENTS (UK ONLY) Before using this appliance ensure that the voltage indicated on the product corresponds with the main voltage in your home, if you are in any doubt about your supply contact your local electricity company. -
Page 13: Displayed Messages
DISPLAYED MESSAGES DISPLAYED MESSAGE POSSIBLE CAUSE SOLUTION FILL TANK Insufficient water in the tank. Fill the tank with water and/or insert it correctly, pushing it as far as it will go until it clicks into place. GROUND TOO FINE The grinding is too fine and the coffee is delivered too slowly Repeat coffee delivery and turn the grinding adjustment or not at all. -
Page 14: Troubleshooting
TROUBLESHOOTING Below is a list of some of the possible malfunctions. If the problem cannot be resolved as described, contact customer services. PROBLEM POSSIBLE CAUSE SOLUTION The coffee is not hot The cups were not preheated. • Enable the cup warmer, leave the cups at least 20 minutes to warm up. •...
Need help?
Do you have a question about the ESAM5500 and is the answer not in the manual?
Questions and answers