Table of Contents
Advertisement
Quick Links
INDEX
........................................27
Symbols used in these instructions .........27
Letters in brackets ..................................27
Troubleshooting and repairs ...................27
......................................................27
Fundamental safety warnings...................27
Designated use.........................................28
Instructions .............................................28
.........................................28
Description of appliance ..........................28
Description of milk container ..................28
Description of control panel ....................28
Explanation of indicator lights .................29
Controls after transport ...........................29
Installing the appliance ............................29
Connecting the appliance .........................29
Setting the clock .....................................31
Setting the language ...............................31
Setting automatic start up time................31
Descaling ...............................................31
Setting the temperature ..........................31
Auto-Off ..................................................31
Setting water hardness ...........................32
Installing the filter ....................................32
Removing the filter ..................................32
Statistics function ....................................32
......................................33
Selecting the coffee taste .........................33
the cup ...................................................33
Regulating the coffee mill .......................33
Making coffee (using coffee beans) ........34
.........................29
............30
.............30
.........31
in the cup for cappuccino or frothed milk35
Making cappuccino ..................................35
Making frothed milk ................................35
Making caffelatte ....................................36
Making hot milk ......................................36
HEATING WATER...............................
Preparation .............................................36
Changing the quantity ............................36
Emptying the drip tray ............................36
Cleaning the coffee maker .......................37
Cleaning the water tank............................37
Cleaning the drip tray ..............................37
Cleaning the spouts ...............................37
Cleaning the coffee feed funnel ...............37
Cleaning the inside of the machine .........37
Cleaning the infuser ................................37
Cleaning the milk container .....................38
Measuring water hardness ......................39
Setting water hardness ...........................39
..................................................44
26
.......................34
.............................................38
..............39
........................40
.............................42
...............44
36
........36
Advertisement
Table of Contents
Troubleshooting

Related Manuals for DeLonghi ESAM 5500


Summary of Contents for DeLonghi ESAM 5500
-
Page 1: Table Of Contents
INDEX MAKING MILKY DRINKS .......34 Filling and attaching the milk container ..34 INTRODUCTION ........27 Cleaning the milk container after use ..35 Programming the quantity of coffee and milk Symbols used in these instructions ..27 in the cup for cappuccino or frothed milk35 Letters in brackets ........27 Making cappuccino ........35 Troubleshooting and repairs ....27... -
Page 2: Introduction
INTRODUCTION The addresses are given in the guarantee certifi- cate provided with the machine. Thank you for choosing the ESAM 5500 automa- tic coffee maker. We hope you enjoy using your new appliance. SAFETY Take a few minutes to read these instructions. -
Page 3: Designated Use
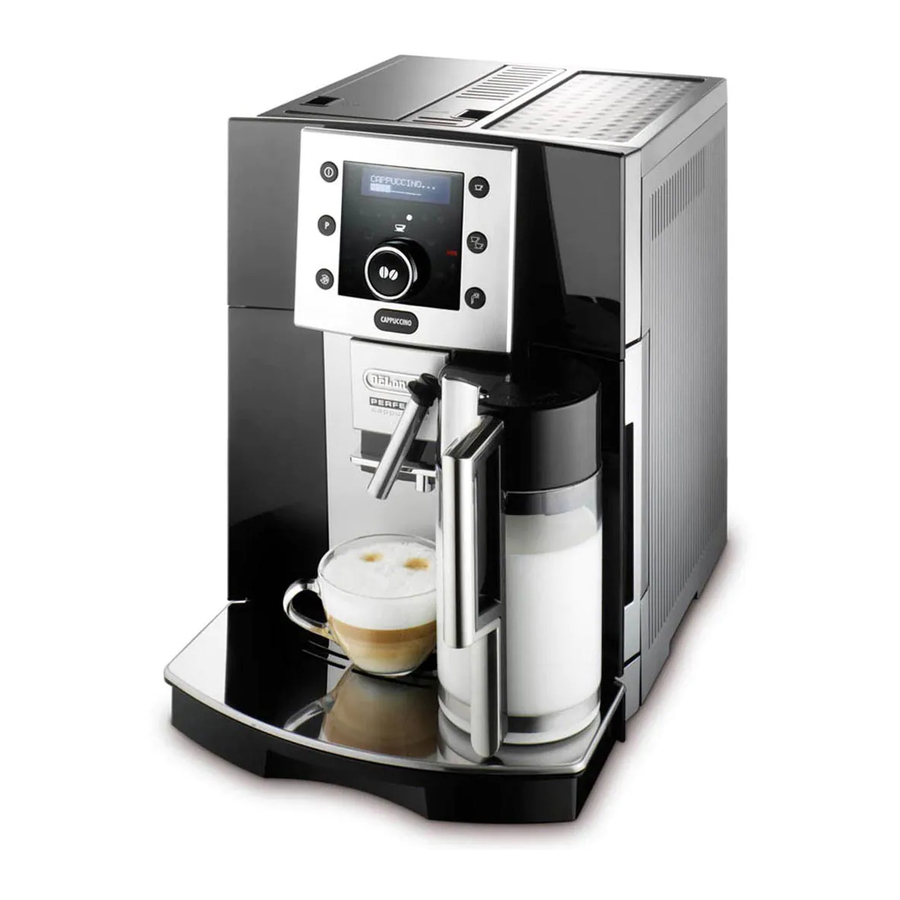
Designated use DESCRIPTION This appliance is designed and made to prepare Description of the appliance coffee and heat drinks. All other use is considered improper. (pag. 3 - This appliance is not suitable for commercial use. Grinding coarseness regulator knob The manufacturer is not liable for damage deri- Bean container lid ving from improper use of the appliance. -
Page 4: Explanation Of Indicator Lights
Selection knob: turn clockwise or PRELIMINARY CHECKS anticlockwise until light corresponding to the quantity of coffee Controls after transport comes on After removing the packaging, make sure the pro- customised "my coffee" duct is complete and undamaged and that all accessories are present. -
Page 5: Using The Appliance For The First Time
Using the appliance for the first TURNING THE APPLIANCE time Each time the appliance is turned on, it performs an automatic preheat and rinse cycle which can- • Coffee has been used to factory test the not be interrupted. appliance and it is therefore completely nor- The appliance is ready for use only after comple- mal for there to be traces of coffee in the mill. -
Page 6: Changing The Menu Settings
CHANGING THE MENU The AUTO icon on the display goes off. SETTINGS NB! To activate this function, the time must be set. Setting the clock 1. Press the P button to enter the menu; 2. Turn the selection knob until "Adjust Time" is Descaling displayed;... -
Page 7: Resetting Factory Default Values (Reset)
button to cancel the operation); 7. Press the button to exit the menu. 6. Press the button to exit the menu. Removing the filter Resetting factory default values If you want to use the appliance without a filter, (reset) you must remove it and notify the appliance of its removal as follows: This function resets the entire menu with the 1. -
Page 8: Making Coffee
MAKING COFFEE Regulating the coffee mill The coffee mill is preset in the factory to prepare Selecting the coffee taste coffee correctly and should not require regulating initially. The appliance is preset to make coffee with a However, if after making the first few coffees you standard taste. -
Page 9: Making Coffee (Using Coffee Beans)
Preparing coffee using coffee • Never use more than one level measure or it could beans dirty the inside of the machi- ne or block the funnel. Important! Do not use caramelised or 2. Put one level measure of pre-ground coffee candied coffee beans as they could stick to the into the funnel (fig. -
Page 10: Cleaning The Milk Container After Use
Cleaning the milk container after Making cappuccino 1. Fill the container (B) with milk and attach it as described in the section "Filling and attaching Clean the internal tubes of the milk container each the milk container". time you use it to avoid the build-up of milk resi- 2. -
Page 11: Making Caffelatte
Making caffelatte Changing the quantity 1. Fill the container (B) with milk and attach it as The appliance is factory preset to automatically described in the section "Filling and attaching deliver 250ml. To modify these quantities, pro- the milk container". ceed as follows: 2. -
Page 12: Cleaning The Coffee Maker
2. Remove the drip tray and the grounds contai- Cleaning the spouts ner (Fig. 25); 1. Clean the nozzle (A15), ideally each time the 3. Empty the drip tray and grounds container coffee maker is used, with a sponge or cloth (A9);... -
Page 13: Cleaning The Milk Container
ding it onto the internal support and pin at the 2. Remove the milk spout and intake tube. bottom, then push the PUSH symbol fully in 3. Remove the pointer by pulling it outwards. until it clicks into place. 4. Wash all the components thoroughly with hot water and mild washing-up liquid. -
Page 14: Setting Water Hardness
After about a minute, 1, 2, 3, or 4 red squares Important! Danger of burns Hot water con- form, depending on the hardness of the water. taining acid runs out of the hot water spout. Avoid Each square corresponds to one level. contact with splashes of water. -
Page 15: Displayed Messages
DISPLAYED MESSAGES DISPLAYED MESSAGE POSSIBLE CAUSE REMEDY FILL TANK! • The water tank is empty or • Fill the tank with water positioned incorrectly. and/or insert it correctly, pushing it as far as it will go until it clicks into place. GROUND TOO FINE ADJUST •... - Page 16 DISPLAYED MESSAGE POSSIBLE CAUSE REMEDY • This indicates the presence • The descaling procedure DESCALE! of limescale in the machine. described in the "Descaling" section needs to be perfor- med as soon as possible. • The ground coffee funnel is •...
-
Page 17: Troubleshooting
TROUBLESHOOTING Below is a list of some of the possible malfunctions. If the problem cannot be resolved as described, contact a Technical Assistance centre. PROBLEM POSSIBLE CAUSE REMEDY The coffee is not hot • The cups have not been • Heat the cups by rinsing preheated. - Page 18 PROBLEM POSSIBLE CAUSE REMEDY The coffee does not come out • The spouts are blocked. • If necessary, remove coffee of one of the spouts. deposits with a toothpick (fig. 26), sponge or stiff bristled kitchen brush. The coffee does not come out •...
-
Page 19: Technical Specification
TECHNICAL SPECIFICATION DISPOSAL Important information for correct disposal Voltage: 220-240 V~ 50/60 Hz max. 10A of the product in accordance with EC Absorbed power: 1350W Directive 2002/96/EC. Pressure: 15 bar At the end of its working life, the product Water tank capacity: 1,7 litres must not be disposed of as urban waste.
Need help?
Do you have a question about the ESAM 5500 and is the answer not in the manual?
Questions and answers