Table of Contents
Advertisement
OPERATOR'S MANUAL
United States Patent Pending
18 in. 40 VOLT
LITHIUM-ION LAWN MOWER
WITH 2.5 AMP HOUR BATTERY
60418
BATTERY MUST BE CHARGED BEFORE FIRST USE. SEE PAGE 11 FOR INSTRUCTIONS
Your lawn mower has been engineered and manufactured to our high standard for dependability, ease of operation,
and operator safety. Properly cared for, it will give you years of rugged, trouble-free performance.
WARNING: To reduce the risk of injury, the user must read and understand the operator's manual
before using this product.
Thank you for your purchase.
DO NOT RETURN THIS PRODUCT TO THE STORE. OPERATING, ASSEMBLY, PARTS, SERVICE QUESTIONS?
CALL 1-800-377-5888 (USA) / 1-800-561-0004 (CAN) BETWEEN 7:30AM—4:30PM EST FOR ASSISTANCE
SAVE THIS MANUAL FOR FUTURE REFERENCE
Advertisement
Table of Contents

Subscribe to Our Youtube Channel
Related Manuals for EarthWise 60418


Summary of Contents for EarthWise 60418
- Page 1 18 in. 40 VOLT LITHIUM-ION LAWN MOWER WITH 2.5 AMP HOUR BATTERY 60418 BATTERY MUST BE CHARGED BEFORE FIRST USE. SEE PAGE 11 FOR INSTRUCTIONS Your lawn mower has been engineered and manufactured to our high standard for dependability, ease of operation, and operator safety.
-
Page 2: Table Of Contents
TABLE OF CONTENTS Introduction…………………………………..…………………………………………...2 General Safety Rules……………………………………...…………………………….3 Specific Safety Rules………………………………………………………………… 3-4 Symbols……………………………………..………………………………………… 5-6 Features………………………………………………………………………………. 7-8 Assembly…………………………………………………………………...…………8-11 Operation…………………………………...……………………………...………..12-14 Maintenance………………………………..………………………………...……..15-17 Exploded View/Parts List………………………………….…………………….…18-19 Troubleshooting…………………………….…………………………………………..20 Warranty………………………………………..………………………...…………..21 Parts Ordering/Service..…………………………………………………Back Page INTRODUCTION This product has many features for making its use more pleasant and enjoyable. -
Page 3: General Safety Rules
GENERAL SAFETY RULES Do not operate the equipment while barefoot or when wearing WARNING: sandals or similar lightweight footwear. Wear protective footwear READ AND UNDERSTAND ALL INSTRUCTIONS that will protect your feet and improve your footing on slippery surfaces. Failure to follow all instructions listed below and on the machine ... - Page 4 SPECIFIC SAFETY RULES SAFETY RULES FOR CHARGER Clear the work area before each use. Remove all objects such as rocks, sticks, wire, bones, toys, or other objects which can be Do not abuse the cord. Never use the cord for carrying, pulling thrown by the blade.
-
Page 5: Symbols
SYMBOLS Some of the following symbols may be used on this product. Please study them and learn their mean- ing. Proper interpretation of these symbols will allow you to operate the product better and safer. SYMBOL NAME DESGNATION/EXPLANATION Volts Voltage Amperes Current Hertz... -
Page 6: Symbols
SERVICE CENTER for repair. When servicing, operator’s manual, do not use this product. Call use only identical replacement parts. Earthwise customer service for assistance. WARNING: The operation of any power tool can result in foreign objects being thrown into your eyes, which can result in severe eye damage. -
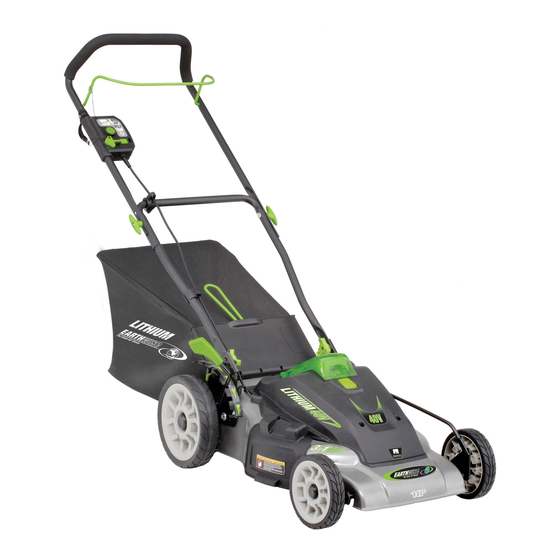
Page 7: Features
FEATURES PRODUCT SPECIFICATIONS Height Adjustments………………………1-1/2 in. to 4 in. *Battery………………………………..40V 2.5Ah Lithium Wheel Size…………………………7 in. front, 9.5 in. rear Input………………………………………….. 40V DC only Weight…………………………………….23.3kg (51.4 lb) No-load Speed…………………………2,800 r/min (RPM) 40V 2.5Ah BATTERIES (2) SWITCH MOTOR/BLADE CONTROL ASSEMBLY BATTERY PORT CHARGER COVER GRASS CATCHER... -
Page 8: Assembly
FEATURES KNOW YOUR LAWN MOWER MOTOR/BLADE CONTROL ASSEMBLY See figure 1 The motor/blade control, located on the upper handle of the mower, engages and disengages the motor and The safe use of this product requires an understanding blade. of the information on the product and in this operator’s manual as well as a knowledge of the project you are MULCHING PLUG attempting. - Page 9 ASSEMBLY ADJUSTING HANDLE See figure 2 UPPER HANDLE Fully loosen the handle knobs on both sides of the HANDLE handle. KNOBS Pull up and back on the upper handle to raise the handle into operating position. Make certain the handles snap into place securely.
- Page 10 ASSEMBLY ASSEMBLY OF BATTERY PORT COVER Position the battery cover hinge hole over the post of Do not attempt to operate mower without battery the battery port bracket. port cover being assembled. Moisture, dust and dirt within the battery port can cause permanent damage to the batteries and will effect the performance of the mower.
-
Page 11: Operation
ASSEMBLY To set the blade height: INSTALLING THE GRASS CATCHER See figure 5 To raise the blade height, grasp the height adjustment NOTE: When using the grass catcher, do not install either lever and move it toward the back of the mower. the side discharge deflector or the mulching plug. - Page 12 2 to 3 initial charging/discharging cycles may be light, this indicates that something is wrong with the required to achieve maximum run time/capacity. battery. Contact Earthwise customer service center at When fully charge, the battery can be safely stored in 1-800-377-5888 (USA)/ 1-800-561-0004 (CAN) for temperatures down to -68℉...
- Page 13 OPERATION REMOVING THE BATTERY PACK WINTER STORAGE To Remove the Battery Pack When fully charge, the battery can be safely stored Lift the battery port cover in temperatures down to -68℉ (-20℃) for a period of Press and hold the battery latch button at the top of up to one month before requiring charging.
- Page 14 OPERATION MOWING TIPS Make sure the lawn is clear of stones, sticks, wires and other objects that could damage the lawn mower blades or motor. Such objects could be accidentally thrown by the mower in any direction and cause serious personal injury to the operator Switch and others.
-
Page 15: Maintenance
MAINTENANCE WARNING: WARNING: When servicing, use only identical replacement parts. Use Always protect hands by wearing heavy gloves and/or of any other parts may create a hazard or cause product wrapping the cutting edges of the blade with rags and other damage. - Page 16 MAINTENANCE Place the new blade on the shaft against the fan assembly. Make sure it is installed with the curved FAN ASSEMBLY ends pointing up toward the mower deck and not down toward the ground. Replace the blade insulator and spacer, then thread the blade nut on the shaft and finger tighten.
-
Page 17: Maintenance
MAINTENANCE REPLACING WHEELS See Figure 16 HUBCAP To Replace a wheel: Stop the motor and remove the switch key. Remove battery from the battery compartment. SELF-LOCKING Turn the mower on its side. Using a flat blade screwdriver, pry off the hubcap. ... -
Page 18: Exploded View/Parts List
EXPLODED VIEW MODEL 60418 Part number Description Qty. Part number Description Qty. 8440-518504 upper handle assy. 8342-516404 button spring 8331-510801 handle grip 1.10 8042-516201 switch 8440-518503 handle assy. 1.11 8187-510801 trigger fixed plate hex lock nut 03D 8312-510801 switch button 1.12... -
Page 20: Troubleshooting
CALL US FIRST For any questions about operating or maintaining your product, call the Earthwise™ Help Line! 1-800-377-5888 (USA) 1-800-561-0004 (CAN) Your product has been fully tested prior to shipment to ensure your complete satisfaction. Page 20... -
Page 21: Warranty
ANY NON-RESIDENTIAL USE OR COMMERCIAL USE VOIDS ALL WARRANTIES. CALL US FIRST!! Call us first with questions about operating or maintaining your lawn mower at 1-800-377-5888 (USA) 1-800-561-0004 (CAN) between 7:30 a.m.—4:30 p.m. Eastern Standard Time, or send emails to earthwise@reelin.com Page 21... - Page 22 WITH 2.5 AMP HOUR BATTERY 60418 SERVICE For parts or service, contact your nearest EarthWise authorized service dealer. Be sure to provide all relevant information when you call or visit. For the location of the authorized service dealer nearest you, please call 1-800-377-5888 (USA) 1-800-561-0004 (CAN) or visit us online at www.americanlawnmower.com.
Need help?
Do you have a question about the 60418 and is the answer not in the manual?
Questions and answers
EARTHWISE MODEL 60420 need PN 8149- 517601