Subaru Legacy Owner's Manual
7” subaru starlink multimedia plus
7” subaru starlink multimedia navigation
2016
Hide thumbs
Also See for Legacy:
- Service manual (83 pages) ,
- Owner's manual (28 pages) ,
- Reference booklet (21 pages)

Subscribe to Our Youtube Channel
Related Manuals for Subaru Legacy


Summary of Contents for Subaru Legacy
- Page 1 7” SUBARU STARLINK Multimedia Plus ™ 7” SUBARU STARLINK Multimedia Navigation ™ OWNER’S MANUAL Legacy, Outback 2016 Love. It’s what makes a Subaru, a Subaru.
- Page 2 This means that information may be included about devices that are not installed in your vehicle. SUBARU STARLINK is the “in-car connectivity system” available on select Subaru vehicles. FUJI HEAVY INDUSTRIES LTD., TOKYO, JAPAN is a registered trademark of Fuji Heavy Industries Ltd.
- Page 3 TABLE OF CONTENTS QUICK GUIDE 1 QUICK GUIDE · BASIC FUNCTION... 20 · QUICK REFERENCE... 28 · NAVIGATION OPERATION... 29 · FUNCTION INDEX... 34 BASIC FUNCTION 2 BASIC FUNCTION · BASIC INFORMATION BEFORE OPERATION... 38 · REAR VIEW CAMERA... See vehicle Owner’s Manual AUDIO 3 AUDIO ·...
-
Page 4: Table Of Contents
INTRODUCTION INTRODUCTION INTRODUCTION READ FIRST The symbols described below are found in this instruction We recommend that you wait until the positioning stabilizes manual as well as on the unit itself to insure its proper and before starting to drive. safe usage and to prevent injury or damage to property. - Page 5 INTRODUCTION Information in this manual that must be observed for the SYMBOLS USED IN ILLUSTRATIONS unit, and information that is useful to know is indicated as follows. Safety symbol WARNING The symbol of a circle with a slash through it means “Do not”, “Do not do this”...
- Page 6 INTRODUCTION The driver should not perform operations such as volume PRECAUTIONS FOR USE adjustment while driving. Inattention to road conditions ahead may result in an accident, so be sure to stop the vehicle in a safe place before performing the operation. WARNING The driver should not change discs while driving.
- Page 7 If such an abnormality occurs, stop Be careful of the volume when turning on the power. If a loud using the unit immediately and contact your SUBARU dealer. noise is emitted suddenly when you turn on the power, it may damage your hearing.
- Page 8 Furthermore, do not hit the screen or rub it with hard objects. If the unit does not return to normal operation even after several Avoid touching the “SD memory card” terminals to prevent hours, contact your SUBARU dealer. contamination. Doing so may cause card read failure.
- Page 9 INTRODUCTION NOTE NOTE The display may appear brighter when the temperature is low, the battery was removed for a long time, the current position or immediately after starting the engine, however, this is a may not be displayed correctly. Wait a short time until the GPS characteristic of the LED elements, and does not indicate a fault.
- Page 10 INTRODUCTION SAFETY INSTRUCTION (WITHOUT WARNING NAVIGATION FUNCTION) For safety, the driver should not operate the system while he/ cause an accident. SAFETY INSTRUCTION (WITH NAVIGATION FUNCTION) To use this system in the safest possible manner, follow all the safety tips shown below. Do not use any feature of this system to the extent it priority while driving should always be the safe operation To use this system in the safest possible manner, follow all...
- Page 11 INTRODUCTION Prior to the actual use of this system, learn how to use it and While driving, listen to the voice instructions as much as become thoroughly familiar with it. Read the entire manual to make sure you understand the system. Do not allow is safe.
- Page 12 INTRODUCTION HOW TO READ THIS MANUAL BASIC INFORMATION BEFORE OPERATION INFO SCREEN OPERATION SPLIT SCREEN OPERATION The split screen can display multiple information screens, REORDERING THE MENU ICONS such as the audio system screen and hands-free screen, simultaneously. Order of the menu icons can be changed. The following describes screen operation for the system Display the “INFO (INFO)”...
-
Page 13: Table Of Contents
Table of Contents BASIC FUNCTION BASIC INFORMATION BEFORE OPERATION ... 38 INITIAL SCREEN ..............38 QUICK GUIDE INITIAL SCREEN ............38 BASIC FUNCTION ..........20 LOADING AND UNLOADING A DISC ........41 LOADING A DISC ............41 OVERVIEW BUTTONS ............20 UNLOADING A DISC............41 “HOME (HOME)” SCREEN ..........22 CONNECTING AND DISCONNECTING A USB MEMORY/ “APPS (APPS)”... - Page 14 MEDIA OPERATION ..........78 AUDIO CD ..................78 BASIC OPERATION ..........54 OVERVIEW ..............78 SOME BASICS ..............54 USB MEMORY ..............81 TURNING THE SYSTEM ON AND OFF ......54 OVERVIEW ..............81 SELECTING AN AUDIO SOURCE ........55 iPod ..................84 SOUND SETTINGS............56 OVERVIEW ..............84 AUDIO SCREEN ADJUSTMENT ........58 SD CARD (WITH NAVIGATION FUNCTION) .......87 VOICE RECOGNITION SYSTEM ........59 OVERVIEW ..............87...
- Page 15 Bluetooth PHONE MESSAGE FUNCTION ......127 PHONE RECEIVING A MESSAGE ..........129 PHONE OPERATION (HANDS-FREE SYSTEM CHECKING MESSAGES ..........129 REPLYING TO A MESSAGE (QUICK REPLY) ....130 FOR CELLULAR PHONES) ....... 114 CALLING THE MESSAGE SENDER ......131 QUICK REFERENCE ............114 SOME BASICS ..............115 SETUP ..............
- Page 16 APPS INFORMATION BEFORE USING THE APPLICATION ....146 USEFUL INFORMATION ........162 BEFORE USING THE APPLICATION ........146 SiriusXM RADIO DATA SERVICE ........162 SETTINGS REQUIRED DISPLAYING SPORTS INFORMATION......162 TO USE THE APPLICATION ........147 DISPLAYING WEATHER INFORMATION.....163 ABOUT APP-BASED CONNECTED CONTENT ...147 DISPLAYING STOCKS INFORMATION......167 DISPLAYING FUEL INFORMATION STARLINK ............
- Page 17 OTHER SETTINGS ..........188 DESTINATION SEARCH ........209 GENERAL SETTINGS ............188 DESTINATION SEARCH SCREEN ........209 GENERAL SETTINGS SCREEN ........188 SEARCH OPERATION ............210 VOICE SETTINGS ...............193 SETTING HOME AS DESTINATION ......211 VOICE SETTINGS SCREEN ........194 SEARCHING BY FIND ADDRESS ........ 211 SEARCHING BY FIND PLACES ........214 VEHICLE CUSTOMIZATION ..........194 SEARCHING BY FIND ON MAP ........218...
- Page 18 ROUTE GUIDANCE ..........224 MEMORY POINTS ..........237 ROUTE GUIDANCE SCREEN ..........224 MEMORY POINTS SETTINGS ...........237 SCREEN FOR ROUTE GUIDANCE ......224 SETTING UP HOME .............237 STANDARD MAP ICON ..........224 SAVING DESTINATIONS ..........238 DATA FIELDS ..............225 SETUP ..............239 ROUTE OVERVIEW ............226 LANE INFORMATION AND SIGNS .......226 NAVIGATION SETTINGS ............239 HIGHWAY SERVICES ...........227...
- Page 19 Siri/VOICE RECOGNITION SYSTEM APPENDIX/WHAT TO DO IF/INDEX Siri ............... 252 MAP DATABASE INFORMATION AND UPDATES ........... 278 Siri ..................252 ® BEFORE USING Siri .............252 CERTIFICATION ..........281 USING Siri ..............253 Siri OPERATION ............253 CERTIFICATION ..............281 SiriusXM Satellite Radio ..........281 ® VOICE RECOGNITION SYSTEM SiriusXM DATA SERVICE..........281 OPERATION ............
- Page 20 MEMO...
-
Page 21: Quick Guide
QUICK GUIDE... -
Page 22: Basic Function
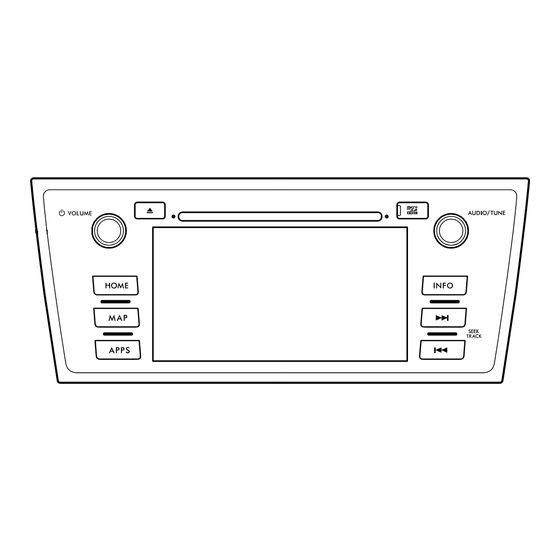
BASIC FUNCTION BASIC FUNCTION OVERVIEW BUTTONS Function Page Without navigation function 45, 46 you can control the selected functions. Insert a disc into this slot. The CD player turns on immediately. 60, 69, Turn the “AUDIO/TUNE” knob to select 78, 81, a radio station or skip to the next or 84, 87, 91, 152... - Page 23 BASIC FUNCTION Function Page Function Page microSD card slot* Select to seek up or 60, 69, Open the cover and insert an SD card down for a radio station or to access a 78, 81, into this slot. 84, 87, Select to display the navigation screen Press and hold (while the map SD card is inserted).
-
Page 24: Home (Home)" Screen
BASIC FUNCTION “HOME (HOME)” SCREEN Function Page Select to display the “HOME (HOME)” screen. Select to display the map screen. Select to display the audio control screen. Select to display the hands-free operation screen. Select to display the “SETTINGS (SETTINGS)” screen. Select to display the “INFO (INFO)”... -
Page 25: Apps (Apps)" Screen
BASIC FUNCTION “APPS (APPS)” SCREEN Function Page Select , or select and then select Select to display the “STARLINK APPS disclaimer (STARLINK disclaimer)” (APPS), to display the “APPS (APPS)” screen. screen. Select to display the “MirrorLink™ (MirrorLink™)” screen. Select to display the “Pandora (Pandora)*”... -
Page 26: Info (Info)" Screen
BASIC FUNCTION “INFO (INFO)” SCREEN Function Page This screen can be used to specify vehicle maintenance Select to display stocks information. settings, display photos, etc. Select to display fuel information. Select , or select and then select INFO Select to view pictures in the USB (INFO), to display the “INFO (INFO)”... -
Page 27: Split Screen
BASIC FUNCTION SPLIT SCREEN Press and hold the “AUDIO/TUNE” knob, to display the split screen. The split screen can display two information screens simultaneously, such as the audio system screen and hands-free screen or the hands-free screen and navigation* screen. When hands-free mode is selected, it is possible to make a call on the home screen if the desired telephone number is registered to one of the 4 displayed buttons. -
Page 28: Status Display
BASIC FUNCTION STATUS DISPLAY Indicators Conditions The status of the Bluetooth connection and so on is This icon is displayed when the Bluetooth connection is established. displayed on the screen. An antenna for the Bluetooth connection is built into the instrument panel. The condition of the Bluetooth connection may deteriorate and the system may not function when a Bluetooth device is used in the following... - Page 29 BASIC FUNCTION Indicators Conditions Full amount The amount displayed does not always of battery correspond with the amount displayed on the charge left Bluetooth device. The amount of battery charge left may not be displayed depending on the type of the Bluetooth device connected.
-
Page 30: Quick Reference
QUICK REFERENCE QUICK REFERENCE “SETTINGS (SETTINGS)” SCREEN Function Page The items shown on the “SETTINGS (SETTINGS)” screen Select to turn the screen off. can be set. Select and then select SETTINGS Select to change the selected language, (SETTINGS) to display the “SETTINGS (SETTINGS)” operation sound, automatic screen screen. -
Page 31: Navigation Operation
NAVIGATION OPERATION NAVIGATION OPERATION Select (Destination). REGISTERING HOME (WITH Destination NAVIGATION FUNCTION) Select , or select and then select (MAP). Select (Go Home). Go Home Select (Menu). Menu Select (Yes). - Page 32 NAVIGATION OPERATION Select (Find on Map). Select (OK). Find on Map Registration of home is complete. Select (Select). Select Registering home in a different way Setting home as the destination...
-
Page 33: Operation Flow: Guiding The Route (With Navigation Function)
NAVIGATION OPERATION OPERATION FLOW: GUIDING Select (Destination). Destination THE ROUTE (WITH NAVIGATION FUNCTION) Select , or select and then select (MAP). There are different kinds of methods to search for a Select (Menu). Menu Select (Next). Next... -
Page 34: Setting Home As The Destination (With Navigation Function)
NAVIGATION OPERATION SETTING HOME AS THE Select (Go!). Guidance to the destination is displayed on the DESTINATION (WITH NAVIGATION screen and can be heard via voice guidance. FUNCTION) Select , or select and then select (MAP). Select (Menu). Menu... - Page 35 NAVIGATION OPERATION Select (Destination). Destination Select (Go Home). Go Home Select (Next). Next Select (Go!). Guidance to the destination is displayed on the screen and can be heard via voice guidance.
-
Page 36: Function Index
FUNCTION INDEX FUNCTION INDEX Map* FUNCTION INDEX *: With navigation function Audio Displaying maps Page Function Page Viewing the map screen Using the radio 60, 69 Displaying the current position Playing an audio CD or MP3/WMA/AAC disc Changing the scale Playing an SD* card Changing the map orientation... - Page 37 FUNCTION INDEX Route guidance* Useful functions *: With navigation function Information Page Before starting or during route guidance Page Displaying vehicle maintenance Starting route guide Hands-free system (for cellular phone) Page Editing the route Registering/connecting Bluetooth phone Viewing the entire route map Making a call on a Bluetooth phone Adjusting route guidance volume Receiving a call on the Bluetooth phone...
- Page 38 MEMO...
-
Page 39: Basic Function
BASIC FUNCTION... -
Page 40: Basic Information Before Operation
BASIC INFORMATION BEFORE OPERATION BASIC INFORMATION BEFORE OPERATION Select (I Agree). INITIAL SCREEN I Agree INITIAL SCREEN WARNING When the vehicle is stopped with the engine running, always apply the parking brake for safety. After about 5 seconds, the “CAUTION (CAUTION)” screen automatically switches to the next screen. - Page 41 BASIC INFORMATION BEFORE OPERATION Select (Next). Change the unit settings if necessary. Select Next Next (Next) to continue. starts. You can change this at any time from “Units and Select the desired language and narrator. Select Next (Next) to continue. Change the initial route plan settings if necessary.
- Page 42 BASIC INFORMATION BEFORE OPERATION Select (Finish). Finish The screen goes off if the screen is not operated for several seconds. To prevent the screen from being displayed again, select (Do Not Tell Me Do Not Tell Me Again Again). MAINTENANCE INFORMATION is selected, the registered phone number can This system reminds users when to replace certain parts or be called.
-
Page 43: Loading And Unloading A Disc
BASIC INFORMATION BEFORE OPERATION LOADING AND UNLOADING A DISC UNLOADING A DISC Press and remove the disc. LOADING A DISC CAUTION Never try to disassemble or oil any part of the CD player. Do not insert anything other than a disc into the slot. Insert a disc into the disc slot. -
Page 44: Connecting And Disconnecting A Usb Memory/ Portable Device
BASIC INFORMATION BEFORE OPERATION CONNECTING AND LOADING AND UNLOADING AN DISCONNECTING A USB MEMORY/ SD CARD (WITH NAVIGATION PORTABLE DEVICE FUNCTION) CONNECTING A DEVICE LOADING AN SD CARD Connect a device. CAUTION insert it until it clicks into place. When contact is made with the stopper inside, the card cannot be inserted any further. - Page 45 BASIC INFORMATION BEFORE OPERATION Turn the ignition switch to the “OFF” position. Close the SD card slot cover. Open the SD card slot cover. NOTE You can enjoy music/video by inserting an SD card containing card containing image data. Insert the SD card. Make sure that the SD card is fully inserted.
-
Page 46: Unloading An Sd Card
BASIC INFORMATION BEFORE OPERATION Turn the ignition switch to the “OFF” position. UNLOADING AN SD CARD Open the SD card slot cover. CAUTION When removing an SD card from the unit, pull it out horizontally. Do not pull it out upward or downward with force. Doing so may damage the SD card. -
Page 47: Touch Screen Gestures
BASIC INFORMATION BEFORE OPERATION TOUCH SCREEN GESTURES Operation method Outline Main use Operations are performed by touching the touch screen Drag* Touch the Scrolling the screen with lists Scrolling the Operation method Outline Main use and move the map screen* screen to the desired position. -
Page 48: Touch Screen Operation
BASIC INFORMATION BEFORE OPERATION TOUCH SCREEN OPERATION Operation method Outline Main use This system is operated mainly by the buttons on the Rotate* To change the Changing the screen. (Referred to as screen buttons in this manual.) map direction, horizontal When a screen button is touched, a beep sounds. -
Page 49: Info Screen Operation
BASIC INFORMATION BEFORE OPERATION INFO SCREEN OPERATION SPLIT SCREEN OPERATION The split screen can display multiple information screens, REORDERING THE MENU ICONS such as the audio system screen and hands-free screen, simultaneously. Order of the menu icons can be changed. The following describes screen operation for the system with navigation function. -
Page 50: Customizing The Split Screen
BASIC INFORMATION BEFORE OPERATION ENTERING LETTERS AND CUSTOMIZING THE SPLIT SCREEN NUMBERS/LIST SCREEN The display items/area on the split screen can be changed. OPERATION From the split screen Select ENTERING LETTERS AND NUMBERS When searching by an address, name, etc., or entering data, letters and numbers can be entered via the screen. -
Page 51: List Screen Operation
BASIC INFORMATION BEFORE OPERATION On certain letter entry screens, letters can be entered Icon Function in upper or lower case. : Select to enter in lower case. Select to skip to the next or previous page. Select and hold to scroll through the : Select to enter in upper case. - Page 52 BASIC INFORMATION BEFORE OPERATION CHARACTER JUMP BUTTONS IN LISTS SORTING (WITH NAVIGATION FUNCTION) Some lists contain character screen buttons, (ABC), The order of a list displayed on the screen can be sorted in the order of name, distance, detour, etc. (DEF) etc., which allow a direct jump to list entries that begin with the same letter as the character screen Select...
-
Page 53: Screen Adjustment
BASIC INFORMATION BEFORE OPERATION SCREEN ADJUSTMENT Function The brightness, contrast, tone and color of the screen can Select to adjust the general screen display. be adjusted. Select to adjust the camera display. Select Select to adjust the video display. Select the desired item to be adjusted. General Select (SETTINGS). -
Page 54: Changing Between Day And Night Mode
BASIC INFORMATION BEFORE OPERATION Video (USB video/SD video*) CHANGING BETWEEN DAY AND NIGHT *: With navigation function MODE Depending on the position of the headlight switch, the screen changes to day or night mode. NOTE If the screen is set to day mode with the headlight switch turned on, this condition is memorized even with the engine turned off. -
Page 55: Audio
AUDIO... -
Page 56: Basic Operation
BASIC OPERATION BASIC OPERATION SOME BASICS TURNING THE SYSTEM ON AND OFF This section describes some of the basic features of the audio/visual system. Some information may not pertain to your system. Your audio/visual system works when the ignition switch is turned to the “ACC”... -
Page 57: Selecting An Audio Source
BASIC OPERATION SELECTING AN AUDIO SOURCE NOTE When there are two pages, select to change the page. Press the “AUDIO/TUNE” knob. REORDERING THE AUDIO SOURCE Display the “Select Audio Source (Select Audio Source)” Select (Reorder). Reorder The screen can also be displayed by selecting followed by (AUDIO). -
Page 58: Sound Settings
BASIC OPERATION Select (Sound) on the audio control screen. Sound SOUND SETTINGS Select the desired screen button. The following sound quality can be adjusted, however, the Type A adjustments that can be made will differ depending on the TONE: How good an audio program sounds is largely determined by the mix of the treble, mid and bass levels. - Page 59 BASIC OPERATION ADJUSTING THE SOUND QUALITY (type A model Function only) Select to reset the adjusted sound quality. You can adjust the sound quality from the low band to the Select to change to sound quality appropriate for the high band. music (POP, ROCK, JAZZ) type.
-
Page 60: Audio Screen Adjustment
BASIC OPERATION SAVING THE SOUND QUALITY AUDIO SCREEN ADJUSTMENT You can save the adjusted sound quality settings. The screen size can be selected for each type of media. Adjust the sound quality. USB video/SD video* Select (EQ1) or (EQ2) for 2 seconds or *: With navigation function more. -
Page 61: Voice Recognition System
BASIC OPERATION MirrorLink VOICE RECOGNITION SYSTEM Select (Screen Format) on the Screen Format application list screen. Press this switch to operate the voice recognition system. Select the desired item to be adjusted. Function The voice recognition system and its list of Select to display a screen surrounded by black on all four sides. -
Page 62: Radio Operation
RADIO OPERATION RADIO OPERATION AM/FM RADIO Function Select to seek for a station/channel. Select and hold for continuous seek. OVERVIEW Control screen Select (AM) or (FM) on the “Select Audio Source Control panel <Top screen> <Option screen> Function Function Turn to adjust volume. Select to scroll the list of preset buttons. -
Page 63: Presetting A Station
RADIO OPERATION PRESETTING A STATION Function Select to display the audio source selection screen. Radio mode has a mix preset function, which can store up to 36 stations from any of the AM, FM or SiriusXM Satellite Select to display the cache radio operation buttons. Radio bands. -
Page 64: Selecting A Station From The List
RADIO OPERATION SELECTING A STATION FROM THE LIST RADIO BROADCAST DATA SYSTEM A station list can be displayed. This audio system is equipped with Radio Broadcast Data Systems (RBDS). RBDS mode allows text messages to be Select received from radio stations that utilize RBDS transmitters. FM radio only: Select the desired program genre. - Page 65 RADIO OPERATION SELECTING A DESIRED GENRE REFRESHING THE STATION LIST Select Select (Refresh) on the station list screen Refresh and the following screen will be displayed. FM radio only: Select a desired genre of station and select a desired station. The genre list is in the following order: Classical Country...
-
Page 66: Available Hd Radio™ Technology
RADIO OPERATION TRAFFIC ANNOUNCEMENT (FM RADIO) AVAILABLE HD Radio™ TECHNOLOGY automatically located. Select Select Traffic NOTE program station will be displayed for a while. - Page 67 RADIO OPERATION HD Radio Technology manufactured under license from MULTICAST iBiquity Digital Corporation. U.S. and Foreign Patents. HD Radio™ and the HD, HD Radio, and “Arc” logos are On the FM radio frequency most digital stations have proprietary trademarks of iBiquity Digital Corp. “multiple”...
- Page 68 RADIO OPERATION NOTE The tag information can not be preserved while scanning or caching the radio station. FM stations can provide additional digital-only audio If tagging the music information fails, “Saving the HD Radio programming on HD2/HD3 Channels. tag was unsuccessful. (Saving the HD Radio tag was unsuccessful.)”...
-
Page 69: Caching Radio Programs
RADIO OPERATION CACHING RADIO PROGRAMS A radio program can be cached and played back in a time- Program Service Data: Presents song name, artist, station shifted manner. IDs, and other relevant data streams. AUTOMATIC PLAYBACK OF THE CACHE Visual information related to content being played on If the radio broadcast is interrupted by another audio your HD Radio receiver, such as Album Art, historical output, such as an incoming phone call, the system will... - Page 70 RADIO OPERATION PLAYING BACK THE CACHE MANUALLY Function Returns to the live radio broadcast. The broadcast cached in the program cache can be played back manually. Shows the current playback location relative to the cached broadcast recording time with a bar scale. Select the desired cache radio operation button.
-
Page 71: Siriusxm ® Satellite Radio
RADIO OPERATION SiriusXM Satellite Radio ® Control screen OVERVIEW Select (SiriusXM) on the “Select Audio Source SiriusXM Control panel <Top screen> <Option screen> Information/Function Select to scroll the list of preset buttons. Select to display the option screen. Function Displayed when playing cached programs. Turn to adjust volume. -
Page 72: How To Subscribe To Siriusxm ® Satellite Radio
RADIO OPERATION NOTE Information/Function If the ignition switch is turned “OFF” and then set to the “ACC” or “ON” position when listening to an XL channel, broadcasting from the XL channel will not begin. If so, the SXM001 channel will be broadcast. XL channels may include frequent explicit language or mature Select to search subscribed channels by category. - Page 73 RADIO OPERATION HOW TO SUBSCRIBE WARNING SiriusXM Satellite Radio Services — Legal Disclaimers and ® It is necessary to enter into a separate service agreement Warnings with SiriusXM Satellite Radio Services in order to receive ® Fees and Taxes — Subscription fee, taxes, one time satellite broadcast programming in the vehicle.
- Page 74 RADIO OPERATION NOTE CAUTION SiriusXM ® Satellite Radio Services — Subscription Instructions It is prohibited to copy, decompile, disassemble, reverse For SiriusXM Services requiring a subscription (such as engineer, hack, manipulate, or otherwise make available any SiriusXM Satellite Radio Services, and some Infotainment & ®...
-
Page 75: Displaying The Radio Id
RADIO OPERATION PRESETTING A CHANNEL NOTE SiriusXM ® Satellite Radio Service is solely responsible for the quality, availability and content of the satellite radio services Tune in the desired channel. provided, which are subject to the terms and conditions of the Select ((add new)). -
Page 76: Caching Radio Programs
RADIO OPERATION PLAYING BACK THE CACHE CACHING RADIO PROGRAMS A radio program can be cached and played back in a time- The broadcast cached in the program cache can be played shifted manner. back. The program that is currently being listened to, and channel programs registered as Smart Favorites can be cached. -
Page 77: Registering A Smart Favorite Channel
RADIO OPERATION TuneStart FUNCTION Function Fast forwards continuously. TuneStart begins playing the current program from the The fast forward speed increased the longer the button beginning when tuning to a channel registered in Smart is held down. Favorites, allowing you to enjoy the complete program. Select to access the desired program. -
Page 78: Tunescan Tm Function
RADIO OPERATION TuneScan FUNCTION SEARCHING BY FEATURED FAVORITES Featured Favorites are a collection of channels that are of all recorded programs one after another. created by the SiriusXM programming team that are updated several times throughout the year. TuneScan is applicable to channels registered in Smart Favorites, and programs that are currently being listened to. -
Page 79: Preserving A Music Information
RADIO OPERATION PRESERVING A MUSIC INFORMATION NOTE The tag information can not be preserved while scanning or Tag information in the music broadcasting is preserved in caching the radio program. The song title and artist name will appear on the screen when the system and transmits to an iPod. -
Page 80: Media Operation
MEDIA OPERATION MEDIA OPERATION Control panel OVERVIEW The CD operation screen can be reached by the following methods: Select (DISC) on the “Select Audio Source DISC Function Turn to adjust volume. Press to turn the audio system on/off. Press to eject a disc. Disc slot Press to select an audio mode. - Page 81 MEDIA OPERATION Control screen Function Audio CD Select to enable/disable repeat playback of the track currently playing. MP3/WMA/AAC disc The repeat method changes as shown below each time the repeat button is selected. : Repeat playback is disabled. <Audio CD> : The file currently playing will be repeated.
- Page 82 MEDIA OPERATION NOTE Function Audio CD Select to enable/disable random playback for the tracks If a CD-TEXT disc is inserted, the title of the disc and track will currently playing on the CD. be displayed. Up to 32 characters can be displayed. MP3/WMA/AAC disc If the disc contains no CD-TEXT, only the track number would be displayed on the screen.
-
Page 83: Usb Memory
MEDIA OPERATION USB MEMORY Control panel While driving, video/slideshow will not be displayed. Only sound will be output. OVERVIEW The USB Audio/Video playback screen can be reached by the following methods: Function Select (USB (DEVICE USB (DEVICE NAME) Turn to adjust volume. Press to turn the audio system on/off. - Page 84 MEDIA OPERATION Control screen (Audio/Video) Function The repeat method changes as shown below each time the repeat button is selected. : Repeat playback is disabled. : The file/track currently playing will be repeated. : The files/tracks contained within the <USB Audio> folder/album currently playing will be repeated.
- Page 85 MEDIA OPERATION Control screen (Photo) Function Select to display the play mode selection screen. “Artists (Artists)”/“Albums (Albums)”/“Songs (Songs)”/“Genres (Genres)”/“Composers (Composers)”/“Folder (Folder)”/“Videos (Videos)” are on the play mode selection screen. Switching between USB audio and USB video is possible on the play mode selection screen. To return to the top screen, select (Now Now Playing...
-
Page 86: Ipod
MEDIA OPERATION iPod WARNING Do not operate the player’s controls or connect the USB memory while driving. On this unit, you can perform operations such as selecting CAUTION OVERVIEW Do not leave your portable player in the car. In particular, high temperatures inside the vehicle may damage the portable The iPod operation screen can be reached by the following player. - Page 87 MEDIA OPERATION Control panel Control screen Function Turn to adjust volume. Press to turn the audio system on/off. Turn to select a track. Function Press to select an audio mode. Displays cover art. Select to select a track. Select to display a track list. Select and hold to fast forward/rewind.
- Page 88 MEDIA OPERATION CAUTION Function Do not leave your portable player in the car. In particular, high Select to set repeat playback. temperatures inside the vehicle may damage the portable player. The random playback method changes as shown below each time the random button is selected. Do not push down on or apply unnecessary pressure to the portable player while it is connected as this may damage the : The tracks contained within the list...
-
Page 89: Sd Card (With Navigation Function)
MEDIA OPERATION SD CARD (WITH NAVIGATION OVERVIEW FUNCTION) The SD Audio/Video playback screen can be reached by the following methods: Select (microSD) on the “Select Audio microSD NOTE The SD Photo playback screen can be reached by the following method: will not be possible to use the navigation function if an SD card other than the map SD card is inserted in the SD card slot. - Page 90 MEDIA OPERATION Control panel Control screen (Audio/Video) <SD Audio> Function Turn to adjust volume. <SD Video> Press to turn the audio system on/off. Function Press to select an audio mode. Displays cover art. Select and hold to fast forward/rewind. Select to display the audio source selection screen. Select to play/pause.
- Page 91 MEDIA OPERATION Function Function The repeat method changes as shown below each time Select to display the play mode selection screen. the repeat button is selected. “Artists (Artists)”/“Albums (Albums)”/“Songs (Songs)”/“Genres (Genres)”/“Composers : Repeat playback is disabled. (Composers)”/“Folder (Folder)”/“Videos (Videos)” are on the play mode selection screen.
- Page 92 MEDIA OPERATION Control screen (Photo) WARNING Do not operate the player’s controls or insertion and pulling out the SD card while driving. CAUTION Do not insert foreign objects into the SD card slot. NOTE However, the slideshow interval may be longer than when an names.
-
Page 93: Bluetooth Audio
MEDIA OPERATION Bluetooth AUDIO Control panel The Bluetooth audio system enables users to enjoy listening to music that is played on a portable player on the vehicle speakers via wireless communication. This audio system supports Bluetooth, a wireless data system capable of playing portable audio music without cables. - Page 94 MEDIA OPERATION Control screen Function Select to enable/disable repeat playback of the track currently playing. Select to enable/disable random playback for the tracks currently playing on the Bluetooth audio device. Select to display the playlist screen. To return to the top screen, select (Now Now Playing Playing) on the list screen.
- Page 95 MEDIA OPERATION WARNING NOTE Depending on the Bluetooth device that is connected to the Do not operate the player’s controls or connect to the system, the music may start playing when selecting while Bluetooth audio system while driving. it is paused. Conversely, the music may pause when selecting implantable cardiac pacemakers, cardiac resynchronization while it is playing.
-
Page 96: Connecting A Bluetooth Device
MEDIA OPERATION CONNECTING A Bluetooth DEVICE To use the Bluetooth audio system, it is necessary to OVERVIEW register a Bluetooth device with the system. The AUX operation screen can be reached by the following Registering an additional device methods: Select (Select Device) on the Bluetooth Select Device audio control screen. - Page 97 MEDIA OPERATION Control screen WARNING Do not operate the player’s controls or connect the portable audio device while driving. CAUTION Do not leave portable audio device in the vehicle. The temperature inside the vehicle may become high, resulting in damage to the player. Do not push down on or apply unnecessary pressure to the portable audio device while it is connected as this may damage the portable audio device or its terminal.
-
Page 98: Audio/Visual Remote Controls
AUDIO/VISUAL REMOTE CONTROLS AUDIO/VISUAL REMOTE CONTROLS “+/-” switch STEERING SWITCHES Mode Operation Function Some parts of the audio/visual system can be adjusted using the switches on the steering wheel. Press Volume up/down Volume Press and hold Volume up/down continuously List screen Press Cursor up/down “... - Page 99 AUDIO/VISUAL REMOTE CONTROLS Back switch Mode Operation Function Mode Operation Function Audio CD, MP3/ Press WMA/AAC disc, Return to the previous screen ,USB,iPod, Press and hold Fast forward/rewind Press when is displayed on Bluetooth audio the screen. Press Track up (“ ”only) Return to the “HOME Pandora*...
-
Page 100: Setup
SETUP SETUP AUDIO SETTINGS AUDIO SETTINGS SCREEN Detailed audio settings can be programmed. Select Select (SETTINGS). SETTINGS Select (Audio). Audio Select the items to be set. - Page 101 SETUP DISPLAYING THE “Audio Settings (Audio Function Page Settings)” SCREEN IN A DIFFERENT WAY Select to specify the sound settings. USB video/SD video* Select to change the number of preset radio *: With navigation function stations/channels displayed on the screen. Select on the audio control screen.
- Page 102 SETUP iPod SETTINGS Display the “Audio Settings (Audio Settings)” screen. Select (iPod Sound Input). iPod Sound Input Select a screen button for the desired setting. AUTOMATIC SOUND LEVELIZER (ASL) The system adjusts to the optimum volume and tone quality according to vehicle speed to compensate for increased vehicle noise.
-
Page 103: Tips For Operating The Audio/Visual System
TIPS FOR OPERATING THE AUDIO/VISUAL SYSTEM TIPS FOR OPERATING THE AUDIO/VISUAL SYSTEM OPERATING INFORMATION RADIO Usually, a problem with radio reception does not mean there CAUTION is a problem with the radio — it is just the normal result of To avoid damage to the audio/visual system: conditions outside the vehicle. - Page 104 TIPS FOR OPERATING THE AUDIO/VISUAL SYSTEM Fading and drifting stations: Generally, the effective range of FM is about 25 miles (40 km). Once outside this range, you may notice fading and drifting, which increase with can interfere with those received directly from the radio the distance from the radio transmitter.
-
Page 105: Cd Player And Disc
TIPS FOR OPERATING THE AUDIO/VISUAL SYSTEM Use only discs marked as shown above. The CD PLAYER AND DISC following products may not be playable on your player: Extremely high temperatures can keep the CD player SACD from working. On hot days, use the air conditioning dts CD system to cool the inside of the vehicle before using the player. - Page 106 TIPS FOR OPERATING THE AUDIO/VISUAL SYSTEM Low quality discs CAUTION special shaped, transparent/translucent, low quality or labeled discs such as those shown in the illustrations. The use of such discs may damage the player, or it may be impossible to eject the disc. This system is not designed for use of Dual Discs.
- Page 107 TIPS FOR OPERATING THE AUDIO/VISUAL SYSTEM Dirt, scratches, warping, pin holes or other disc CD-R/RW DISCS damage could cause the player to skip or to repeat a section of a track. (To see a pin hole, hold the disc up CD-R/CD-RW discs that have not been subject to to the light.) Remove discs from the players when not in use.
-
Page 108: Usb Memory
For USA customers, please visit www.subaru.com for details. Outside of the USA customers, contact your local dealer to arrange a demonstration in order to the vehicle. -
Page 109: Sd Card (With Navigation Function)
TIPS FOR OPERATING THE AUDIO/VISUAL SYSTEM CORRESPONDING SAMPLING FREQUENCY SD CARD (WITH NAVIGATION FUNCTION) (Audio) SD cards that are marked as follows can be used. File type Frequency (kHz) 32/44.1/48 MPEG 1 LAYER 3 played. 16/22.05/24 Multi Media Cards (MMC) cannot be used. MPEG 2 LSF LAYER 3 Supported capacity: Maximum 32 GB 32/44.1/48... - Page 110 TIPS FOR OPERATING THE AUDIO/VISUAL SYSTEM The player is compatible with VBR (Variable Bit Rate). used in the same way as an ID3 tag. WMA/AAC tags MP3 (MPEG Audio Layer 3), WMA (Windows Media carry information such as track title and artist name. Audio) and AAC (Advanced Audio Coding) are audio compression standards.
- Page 111 TIPS FOR OPERATING THE AUDIO/VISUAL SYSTEM can be played. However, the start of playback may be delayed when using discs containing numerous levels of folders. For this reason, we recommend creating discs with no more than 2 levels of folders. 001.mp3 002.wma Folder 1...
- Page 112 TIPS FOR OPERATING THE AUDIO/VISUAL SYSTEM COMPATIBLE COMPRESSED FILES (Video) Video Codec File Type WMV9 MPEG4 MPEG4 H.264/AVC MPEG4 Audio Codec Corresponding Sampling File Type Corresponding Bit Rates (kbps) Channel Mode Frequency (kHz) Stereo MPEG1 Layer3: 32/44.1/48 MPEG1 Layer3: 32-320 Joint Stereo MPEG2 LSF Layer3: 16/22.05/24 MPEG2 LSF Layer3: 8-160...
-
Page 113: Terms
TIPS FOR OPERATING THE AUDIO/VISUAL SYSTEM WMA TAG TERMS PACKET WRITE same way as an ID3 tag. WMA tags carry information such as track title and artist name. This is a general term that describes the process of ISO 9660 FORMAT writing data on-demand to CD-R, etc., in the same This is the international standard for the formatting of ID3 TAG... - Page 114 TIPS FOR OPERATING THE AUDIO/VISUAL SYSTEM Playlists created using “WINAMP” software have a AAC is short for Advanced Audio Coding and refers to an audio compression technology standard used with MPEG2 and MPEG4. MP3 is an audio compression standard determined by a working group (MPEG) of the ISO (International Standard Organization).
-
Page 115: Phone
PHONE... -
Page 116: Phone Operation (Hands-Free System For Cellular Phones)
PHONE OPERATION (HANDS-FREE SYSTEM FOR CELLULAR PHONES) PHONE OPERATION (HANDS-FREE SYSTEM FOR CELLULAR PHONES) QUICK REFERENCE Function Page The phone top screen can be used to make a phone call. To Registering/connecting Bluetooth phone display the hands-free operation screen, select Calling on the Bluetooth phone then select (PHONE), select... -
Page 117: Some Basics
PHONE OPERATION (HANDS-FREE SYSTEM FOR CELLULAR PHONES) SOME BASICS CAUTION The hands-free system enables calls to be made and Do not leave your cellular phone in the vehicle. The temperature inside may rise to a level that could damage the received without having to take your hands off the steering phone. -
Page 118: Registering/Connecting A Bluetooth Phone
PHONE OPERATION (HANDS-FREE SYSTEM FOR CELLULAR PHONES) USING THE PHONE SWITCH/MICROPHONE NOTE Keep call volume down. Otherwise, the other party’s voice Steering switch may be audible outside the vehicle and voice echo may increase. When talking on the phone, speak clearly towards the By pressing the phone switch, a call can be received or microphone. -
Page 119: Voice Recognition System
PHONE OPERATION (HANDS-FREE SYSTEM FOR CELLULAR PHONES) Microphone ABOUT THE CONTACTS IN THE CONTACT The microphone is used when talking on the phone. LIST The following data is stored for every registered phone. When another phone is connected, the following registered data cannot be read: Contact data Call history data Speed dial data... -
Page 120: When Selling Or Disposing Of The Vehicle
PHONE OPERATION (HANDS-FREE SYSTEM FOR CELLULAR PHONES) CALLING ON THE Bluetooth WHEN SELLING OR DISPOSING OF THE PHONE VEHICLE After a Bluetooth phone has been registered, a call can A lot of personal data is registered when the hands-free be made using the hands-free system. There are several system is used. - Page 121 PHONE OPERATION (HANDS-FREE SYSTEM FOR CELLULAR PHONES) With navigation function How to make a call list Page Select By speed dial list By call history By contacts list By dial pad* By e-mail/SMS/MMS By POI call* Select (PHONE). By off hook switch PHONE Select the desired tab to call from.
-
Page 122: By Speed Dial List
PHONE OPERATION (HANDS-FREE SYSTEM FOR CELLULAR PHONES) BY SPEED DIAL LIST BY CALL HISTORY Calls can be made using registered contacts which can be Up to 30 of the latest call history items (missed, incoming and outgoing) can be selected from the (Call Call History History) tab. -
Page 123: By Contacts List
PHONE OPERATION (HANDS-FREE SYSTEM FOR CELLULAR PHONES) When is selected BY CONTACTS LIST Check that the “Call (Call)” screen is displayed. Calls can be made by using contact data which is When the desired contact is selected Select corresponding to the desired number to call. Up to 2500 contacts (maximum of 4 phone numbers and Check that the “Call (Call)”... -
Page 124: By Dial Pad
PHONE OPERATION (HANDS-FREE SYSTEM FOR CELLULAR PHONES) WHEN THE CONTACT IS EMPTY BY DIAL PAD FOR PBAP COMPATIBLE Bluetooth PHONES Select the (Dial Pad) tab and enter the phone Dial Pad When “Automatic Contact/History Transfer (Automatic number. Contact/History Transfer)” is set to on, contacts are FOR OPP COMPATIBLE Bluetooth PHONES Contacts can be transferred or added manually. -
Page 125: By Off Hook Switch
PHONE OPERATION (HANDS-FREE SYSTEM FOR CELLULAR PHONES) BY OFF HOOK SWITCH BY SPLIT SCREEN Calls can be made using the latest call history item. Press the switch on the steering wheel to display the phone top screen. Press the switch on the steering wheel to display the “Call History (Call History)”... -
Page 126: Receiving On The Bluetooth Phone
PHONE OPERATION (HANDS-FREE SYSTEM FOR CELLULAR PHONES) RECEIVING ON THE Bluetooth NOTE PHONE During international phone calls, the other party’s name or number may not be displayed correctly depending on the type of cellular phone you have. INCOMING CALLS The ringtone that has been set in the “Sound Settings (Sound Settings)”... -
Page 127: Talking On The Bluetooth Phone
PHONE OPERATION (HANDS-FREE SYSTEM FOR CELLULAR PHONES) TALKING ON THE Bluetooth PHONE Function Page While talking on the phone, this screen is displayed. The Select to send tones. This button only appears when a number that contains a (w) is dialed in operations outlined below can be performed on this screen. -
Page 128: Sending Tones
PHONE OPERATION (HANDS-FREE SYSTEM FOR CELLULAR PHONES) SENDING TONES NOTE A continuous tone signal is a character string that consists of numbers and the characters “p” or “w”. (e.g. 056133w0123p#1 ) BY DIAL PAD When the “p” pause tone is used, the tone data up until the next pause tone will be automatically sent after 2 seconds have This operation cannot be performed while driving. -
Page 129: Incoming Call Waiting
PHONE OPERATION (HANDS-FREE SYSTEM FOR CELLULAR PHONES) Bluetooth PHONE MESSAGE Select (OK). FUNCTION NOTE The sound quality of the voice heard from the other party’s Received messages can be forwarded from the connected speaker may be negatively impacted. Bluetooth phone, enabling checking and replying using the To reset the transmit volume, select (Default). - Page 130 PHONE OPERATION (HANDS-FREE SYSTEM FOR CELLULAR PHONES) Check that the message inbox screen is displayed. Check that the message inbox screen is displayed. With navigation function Select : Select to change to phone mode. Function Page Receiving a message Select (PHONE).
-
Page 131: Receiving A Message
PHONE OPERATION (HANDS-FREE SYSTEM FOR CELLULAR PHONES) RECEIVING A MESSAGE NOTE Depending on the cellular phone used for receiving messages, When an e-mail/SMS/MMS is received, the incoming or its registration status with the system, some information may not be displayed. message screen pops up with sound and is ready to be The pop up screen is separately available for incoming e-mail operated on the screen. -
Page 132: Replying To A Message (Quick Reply)
PHONE OPERATION (HANDS-FREE SYSTEM FOR CELLULAR PHONES) Check that the message is displayed. NOTE Depending on the type of Bluetooth phone being connected, it may be necessary to perform additional steps on the phone. Messages are displayed in the appropriate connected Bluetooth phone’s registered mail address folder. -
Page 133: Calling The Message Sender
PHONE OPERATION (HANDS-FREE SYSTEM FOR CELLULAR PHONES) Select the desired message. NOTE Select (Send). Send To reset the editquick reply messages, select Default While the message is being sent, a sending message (Default). screen is displayed. “Quick Message 1” ( I'm driving right now. - Page 134 PHONE OPERATION (HANDS-FREE SYSTEM FOR CELLULAR PHONES) Select the text area. CALLING FROM E-MAIL/SMS/MMS MESSAGE DISPLAY Select the desired message. Select Select corresponding to the desired number to call. are displayed. Check that the “Call (Call)” screen is displayed. NOTE If there are 2 or more phone numbers, select the A series of numbers may be recognized as a phone number.
-
Page 135: Setup
SETUP SETUP PHONE/MESSAGE SETTINGS PHONE/MESSAGE SETTINGS SCREEN Select Information Page Connect phone Select (SETTINGS). SETTINGS Sound settings Select (Phone). Phone Select the item to be set. Contact/call history settings Messaging settings Phone display settings... -
Page 136: Sound Settings (Sound Settings)" Screen
SETUP Select the desired item to be set. DISPLAYING THE PHONE/MESSAGE SETTINGS SCREEN IN A DIFFERENT WAY Select “Sound Settings (Sound Settings)” SCREEN The call and ringtone volume can be adjusted. A ringtone Function can be selected. Select to set the desired ringtone. Display the “Phone/Message Settings (Phone/Message Select to adjust the ringtone volume. -
Page 137: Contact/Call History Settings (Contact/Call History Settings)" Screen
SETUP Select the desired item to be set. Function Select to set the desired incoming e-mail tone. Select to adjust the incoming e-mail tone volume. Select to adjust the default volume of the other party’s voice. Select to reset all setup items. “Contact/Call History Settings (Contact/Call History Settings)”... - Page 138 SETUP UPDATE CONTACTS FROM PHONE Function Page Select to add contacts to the speed dial list. Operation methods differ between PBAP compatible and OPP compatible Bluetooth phones. Select to delete contacts from the speed dial list. If your cellular phone is neither PBAP nor OPP compatible, Select to set the transferred contact image the contacts cannot be transferred.
- Page 139 SETUP FOR OPP COMPATIBLE Bluetooth PHONES REGISTERING A NEW CONTACT TO THE CONTACT LIST This operation cannot be performed while driving. Select (Update Update Contacts from Phone New contact data can be registered. Contacts from Phone). Up to 4 numbers per person can be registered. For PBAP Transfer the contact data to the system using a compatible Bluetooth phones, this function is available when Bluetooth phone.
- Page 140 SETUP REGISTERING A NEW CONTACT IN A DIFFERENT Select corresponding to the desired name or WAY (FROM THE “Call History (Call History)” number. SCREEN) This function is available for OPP compatible Bluetooth phones. Select the (Call History) tab and then Call History select a contact not yet registered in the contact list.
- Page 141 SETUP Select (Edit Contact). Select Edit Contact appears. NOTE Multiple data can be selected and deleted at the same time. DELETING THE CONTACT IN A DIFFERENT WAY (FROM THE “Contact Details (Contact Details)” SCREEN) (E-mail Addresses): Select to E-mail Addresses display all registered e-mail addresses for the contact.
- Page 142 SETUP When 15 contacts have already been registered to SPEED DIAL LIST SETTING the speed dial list When 15 contacts have already been registered to Up to 15 contacts (maximum of 4 numbers per contact) can the speed dial list, a registered contact needs to be be registered in the speed dial list.
- Page 143 SETUP DELETING THE CONTACTS IN THE SPEED DIAL LIST Select at the beginning of the desired contact list name to be registered in the speed dial list. Select (Remove Speed Dial). Remove Speed Dial Select the desired contacts and then select Remove (Remove).
-
Page 144: Messaging Settings (Messaging Settings)" Screen
SETUP Select at the beginning of the contact list name to “Messaging Settings (Messaging Settings)” be deleted from the speed dial list. SCREEN Display the “Phone/Message Settings (Phone/Message Select (Messaging Settings). Messaging Settings Select the desired item to be set. When selected, is changed to , and the data... -
Page 145: Phone Display Settings (Phone Display Settings)" Screen
SETUP Function Function Select to change the incoming e-mail display. Select to set automatic message transfer on/off. (Full Screen): When an e-mail is Full Screen Select to set automatic message readout on/off. received, the incoming e-mail display screen is the displayed and can be operated on the screen. - Page 146 SETUP Select the desired item to be set. Function Select to change the incoming call display. (Full Screen): When a call is received, Full Screen the hands-free screen is displayed and can be operated on the screen. (Drop-Down): A message is displayed Drop-Down on the upper side of the screen.
-
Page 147: Apps
APPS... -
Page 148: Before Using The Application
BEFORE USING THE APPLICATION BEFORE USING THE APPLICATION BEFORE USING THE APPLICATION NOTE Depending on the application, certain functions are not available Precautions to be aware of when using the application are while driving for reasons of safety. shown below. In order to maximize signal reception, performance and precision of the smartphone, please ensure the smartphone is placed as In this chapter, iPhone or Android devices will be referred to... -
Page 149: Settings Required To Use The Application
BEFORE USING THE APPLICATION SETTINGS REQUIRED TO USE THE ABOUT APP-BASED CONNECTED APPLICATION CONTENT In order to use the application on this system, the Requirements for using the connected content services of application must be installed on the smartphone. the application on this system. Search and download the application from your The latest version of the system is compatible with smartphone app. - Page 150 BEFORE USING THE APPLICATION NOTE NOTE Limitations: Communication and phone call charges for smartphones should Access to app-based connected content will depend on the be paid by the wireless subscriber. availability of wireless cellular and/or Wi-Fi network coverage If you lose the data in a smartphone or other device while using for the purpose of allowing your smartphone to connect to the it with the system, no compensation will be given for the lost internet.
-
Page 151: Starlink
STARLINK STARLINK Check that the “STARLINK disclaimer (STARLINK STARLINK disclaimer)” screen is displayed. The STARLINK function allows the system to link with a smartphone using Bluetooth. When connecting iPhone or Android devices with the STARLINK application installed, you can control STARLINK content through the system. -
Page 152: Mirrorlink
MirrorLink™ MirrorLink™ Control panel MirrorLink™ The MirrorLink function allows smartphone content to be operated via the system. To use the MirrorLink application, connect your Android device to the USB port. Depending on differences between models or software version etc., some models might be incompatible with this system. - Page 153 MirrorLink™ Control screen Function Displays software buttons that function as the buttons on the smartphone. Select to change the other audio source (Radio, Disc etc.). NOTE This function cannot be used while USB audio, video or photo is <Application list screen> in use.
-
Page 154: Aha Tm By Harman
by HARMAN by HARMAN by HARMAN OVERVIEW aha is a cloud-based application that connects to the system Control panel and gives you access to your favorite web content safely and easily. There are over 40,000 stations spanning internet radio, personalized music, audiobooks, Facebook, Twitter, restaurant and hotel searches, weather and more. - Page 155 by HARMAN Control screen Function Select to display the audio source selection screen. Station list Select to display the station operation screen. Displays station name. Select to display the top screen. <Top screen> Select to change the station operation screen buttons. Select to display the content item list.
-
Page 156: Using Aha Application
by HARMAN ABOUT THE SUPPORTED DEVICES FOR aha NOTE Top 35 entries in the preset station list on the smartphone are displayed. When there are more than 35 entries in the preset This system supports the following devices. station list, change the order of the entries in the list on the iPhone: iOS 5.0 or later smartphone. - Page 157 by HARMAN Main functions of the station operation screen button: For Android devices: Select (aha) on the “APPS (APPS)” screen. For details on the services or the operations, check The “aha” top screen can also be displayed by the aha site (http://www.aharadio.com) on the selecting (aha) on the “Select Audio Source internet.
- Page 158 by HARMAN STATION OPERATION SCREEN BUTTONS Button Function Select to refresh the content item information in the current station. Button Function Select to rewind the current content item for 15 Select to start playback. seconds. Select to fast forward the current content item for Select to pause playback.
- Page 159 by HARMAN Check that the countdown screen is displayed. Select (Send). Send (Cancel): Select to cancel shout function. Cancel Confirmation Record your voice and then select (Save). saved voice. Save (Try Again): Select to record your voice Try Again again. (Cancel): Select to cancel shout function.
-
Page 160: Pandora
Pandora ® Pandora ® Pandora ® OVERVIEW Pandora is free personalized radio that offers effortless and The Pandora operation screen can be reached by the endless music enjoyment and discovery. following methods: To use the Pandora application, connect your iPhone Connect the iPhone to the USB port, or connect the to the USB port, or connect your Android device via Android device by utilizing the Bluetooth connection. - Page 161 Pandora ® Control panel Function Turn to adjust volume. Press to turn the audio system on/off. Press to select an audio mode. Select to skip to the next track. Select and hold to rate the track currently playing as “Like” or “Dislike”.
- Page 162 Pandora ® Control screen Function Select to skip to the next track. Select to play/pause. Select to display a station list. Displays cover art. ABOUT THE SUPPORTED DEVICES This system supports the following devices. iPhone: iOS 5.0 or later Android: Differs with mobile device used Function Select to display the audio source selection screen.
-
Page 163: Information
INFORMATION... -
Page 164: Useful Information
USEFUL INFORMATION USEFUL INFORMATION SiriusXM RADIO DATA SERVICE* DISPLAYING SPORTS INFORMATION *: SiriusXM U.S. satellite and data services are available only in the 48 contiguous USA and DC. SiriusXM satellite service is also available in Sports information can be received via the SiriusXM ®... -
Page 165: Displaying Weather Information
USEFUL INFORMATION CHANGING THE FAVORITE Function Select (Change) next to the item to be edited. Change Select to switch to an audio broadcast while information during a game is being displayed. Select the desired sports. Select (Select) next to the item you want to set Select highest score is displayed in yellow. - Page 166 USEFUL INFORMATION With navigation function Weather forecast icons Check that weather information is displayed. Display Information No Data Available none Unknown Precip Isolated Thunderstorms Scattered Thunderstorms Scattered Thunderstorms (night) Function Select to switch the timing of the displayed forecast. Severe Thunderstorms Thunderstorms Items such as the weather forecast, forecast temperature or highest temperature (orange)/lowest...
- Page 167 USEFUL INFORMATION Display Information Display Information Moderate Snow Scattered Showers (night) Snow Drizzle Heavy Snow Freezing Drizzle Scattered Snow Showers (night) Freezing Rain Blowing Snow Mixed Rain And Hail Wintry Mix Blizzard Mixed Rain And Snow Mixed Rain And Sleet Sandstorm Hail Blowing Dust...
- Page 168 USEFUL INFORMATION Display Information Display Information Light Fog Sunny Heavy Fog Mostly Sunny Mist Clear (night) Hazy Mostly Clear (night) Smoky Partly cloudy Blustery Partly cloudy (night) Windy Mostly cloudy Cold Mostly cloudy (night) Cloudy...
-
Page 169: Displaying Stocks Information
USEFUL INFORMATION Check that stock information is displayed. Display Information Tropical Storm Hurricane Funnel Cloud Tornado Function Changes in brand, stock price and variation are DISPLAYING STOCKS INFORMATION displayed. Variations greater than zero are displayed in white and variations less than zero are displayed in red. Stock information can be received via the SiriusXM ®... -
Page 170: Displaying Fuel Information (Not Available In Canada)
USEFUL INFORMATION DISPLAYING FUEL INFORMATION Function (NOT AVAILABLE IN CANADA) Select to sort gas station by Distance from the current position. Fuel information can be received via the SiriusXM ® Satellite Select to sort gas station by price. Radio Service. Select to display information about the gas station and Select (Fuel). -
Page 171: Vehicle Monitor
USEFUL INFORMATION VEHICLE MONITOR SETTING FUEL TYPE Select (Fuel Type). Fuel Type DISPLAYING VEHICLE MONITOR Select the desired fuel type. Vehicle information such as the vehicle mode, acceleration, SETTING GAS STATION AS DESTINATION and engine oil temperature can be displayed. Select the desired nearby gas station. -
Page 172: Eco Monitor
USEFUL INFORMATION ECO MONITOR DISPLAYING FUEL HISTORY The average fuel consumption and instantaneous fuel DISPLAYING ECO MONITOR consumption history can be displayed. Three items of information can be displayed from remaining travel distance (range), instantaneous fuel consumption, Select (Eco Monitor). Eco Monitor average interval fuel consumption, and lifetime fuel Select... - Page 173 USEFUL INFORMATION CUSTOMIZE ECO MONITOR FUEL HISTORY SETTINGS Three items can be selected and displayed from remaining The scale of the time axis used to display Eco history can travel distance (range), instantaneous fuel consumption, be changed. average interval fuel consumption, and lifetime fuel Display “SETTINGS (SETTINGS)”...
- Page 174 USEFUL INFORMATION RESETTING THE LIFETIME FUEL CONSUMPTION The lifetime fuel consumption can be reset. Display “SETTINGS (SETTINGS)” screen. Select (Info). Info Select (Eco Monitor). Eco Monitor Select (Lifetime Fuel Cons Lifetime Fuel Cons Reset Reset). Select (Yes).
-
Page 175: Settings
SETTINGS... -
Page 176: Bluetooth ® Settings
Bluetooth SETTINGS ® Bluetooth ® SETTINGS Turn the Bluetooth connection setting of your cellular REGISTERING/CONNECTING phone on. Bluetooth DEVICE ® This function is not available when Bluetooth connection setting of your cellular phone is set to off. Without navigation function Select to display the phone top screen. - Page 177 Bluetooth SETTINGS ® For PBAP compatible Bluetooth phones When this screen is displayed, search for the device name displayed on this screen on the screen of your Select the desired item. Bluetooth device. (Yes): Transfer contacts from cellular phone. For details about operating the Bluetooth device, see (No): Do not transfer contacts from cellular the manual that comes with it.
- Page 178 Bluetooth SETTINGS ® For OPP compatible Bluetooth phones Select the desired item. Select (OK). (Transfer): Select to transfer contacts from Transfer the connected cellular phone. NOTE (Add): Select to add a new contact manually. The system waits for connection requests from the registered (Cancel): Select to cancel transfer.
-
Page 179: Registering A Bluetooth Audio Device For The First Time
Bluetooth SETTINGS ® The screen can also be displayed by selecting REGISTERING A Bluetooth AUDIO DEVICE followed by (AUDIO). AUDIO FOR THE FIRST TIME If the audio control screen appears, select Source (Source) on the audio screen, or press the “AUDIO/ To use the Bluetooth Audio, it is necessary to register an TUNE”... -
Page 180: Profiles
Bluetooth SETTINGS ® PROFILES This system supports the following services. Bluetooth Device Spec. Function Requirements Recommendations Bluetooth Phone/ Registering a Bluetooth Ver. 1.1 Ver. 3.0 +EDR Bluetooth Audio Device device Bluetooth Device Function Requirements Recommendations Hands-free system Ver. 1.0 Ver. 1.6 Ver. -
Page 181: Setting Bluetooth Details
Bluetooth SETTINGS ® SETTING Bluetooth DETAILS “Bluetooth Settings (Bluetooth Settings)” SCREEN Select Function Page Select (SETTINGS). SETTINGS Registering a Bluetooth device Select (Bluetooth). Bluetooth Deleting a Bluetooth device Select the desired item to be set. Connecting a Bluetooth device Editing the Bluetooth device information Bluetooth system settings... -
Page 182: Registering A Bluetooth Device
Bluetooth SETTINGS ® Select (Add). DISPLAYING THE “Bluetooth Settings (Bluetooth Settings)” SCREEN IN A DIFFERENT WAY When another Bluetooth device is connected To disconnect the Bluetooth device, select (Yes). From the phone/message settings screen When 5 Bluetooth devices have already been Select registered Select... -
Page 183: Deleting A Bluetooth Device
Bluetooth SETTINGS ® Register the Bluetooth device using your Bluetooth Select (OK) when the connection status changes device. from “Connection waiting... (Connection waiting...)” to A PIN-code is not required for SSP (Secure Simple “Connected (Connected)”. Pairing) compatible Bluetooth devices. Depending on the type of Bluetooth device being connected, a the Bluetooth device’s screen. -
Page 184: Connecting A Bluetooth Device
Bluetooth SETTINGS ® Select the device to be connected. Select appears. operation is complete. NOTE When deleting a Bluetooth phone, the contact data will be deleted at the same time. CONNECTING A Bluetooth DEVICE : Phone : Audio device Up to 5 Bluetooth devices (Phones (HFP) and audio devices : Smartphone Application (AVP)) can be registered. - Page 185 Bluetooth SETTINGS ® CONNECTING MANUALLY connection is complete. If an error message is displayed, follow the guidance When the auto connection has failed or “Bluetooth Power on the screen to try again. (Bluetooth Power)” is turned off, it is necessary to connect Bluetooth manually.
-
Page 186: Editing The Bluetooth Device Information
Bluetooth SETTINGS ® EDITING THE Bluetooth DEVICE INFORMATION The Bluetooth device’s information can be displayed on the screen. The displayed information can be edited. Display the “Bluetooth Settings (Bluetooth Settings)” Select the desired device to be edited. Select (Device Info). Device Info Information The name of the Bluetooth device. - Page 187 Bluetooth SETTINGS ® SETTING AUDIO DEVICE CONNECTION METHOD Information Select (Connect Audio Connect Audio Device from Device from). Select to reset all setup items. Select the desired connection method. (Vehicle): Select to connect the audio NOTE Vehicle system to the audio device. If 2 Bluetooth devices have been registered with the same device name, the devices can be distinguished referring to the (Device): Select to connect the audio device...
-
Page 188: System Settings (System Settings)" Screen
Bluetooth SETTINGS ® “System Settings (System Settings)” Information Page SCREEN Select to set Bluetooth connection on/off. Displays system name. Can be changed to a desired name. Display the “Bluetooth Settings (Bluetooth Settings)” PIN-code used when the Bluetooth device was registered. Can be changed to a desired Select (System Settings). - Page 189 Bluetooth SETTINGS ® CHANGING “Bluetooth Power (Bluetooth Power)” Select (Bluetooth Power). Bluetooth Power WHEN “Bluetooth Power (Bluetooth Power)” IS ON The Bluetooth device is automatically connected when the ignition switch is turned to the “ACC” or “ON” position. WHEN “Bluetooth Power (Bluetooth Power)” IS OFF The Bluetooth device is disconnected, and the system will not connect to it next time.
-
Page 190: Other Settings
OTHER SETTINGS OTHER SETTINGS GENERAL SETTINGS GENERAL SETTINGS SCREEN Settings are available for keyboard layout, operation sounds, etc. Select Select (SETTINGS). SETTINGS Select (General). General Select the items to be set. - Page 191 Android devices. Select to update the Gracenote database. For details, ® contact your SUBARU dealer. Select to change the language. Select to display the software information. Notices Select to turn the beep sound on/off. related to third party software used in this product are enlisted.
- Page 192 OTHER SETTINGS Function Function Select to set automatic time adjustment using GPS information on/off. Select to reset all setup items. : With navigation function Select to set daylight saving time on/off or to auto. : Pandora is available in the United States, Australia, and New Zealand. When set to auto, the daylight saving time setting automatically turns on or off based on the current CLOCK SETTINGS (WITH NAVIGATION...
- Page 193 OTHER SETTINGS Select (Copy from [device]). CUSTOMIZING THE SCREEN OFF IMAGES Copy from [device] Select the desired images from the list and then select (Copy). When the screen is turned off, the desired set image Copy can be displayed as the screen off image. Images can be copied from a USB memory or SD card*.
- Page 194 OTHER SETTINGS SETTINGS THE SCREEN OFF IMAGES Select the images to be deleted and then select Delete (Delete). Display the “General Settings (General Settings)” Select (Customize Customize Screen Off Image Screen Off Image). Select the device that the image is stored on. Select (Select Images).
-
Page 195: Voice Settings
OTHER SETTINGS VOICE SETTINGS Select appears. Voice volume, etc. can be set. Registered or changed personal settings will be deleted or returned to their default conditions. Select For example: Navigation settings* Audio settings SiriusXM Radio settings SiriusXM Radio service contents Phone settings *: With navigation function CAUTION... -
Page 196: Voice Settings Screen
OTHER SETTINGS VEHICLE CUSTOMIZATION VOICE SETTINGS SCREEN Settings are available for vehicle customization. Select Function Select to adjust the volume of voice guidance. Select to set the voice recognition prompts. Select (SETTINGS). SETTINGS Select to reset all setup items. Select (Vehicle Customization). -
Page 197: Vehicle Settings Screen
OTHER SETTINGS VEHICLE SETTINGS SCREEN Function Select to set the audible signal on/off. Select to set the leaving time for the welcome lighting. Select to set the approaching time for the welcome lighting. Select to change the defogger setting. Select to change the interior light off timer. Select to change the auto light sensor setting. -
Page 198: Maintenance
OTHER SETTINGS MAINTENANCE Select the desired item. MAINTENANCE When this system is turned on, the “Maintenance Reminder (Maintenance Reminder)” screen displays when it is time to Select , or select and then select INFO (INFO). Function Select to set the condition of parts or components. Select to add new information items separately from provided ones. - Page 199 OTHER SETTINGS Function Function When set to on, the indicator will illuminate. The Select to enter the next maintenance date. system is set to give maintenance information with the “Maintenance Reminder (Maintenance Reminder)” Select to enter the driving distance until the next maintenance check.
- Page 200 OTHER SETTINGS EDITING DEALER OR CONTACT NAME DEALER SETTING Select next to “Dealer (Dealer)” or “Contact Dealer information can be registered in the system. (Contact)”. Select (Set Dealer). Enter the name and then select (OK). Set Dealer Select the items to be edited. EDITING PHONE NUMBER Select next to “Phone # (Phone #)”.
-
Page 201: Navigation System
NAVIGATION SYSTEM (WITH NAVIGATION FUNCTION) -
Page 202: Basic Operation
BASIC OPERATION BASIC OPERATION QUICK REFERENCE Name Information/Function Page Select to change the map MAP SCREEN display mode between 2D 2D North-up, 2D north-up, 2D heading-up heading-up or or 3D. In 3D map, only To display this screen, select , or select 3D symbol a heading-up view is then select... -
Page 203: Map Operations
BASIC OPERATION MAP OPERATIONS Name Information/Function Page Highway Select to display the You can touch a position on the map, and then check that information highway information. position during navigation. The map’s current position Speed Limit Displays the speed limit for tracking function stops (the car marker (a blue arrow by indicator the road being driven on. - Page 204 BASIC OPERATION Operation Function Operation Function Select to open another screen Select to select the cursor as a new Selecting a displaying information on the destination. The route is researched destination selected map position (cursor). When automatically. Point Bluetooth is enabled on your cellular information Select to display the additional phone, a call can be placed if the...
-
Page 205: Navigation Menu
BASIC OPERATION NAVIGATION MENU Function Select to search for a destination. You can select which When you select (Menu) on the navigation screen, Menu method to use to reach your destination by entering the the navigation menu (main menu) appears. You can access address, selecting a favorite spot, selecting a position all of the software’s functions from this menu. -
Page 206: Check Current Position
BASIC OPERATION CHECK CURRENT POSITION Information/Function Latitude/Longitude (Current positional coordinates use The button on this screen searches for information on the the WGS84 land survey system) current position (if there is no GPS reception it uses the last Altitude (Advanced information acquired by the GPS receiver - may not be accurate) and displays them on the screen. -
Page 207: Map Screen Operation
BASIC OPERATION MAP SCREEN OPERATION NOTE and the map moves. CURRENT POSITION DISPLAY The current position is automatically set as the vehicle receives signals from the GPS (Global Positioning System). If the current Select , or select and then select position is not correct, it is automatically corrected after the vehicle receives signals from the GPS. -
Page 208: Map Scale
BASIC OPERATION This map shows the current position (shown as the MANUAL OPERATION vehicle marked as a blue arrow), recommended routes (blue lines), and the immediate surrounding Select to change the scale of the map screen. area. When GPS positioning is not active, the vehicle displayed. -
Page 209: Orientation Of The Map
BASIC OPERATION 3D screen ORIENTATION OF THE MAP The orientation of the map can be changed between 2D north-up, 2D heading-up and 3D. Select North-up screen : 2D north-up symbol Regardless of the direction of vehicle travel, north is always up. : 2D heading-up and 3D symbol The direction of vehicle travel is always up. -
Page 210: Position Marker
BASIC OPERATION TRAFFIC INFORMATION POSITION MARKER SELECTED MAP LOCATION (CURSOR) DISPLAYING TRAFFIC INFORMATION Use one of the following methods to mark a map location. a different color on the map, and a small icon representing Select the map during navigation. Select the map when the destination you want is displayed in the search results. -
Page 211: Destination Search
DESTINATION SEARCH DESTINATION SEARCH DESTINATION SEARCH SCREEN Function Page The “Destination (Destination)” screen enables to search Select to search for a destination by address. for a destination. To display the “Destination (Destination)” Select to search for a destination by point of screen, select , or select and then select... -
Page 212: Search Operation
DESTINATION SEARCH SEARCH OPERATION If necessary, you can touch another point on the map to change the destination. Select , or select and then select The cursor ( ) is displayed at the new position. (MAP). Select (Next) (when a route has been set) or Next (Select) (when no route has been set) to set the Select... -
Page 213: Setting Home As Destination
DESTINATION SEARCH Select the desired country or state (province). SETTING HOME AS DESTINATION To use this function, it is necessary to register a home Display “Destination (Destination)” screen. Select (Go Home). Go Home Select (Next) (when a route has been set) or Select the desired search method. - Page 214 DESTINATION SEARCH SEARCHING BY CITY NOTE If the destination is to be used frequently, it can be saved to the Select (City). destination list before selecting (Next) (when a route City Next has been set) or (Go!) (when no route has been set). Enter a city name or ZIP Code.
- Page 215 DESTINATION SEARCH SEARCHING BY INTERSECTION HINTS FOR QUICK ADDRESS ENTRY When entering a city/town name or a street name: Select (Intersecting Street). Intersecting Street Only characters that can be displayed in the Select from the list. search results are shown on the keyboard. Other If there are only a few roads at the intersection, the characters are grayed out.
-
Page 216: Searching By Find Places
DESTINATION SEARCH You can search by road category as well as road SEARCHING BY FIND PLACES name. When the same word is included in names such as the street, road, and main street, by entering There are 3 methods to search for a destination by Find Places. - Page 217 DESTINATION SEARCH SEARCHING BY NAME SEARCHING BY LOCATION Select (Quick Search Select (Custom Search). Quick Search Along Route Custom Search Along Route). Select the spot area. When route been set, select (Quick Search Quick Search Around Last Known Position Around Last Known Position) (no GPS signal) or (Quick Search Around Here) Quick Search Around Here (on GPS signal).
- Page 218 DESTINATION SEARCH SELECTING FROM THE CATEGORIES SEARCHTING BY NAME Select a main category (such as accommodation) or Select a main category (such as accommodations) or (List All Places). (Find by Name). List All Places Find by Name Select a sub-category (such as hotel or motel) or Select a sub-category (such as hotels or motels) or (Find by Name).
- Page 219 DESTINATION SEARCH Select the desired spot. SEARCHING BY PRESET CATEGORY Select the desired search category. (Filter): Select to narrow down the list. Filter (More): Select to change the sort order of the More list or to display all listed spots on the map. Function Select to search for gas stations along the set route.
-
Page 220: Searching By Find On Map
DESTINATION SEARCH SEARCHING BY FIND ON MAP SEARCHING BY FAVORITES Display “Destination (Destination)” screen. Display “Destination (Destination)” screen. Select (Find on Map). Select (Favorites). Find on Map Favorites Scroll the map to the desired point and touch. Select the desired destination. The cursor ( ) is displayed. -
Page 221: Searching From A Frequently Used Destination (Smart History)
DESTINATION SEARCH (Filter): Select to narrow down the list. Filter SEARCHING FROM A FREQUENTLY USED : Select to delete the previous destination. DESTINATION (SMART HISTORY) (More): Select to delete all destinations on the More Display “Destination (Destination)” screen. list. SEARCHING BY COORDINATES Select the destination Display “Destination... -
Page 222: Other Search Operation
DESTINATION SEARCH OTHER SEARCH OPERATION Function Select to search for police stations. SEARCHING BY WHERE AM I? Select to search for gas stations. You can search for the closest assistance service by using This button searches for everything around your the “Where Am I? (Where Am I?)”... -
Page 223: Searching For A Rest Area Following Periodic Rest Notification
DESTINATION SEARCH Display the “General Settings (General Settings)” SEARCHING GAS STATION IN LOW FUEL WARNING Select (Periodic Rest Periodic Rest Notification A nearby gas station can be selected as a destination. SEARCHING FOR A REST AREA FOLLOWING Select (Yes) when the low fuel warning appears. PERIODIC REST NOTIFICATION Select the desired nearby gas station. -
Page 224: Starting Route Guidance
DESTINATION SEARCH STARTING ROUTE GUIDANCE When the countdown is displayed in the (Go!), guidance begins automatically after 10 seconds even When the destination is set, the entire route map from the if you do not select the button. current position to the destination is displayed. WARNING STARTING ROUTE GUIDANCE Select... -
Page 225: Canceling Route
DESTINATION SEARCH Select (More). More Function Select (Simulate Navigation). Simulate Navigation Select to change the speed of the simulation. You can Check that the route simulation is displayed. select from speeds of 4x, 8x, or 16x. Select again to return to normal speed. The simulation begins from the start point and works through the entire route at the recommended speed. -
Page 226: Route Guidance
ROUTE GUIDANCE ROUTE GUIDANCE ROUTE GUIDANCE SCREEN Information/Function Current street name During the route guidance, various types of guidance Select to display the “Where Am I? (Where Am I?)” screens can be displayed depending on conditions. Next street name SCREEN FOR ROUTE GUIDANCE NOTE If the vehicle goes off the guidance route, the route is searched again. -
Page 227: Data Fields
ROUTE GUIDANCE Icon Explanation Icon Explanation Disembark from the ferry. U-turn right You are half way to your destination. Keep left at the fork in the road. You have arrived at your destination. Keep right at the fork in the road. Turn left &... -
Page 228: Route Overview
ROUTE GUIDANCE Select to display the desired item. Check that the entire route map is displayed. NOTE LANE INFORMATION AND SIGNS When the vehicle is on the guidance route, the distance measured along the route is displayed. Travel time and arrival LANE INFORMATION speed limit. -
Page 229: Highway Services
ROUTE GUIDANCE SIGNS HIGHWAY SERVICES When detailed information is available, the arrows are When driving on the expressway, this displays information on up to the next three highway service areas. By default, removed and signs are displayed. Signs are displayed “Gas Station (Gas Station)”, “Restaurant (Restaurant)”, at the top of the map. -
Page 230: Junction Display
ROUTE GUIDANCE TYPICAL VOICE GUIDANCE Select one from the list to display more details. PROMPTS As the vehicle approaches an intersection, or point, where maneuvering the vehicle is necessary, the system’s voice guidance will provide various messages. WARNING You can check it on the map and set it as a waypoint or as a destination. -
Page 231: Route Related Functions
ROUTE GUIDANCE ROUTE RELATED FUNCTIONS Information/Function Destination Name/Address DISPLAYING CHANGE ROUTE Displays detailed information (unpaved roads, toll roads, and so on) on the warning icons (depending on conditions) for the current route. You can check a variety of route settings recommended by Total time for route the software. -
Page 232: Editing Route
ROUTE GUIDANCE EDITING ROUTE ADDING DESTINATIONS You can change the destination list and edit the route. You can add or delete destinations, change the start point, or Select change the order of the list. Search for an additional destination in the same way as Display the “Change Route (Change Route)”... -
Page 233: Deleting Destinations
ROUTE GUIDANCE DELETING DESTINATIONS Select Select Delete appears. SETTING ROUTE PREFERENCES The conditions to determine the route can be selected from various choices such as Highways, Toll Road, Ferries, etc. Select (Menu) on the map screen. Menu Select (More). More Select (Settings). - Page 234 ROUTE GUIDANCE SELECTING ROUTE TYPE Function Select whether or not to use the expressway when Display the “Route Settings (Route Settings)” screen. creating the route. Select whether or not to use toll roads (Period Charge) Select (Route Planning Route Planning Method in the route.
-
Page 235: Avoidances Setting
ROUTE GUIDANCE AVOIDANCES SETTING Function Select to delete the avoid route being navigated. The avoidances feature allows you to remove any of the roads or special sections on the planned route. In each case, the result of the selected avoidance is shown on the map with an indication of additional or Display the “Change Route (Change Route)”... -
Page 236: Setting A New Starting Point
ROUTE GUIDANCE SETTING A NEW STARTING POINT In standard navigation, all routes are created from the current position. You can turn off the GPS so that you can study a route that is not currently being driven, run a simulation, and check the time or distance for the route. This way, you can set a start point for the route without using the current GPS position. -
Page 237: Creating A Route
ROUTE GUIDANCE CREATING A ROUTE current position) for the route. Select the route’s start point by using the same method You can create a route for each destination in the saved as selecting the destination. routes menu. Set the new start point and then select (Go!). -
Page 238: Route Alternatives
ROUTE GUIDANCE Select the desired route. Select the route’s destination using the same method as described previously. After selecting a new destination, you are returned to the list. To add another destination, select at the point where you want to add a new route point to the list, and repeat the steps above. -
Page 239: Memory Points
MEMORY POINTS MEMORY POINTS Select (Set HOME MEMORY POINTS SETTINGS Set as HOME location location). Home and preset destinations can be set as memory points. The registered points can be used as the destinations. SETTING UP HOME If home has been registered, that information can be recalled by selecting (Go Home) on the Go Home... -
Page 240: Saving Destinations
MEMORY POINTS SAVING DESTINATIONS The destination list is a list of frequently used destinations. Up to 100 destinations can be stored in the favorites list. Select the desired item to search for the location. The map is displayed in full-screen mode with the selected point at the center. -
Page 241: Setup
SETUP SETUP NAVIGATION SETTINGS Function Select to check global sunrise and sunset times. Places a mark on the map to show the user’s current position OPTIONAL FUNCTIONS and route points. Select Details button to check accurate sunrise and sunset times for all points along the route Various options are available from the “More (More)”... - Page 242 SETUP SCREENS FOR NAVIGATION SETTINGS Function Page Select to change the voice guidance language. Select to specify various warnings and warning Select (Settings). settings. Settings Select the items to be set. display and the method to use the received Select to set the route search method. appearance.
-
Page 243: Sound And Warnings
SETUP SOUND AND WARNINGS Function This button displays the current language for voice guidance. Select to change to a new language/narrator WARNING from the available languages and list of narrators. When you select an item from the list, a sample of the audio is Be sure to set the volume of the audio at an appropriate level. - Page 244 SETUP DETOUR SETTINGS TRAFFIC Select Traffic Select (Detour). Detour Select the items to be set. Select the items to be set. Function Function When this button is selected, routes that do not satisfy searching for a route. When searching for a new route, conditions are searched.
- Page 245 SETUP EVENT TYPES SETTINGS MAP SETTINGS Fine tunes the map screen appearance. Because the map is displayed on the screen, you can check the results as you Select (Event Types). Event Types change settings. Select an item from the event list. Select the items to be set.
- Page 246 SETUP UNITS AND FORMATS Function Select to adjust the standard zoom and the angle of tilt. Sets the units used by the program to measure distance. You can set the level in three stages. You can select to display the time in various international Select to turn the auto zoom function on or off.
- Page 247 SETUP TRIP MONITOR VISUAL GUIDANCE Contains useful information on the user’s distance moved Changes settings related to map screen guidance. in the trip logs and path logs. You can save trip logs automatically by turning this setting on, or save them Select (Visual Guidance).
- Page 248 SETUP Function Displays service area information while driving on the expressway. Select to turn this function on and off. Select to select the service area information display items. When information is available, lane information similar to map. Select to turn this function on and off. When approaching an expressway exit or a complicated intersection, the map switches to a 3D display if the necessary information can be displayed.
-
Page 249: Tips For The Navigation System
TIPS FOR THE NAVIGATION SYSTEM TIPS FOR THE NAVIGATION SYSTEM The Global Positioning System (GPS) developed and GPS (GLOBAL POSITIONING operated by the U.S. Department of Defense provides SYSTEM) an accurate current position, normally using 4 or more satellites, and in some case 3 satellites. The GPS system has a certain level of inaccuracy. - Page 250 TIPS FOR THE NAVIGATION SYSTEM When the tires are worn. CAUTION After replacing a tire or tires. The installation of window tinting may obstruct the GPS When using tires that are smaller or larger than the signals. Most window tinting contains some metallic content that will interfere with GPS signal reception of the antenna in When the tire pressure in any of the 4 tires is not the instrument panel.
-
Page 251: Map Data
TIPS FOR THE NAVIGATION SYSTEM MAP DATA If a location has multiple names and the system announces 1 or more of them. When a route cannot be searched. REGARDING ROADS AND PLACE NAME If the route to your destination includes gravel, DATA unpaved roads or alleys, the route guidance may not be shown. - Page 252 MEMO...
-
Page 253: Siri/Voice Recognition System
Siri/VOICE RECOGNITION SYSTEM... -
Page 254: Siri
Siri Siri An iPhone and iPod touch data plan: If the data plan Siri ® for your iPhone and iPod touch does not provide for unlimited data usage, additional charges from your Siri is a function that allows your iPhone and iPod touch to carrier may apply for accessing app-based connected be used without any manual operation by connecting your content via 3G, 4G, Wi-Fi, or 4G LTE wireless... -
Page 255: Using Siri
Siri MICROPHONE USING Siri STEERING SWITCH It is unnecessary to speak directly into the microphone when using Siri. Talk switch Siri OPERATION Press and hold the talk switch to start Siri. To cancel Siri, press and hold the talk switch. Press and hold the talk switch. - Page 256 Siri If required to say more, the system will notify you with NOTE the beep sound. Continue speaking. In the following conditions, the system may not recognize what is If the system fails to recognize what is being said, or being said properly, and use of Siri may not be possible.
-
Page 257: Voice Recognition System Operation
VOICE RECOGNITION SYSTEM OPERATION VOICE RECOGNITION SYSTEM OPERATION Press the talk switch to start the voice recognition VOICE RECOGNITION SYSTEM system. To cancel voice recognition, press and hold the talk The voice recognition system enables the navigation, switch or the source switch. audio, hands-free systems, etc. -
Page 258: Voice Recognition System Operation
VOICE RECOGNITION SYSTEM OPERATION Say the command. NOTE In the following conditions, the system may not recognize the command properly and using voice commands may not be possible: The command is incorrect or unclear. Note that certain words, recognize. There is excessive background noise, such as wind noise. Commands related with each function are displayed VOICE RECOGNITION SYSTEM OPERATION on the screen of the each function tab. - Page 259 VOICE RECOGNITION SYSTEM OPERATION With navigation function: VOICE COMMAND EXAMPLE: SEARCH FOR A To use the voice recognition system for navigation SONG function, say the command to change to the Press the talk switch. This function is available when “Voice Language Say “Play song <name>”.
- Page 260 VOICE RECOGNITION SYSTEM OPERATION NOTE NOTE While the recognition data is being created or being updated, a When the system recognizes multiple names from the contacts track search cannot be performed using a voice command. list, a name candidate list will be displayed on the screen. If the desired name is not displayed on the top of the screen, say or VOICE COMMAND EXAMPLE: CALL NAME select the number of the name from the candidate list (number 1,...
-
Page 261: Casual Speech Recognition
VOICE RECOGNITION SYSTEM OPERATION “Yes”, CASUAL SPEECH RECOGNITION select (Yes), or press the switch on the steering wheel. Due to natural language speech recognition technology, this Try saying the complete number. If it is not system enables recognition of a command when spoken recognized, however, numbers can be added, naturally. - Page 262 VOICE RECOGNITION SYSTEM OPERATION EXPRESSION EXAMPLES FOR EACH FUNCTION Command Expression examples Phone the <phonetypes> number of Call by specifying <contacts>. contact Ring <contacts> ’s <phonetypes> number. Call by specifying Phone <phone number>. phone number Search artists to Put on the artist <name>. listen to song Listen to the singer <name>.
-
Page 263: Command List
COMMAND LIST COMMAND LIST Basic command Recognizable voice commands and their actions are shown below. Voice command Phrase Function Frequently used commands are listed in the following tables. Pause the current System pause pause voice interaction For devices that are not installed in the vehicle, the related commands will not be displayed in the screen. - Page 264 COMMAND LIST Commands for changing the audio mode Commands for changing the mode Voice command Phrase Function Voice command Phrase Function AM mode Switch to AM Hands-free mode [go to] phone, phone play AM, select AM Switch to HF mode change mode change...
- Page 265 COMMAND LIST Commands for Hands-free Commands for Pandora* *: Pandora is available in the United States, Australia, and New Zealand. Voice command Phrase Function Voice command Phrase Function Places a call to the redial, call again, dial phone number of Pandora mode Switch to Pandora Redial...
- Page 266 COMMAND LIST Commands for climate Voice command Phrase Function Voice command Phrase Function dislike/unselect dislike, Dislike on/off thumbs down/unselect Unmark it auto mode on, turn on thumbs down Auto Auto mode on auto mode When station increase the Relative go there, route, has location Temperature+ temperature,...
- Page 267 COMMAND LIST Commands for AM control Commands for SiriusXM Radio Control Voice command Phrase Function Voice command Phrase Function Designate the Designate the Direct frequency tune to AM frequency to Preset number tune to preset preset channel to tuning <frequencies> tuning <number>...
- Page 268 COMMAND LIST Commands for MP3/WMA/AAC, USB, SD* Control Commands for iPod Control *: With navigation function Voice command Phrase Function Voice command Phrase Function Select a song in Artist music play artist <artists> the iPod by artist Artist music Select a song by selection play artist <artists>...
- Page 269 COMMAND LIST Commands for navigation mode* Voice command Phrase Function *: With navigation function Voice command Phrase Function for, look for] [an] accommodation at my Accepts questions destination Accept accept (such as talkback) for, look for] [an] for] accommodation accommodation at the Narrows down POI destination Accommodation*...
- Page 270 COMMAND LIST Voice command Phrase Function Voice command Phrase Function Transits to the for, look for] [an] screen that allows accommodation near you to search for Address here look for] [an] address the destination by reading the address for, look for] [an] accommodation nearby avoidances Transits to the...
- Page 271 COMMAND LIST Voice command Phrase Function Voice command Phrase Function Transits to the Back back previous screen selected route and starts the [go, jump, move, scroll] Transits to the navigation Bottom [to] [the] bottom bottom of the list guidance Exits from the go to [the] map voice recognition Cancel...
- Page 272 COMMAND LIST Voice command Phrase Function Voice command Phrase Function Sets the Selects the item [line] 3 destination from listed in the third History the search history line of the list Line 3 results (on the screen third [line] where the list is Reduces the displayed) detour distance set...
- Page 273 COMMAND LIST Voice command Phrase Function Voice command Phrase Function [near] here look for] [a] parking [lot] Narrows down [along, around, near, nearby the selected POI Searches for on] [the] route Near here search candidates Parking along parking lots along around here to places along the route...
- Page 274 COMMAND LIST Voice command Phrase Function Voice command Phrase Function Narrows down POI look for] [a] parking [lot] look for] [a] parking Parking* search targets to near here parking lots for, look for] [a] car park look for] [a] parking [lot] nearby Selects POI look for] [a] place...
- Page 275 COMMAND LIST Voice command Phrase Function Voice command Phrase Function route info look for] [a] restaurant Searches for along [the] route Route info route information Restaurant along Reads the route restaurants along route information that the route route summary for] food along [the] has been set route (after the voice...
- Page 276 COMMAND LIST Voice command Phrase Function Voice command Phrase Function look for] [a] restaurant look for] [a] gas station Narrows down POI near here Gas station* search targets to gas stations for, look for] [a] petrol look for] [a] restaurant [station] nearby Searches for...
- Page 277 COMMAND LIST Voice command Phrase Function Voice command Phrase Function look for] [a] gas station look for] [a] gas station at my destination near here look for] [a] gas station look for] [a] gas station at the destination nearby Searches for gas Gas station at stations around my destination...
- Page 278 COMMAND LIST Voice command Phrase Function Voice command Phrase Function Transits to the top [go, jump, move, scroll] of the list (on the Accepts questions [to] [the] top screen where the or other contents list is displayed) spoken to you yeah Moves the list one page up (on the...
-
Page 279: Appendix/What To Do If/Index
APPENDIX/WHAT TO DO IF/INDEX... -
Page 280: Map Database Information And Updates
MAP DATABASE INFORMATION AND UPDATES MAP DATABASE INFORMATION AND UPDATES... - Page 281 MAP DATABASE INFORMATION AND UPDATES...
- Page 282 MAP DATABASE INFORMATION AND UPDATES...
-
Page 283: Certification
SiriusXM DATA SERVICE responsible for compliance could void the user’s authority to operate the equipment. Neither SiriusXM nor Subaru is responsible for any errors CAUTION: Radio Frequency Radiation Exposure or inaccuracies in the SiriusXM data services or its use in This equipment complies with FCC radiation exposure limits vehicle. - Page 284 CERTIFICATION Canada WARNING IC: 2024B-FT0054A CAUTION: Radio Frequency Radiation Exposure This device complies with Industry Canada licence- This equipment complies with IC radiation exposure limits set exempt RSS standard(s). Operation is subject to the forth for an uncontrolled environment and meets RSS-102 of following two conditions: (1) this device may not cause the IC radio frequency (RF) Exposure rules.
-
Page 285: Gracenote
CERTIFICATION México Gracenote Gracenote ® , Gracenote logo and logotype, and the “Powered by Gracenote” logo are either registered trademarks or trademarks of Gracenote, Inc. in the United States and/or other countries. RCPFUFT14-1151 La operación de este equipo está sujeta a las siguientes dos condiciones: (1) es posible que este equipo o dispositivo no cause interferencia perjudicial y (2) este equipo o dispositivo debe aceptar cualquier interferencia,... -
Page 286: Bluetooth
CERTIFICATION Bluetooth The Bluetooth word mark and logos are registered ® trademarks owned by Bluetooth SIG, Inc. and any use of such marks by Fujitsu Ten Limited is under license. Other trademarks and trade names are those of their respective owners. -
Page 287: Ipod
CERTIFICATION iPod MirrorLink “Made for iPod” and “Made for iPhone” mean that an electronic accessory has been designed to connect Logo, MirrorLink™ and the MirrorLink™ Logo are standards. Consortium LLC. Unauthorized use is strictly prohibited. Apple is not responsible for the operation of this device Pandora or its compliance with safety and regulatory standards. -
Page 288: How To Get The Source Code Using The Open Source
HOW TO GET THE SOURCE CODE USING THE OPEN SOURCE HOW TO GET THE SOURCE CODE USING THE OPEN SOURCE This system implements software using the open source. For customers who would like to get the source code of the software, it is available by downloading it from the web site of Clarion, Co., Ltd. -
Page 289: What To Do If
WHAT TO DO IF WHAT TO DO IF TROUBLESHOOTING RADIO OPERATION Experience Cause Action Mismatch of time alignment- a user may hear The radio stations analog and digital volume None, radio broadcast issue. A user can a short period of programming replayed or an is not properly aligned or the station is in contact the radio station. -
Page 290: Phone
For USA customers, please visit The connected device may not be a www.subaru.com for details. compatible Bluetooth cellular phone. Outside of the USA customers, The hands-free system or Bluetooth contact your local dealer to arrange device does not work. - Page 291 WHAT TO DO IF When registering/connecting a cellular phone Page Symptom Likely cause Solution Cellular This phone system An incorrect passcode was entered Enter the correct passcode on the on the cellular phone. cellular phone. The registration operation has not Complete the registration operation been completed on the cellular phone on the cellular phone (approve...
- Page 292 Cellular This phone system system. For USA customers, please visit www.subaru.com for details. cellular phone may not be compatible Outside of the USA customers, with transferring phonebook data. contact your local dealer to arrange Phonebook data cannot be whether or not the phone can be transferred manually/automatically.
- Page 293 WHAT TO DO IF When using the Bluetooth message function Page Symptom Likely cause Solution Cellular This phone system Enable message transfer on the Message transfer is not enabled on cellular phone (approve message the cellular phone. transfer on the phone). Messages cannot be viewed.
- Page 294 WHAT TO DO IF In other situations Page Symptom Likely cause Solution Cellular This phone system The Bluetooth connection status is To turn off the display, set connection displayed at the top of the screen each time the ignition switch is turned this system is set to on.
-
Page 295: Error Messages
ERROR MESSAGES ERROR MESSAGES If the following messages appear, check by referring to the cause and action below. Mode Message Cause Action “No stations available. Displayed when the FM radio signal Try to receive the signal again in a FM radio (No stations available.)”... - Page 296 ERROR MESSAGES Mode Message Cause Action “Check Antenna (Check Antenna)” The SiriusXM antenna is not Check whether the SiriusXM antenna connected. cable is attached securely. “Antenna Disconnected (Antenna Disconnected)” A short circuit occurs in the antenna “Antenna Shorted (Antenna Shorted)” or the surrounding antenna cable.
- Page 297 ERROR MESSAGES Mode Message Cause Action This indicates that no MP3/WMA/ Insert a disc on which playable music found.)” data is recorded. It indicates that the disc is dirty, “Check DISC (Check DISC)” damaged, or it was inserted upside Clean the disc or insert it correctly. down.
- Page 298 ERROR MESSAGES Mode Message Cause Action This indicates that there is no music Connect a iPod in which playable data in the iPod. music data is stored. Playback failure or communication Connect a iPod correctly. “iPod Error. abnormality. (iPod Error.)” Because an over current was Stop using the device for a short detected.
- Page 299 ERROR MESSAGES Mode Message Cause Action “Music tracks not supported. Please Check the device settings. check your audio player. (Music A device that is incompatible with Bluetooth Audio Connect a device that is compatible tracks not supported. Please check audio playback was connected. with audio playback.
- Page 300 ERROR MESSAGES Mode Message Cause Action When not able to get the content Please try again (Refresh etc.) later information. “The content cannot be acquired. or reconnect it. When not able to switch to the Top (The content cannot be acquired.)” Select the desired station again content when touching when the station list appears.
- Page 301 ERROR MESSAGES Mode Message Cause Action “No stations have been added to your When no stations have been list. (No stations have been added to Please register stations. registered. your list.)” “Your ratings information was not When ratings information has not saved.
-
Page 302: Index
INDEX INDEX CD ....................78 Command list................261 by HARMAN ...............152 AM radio ..................60 “APPS (APPS)” screen ..............23 Destination search screen ............209 Audio settings .................98 AUX ....................94 Eco monitor ..................170 Entering letters, numbers/list screen ..........48 Bluetooth ..................174 Entering letters/numbers............. 48 ..................178 List screen operation .............. - Page 303 INDEX “INFO (INFO)” screen ..............24 Operating information ..............101 Info screen operation ..............47 CD player/disc ................103 Reordering the menu icons............47 File information .................107 Initial screen ...................38 iPod...................106 iPod ....................84 Radio ..................101 SD card ..................107 Terms ..................111 Overview buttons ................20 Loading/unloading an SD card ............
- Page 304 INDEX Receiving on Bluetooth phone............124 Screen adjustment................51 Incoming calls ................124 Day and night mode..............52 Registering home ................29 SD card...................87 Route guidance screen..............224 Search operation ................210 .................225 Coordinates ................219 Highway services ..............227 Favorites ...................218 Junction display ................228 Find address ................211 Lane information/signs..............
- Page 305 INDEX SiriusXM radio data service ............162 Fuel information ................168 USB memory ..................81 Sports information..............162 Stock information ..............167 Weather information ..............163 Vehicle customization ..............194 SiriusXM satellite radio ..............69 ® Vehicle monitor ................169 Split screen ..................25 Voice recognition system ..............59 Split screen operation ..............47 Voice settings ................193 Customizing ................48...
- Page 306 MEMO...
- Page 308 B2523BE-A Issued June 2015 Printed in USA 06/15 2016A Subaru of America, Inc., Subaru Plaza, FUJI HEAVY INDUSTRIES LTD. P.O. Box 6000, Cherry Hill, NJ 08034-6000 TOKYO, JAPAN...
Need help?
Do you have a question about the Legacy and is the answer not in the manual?
Questions and answers
How do you edit and reorder the suggested text messages?
To edit and reorder suggested text messages in a Subaru Legacy:
1. Select the desired message from the list.
2. Select "Quick Message" to view or edit quick reply messages.
3. To reset messages to the original set, select "Default."
4. To send a message, select "Send."
Reordering messages is not mentioned, so it may not be supported.
This answer is automatically generated