Table of Contents
Advertisement
Advertisement
Table of Contents

Subscribe to Our Youtube Channel
Related Manuals for Yachting FC60X


Summary of Contents for Yachting FC60X
- Page 1 FC60X www.goyachting.cn...
- Page 3 Yachting Electronic Co., Ltd. Yachting Electronic may find it necessary to change or end our policies, regulations, and special offers at any time. We reserve the right to change or improve its products and to make changes in the content without obligation to notify any person or organization.
-
Page 4: Table Of Contents
Content Content Introduction ..............1 Packing list..............2 General attention............2 Installing battery............3 Using the product............4 Operational modes............6 Instruction of Freecast sensor........7 Power supply............7 Electronic switch.............7 Using the Freecast sensor..........10 Operational Panel Basic..........12 Display.................13 Understanding the display........13 Depth range.............14 Water surface line............15 Operation..............17... - Page 5 Menu Operation Instruction........17 Sensitivity..............19 Channel..............20 Shallow..............21 Depth Range............22 Fish ID..............23 Units................24 Backlight..............25 Contrast..............26 Load DFT..............27 Trouble Shooting............28 Maintenance..............33 Guarantee Conditions..........34 Specfications and Feature...........35 Specfications...............35 Features...............36...
-
Page 6: Introduction
FC60X is designed to facilitate fishing on the bank, along the seashore,and on-board in a variety of water areas. We offer six months charge-free main-tenance against any damages induced by non-human factors;... -
Page 7: Packing List
Packing list Packing list The following items are included in FC60X: 1) A FREECAST wireless remote sonar sensor 2) A handheld with 3” Dot matrix LCD 3) A copy of FC60X User’s Guide In the event that any of the items listed is found missing, call us immediately or log on to our website at www.goyachting.cn. -
Page 8: Installing Battery
Installing the battery Installing the battery Warning: Warning: do not split the battery cover with strength in the vertical directiion! To take off the battery cover, press it and slide in the indicated direction 1. Turn the screw anti-clockwise with a screw driver. Then slide the battery cover towards the bottom of the unit and remove it from the main housing. -
Page 9: Using The Product
Attach the sensor to the fishing thread’s extreme and throw them into water as you do with float and lure. After switching on the main unit’s power,you are ready to fish. With sonar technologies employed, the FC60X sensor transmits ultrasonic waves to water, and the... - Page 10 To pick up the sensor working in water, take hold of the antenna post at the sensor’s top. Warning Warning: FC60X is designed to work durably in normal service. However, in water areas where there are significant water level fluctuations, the sensor may be subject to collision with rocks, which will result in damages to the device.
-
Page 11: Operational Modes
Operational modes FC60X features two operational modes: 1) Sonar Graphic Mode FC60X renders real-time conditions at the sea bottom with sonar graphic. Cast the sensor into water, drag it slowly and at stable speed, and you can view accurate information displayed on the screen, including sea bottom contour, structure, depth, fish location, size, etc. -
Page 12: Instruction Of Freecast Sensor
1. Power 1. Power supply supply The FC60X sensor is provided with a separate, built-in, and irremovable lithium battery that has a continuous service time of 550 hours in normal operation. When the battery’s service life ends and becomes out of service, it should be handled in a way compliant with local provisions regarding discarding used batteries and relevant electronic products. - Page 13 1) When the sensor is casted into water, with the three pins touching water, the sensor begin working. 2) When the sensor is droped out from water, after wiping off the remained water on pin surface, the sensor stop working automatically. Three pins for electronic switch Warning: Warning: do not place your Freecast sensor in a wet area...
- Page 14 Using the Freecast sensor sing the Freecast sensor The two holes at the FC60X front end is for tying fishing thread. If you desire to use it in the Stationary float Mode, bind the fishing hook with light threads to the second hole.
-
Page 15: Using The Freecast Sensor
Handle the sensor by the antenna post when trying to draw it out from the water Use a thread tied to the first hole, tackled to be rotatable Use the second hole in the Stationary float Mode, bind the fishing hook with light threads to the second hole. - Page 16 the hook, fishing thread, and lure etc., can total up to 5.4~5.9g. With the sensor’s weight of 34g joining, the break-down becomes very likely.
-
Page 17: Operational Panel Basic
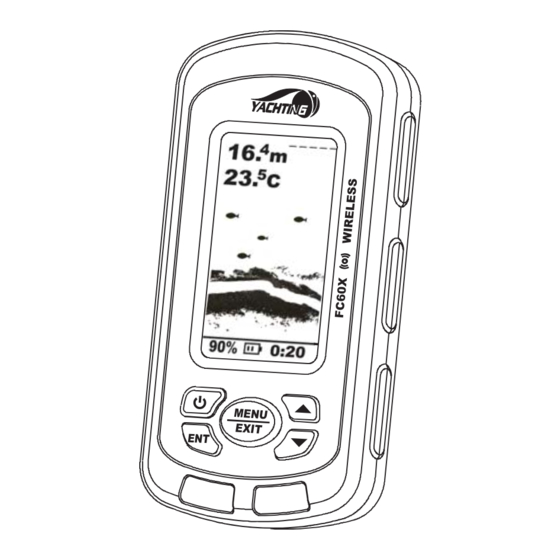
Operational Panel Basic Operational Panel Basic (1) Transducer plug (8) Sensitivity Reading For NAKI8850B model (9) Battery Strength (2) Depth Reading (10) Power Key (3) Water surface line (11) Ent Key (4) Temperature Reading (12) Menu and Exit Key (5) Fish Icon (13) Down Arrow Key. -
Page 18: Display
Display Display 1. Understand 1. Understanding th ing the display e display Water surface Depth reading line Temperature reading Sonar information scroll from right to Fish icon left Bottom Sensitivity Depth range Battery strength (1) Depth reading: indicate water depth (2) Temperature reading: indicate atmosphere temperature (3) Sensitivity: the curren sensitivity setting (4) Water surface line: display the position of water surface... -
Page 19: Depth Range
(7) Depth range: the current Depth range setting (8) Battery strength: indicate the remained battery strength The detection graph is shown from the right corner from top to down. It would scroll forwards to left continuously. The most present and newest signals are displayed on the rightmost screen. -
Page 20: Water Surface Line
change in depth. New returns graphed at a different scale will not match up with the historic data already graphed at a higher or lower scale. 3. Water surface line 3. Water surface line The water surface line indicate the displayed position of water surface on the screen, which is very helpful for you to estimate the depth of detected fish. - Page 21 Underwater conditions vary greatly, so some experience is needed to get the most benefits of FC60X. Use the message displayed in the screen as a helpful tools for your judgment, thus you could exert the full function of FC60X.
-
Page 22: Operation
Menu O Menu Operation Instr peration Instruction uction The menu setting of FC60X is convenient and friendly. You can get various function setting by simple operation. 1. Power key: Power on / Power off Note: Note: to shut off the unit, press the Power key and keep it for 3s, then release it. - Page 23 Note: Note: when you enter into a menu setting, pressing Ent key, then you are able to change the setting then the frame line of current menu will look thicker then non-setting. see following: thicker non-setting setting To exit the setting condition, press ENT key again. 3.
-
Page 24: Sensitivity
Sensitivity Sensitivity Sensitivity determines how echoes will be displayed on the screen. Increasing the sensitivity will make you see more details on the screen. In such situations when you see too much clutter on the screen, decreasing the sensitivity will play an effect. -
Page 25: Channel
6) Press EXIT to exit. Channel Channel Channel make it possible for you to switch using between the FC60X wireless model and another model NAKI8850B (provided that you have bought one). CH1 - for FC - for FC60X CH2 - for NAKI8850B... -
Page 26: Shallow
4) Use the Up / Down Arrow to change the value 5) Press ENT to confirm the setting. 6) Press EXIT to exit. Shallo Shallow The Fishfinder sound an alarm tone when the bottom goes shallower or equal than the alarm’s setting. You also could exit alarm mode by enter into Shallow menu and artificially increase the current depth alarm value to a safe grade. -
Page 27: Depth Range
Depth Range Depth Range Depth Range determine in which portion the bottom will display in the screen. (For example, if the actual depth is 10m, and the current Depth Range is 20m, then the bottom will display on 50% portion of the screen). To set the Depth Range: 1) Press MENU to enter into menu setting,... -
Page 28: Fish Id
Fish ID. Fish ID. Fish ID control the way the detected target is displayed on the screen. 1) If Fish ID is on, a fish icon will be displayed when some fish and other object is detected. 2) If Fish ID is off, a arch will be displayed on the screen. Fish ID is On Fish ID is Off Note:... -
Page 29: Units
suggest you turn off the Fish ID, and only study the sonar returns which is displayed as archs. To set the Fish ID.: 1) Press MENU to enter into menu setting, 2) Use the Up / Down Arrow to select Fish ID. . option. 3) Press ENT to confirm selecting 4) Use the Up / Down Arrow to change the value. -
Page 30: Backlight
To set the Units. . : 1) Press MENU to enter into menu setting, 2) Use the Up / Down Arrow to select Units. option. 3) Press ENT to confirm selecting 4) Use the Up / Down Arrow to change the value. 5) Press ENT to confirm the setting. -
Page 31: Contrast
4) Use the Up / Down Arrow to change the value. 5) Press ENT to confirm the setting. 6) Press EXIT to exit. Contrast Contrast Contrast is used to let you get a most suitable display when you operate the unit. To set the Contra Contrast st: 1) Press MENU to enter into menu... -
Page 32: Load Dft
Load D d DFT Load DFT is used to restore to the factory settings. To set the Load Load DFT DFT: 1) Press MENU to enter into menu setting, 2) Use the Up / Down Arrow to select Load DFT Load DFT option. -
Page 33: Trouble Shooting
Trouble shooting Trouble shooting You are not supposed to fix the FC60X handheld or the sensor. The product contains no customizable parts. On the other hand, the waterproof performance is enabled by unique techniques, functions of which may be disabled by unau- thorized disassembly. - Page 34 1. 1. No signal on FC60X screen No signal on FC60X screen If the FC60X fails to receive signals from the sensor, it will stop updating the screen (which will then remain unchanged). Under any circumstances, if the handheld can not receive signals transmitted by the sensor or the...
- Page 35 A total weight over 5.8g can submerge the sensor and cause signal loss in consequence. e) With relatively quite water areas, FC60X is able to obtain a 130ft (40m) remote-control distance in maximum; with significant fluctuations on water surface, the distance may be reduced slightly.
- Page 36 The FC60X sensor has a normal detection depth ranging from 1 to 100 feet (0.4~30m). Abnormal display and inconsistent depths may occur when used in areas with depth less than 0.3m.
- Page 37 The picture vibrates because the sea bottom depth being scanned is changing. Since the depth range used by the current test signal and by the previous test signal differs, plus the varying height of the sea bed contour, pictures displayed on the screen will occupy different heights, causing the vibrating phenomenon.
-
Page 38: Maintenance
Maintenance Maintenance With a view to making most of your Fishfinder, we reco- mmend you follow the steps bellow and carry out maint- enance. 1. For the case Cleaning the sonar unit’s outer case (except for the screen) with a cloth dipped mild detergent solution, and then wipes it dry. -
Page 39: Guarantee Conditions
concentrated air in hot days can pose damage to internal electronic parts. Guarantee Conditions Guarantee Conditions 1. We assure you this product is free from defects in materials and workmanship. The warranty coverage is One Year from the date of purchase, during which if the unit fails to perform as described in the product’s written specifications, we will repair or replace it free of charge. -
Page 40: Specfications And Feature
Specifications and feature Specifications and feature 1. Sp 1. Specificat ecifications: ions: 1) Display Display size: 3.0in / 76mm, FSTN LCD Display Resolution: 128 x 64 (H ×W) Pixels Display Contrast: 0~100% range adjustable Backlight: On / Auto Visible under strong sunlight 2) Sonar &... -
Page 41: Features
Sensor Could Shut Down When The Sonar Sensor Is Out Of Water. Units: °f/ft °f/m °C/ft °C/m Unit Dimensions: 138mm × 69mm × 32mm. IPX7 Level Sealed And Waterproof Casing Design 4) Power Power Supply: 4×AAA Alkaline batteries Sensor Battery Life: 550 Hours Of In-the-water Usage Handheld Battery Life: 45 Hours Continuous Use Handheld Power Off Automatically In 10minutes Without Any Using... - Page 42 Monday - Friday: 8.am. to 5:30 pm. (Central Standard Time) 0086 25 84680809 Or by e-mail: Typically we respond to you in 2 business days support@goyachting.cn For direct shipping, our address is: No.508, Heyan Road, Nanjing, 210038, China Yachting Electronic Co., Ltd...
- Page 44 www.goyachting.cn...
Need help?
Do you have a question about the FC60X and is the answer not in the manual?
Questions and answers