Table of Contents
Advertisement
Available languages
Available languages
THERMOSTAT INSTRUCTIONS / MODEL 83501
Thank you for purchasing the Clear Comfort™ thermostat from
Orbit™. We are excited to provide a long-lasting thermostat that
blends style with function.
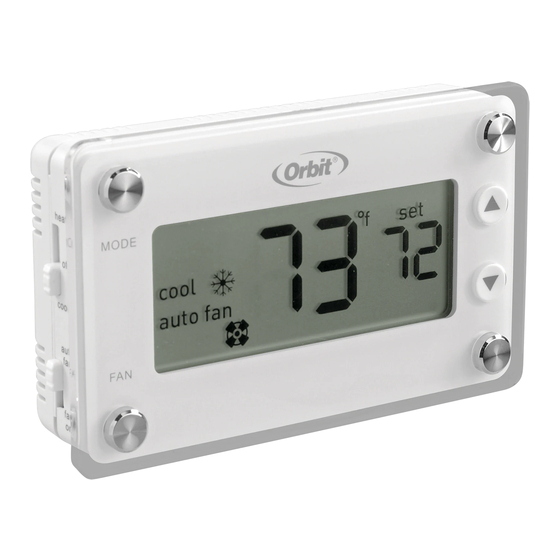
THERMOSTAT FEATURES
Mode Switch:
Heat/Off/Cool
Fan Switch:
Auto Fan/Fan On
Heat Icon
Cool Icon
Mode
MODE
heat
Indicators
off
cool
Fan
Indicators
auto fan
fan on
FAN
Fan Icon
Room Temperature
Room Temperature–Actual temperature of the room
Set Temperature–Desired room temperature
Fahrenheit/Celsius Indicator–
Indicates scale in which temperature is displayed
Mode Indicators–Indicates which mode the system is in: Heat/Off/Cool
Heat Icon–System is in Heating Mode to reach set temperature
Cool Icon–System is in Cooling Mode to reach set temperature
Fan Indicators–Indicates which mode fan is in: Auto Fan/Fan On
Fan Icon–Indicates the fan is energized
Low Battery Indicator–Reminder to change thermostat batteries.
If the batteries are not changed within 7 days after the Low Battery
Indicator appears on the display, the set temperature will offset by +/- 10°F
as a further reminder. After 90 days or less, depending on the condition
of the batteries, the system will turn off and the Low Battery Indicator will
flash on the display.
Temperature Offset–Offset the temperature by +/- 9° F or +/- 4.5° C
SYSTEM TYPE
This thermostat is compatible with 1-stage gas furnaces with electric or gas
fan, 1-stage oil systems, 1-stage heat pumps, and 1-stage cooling systems.
Note: This thermostat is not compatible with base board heaters (or other line
voltage heating), multi-stage heating or cooling systems, or 3-wire hydronic systems
INSTALLATION
Tools required for installation:
• Phillips screwdriver
• Wire cutters/strippers
• Drill with 3/16 in. (4.8 mm) drill bit
• Level
Temperature
Adjustment
Buttons
LCD
°F / °C Indicator
Set
˚
f c
set
Temperature
offset
Low
Battery
Indicator
Temperature Offset
Tips for Thermostat Location
When replacing an existing thermostat, place your new
Clear Comfort™ thermostat in the same location as the old one, unless
the conditions below suggest otherwise. For a new installation, follow
these guidelines for placement:
• Place the thermostat in a room or hallway that is used often; position on
an inside wall about 5 ft. (1.52 m) from the floor.
• Avoid installing the thermostat in unusually heated areas (e.g., near a
television, lamp, radiator, or fireplace), in direct sunlight, or on a wall
that has hot water pipes or that is opposite a stove.
• Avoid installing the thermostat in unusually chilled areas, such as in
a drafty area (e.g., stairwell, door, or window), on a wall separating an
unheated room, or where air circulation is poor (e.g., in a corner or
behind a door).
• Avoid installing the thermostat in unusually damp areas as this can lead
to corrosion.
• DO NOT install the thermostat until construction work is complete, dust
free, and painting has been completed.
• If the thermostat housing is cold, wait for it to reach room temperature
before installing.
Removing the Old Thermostat from the Wall
WARNING: Switch off electricity to both the heating (furnace) and cooling
(air conditioner) equipment before proceeding with the following steps:
1.
Remove the front cover from the old thermostat.
2.
Before removing wires from the old thermostat terminals, take note
of the letters printed near each of the wire terminals.
3.
Attach a wiring label (included) to its corresponding wire,
so as to identify the wires' letter; not the wire color.
G
Y W
R
0/B
RC
G
Y W
R
0/B
RC
4.
After labeling the wires, remove them from the old thermostat
terminals (usually by releasing clamps or undoing terminal screws
5.
Remove the old base from the wall (usually by removing screws).
Mounting Your Clear Comfort™ Thermostat to the Wall
1. Remove the thermostat body from the base by gently pulling them apart.
2. Place the base flat against the wall by feeding the wires through
the opening below the wiring terminal.
3. Level the base and mark the holes for the mounting screws with a pencil.
4. Remove the base and drill holes at marked positions;
insert the provided wall anchors.
5. Feed wires back through the opening and attach the base to the wall
with the two screws provided.
Note: While labeling the individual
wires, DO NOT let the wire fall
back inside the wall, as they can be
difficult to retrieve.
G
Y W
R
0/B
RC
G
Y W
R
0/B
RC
Advertisement
Table of Contents

Related Manuals for Orbit Clear Comfort 83501


Summary of Contents for Orbit Clear Comfort 83501
- Page 1 Thank you for purchasing the Clear Comfort™ thermostat from Orbit™. We are excited to provide a long-lasting thermostat that • Place the thermostat in a room or hallway that is used often; position on an inside wall about 5 ft. (1.52 m) from the floor.
-
Page 2: Connecting Wires To Terminal
Note: If the batteries are not changed Connecting the Wires to the Terminal within 7 days after the Low Battery 601-VO Electric Gas/Oil Furnace Furnace 1. Strip 3/8 in. (9.5 mm) insulation from the end of each wire. Indicator appears on the display, the R RC W Y O/B G C 2. - Page 3 Installation for Heat Pump Systems: If installing your Clear Comfort™ thermostat on a heat pump system, the following instructions are necessary. Up Arrow Off Arrow up • Insert the additional jumper (included) into the Y and W terminals. RESET • If a B wire is part of your installation, connect it to the O/B terminal. Arrow down 601-VO Electric...
-
Page 4: Troubleshooting
Problem: System turns on too frequently water only, and use a soft cotton cloth. DO NOT use paper towels or other Solution: The Orbit™ Clear Comfort™ thermostat uses smart logic to turn abrasive cloths. DO NOT spray any liquid directly onto the thermostat. -
Page 5: Technical Support Information
Before returning this thermostat to the store, please call: 1-800-488-6156 or 1-801-299-5555. WARRANTY INFORMATION Orbit, Inc. warrants to its customers that its products will be free from defects in materials and workmanship for a period of three years from the date of purchase. -
Page 6: Características Del Termostato
Para la ubicación de una instalación nueva, siga estas INSTRUCCIONES PARA EL TERMOSTATO / MODELO 83501 pautas: Gracias por comprar el termostato Clear Comfort™ de Orbit™. • Ubique el termostato en una habitación o pasillo que use a menudo, en una Estamos entusiasmados por proporcionar un termostato duradero pared interior, a aproximadamente 1,53 m (5 pies) del piso. - Page 7 Para conectar los cables al terminal Nota: Si las baterías no se cambian dentro de 7 días después de que el 1. Pele 9,53 mm (3/8 pulg) del aislamiento del extremo de cada cable. indicador de batería baja aparece 2. Afloje los tornillos de cada terminal. Conecte cada cable a su terminal en la pantalla, la regulación de la correspondiente (haciendo coincidir la etiqueta en el cable con la etiqueta temperatura aumentará...
- Page 8 nstalación de sistemas de bombas de calor: Si instala el termostato Clear Comfort™ en un sistema de bomba de calor, las siguientes instrucciones son necesarias. Apagado Flecha • Inserte el puente adicional (incluido) en los terminales Y y W. Off Arrow up 601-VO Electric...
-
Page 9: Solución De Problemas
Solución: Problema: 1. El termostato Clear Comfort™ de Orbit™ utiliza la lógica inteligente para El ventilador no funciona/funciona en forma continua encenderse una vez por período de tiempo, de modo de maximizar la comodidad y estabilidad de la temperatura. Para ajustar el período de tiempo, Solución:... -
Page 10: Información De La Garantía
1-800-488-6156 o 1-801-299-5555. INFORMACIÓN DE LA GARANTÍA Orbit, Inc. garantiza a sus clientes que sus productos no tendrán defectos en los materiales ni en la mano de obra durante un período de tres años a partir de la fecha de compra.
Need help?
Do you have a question about the Clear Comfort 83501 and is the answer not in the manual?
Questions and answers