Table of Contents
Advertisement
Advertisement
Table of Contents

Subscribe to Our Youtube Channel
Related Manuals for Orbit Clear Comfort Pro 83521


Summary of Contents for Orbit Clear Comfort Pro 83521
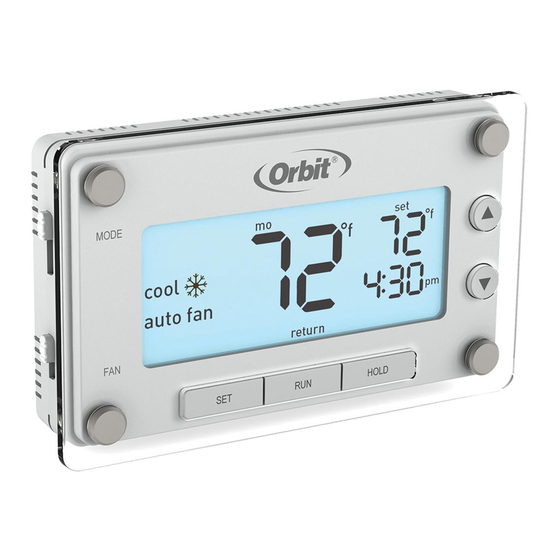
- Page 1 User Guide Clear Comfort ™ 7-day Programmable Thermostat Model 83521...
- Page 2 Thank you for purchasing the Clear Comfort™ Pro thermostat from Orbit We are excited to provide you a long-lasting thermostat that blends style with function. Features • Easily program 7 individual days or copy one programmed day to another • Pre-programmed and ready to go with Energy Star settings ®...
-
Page 3: Table Of Contents
TABLE OF CONTENTS Quick Reference Overriding Schedules Temporarily........26 Overriding Schedules Permanently ........27 Easy 1-2-3 Operation ..............2 Turning Off Schedules ...............28 Thermostat Controls ..............3 Compressor Protection .............29 Display Screen ................. 4 Early Start..................30 Before You Begin................5 Appendices Installation Replacing the Batteries ...............31... -
Page 4: Easy 1-2-3 Operation
EASY 1-2-3 OPERATION 1. Set the time and day ........................See page 20 2. Select whether to heat or cool ....................See page 21 3. Select fan setting ..........................See page 21 Your thermostat is now ready to use, simply press RUN. If you do not wish to use the preprogrammed Energy Star thermostat settings you can: ®... -
Page 5: Thermostat Controls
THERMOSTAT CONTROLS Backlit Screen: Press any button to activate Buttons: Press to MODE Switch: adjust temperature or use to Select between navigate during set up Heat/Off/Cool FAN Switch: HOLD: Press to override Select between programmed schedule Auto Fan/Fan On RUN: Press to resume SET: Press to set programmed schedule schedule, time, and day... -
Page 6: Display Screen
DISPLAY SCREEN Room temperature Cooling system is on Current day of the Heating system is on week Desired Indicate which temperature mode the setting system is in Current time Fan setting Fan is activated Reminder to Schedule period change batteries... -
Page 7: Before You Begin
BEFORE YOU BEGIN This thermostat is compatible with Tools Required For Installation the following systems: • Phillips screwdriver • Wire cutters/strippers • Gas, oil or electric furnace • Drill with 3/16" (4.8 mm) drill bit • Central air conditioner • Level •... - Page 8 TIPS FOR INSTALLATION When replacing an existing thermostat, • Avoid installing the thermostat in overly chilled areas, such as in a drafty area (e.g., position your new Clear Comfort™ Pro stairwell, door, or window), thermostat in the same location as your on a wall separating an unheated room, old one, unless the conditions that follow or where air circulation is poor...
-
Page 9: Installing Your Thermostat
INSTALLING YOUR THERMOSTAT Switch Off Power Turn off the power to the heating and cooling equipment. Remove Cover Remove the front cover from the old thermostat. Mercury Notice: If your old thermostat contains mercury contact your local waste management authority for information on how to safely dispose of it. - Page 10 INSTALLING YOUR THERMOSTAT Label Wires Use the supplied wire labels to identify the wire by its terminal letter and not the color. Once the wires are labeled, disconnect the wires and remove the base. While labeling and removing the RC RC RH RH individual wires DO NOT let the wire fall back inside the wall.
- Page 11 INSTALLING YOUR THERMOSTAT Mount New Base a. Remove the thermostat body from the base by gently pulling them apart. G O/B Y b. Place the base flat against the wall by feeding the wires through the opening below the wiring terminal. c.
- Page 12 INSTALLING YOUR THERMOSTAT G O/B Y W RC Wire Installation for Conventional Systems a. Loosen the screws on each terminal. screw Note: Remove jumper wire if you have both R and RC wires. b. Insert each labeled wire into the matching jump wire terminal and tighten the screws.
- Page 13 INSTALLING YOUR THERMOSTAT W RC G O/B Y Wire Installation for Heat Pump Systems a. Loosen the screws on each terminal. b. Insert jumper wire into the Y and W screw terminals. c. Insert each labeled wire into the matching terminal and tighten the screws.
- Page 14 INSTALLING YOUR THERMOSTAT Set Heat Pump Jumper The following instructions are necessary to check the J3 jumper placement if you have a heat pump system. Leave the jumper in the Cool (O) factory-set position if you connected an O wire to the O/B terminal. Heat Cool Heat...
- Page 15 INSTALLING YOUR THERMOSTAT Set Fan Control Jumper Correct placement of this J2 jumper optimizes energy use and comfort levels for the connected system type. Electric Heat Gas/Oil Heat For electric and heat pump systems move For gas or oil systems leave the jumper in the the jumper to the Electric Heat position.
- Page 16 INSTALLING YOUR THERMOSTAT Completing an installation a. Insert three Energizer® or Duracell® AAA G O/B Y W RC R alkaline batteries. b. Install the thermostat body by gently pushing it onto the base until it “clicks” into place. Verify that there are no gaps in the MODE side housing.
-
Page 17: Temperature Format
TEMPERATURE FORMAT RESET BUTTON Switching Between To access the RESET button, remove the Fahrenheit (°F) and Celsius (°C) thermostat body from its base by gently pulling them apart. Slide the MODE switch to the • Press and hold for five seconds to reset all off position. -
Page 18: Advanced System Setup
ADVANCED SYSTEM SETUP TEMPERATURE OFFSET The following four features are done in a Offset the temperature display to read +/- 9° flow-through setup. The system will walk you F (+/- 4.5° C). This thermostat has a highly through each feature. To access only one accurate temperature sensor;... - Page 19 EARLY START SYSTEM TYPE Your thermostat comes preprogrammed Your thermostat is set at the factory to with early start functionality turned off. This operate a standard fossil fuel furnace function allows the heating or cooling system heating system. to turn on before the programmed start time Press p or q to toggle between the so that the room temperature matches the heat systems being used.
- Page 20 MINIMUM CYCLE PERIOD The cycle period is the minimum time in minutes between each heating or cooling cycle. As a default, your thermostat’s minimum cycle period is set to optimize energy use and comfort levels. The default can be changed if you want it to turn on more or less •...
- Page 21 MINIMUM CYCLE PERIOD Recommended Cycle Periods Cycle Period System Type (Minutes) 1-Stage gas furnace heat with electric fan 1-Stage gas furnace heat with gas fan 1-Stage oil furnace Steam and gravity Hot water system High efficiency furnace Electric furnace 1-Stage heat pump Compressor...
-
Page 22: Set Time And Day
SET TIME AND DAY Set the time and day With the thermostat in off mode, press SET. 2. Press p or q to adjust the time. 3. Press SET to accept the time and continue. MODE 4. Press p or q to select the day of the week. -
Page 23: Select Mode And Fan Settings
SELECT MODE AND FAN SETTINGS Slide the mode switch to whether you want to heat or cool to achieve the set temperature. heat • heat—System will activate heating to reach the set temperature. • off—Systems are off. cool • cool—System will activate cooling to reach the set temperature. -
Page 24: Programmed Schedules
PROGRAMMED SCHEDULES The thermostat schedule is divided into four periods for you to program for maximum energy savings. wake Set it to the time you wake up and the temperature you want it to be at that time. leave Set it to the time you leave the house and the temperature you want while you are out. -
Page 25: Energy Star ® Programmed Schedule
ENERGY STAR PROGRAMMED SCHEDULE ® For optimal energy savings your thermostat is preprogrammed with the following schedule for each day of the week. Simply switch your thermostat to the heat or cold mode and press RUN. Period Start Time Heat Cool wake 6:00 am... -
Page 26: Modifying The Programmed Schedule
MODIFYING THE PROGRAMMED SCHEDULE Switch the thermostat to the MODE 4. Press p or q to set the wake you want to program (heat or cool) and temperature and press SET to accept the press SET. temperature and proceed. 2. Press p or q to scroll between days and press SET when the day you would like to schedule is flashing. -
Page 27: Using The Copy Feature
USING THE COPY FEATURE From the days of the week menu you can 2. Press p or q to select the day you would copy a schedule from a single day to one or like to copy and press SET when that day more days. -
Page 28: Overriding Schedules Temporarily
OVERRIDING SCHEDULES TEMPORARILY Press p or q to raise or lower the You can remove the temporary setting at any temperature. This temporary adjustment time by pressing RUN, the system will return will remain until the start time of the next to your previous programmed schedule. -
Page 29: Overriding Schedules Permanently
OVERRIDING SCHEDULES PERMANENTLY Press HOLD to override the programmed You can remove the hold at any time by schedule. All programmed temperature pressing RUN, the system will return to your changes for all periods will be ignored. previous programmed schedule. While the system is in hold you can manually change the temperature at any given time by pressing p or q. -
Page 30: Turning Off Schedules
TURNING OFF SCHEDULES Press HOLD for five seconds until the the temperature. manual indicator “man.” appears on the You can exit the manual setting at any time by screen. pressing RUN for five seconds, the system will Your thermostat now functions as a non- return to your previous programmed schedule. -
Page 31: Compressor Protection
BUILT IN COMPRESSOR PROTECTION This function helps protect against damage to the compressor in your air conditioning or heat pump system. The compressor is forced to wait five minutes after turning off before it can turn on again. The appropriate MODE indicator icon will flash on the display whenever this feature is running. -
Page 32: Early Start
EARLY START FUNCTIONALITY THERMOSTAT CARE This function allows the heating or cooling system To prevent damage to the clear lens over the to turn on before the programmed start time thermostat face, use a soft cotton cloth and so that the room temperature matches the set clean with mild soap and water only. -
Page 33: Replacing The Batteries
REPLACING THE BATTERIES It is recommended that the batteries 5. Reinstall the thermostat body onto its in the thermostat be replaced once base by gently pushing it until it “clicks” a year or before leaving the home for into place. a prolonged period of time. -
Page 34: Troubleshooting
TROUBLESHOOTING Problem: No heating/cooling system activation Solution: Verify MODE switch is in proper heat or cool mode. 2. Check batteries. Replace if necessary. (See “Replacing the Batteries,” page 31). 3. Check set temperature. Set temperature should read above room temperature in heat mode and below room temperature in cool mode. - Page 35 TROUBLESHOOTING Problem: No fan/fan runs continuously Solution: If the fan runs continuously, verify that the thermostat is in the AUTO position not the ON position. 2. Let the thermostat sit (do not touch) for 30 minutes to allow the temperature to stabilize. 3.
- Page 36 TROUBLESHOOTING Problem: Incorrect room temperature Solution: Let the thermostat sit (do not touch) for 30 minutes to allow the temperature to stabilize. 2. Check placement of thermostat; make sure it’s not in an unusually drafty or heated area. 3. Verify that the wall hole for wires is insulated properly. 4.
- Page 37 TROUBLESHOOTING Problem: Not reaching set temperature Solution: Verify that the MODE switch is in proper heat or cool mode. 2. Verify that Heating/Cooling systems are working properly. (See “No heating/cooling system activation,” page 32.) 3. Check for loose or crossed wiring in the thermostat wiring terminal. 4.
- Page 38 TROUBLESHOOTING Problem: Temperature does not change at programmed start time for a given period Solution: Verify that the HOLD feature is not active (see “Overriding the Schedules Permanently,” page 27). 2. Check the programmed schedule (see “Modifying the Programmed Schedule,” page 24). 3.
- Page 39 Problem: System turns on too frequently Solution: The Orbit Clear Comfort™ Pro thermostat uses smart logic to turn on once every cycle period to maximize comfort and temperature stability. To adjust the cycle period, see “Minimum Cycle Period Adjustment,” page 18.
-
Page 40: Customer Assistance
CUSTOMER ASSISTANCE For technical assistance, please call: 1-800-488-6156 or 1-801-299-5555. Before returning this thermostat to the store, please call: 1-800-488-6156 or 1-801-299-5555. Orbit, Inc. North Salt Lake, UT 84054 www.orbitonline.com © 2014 Orbit, Inc. All rights reserved. Made in China... -
Page 41: Warranty
(proof of purchase required). We reserve the right to inspect the defective part prior to replacement. Orbit, Inc. will not be responsible for consequential or incidental cost or damage caused by the product failure. Orbit, Inc. liability under this warranty is limited solely to the replacement or repair of defective parts.
Need help?
Do you have a question about the Clear Comfort Pro 83521 and is the answer not in the manual?
Questions and answers