Table of Contents
Advertisement
Available languages
Available languages
Advertisement
Chapters
Table of Contents

Related Manuals for Orbit 83521


Summary of Contents for Orbit 83521
- Page 1 IMPORTANT: Make sure to label your wires with the included wire labels before removing your old thermostat (see page 8). We also recommend taking a picture of the current wiring before disconnecting. User Guide Clear Comfort ® 7-day Programmable Thermostat Model 83521...
-
Page 2: Table Of Contents
TABLE OF CONTENTS Thank you for purchasing the Clear Comfort® Pro thermostat from Orbit Quick Reference ® Overriding Schedules Permanently ........29 Turning Off Schedules .............. 30 Easy 1-2-3 Operation ..............2 We are excited to provide you a long-lasting thermostat that blends style with function. -
Page 3: Easy 1-2-3 Operation
EASY 1-2-3 OPERATION THERMOSTAT CONTROLS 1. Set the time and day ........................See page 20 Backlit Screen: 2. Select whether to heat or cool ....................See page 21 Press any button to activate 3. Select fan setting ..........................See page 21 Your thermostat is now ready to use, simply press RUN. -
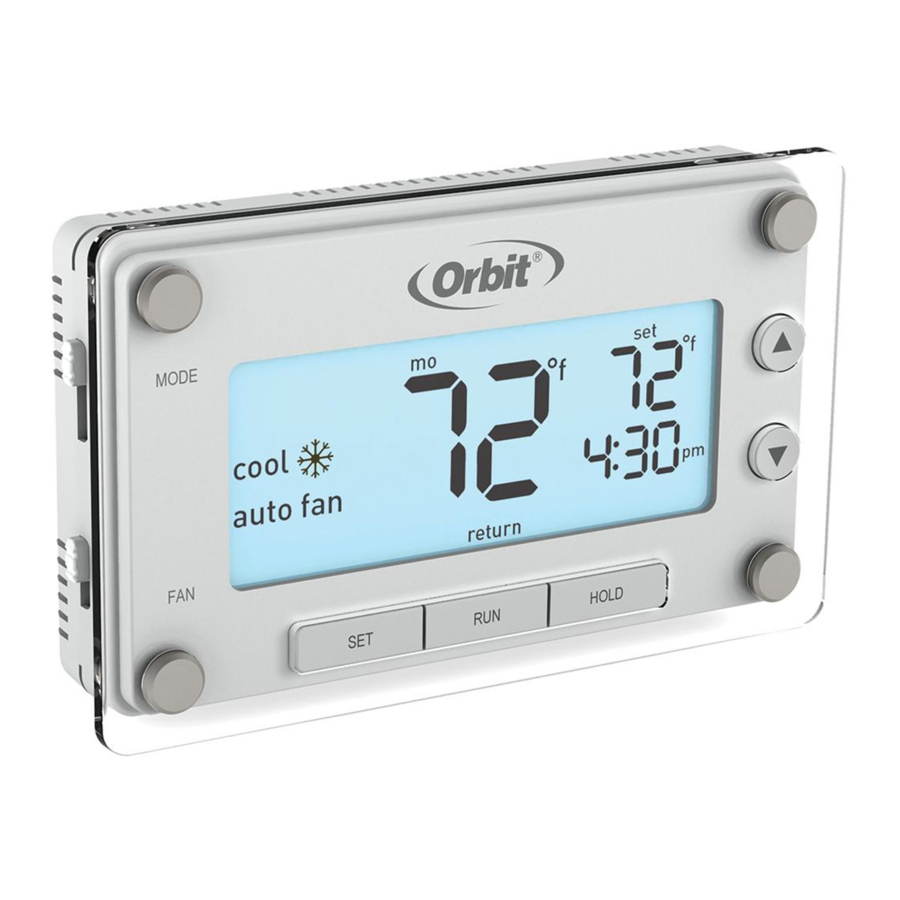
Page 4: Display Screen
DISPLAY SCREEN BEFORE YOU BEGIN Cooling system is on Room temperature This thermostat is compatible with Tools Required For Installation the following systems: Heating system is on Current day of the week • Phillips screwdriver • Wire cutters/strippers • Gas, oil or electric furnace •... -
Page 5: Installation
TIPS FOR INSTALLATION INSTALLING YOUR THERMOSTAT When replacing an existing thermostat, • Avoid installing the thermostat in Switch Off Power overly chilled areas, such as in a drafty area (e.g., position your new Clear Comfort® Pro Turn off the power to the heating stairwell, door, or window), thermostat in the same location as your and cooling equipment. - Page 6 INSTALLING YOUR THERMOSTAT INSTALLING YOUR THERMOSTAT Label Wires Mount New Base Use the supplied wire labels to identify the a. Remove the thermostat body from wire by its terminal letter and not the color. the base by gently pulling them apart. G O/B Y Once the wires are labeled, disconnect the b.
- Page 7 INSTALLING YOUR THERMOSTAT INSTALLING YOUR THERMOSTAT Wire Installation for Heat Pump Systems Wire Installation for Conventional Systems a. Loosen the screws on each terminal. b. Insert jumper wire into the Y and W a. Loosen the screws on each terminal. screw screw terminals.
- Page 8 L, F, E, or Aux wires, a separate O and B wire, stop compatible with your & Rc terminals. Connect the R the Orbit thermostat is now and contact a qualified system. wire to the Rc terminal and the not compatible with your HVAC technician for assistance.
- Page 9 INSTALLING YOUR THERMOSTAT INSTALLING YOUR THERMOSTAT Set Heat Pump Jumper Set Fan Control Jumper The following instructions are necessary Correct placement of this J2 jumper to check the J3 jumper placement if you optimizes energy use and comfort levels have a heat pump system. for the connected system type.
-
Page 10: Temperature Format
INSTALLING YOUR THERMOSTAT TEMPERATURE FORMAT RESET BUTTON Switching Between To access the RESET button, remove the Completing an installation Fahrenheit (°F) and Celsius (°C) thermostat body from its base by gently a. Insert three Energizer® or Duracell® AAA G O/B Y W RC R pulling them apart. -
Page 11: Advanced System Setup
ADVANCED SYSTEM SETUP TEMPERATURE OFFSET EARLY START SYSTEM TYPE The following four features are done in a Offset the temperature display to read +/- 9° Your thermostat comes preprogrammed Your thermostat is set at the factory to flow-through setup. The system will walk you F (+/- 4.5°... -
Page 12: Minimum Cycle Period
MINIMUM CYCLE PERIOD MINIMUM CYCLE PERIOD Changing the minimum cycle period to six Common Cycle Period Settings Cycle Period minutes or greater enables smart logic. System Type (Minutes) Your thermostat will learn, over time, the best cycle times for your system and home 1-Stage gas furnace heat with electric fan conditions. -
Page 13: Set Time And Day
SET TIME AND DAY SELECT MODE AND FAN SETTINGS Set the time and day Slide the mode switch to whether you With the thermostat in off mode, press SET. want to heat or cool to achieve the set 2. Press p or q to adjust the time. temperature. -
Page 14: Programmed Schedules
PROGRAMMED SCHEDULES ENERGY STAR PROGRAMMED SCHEDULE ® The thermostat schedule is divided into four periods For optimal energy savings your thermostat is preprogrammed with the following schedule for for you to program for maximum energy savings. each day of the week. Simply switch your thermostat to the heat or cold mode and press RUN. wake Set it to the time you wake up and the temperature you want Period... -
Page 15: Modifying The Programmed Schedule
MODIFYING THE PROGRAMMED SCHEDULE USING THE COPY FEATURE From the days of the week menu you can 2. Press p or q to select the day you would Switch the thermostat to the MODE 4. Press p or q to set the wake copy a schedule from a single day to one or like to copy and press SET when that day more days. -
Page 16: Overriding Schedules Temporarily
OVERRIDING SCHEDULES TEMPORARILY OVERRIDING SCHEDULES PERMANENTLY Press p or q to raise or lower the You can remove the temporary setting at any Press HOLD to override the programmed You can remove the hold at any time by temperature. This temporary adjustment time by pressing RUN, the system will return schedule. -
Page 17: Turning Off Schedules
TURNING OFF SCHEDULES BUILT IN COMPRESSOR PROTECTION Press HOLD for five seconds until the the temperature. This function helps protect against damage manual indicator “man.” appears on the to the compressor in your air conditioning You can exit the manual setting at any time by screen. -
Page 18: Early Start
EARLY START FUNCTIONALITY THERMOSTAT CARE REPLACING THE BATTERIES It is recommended that the batteries 5. Reinstall the thermostat body onto its in the thermostat be replaced once base by gently pushing it until it “clicks” This function allows the heating or cooling system To prevent damage to the clear lens over the a year or before leaving the home for into place. -
Page 19: Troubleshooting
TROUBLESHOOTING TROUBLESHOOTING Problem: Problem: No heating/cooling system activation No fan/fan runs continuously Solution: Solution: Verify MODE switch is in proper heat or cool mode. If the fan runs continuously, verify that the thermostat is in the AUTO position not the ON 2. - Page 20 TROUBLESHOOTING TROUBLESHOOTING Problem: Problem: Not reaching set temperature Incorrect room temperature Solution: Solution: Verify that the MODE switch is in proper heat or cool mode. Let the thermostat sit (do not touch) for 30 minutes to allow the temperature to stabilize. 2.
- Page 21 2. Check the programmed schedule (see “Modifying the Programmed Schedule,” page 24). Solution: The Orbit Clear Comfort™ Pro thermostat uses smart logic to turn on once every 3. Verify that the thermostat is not in MANUAL mode (see “Turning Off Schedules,” page 28).
-
Page 22: Customer Assistance
Orbit, Inc. North Salt Lake, UT 84054 Orbit, Inc. will not be responsible for consequential or incidental cost or damage caused by the www.orbitonline.com product failure. Orbit, Inc. liability under this warranty is limited solely to the replacement or repair of defective parts. - Page 23 (consulte la página 8). También recomendamos tomar una foto de los cables de corriente antes de desconectar. Guía del usuario Clear Comfort ® Termostato programable para 7 días Modelo 83521...
- Page 24 ÍNDICE Gracias por comprar el termostato Clear Comfort® Pro de Orbit®. Referencia rápida Anulación temporal de horarios ........... 28 Anulación permanente de horarios ........29 Funcionamiento tan fácil como contar 1-2-3 ......2 Nos complace suministrarle un termostato duradero que combina estilo con funcionalidad.
-
Page 25: Controles Del Termostato
FUNCIONAMIENTO TAN FÁCIL COMO CONTAR 1-2-3 CONTROLES DEL TERMOSTATO Pantalla con 1. Configure la hora y día ....................Consulte la página 20 Interruptor MODE iluminación de fondo: 2. Seleccione calefacción o refrigeración ..............Consulte la página 21 (MODALIDAD): Presione cualquier botón 3. -
Page 26: Pantalla De Visualización
PANTALLA DE VISUALIZACIÓN ANTES DE COMENZAR El sistema de Temperatura de la habitación refrigeración está activado Este termostato es compatible con los Herramientas necesarias para la instalación Día actual de la semana El sistema de calefacción siguientes sistemas: • Destornillador de estrella está... - Page 27 CONSEJOS PRÁCTICOS PARA LA INSTALACIÓN INSTALACIÓN DEL TERMOSTATO Corte el suministro de energía eléctrica Cuando cambie un termostato existente, una estufa. • Evite instalar el termostato en áreas coloque su nuevo termostato Apague el suministro de energía al equipo de excepcionalmente frías, tales como un área Clear Comfort®...
- Page 28 INSTALACIÓN DEL TERMOSTATO INSTALACIÓN DEL TERMOSTATO Etiquete los cables Monte la nueva base Utilice las etiquetas de cables que se suministran a. Retire el cuerpo del termostato de la base para identificar el cable por la letra de su terminal halándolo suavemente para separarlo.
- Page 29 INSTALACIÓN DEL TERMOSTATO INSTALACIÓN DEL TERMOSTATO Instalación de los cables Instalación de cables para sistemas G O/B G O/B en sistemas convencionales de bomba de calor a. Afloje los tornillos de cada terminal. a. Afloje los tornillos de cada terminal. Nota: Retire el cable de puente si tiene b.
- Page 30 L, F, E o Aux, cables O y B separados, pare sistema. terminales R y Rc. Conecte el el termostato Orbit no es y comuníquese con un técnico cable R al terminal Rc y el cable compatible con su sistema.
- Page 31 INSTALACIÓN DEL TERMOSTATO INSTALACIÓN DEL TERMOSTATO Configuración del puente de control del ventilador Configuración del puente de la bomba de calor La colocación correcta de este puente J2 optimiza el uso de la energía y los niveles de confort del tipo de sistema conectado. Las siguientes instrucciones son necesarias para revisar la colocación del puente J3 si Calefacción de gas/aceite...
- Page 32 INSTALACIÓN DEL TERMOSTATO FORMATO DE TEMPERATURA BOTÓN DE REINICIO Cambio entre grados Fahrenheit (°F) Para acceder al botón RESET (reinicio), y Centígrados (°C) retire el cuerpo del termostato de la base Finalización de la instalación halándolo suavemente para separarlo. a. Inserte tres baterías alcalinas AAA Coloque el interruptor MODE G O/B Y W RC R Energizer®...
- Page 33 CONFIGURACIÓN AVANZADA DEL SISTEMA DESPLAZAMIENTO DE LA TEMPERATURA INICIO TEMPRANO TIPO DE SISTEMA Las siguientes cuatro funciones se realizan Desplace la pantalla de la temperatura Su termostato viene preprogramado Su termostato viene configurado de fábrica en una configuración fluida. El sistema le para que aparezca +/- 9°...
- Page 34 PERÍODO MÍNIMO DEL CICLO PERÍODO MÍNIMO DEL CICLO Tipo de sistema Período del ciclo Cambiar el periodo de ciclo mínimo de seis (minutos) Sistema de calefacción de gas de 1 etapa minutos o mayor habilita la lógica inteligente. Su termostato aprender, con el tiempo, los con ventilador eléctrico mejores tiempos de ciclo para su sistema Sistema de calefacción de gas de 1 etapa...
-
Page 35: Configuración De La Hora Y El Día
CONFIGURACIÓN DE LA HORA Y EL DÍA SELECCIÓN DE LA MODALIDAD Y CONFIGURACIÓN DEL VENTILADOR Deslice el interruptor de modalidad hacia Configure la hora y el día calefacción o refrigeración para alcanzar la Con el termostato en la modalidad de temperatura establecida. -
Page 36: Horarios Programados
HORARIOS PROGRAMADOS HORARIO PROGRAMADO ENERGY STAR ® Para un óptimo ahorro de energía su termostato está preprogramado con el siguiente horario El horario del termostato se divide en cuatro períodos para cada día de la semana. Simplemente cambie su termostato a la modalidad de calefacción para que pueda programar el máximo ahorro de energía. -
Page 37: Modificación Del Horario Programado
MODIFICACIÓN DEL HORARIO PROGRAMADO USO DE LA FUNCIÓN DE COPIA Del menú de los días de la semana puede 2. Presione p/q para seleccionar el día que 4. Presione p/q para configurar la Cambie el termostato a MODE (modalidad) copiar un horario de un solo día a uno o desea copiar y presione SET (configurar) temperatura al despertarse y presione para programar a heat o cool (calefacción o... -
Page 38: Anulación Temporal De Horarios
ANULACIÓN TEMPORAL DEL HORARIO ANULACIÓN PERMANENTE DE HORARIOS Presione p/q para elevar o disminuir Puede eliminar la configuración temporal Presione HOLD (suspender) para anular el Puede eliminar la suspensión en cualquier la temperatura. Este ajuste temporal en cualquier momento presionando RUN horario programado. -
Page 39: Desactivación De Horarios
DESACTIVACIÓN DE HORARIOS PROTECCIÓN INTEGRADA DEL COMPRESOR Presione HOLD (suspender) durante cinco Puede salir de la configuración manual Esta función contribuye a proteger de segundos hasta que el indicador “man.” en cualquier momento presionando RUN daños el compresor de su sistema de aire (manual) aparezca en la pantalla. -
Page 40: Inicio Temprano
FUNCIONALIDAD DE INICIO TEMPRANO MANTENIMIENTO DEL TERMOSTATO REEMPLAZO DE LAS BATERÍAS Se recomienda el reemplazo de las baterías 5. Vuelva a instalar el cuerpo del termostato del termostato una vez al año o antes de en su base presionándolo suavemente Esta función permite que el sistema de Para evitar daños al lente transparente del marcharse de la vivienda por un período... -
Page 41: Localización Y Solución De Problemas
LOCALIZACIÓN Y SOLUCIÓN DE PROBLEMAS LOCALIZACIÓN Y SOLUCIÓN DE PROBLEMAS Problema: Problema: No se activa el sistema de calefacción/refrigeración El ventilador no funciona/funciona continuamente Solución: Verifique que el interruptor de modalidad esté en la modalidad adecuada de heat Solución: (calefacción) o cool (refrigeración). Si el ventilador funciona continuamente, verifique que el termostato esté... - Page 42 LOCALIZACIÓN Y SOLUCIÓN DE PROBLEMAS LOCALIZACIÓN Y SOLUCIÓN DE PROBLEMAS Problema: Problema: No alcanza la temperatura establecida Temperatura incorrecta en la habitación. Solución: Solución: Verifique que el interruptor MODE (modalidad) esté en la posición adecuada de heat No toque el termostato durante 30 minutos para permitir que la temperatura se estabilice. (calefacción) o cool (refrigeración).
- Page 43 Problema: El sistema se enciende demasiado frecuentemente 3. Verifique que el termostato no esté en la modalidad MANUAL (Consulte “Desactivación de Solución: El termostato Clear Comfort™ Pro de Orbit utiliza una lógica inteligente para horarios”, página 28). activarse una vez en cada período del ciclo para maximizar el confort y la estabilidad de la temperatura.
-
Page 44: Asistencia Al Cliente
INFORMACIÓN DE LA GARANTÍA Para asistencia técnica, llame al: Orbit, Inc. garantiza a sus clientes que sus productos no tendrán defectos en los materiales 1-800-488-6156 o 1-801-299-5555. ni en la mano de obra durante un período de tres años a partir de la fecha de compra. - Page 45 No es compatible con los calefactores de zócalo (u otros calefactores de voltaje en línea), sistemas de calefacción o refrigeración de etapas múltiples o sistemas hidrónicos de tres cables. • Requiere 3 baterías AAA Incluye: Dotación física de montaje, guía de instalación 83521-24 rD...
Need help?
Do you have a question about the 83521 and is the answer not in the manual?
Questions and answers