Table of Contents
Advertisement
WEATHER STATION
Instruction Manual
Cat. No. 35.1078.10.IT
Thank you for choosing this wireless weather station from TFA.
BEFORE YOU USE IT
Please be sure to read the instruction manual carefully.
This information will help you to familiarise yourself with your new device, learn
all of its functions and parts, find out important details about its first use and how
to operate it, and get advice in the event of faults.
Following the instruction manual for use will prevent damage to the device and
loss of your statutory rights arising from defects due to incorrect use.
We shall not be liable for any damage occurring as a result of not following
these instructions.
Please take particular note of the safety advice!
Please look after this manual for future reference.
SCOPE OF SUPPLY:
Weather station (basic unit)
•
Outdoor transmitter
•
Batteries 5 x AA, IEC LR6, 1.5V
•
Instruction manual
•
FIELD OF OPERATION AND ALL OF THE BENEFITS OF YOUR
NEW WEATHER STATION AT A GLANCE:
DCF Radio controlled time with manual setting option
•
Time reception ON/OFF (user selectable)
•
12/24 hour time display
•
Time zone option ±12 hours
•
Weekday and day calendar display (year and month only in setting mode)
•
Weather forecasting with weather tendency indicator
•
Temperature display in ºC/ºF
•
Indoor and outdoor temperature display with MIN/MAX records and time of
•
reception
Humidity data display as RH%
•
Indoor and outdoor humidity display with MIN/MAX records
•
Relative air pressure hPa/ inHg with adjustable reference value
•
Weather icon sensitivity setting
•
Relative air pressure history for the past 24 hours (electronic barometer
•
with barometric pressure trend)
LCD contrast selectable
•
Wireless transmission at 868 MHz
•
Signal reception intervals at 4 seconds
•
22
Advertisement
Table of Contents

Related Manuals for TFA 35.1078.10.IT


Summary of Contents for TFA 35.1078.10.IT
-
Page 1: Weather Station
WEATHER STATION Instruction Manual Cat. No. 35.1078.10.IT Thank you for choosing this wireless weather station from TFA. BEFORE YOU USE IT Please be sure to read the instruction manual carefully. This information will help you to familiarise yourself with your new device, learn all of its functions and parts, find out important details about its first use and how to operate it, and get advice in the event of faults. -
Page 2: For Your Safety
Can receive up to 3 outdoor transmitters • Low battery indicator • Table standing or wall mounting • FOR YOUR SAFETY: The product is exclusively intended for the field of application described • above. The product should only be used as described within these instructions. -
Page 3: To Install And Replace Batteries In The Weather Station
Thermo-Hygro Transmitter Remote transmission of outdoor temperature and humidity • to weather station by 868MHz Shower proof casing • Wall mounting case • Mounting at a sheltered place. Avoid direct rain and • sunshine TO INSTALL AND REPLACE BATTERIES IN THE THERMO-HYGRO TRANSMITTER The outdoor thermo-hygro transmitter uses 2 x AA IEC LR6, 1.5V batteries. - Page 4 assigned by the transmitter at start-up. This code must be received and stored by the weather station in the first 3 minutes of power being supplied to the transmitter. SETTING UP WHEN ONE TRANSMITTER IS USED First, insert the batteries in the transmitter (see “How to install and replace batteries in the thermo-hygro outdoor transmitter”...
-
Page 5: Dcf Radio Controlled Time
Insert the batteries in the second transmitter as soon as the outdoor temperature and humidity readings from the first transmitter are displayed on the weather station. Note : User shall insert the batteries into the second transmitter within 45 seconds after the weather station displays the information of the first transmitter. -
Page 6: Function Keys
successful at 06:00 am, then the next attempt will take place the next day at 02:00 am. Once the outdoor data reception test period is completed, the DCF tower icon in the clock display will start flashing in the upper left corner. This indicates that the clock has detected that there is a radio signal present and is trying to receive it. -
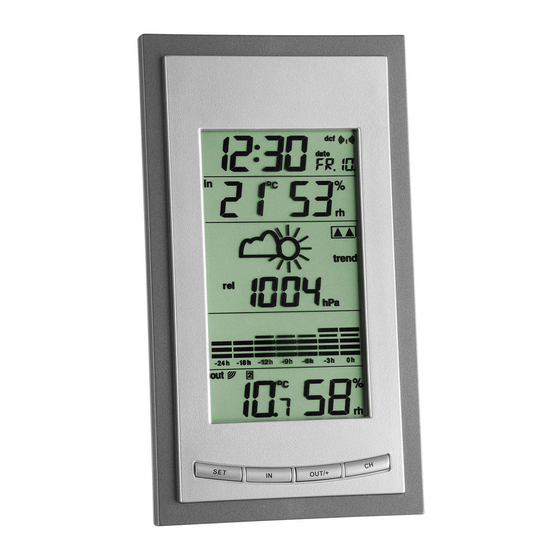
Page 7: Lcd Screen
Exit manual setting mode • LCD SCREEN The LCD screen is split into 5 sections displaying the information for time/calendar, indoor data, weather forecast, relative air pressure history, and outdoor data. Time reception icon (for DCF time) Time Calendar Indoor relative humidity in RH% Indoor temperature... -
Page 8: Lcd Contrast Setting
LCD CONTRAST SETTING: Last digit flashing The LCD contrast can be set within 8 levels, from LCD 0 to LCD7 (Default setting is LCD 4): Press and hold the SET key until the digit starts flashing. Use the OUT/+ key to view all levels of contrast. Select the desired LCD contrast. -
Page 9: Manual Time Setting
The hour display can be selected to show hours in 12-hour or 24-hour settings. (Default 24-Hour). Use the OUT/+ key to toggle between “12H” or “24H”. Confirm with the SET key and enter the Manual time setting. MANUAL TIME SETTING: In case the weather station cannot detect the DCF-signal (for example due to disturbances, transmitting distance, etc.), the time can be manually set. - Page 10 Press the SET key again to confirm and to enter the date setting mode. The date starts flashing. Use the OUT/+ key to set the date. Confirm all calendar settings with the SET key and enter the Temperature unit setting. °C/°F TEMPERATURE SETTING: Flashing The temperature display can be selected to show temperature data in °C or °F...
-
Page 11: To Exit The Manual Setting Mode
WEATHER FORECASTING ICON SENSITIVITY SETTING: For locations with rapid changes of weather conditions, the weather icons sensitivity can be set to a different level for faster display of weather conditions. Flashing The current sensitivity value will start flashing. Use the OUT/+ key to set the weather sensitivity level. There are 3 levels of setting: 2, 3 and 4. - Page 12 WEATHER FORECAST AND WEATHER TENDENCY: WEATHER FORECASTING ICONS: The weather icons in the third section of LCD can be displayed in any of the following combinations: Sunny Cloudy with sunny intervals Rainy For every sudden or significant change in the air pressure, the weather icons will update accordingly to represent the change in weather.
-
Page 13: Weather Tendency Indicator
WEATHER TENDENCY INDICATOR Working together with the weather icons is the weather tendency indicators (located on the left and right sides of the weather icons). When the indicator points upwards, it means that the air-pressure is increasing and the weather is expected to improve, but when indicator points downwards, the air-pressure is dropping and the weather is expected to become worse. -
Page 14: Toggling And Resetting The Outdoor Data
Outdoor transmitter identification number MIN icon Outdoor temperature Outdoor relative in °C/ °F humidity in RH% TOGGLING AND RESETTING THE OUTDOOR DATA To toggle between the outdoor current, MAX/MIN temperature and humidity data and the times (for temperature data only) they were recorded press the OUT/+ key: Once to show the MAX outdoor temperature and humidity data with the recorded time and date. -
Page 15: Positioning The Weather Station
CHECKING FOR 868MHz RECEPTION If the outdoor temperature and humidity data are not being received within three minutes after setting up (or outdoor display always show “- -. -” in the outdoor section of the Weather station during normal operation), please check the following points: The distance of the weather station or transmitters should be at least 2 meters away from any interfering sources such as computer monitors or TV... -
Page 16: Care And Maintenance
POSITIONING THE THERMO-HYGRO TRANSMITTER The thermo-hygro transmitter can be placed onto any flat surface or wall mount using the bracket which doubles as a stand or wall mount base. To wall mount: Secure the bracket onto a desired wall using the screws and plastic anchors. -
Page 17: Waste Disposal
WASTE DISPOSAL This product has been manufactured using high-grade materials and components which can be recycled and reused. Never throw flat batteries and rechargeable batteries in household waste. As a consumer, you are legally required to take them to your retail store or to appropriate collection sites according to national or local regulations in order to protect the environment. -
Page 18: Declaration Of Conformity
Thermo-hygro transmitter : 75 x 55 x 160mm (including stand) TFA Dostmann GmbH & Co. KG, Zum Ottersberg 12, D - 97877 Wertheim No part of this manual may be reproduced without written consent of TFA Dostmann. The technical data are correct at the time of going to print and may change without prior notice.
Need help?
Do you have a question about the 35.1078.10.IT and is the answer not in the manual?
Questions and answers