Table of Contents
Advertisement
Available languages
Available languages
Quick Links
TFA_No_35.1077_Anleitung_12_20
Diese Anleitung oder Auszüge daraus dürfen nur mit Zustimmung von TFA Dostmann veröffentlicht werden. Die technischen
Daten entsprechen dem Stand bei Drucklegung und können ohne vorherige Benachrichtigung geändert werden. Die neuesten
technischen Daten und Informationen zu Ihrem Produkt finden Sie auf unserer Homepage unter Eingabe der Artikel-Nummer
in das Suchfeld.
EU-KONFORMITÄTSERKLÄRUNG
Hiermit erklärt TFA Dostmann, dass der Funkanlagentyp 35.1077 der Richtlinie 2014/53/EU entspricht. Der vollständige Text der
EU-Konformitätserklärung ist unter der folgenden Internetadresse verfügbar: www.tfa-dostmann.de/service/downloads/ce
www.tfa-dostmann.de
E-Mail: info@tfa-dostmann.de
TFA Dostmann GmbH & Co.KG, Zum Ottersberg 12, D-97877 Wertheim, Deutschland
No part of this manual may be reproduced without written consent of TFA Dostmann. The technical data are correct at the
time of going to print and may change without prior notice. The latest technical data and information about this product can
be found in our homepage by simply entering the product number in the search box.
EU declaration of conformity
Hereby, TFA Dostmann declares that the radio equipment type 35.1077 is in compliance with Directive 2014/53/EU. The full text
of the EU declaration of conformity is available at the following Internet address: www.tfa-dostmann.de/service/downloads/ce
www.tfa-dostmann.de
E-Mail: info@tfa-dostmann.de
TFA Dostmann GmbH & Co.KG, Zum Ottersberg 12, D-97877 Wertheim, Germany
La reproduction, même partielle du présent mode d'emploi est strictement interdite sans l'accord explicite de TFA Dostmann.
Les spécifications techniques de ce produit ont été actualisées au moment de l'impression et peuvent être modifiées, sans avis
préalable. Les dernières données techniques et des informations concernant votre produit peuvent être trouvées en entrant le
numéro de l'article sur notre site.
Déclaration UE de conformité
Le soussigné, TFA Dostmann, déclare que l'équipement radioélectrique du type 35.1077 est conforme à la directive 2014/53/UE.
Le texte complet de la déclaration UE de conformité est disponible à l'adresse Internet suivante :
www.tfa-dostmann.de/service/downloads/ce
www.tfa-dostmann.de
E-Mail: info@tfa-dostmann.de
TFA Dostmann GmbH & Co.KG, Zum Ottersberg 12, D-97877 Wertheim, Allemagne
È vietata la pubblicazione delle presenti istruzioni o di parti di esse senza una precedente autorizzazione della TFA Dostmann.
I dati tecnici corrispondono allo stato del prodotto al momento della stampa e possono cambiare senza preavviso. È possibile
trovare dati tecnici e informazioni aggiornate sul prodotto inserendo il numero di articolo sul nostro sito.
Dichiarazione di conformità UE
Il fabbricante, TFA Dostmann, dichiara che il tipo di apparecchiatura radio 35.1077 è conforme alla direttiva 2014/53/UE. Il testo
completo della dichiarazione di conformità UE è disponibile al seguente indirizzo Internet:
www.tfa-dostmann.de/service/downloads/ce
www.tfa-dostmann.de
E-Mail: info@tfa-dostmann.de
TFA Dostmann GmbH & Co.KG, Zum Ottersberg 12, D-97877 Wertheim, Germania
Deze gebruiksaanwijzing of gedeelten eruit mogen alleen met toestemming van TFA Dostmann worden gepubliceerd. De
technische gegevens van dit apparaat zijn actueel bij het ter perse gaan en kunnen zonder voorafgaande informatie worden
gewijzigd. De nieuwste technische gegevens en informatie over uw product kunt u vinden door het invoeren van het artikel-
nummer op onze homepage.
EU-conformiteitsverklaring
Hierbij verklaar ik, TFA Dostmann, dat het type radioapparatuur 35.1077 conform is met Richtlijn 2014/53/EU. De volledige
tekst van de EU-conformiteitsverklaring kan worden geraadpleegd op het volgende internetadres:
www.tfa-dostmann.de/service/downloads/ce
www.tfa-dostmann.de
E-Mail: info@tfa-dostmann.de
TFA Dostmann GmbH & Co.KG, Zum Ottersberg 12, D-97877 Wertheim, Duitsland
Estas instrucciones o extractos de las mismas no pueden ser publicados sin la autorización de la TFA Dostmann. Los datos técnicos
de este producto corresponden al estado en el momento de la impresión y pueden ser modificados sin previo aviso. Los actuales
datos técnicos e informaciones sobre su producto los puede encontrar bajo el número de artículo en nuestra página web.
Declaración UE de conformidad
Por la presente, TFA Dostmann declara que el tipo de equipo radioeléctrico 35.1077 es conforme con la Directiva 2014/53/UE. El
texto completo de la declaración UE de conformidad está disponible en la dirección Internet siguiente:
www.tfa-dostmann.de/service/downloads/ce
www.tfa-dostmann.de
E-Mail: info@tfa-dostmann.de
TFA Dostmann GmbH & Co.KG, Zum Ottersberg 12, D-97877 Wertheim, Alemania
22.12.2020
11:27 Uhr
Seite 1
STRATOS
Bedienungsanleitung
Instruction manual
Mode d'emploi
Istruzioni per l'uso
Gebruiksaanwijzing
Instrucciones de uso
Instruction manuals
12/20
www.tfa-dostmann.de/en/service/downloads/instruction-manuals
Kat. Nr. 35.1077
Advertisement
Chapters
Table of Contents

Related Manuals for TFA 35.1077


Summary of Contents for TFA 35.1077
- Page 1 TFA Dostmann GmbH & Co.KG, Zum Ottersberg 12, D-97877 Wertheim, Deutschland No part of this manual may be reproduced without written consent of TFA Dostmann. The technical data are correct at the time of going to print and may change without prior notice. The latest technical data and information about this product can be found in our homepage by simply entering the product number in the search box.
-
Page 2: Table Of Contents
TFA_No_35.1077_Anleitung_12_20 22.12.2020 11:27 Uhr Seite 2 STRATOS – Funk-Wetterstation Inhaltsverzeichnis 1. Einführung ............4 1.1 Funktionen . -
Page 3: Einführung
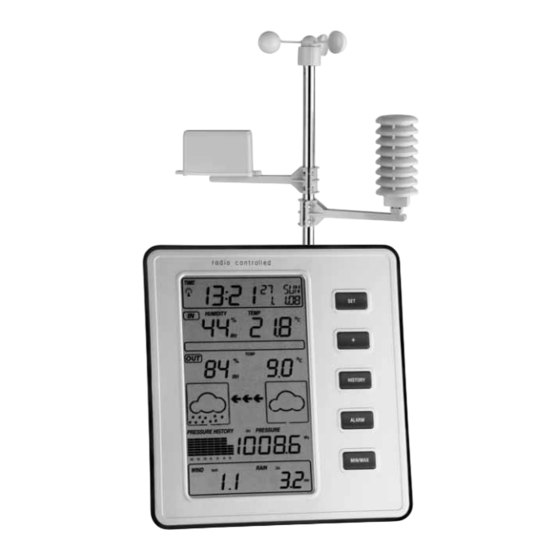
TFA_No_35.1077_Anleitung_12_20 22.12.2020 11:27 Uhr Seite 3 STRATOS – STRATOS – Funk-Wetterstation Funk-Wetterstation 1. Einführung 2.1 Basisstation Ihre neue Profi-Funk-Wetterstation besteht aus einer Basisstation mit Innensen- Vorderseite soren für Raumtemperatur, Luftfeuchtigkeit und Luftdruck und mehreren Außensensoren zur Messung von Außentemperatur, Luftfeuchtigkeit, Wind- stärke und Regenmenge. -
Page 4: Windsensor
TFA_No_35.1077_Anleitung_12_20 22.12.2020 11:27 Uhr Seite 4 STRATOS – STRATOS – Funk-Wetterstation Funk-Wetterstation 2.3 Windsensor Empfang der Außenwerte und der Funkzeit • Wenn die Batterien in die Basisstation eingelegt werden, ertönt ein kurzer Sig- Der Windsensor misst die Windgeschwindigkeit und überträgt nalton und alle LCD Segmente werden für 3 sec. - Page 5 TFA_No_35.1077_Anleitung_12_20 22.12.2020 11:27 Uhr Seite 5 STRATOS – STRATOS – Funk-Wetterstation Funk-Wetterstation 1) Basisstation b.) Montage des Regensensors Mit dem ausklappbaren Ständer auf der Rückseite kann die Basisstation aufge- stellt werden oder mit der Aufhängeöse an der Wand befestigt werden. Vermei- den Sie die Nähe zu anderen elektrischen Geräten (Fernseher, Computer, Funk- telefone) und massiven Metallgegenständen.
-
Page 6: Lcd Bildschirm
TFA_No_35.1077_Anleitung_12_20 22.12.2020 11:27 Uhr Seite 6 STRATOS – STRATOS – Funk-Wetterstation Funk-Wetterstation 4. LCD Bildschirm 4.2 Wettervorhersage 4.1 LCD Überblick Die Funkwetterstation unterscheidet 4 unterschiedliche Wettersymbole (Sonnig, Die folgende Abbildung zeigt sämtliche Displaysegmente. Während der norma- teilweise bewölkt, bedeckt, Regen). len Anwendung erscheint diese Darstellung nicht. -
Page 7: Programm-Modus
TFA_No_35.1077_Anleitung_12_20 22.12.2020 11:27 Uhr Seite 7 STRATOS – STRATOS – Funk-Wetterstation Funk-Wetterstation 5. Programm-Modus 5.3 Historie-Modus Die Basisstation hat 5 Tasten zur einfachen Bedienung: SET, + , HISTORY, ALARM • Drücken Sie im Normalmodus die HISTORY Taste, um in den Historie-Modus zu und MIN/MAX. -
Page 8: Min/Max Modus
TFA_No_35.1077_Anleitung_12_20 22.12.2020 11:27 Uhr Seite 8 STRATOS – STRATOS – Funk-Wetterstation Funk-Wetterstation Hinweis: Wenn Sie das erste Mal die ALARM Taste drücken, erscheint “---“ auf allen 6. Technische Daten Displayfeldern. Später erscheinen die eingegebenen Grenzwerte, sofern sie aktiviert sind. Übertragungsdistanz Freifeld: 100 Meter max. - Page 9 TFA_No_35.1077_Anleitung_12_20 22.12.2020 11:27 Uhr Seite 9 STRATOS – STRATOS – Funk-Wetterstation Wireless weather station 7. Batteriewechsel • Wenn die Batterien der Basisstation ersetzt werden müssen, erscheint die Batte- rieanzeige (RX) auf dem Display. • Wenn die Batterien des Außensenders ersetzt werden müssen, erscheint die Bat- terieanzeige (TX) auf dem Display.
- Page 10 TFA_No_35.1077_Anleitung_12_20 22.12.2020 11:27 Uhr Seite 10 STRATOS – STRATOS – Wireless weather station Wireless weather station 1. Introduction 2.1 Base station This new wireless weather station consists on a base station with indoor sensors Front view for room temperature, humidity and atmospheric pressure and several outdoor sensors for measuring outdoor temperature, humidity, wind velocity and quantity of rainfall.
- Page 11 TFA_No_35.1077_Anleitung_12_20 22.12.2020 11:27 Uhr Seite 11 STRATOS – STRATOS – Wireless weather station Wireless weather station 2.3 Wind sensor Transmission of outdoor values and DCF time • When the base station is powered up, a short beep will sound and all LCD seg- The wind sensor measures wind speed and sends the data to ments will light up for about 3 seconds before it enters into learning mode to thermo-hygro-sensor, which transmits the data to the base sta-...
- Page 12 TFA_No_35.1077_Anleitung_12_20 22.12.2020 11:27 Uhr Seite 12 STRATOS – STRATOS – Wireless weather station Wireless weather station 1) Base station b.) Mounting the rain sensor With the foldable leg at the back of the unit, the base station can be placed onto any flat surface or wall mounted at the desired location by the hanging hole at the back of the unit.
- Page 13 TFA_No_35.1077_Anleitung_12_20 22.12.2020 11:28 Uhr Seite 13 STRATOS – STRATOS – Wireless weather station Wireless weather station 4. LCD display 4.2 Weather forecast 4.1 LCD overview The four weather symbols (sunny, partly cloudy, cloudy and rainy) represent the The following illustration shows the full segments of the LCD for description weather forecast.
- Page 14 TFA_No_35.1077_Anleitung_12_20 22.12.2020 11:28 Uhr Seite 14 STRATOS – STRATOS – Wireless weather station Wireless weather station 5. Program Modes 5.3 History Mode The base station has five buttons for easy operation: SET button, + button, • While in Normal Mode, press the HISTORY button to enter the History Mode. ALARM button, HISTORY buttonand MIN/MAX button.
- Page 15 TFA_No_35.1077_Anleitung_12_20 22.12.2020 11:28 Uhr Seite 15 STRATOS – STRATOS – Wireless weather station Wireless weather station Alarm signal 6. Specifications When a set weather alarm condition has been triggered, that particular alarm Transmission distance in open field: 100 meter max. will sound for 120 seconds.
- Page 16 TFA_No_35.1077_Anleitung_12_20 22.12.2020 11:28 Uhr Seite 16 STRATOS – STRATOS – Wireless weather station Station météorologique radio-pilotée 7. Battery replacement • When batteries require replacement for the base station, the low battery indica- tor (RX) will light up on the LCD. •...
-
Page 17: Introduction
TFA_No_35.1077_Anleitung_12_20 22.12.2020 11:28 Uhr Seite 17 STRATOS – STRATOS – Station météorologique radio-pilotée Station météorologique radio-pilotée 1. Introduction 2.1 Station de base Votre nouvelle station météorologique professionnelle se compose d'une station Face avant de base avec des sondes intérieures pour température, humidité et pression atmosphérique et de plusieurs sondes extérieures destinées à... -
Page 18: Sonde Thermo-Hygrométrique
TFA_No_35.1077_Anleitung_12_20 22.12.2020 11:28 Uhr Seite 18 STRATOS – STRATOS – Station météorologique radio-pilotée Station météorologique radio-pilotée 2.3 Sonde anémométrique Réception des mesures extérieures et du signal radio DCF • Lorsque les piles sont introduites dans la station de base, un signal sonore se fait La sonde anémométrique mesure la vitesse du vent et retrans- entendre et tous les segments DEL s'allument pour 3 s. - Page 19 TFA_No_35.1077_Anleitung_12_20 22.12.2020 11:28 Uhr Seite 19 STRATOS – STRATOS – Station météorologique radio-pilotée Station météorologique radio-pilotée les murs massifs, particulièrement ceux comportant des parties métalliques, peu- b.) Montage de la sonde pluviométrique vent sensiblement réduire la portée des émetteurs). Le cas échéant, cherchez un autre emplacement pour l'émetteur et/ou le récepteur.
-
Page 20: Écran Lcd
TFA_No_35.1077_Anleitung_12_20 22.12.2020 11:28 Uhr Seite 20 STRATOS – STRATOS – Station météorologique radio-pilotée Station météorologique radio-pilotée 4. Écran LCD 4.2 Prévision météorologique 4.1 Aperçu de l'écran LCD La station météorologique radioélectrique affiche 4 symboles météorologiques différents (ensoleillé, peu nuageux, nuageux, pluie). L'illustration suivante montre tous les segments de l'afficheur. -
Page 21: Mode Programmation
TFA_No_35.1077_Anleitung_12_20 22.12.2020 11:28 Uhr Seite 21 STRATOS – STRATOS – Station météorologique radio-pilotée Station météorologique radio-pilotée 5. Mode programmation 5.3 Mode historique La station de base dispose de 5 touches permettant une manipulation facile. SET, • Pour accéder au mode historique, appuyez en mode normal sur la touche HISTORY. + , HISTORY, ALARM et MIN/MAX. -
Page 22: Mode Mini/Maxi
TFA_No_35.1077_Anleitung_12_20 22.12.2020 11:28 Uhr Seite 22 STRATOS – STRATOS – Station météorologique radio-pilotée Station météorologique radio-pilotée Remarque: lorsque vous appuyez pour la première fois sur la touche ALARM, tous les 6. Caractéristiques techniques champs de l'afficheur montrent le symbole “---“. Si elles sont activées, les valeurs limites Portée de retransmission saisies s'afficheront par la suite. - Page 23 TFA_No_35.1077_Anleitung_12_20 22.12.2020 11:28 Uhr Seite 23 STRATOS – STRATOS – Station météorologique radio-pilotée Stazione barometrica radiocontrollata 7. Remplacement des batteries • Quand les batteries de la station de base sont trop faibles, le symbole «batterie faible» (RX) apparaît sur l'affichage. •...
-
Page 24: Introduzione
TFA_No_35.1077_Anleitung_12_20 22.12.2020 11:28 Uhr Seite 24 STRATOS – STRATOS – Stazione barometrica radiocontrollata Stazione barometrica radiocontrollata 1. Introduzione 2.1 Stazione base La vostra nuova stazione meteo professionale è composta da una stazione base Parte anteriore con sensori interni per la misurazione della temperatura ed umidità interna, pressione atmosferica e da numerosi sensori esterni per la misurazione della temperatura esterna, umidità, intensità... -
Page 25: Sensore Anemometrico
TFA_No_35.1077_Anleitung_12_20 22.12.2020 11:28 Uhr Seite 25 STRATOS – STRATOS – Stazione barometrica radiocontrollata Stazione barometrica radiocontrollata 2.3 Sensore anemometrico Ricezione dei valori esterni e dell'ora radiocontrollata • Quando le batterie vengono inserite nella stazione base, si avverte un breve Il sensore anemometrico misura la velocità del vento e tras- segnale acustico e tutti i segmenti LCD vengono visualizzati per 3 sec. - Page 26 TFA_No_35.1077_Anleitung_12_20 22.12.2020 11:28 Uhr Seite 26 STRATOS – STRATOS – Stazione barometrica radiocontrollata Stazione barometrica radiocontrollata 1) Stazione base b.) Montaggio del sensore di pioggia Con il supporto pieghevole situato nella parte posteriore è possibile disporre la stazione base in posizione verticale oppure fissarla a parete con il foro di sospen- sione.
-
Page 27: Schermo Lcd
TFA_No_35.1077_Anleitung_12_20 22.12.2020 11:28 Uhr Seite 27 STRATOS – STRATOS – Stazione barometrica radiocontrollata Stazione barometrica radiocontrollata 4. Schermo LCD 4.2 Previsioni meteorologiche 4.1 Panoramica sul display LCD La stazione meteo riconosce 4 simboli meteo diversi (soleggiato, parzialmente La seguente illustrazione mostra tutti i segmenti del display. Durante il normale nuvoloso, coperto, pioggia). -
Page 28: Modo Programmazione
TFA_No_35.1077_Anleitung_12_20 22.12.2020 11:28 Uhr Seite 28 STRATOS – STRATOS – Stazione barometrica radiocontrollata Stazione barometrica radiocontrollata 5. Modo programmazione con la nuova unità, in modo da poter fornire le stesse perdite di risoluzione tramite l'algoritmo di calcolo interno. La stazione base è dotata di 5 tasti per un facile utilizzo: SET, + , HISTORY, ALARM e MIN/MAX. -
Page 29: Modo Min/Max
TFA_No_35.1077_Anleitung_12_20 22.12.2020 11:28 Uhr Seite 29 STRATOS – STRATOS – Stazione barometrica radiocontrollata Stazione barometrica radiocontrollata Suggerimento: alla prima pressione del tasto ALARM, appare “---“ su tutti i campi 6. Dati tecnici del display. Successivamente appaiono i valori limite inseriti, a condizione che siano Distanza di trasmissione attivati. - Page 30 TFA_No_35.1077_Anleitung_12_20 22.12.2020 11:28 Uhr Seite 30 STRATOS – STRATOS – Stazione barometrica radiocontrollata Draadloze weerstation Durata batterie: circa 12 mesi per la stazione base circa 24 mesi per il sensore termo- igrometrico 7. Sostituire le batterie • Se invece sono scariche le batterie dalla stazione base, il simbolo di “batteria bassa”...
-
Page 31: Inleiding
TFA_No_35.1077_Anleitung_12_20 22.12.2020 11:28 Uhr Seite 31 STRATOS – STRATOS – Draadloze weerstation Draadloze weerstation 1. Inleiding 2.1 Basisstation (ontvanger) Uw nieuw professioneel draadloze weerstation bestaat uit een basisstation met Voorkant binnensensoren voor binnentemperatuur, luchtvochtigheid en luchtdruk en meerdere buitensensoren voor het meten van buitentemperatuur, luchtvochtig- heid, windkracht en neerslaghoeveelheid. -
Page 32: Windsensor
TFA_No_35.1077_Anleitung_12_20 22.12.2020 11:28 Uhr Seite 32 STRATOS – STRATOS – Draadloze weerstation Draadloze weerstation 2.3 Windsensor Ontvangst buitenwaarden en radiografische tijd (DCF) • Bij het inzetten van de batterijen in het basisstation hoort u een kort signaal en De windsensor meet de windsnelheid en stuurt de gegevens verschijnen gedurende 3 s alle LCD-schermsegmenten. - Page 33 TFA_No_35.1077_Anleitung_12_20 22.12.2020 11:28 Uhr Seite 33 STRATOS – STRATOS – Draadloze weerstation Draadloze weerstation 1) Basisstation b.) Montage van de regensensor Mit dem ausklappbaren Ständer auf der Rückseite kann die Basisstation aufge- stellt werden oder mit der Aufhängeöse an der Wand befestigt werden. Vermei- den Sie die Nähe zu anderen elektrischen Geräten (Fernseher, Computer, Funk- telefone) und massiven Metallgegenständen.
-
Page 34: Lcd-Scherm
TFA_No_35.1077_Anleitung_12_20 22.12.2020 11:28 Uhr Seite 34 STRATOS – STRATOS – Draadloze weerstation Draadloze weerstation 4. LCD-scherm 4.2 Weersvoorspelling 4.1 LCD-overzicht Het draadloze weerstation gebruikt 4 verschillende weersymbolen (zonnig, half- De volgende figuur toont alle schermsegmenten. Bij normaal gebruik ziet u de bewolkt, bewolkt, regen). -
Page 35: Programmamodus
TFA_No_35.1077_Anleitung_12_20 22.12.2020 11:28 Uhr Seite 35 STRATOS – STRATOS – Draadloze weerstation Draadloze weerstation 5. Programmamodus 5.3 Verloopmodus Het basisstation is met 5 toetsen eenvoudig te bedienen: SET, + , HISTORY, • Is de normaalmodus actief, druk dan op de HISTORY toets om de verloopmodus ALARM en MIN/MAX. -
Page 36: Min-Maxmodus
TFA_No_35.1077_Anleitung_12_20 22.12.2020 11:28 Uhr Seite 36 STRATOS – STRATOS – Draadloze weerstation Draadloze weerstation Opmerking: Drukt u voor de eerste keer op de ALARM toets, verschijnt “---“ in alle 6. Technische gegevens schermvelden. Later verschijnen de ingevoerde grenswaarden voor zover ze geactiveerd Zendbereik vrij veld: 100 meter max. - Page 37 TFA_No_35.1077_Anleitung_12_20 22.12.2020 11:28 Uhr Seite 37 STRATOS – STRATOS – Draadloze weerstation Estación meteorológica inalámbrica Levensduur batterij: ca. 12 maanden voor basisstation ca. 24 maanden voor thermo-hygro-sensor 7. Batterijwissel • Als de batterij in de basisstation ontladen is verschijnt het „Low Battery-teken” (RX) in de display.
-
Page 38: Introducción
TFA_No_35.1077_Anleitung_12_20 22.12.2020 11:28 Uhr Seite 38 STRATOS – STRATOS – Estación meteorológica inalámbrica Estación meteorológica inalámbrica 1. Introducción 2.1 Estación básica (receptor) Su nueva estación meteorológica consta de una estación básica con sensores de Lado anterior interior para la medición de la temperatura y humedad interna y la presión atmosférica y varios sensores de exterior para la medición de la temperatura externa, humedad del aire, velocidad del viento y cantidad de lluvia. -
Page 39: Puesta En Servicio
TFA_No_35.1077_Anleitung_12_20 22.12.2020 11:28 Uhr Seite 39 STRATOS – STRATOS – Estación meteorológica inalámbrica Estación meteorológica inalámbrica 2.3 Sensor eólico Recepción de los valores externos y la hora radiocontrolada • Al insertar las pilas en la estación básica, suena brevemente una señal acústica corta y El sensor eólico mide la velocidad del viento y transmite los todos los segmentos LCD se iluminan durante 3 s. - Page 40 TFA_No_35.1077_Anleitung_12_20 22.12.2020 11:28 Uhr Seite 40 STRATOS – STRATOS – Estación meteorológica inalámbrica Estación meteorológica inalámbrica 1) Estación básica b.) Montaje del sensor de lluvia Con el soporte desplegable en el lado posterior, se puede colocar la estación básica o fijarla mediante ojales de colgar sobre la pared. Evite la proximidad a otros aparatos eléctricos (Televisor, ordenador, teléfonos móviles) y objetos metálicos macizos.
-
Page 41: Pantalla Lcd
TFA_No_35.1077_Anleitung_12_20 22.12.2020 11:28 Uhr Seite 41 STRATOS – STRATOS – Estación meteorológica inalámbrica Estación meteorológica inalámbrica 4. Pantalla LCD 4.2 Previsión meteorológica 4.1 Sinóptico LCD La estación meteorológica distingue 4 símbolos meteorológicos diferentes (sole- Las figuras mostradas a continuación muestran todos los segmentos del display. ado, parcialmente nublado, cubierto, lluvia). -
Page 42: Modo De Programación
TFA_No_35.1077_Anleitung_12_20 22.12.2020 11:28 Uhr Seite 42 STRATOS – STRATOS – Estación meteorológica inalámbrica Estación meteorológica inalámbrica 5. Modo de programación retroactiva a las unidades nuevas, de modo que con los algoritmos de cálculo inter- nos resulten pérdidas de resolución. La estación básica dispone de 5 teclas para un manejo sencillo: SET, + , HISTORY, ALARM y MIN/MAX. -
Page 43: Modo Mín/Máx
TFA_No_35.1077_Anleitung_12_20 22.12.2020 11:28 Uhr Seite 43 STRATOS – STRATOS – Estación meteorológica inalámbrica Estación meteorológica inalámbrica Indicación: Si pulsa por primera vez la tecla ALARM aparece en todos los campos del 6. Datos técnicos Display “---“. Mas adelante aparecen los valores límites indicados al momento que Distancia de transmisión campo libre: 100 metros máx. - Page 44 TFA_No_35.1077_Anleitung_12_20 22.12.2020 11:28 Uhr Seite 44 STRATOS – Estación meteorológica inalámbrica Vida útil de la pila: aprox. 12 meses para la estación básica aprox. 24 meses para el Termo/Higrosensor 7. Cambio de las pilas • Si las pilas de la estación base, descargadas, aparece el símbolo “pila descargada” (RX) en la pantalla.
Need help?
Do you have a question about the 35.1077 and is the answer not in the manual?
Questions and answers