Table of Contents
Advertisement
Advertisement
Table of Contents

Related Manuals for ECS EC10II2


Summary of Contents for ECS EC10II2
-
Page 3: Limitation Of Liability
Preface @ Copyright 2013 All Rights Reserved. The information in this document is subject to change without prior notice in order to improve reliability, design function does represent commitment on the part of the manufacturer. In no event will the manufacturer be liable for direct, indirect, special, incidental,... -
Page 4: Table Of Contents
Table of Content ................IMITATION OF IABILITY .................... 6 PECIFICATION ....10 TTENTION EACHERS ARENTS AND DULT UPERVISORS ....................12 AFETY RECAUTIONS ................14 ARING FOR YOUR OMPUTER ..............15 GENCY EGULATORY OTICES .......... 15 EDERAL OMMUNICATIONS OMMISSION OTICE ......................17 ODIFICATIONS ............... - Page 5 Front View ......................27 Left Views ......................31 Right View ......................33 Rear View ......................34 Bottom View ...................... 35 PILL ESISTANCES RECAUTIONARY EASURES ON EYBOARD OWER ........36 UTTON OUCH CREEN AND OUCH PAD UTTONS ..................38 ETTING TARTED ..............
- Page 6 PC - C ......49 SING NTEL POWERED CLASSMATE ONVERTIBLE LCD S ..............49 DJUSTING THE CREEN ISPLAY LCD C ........................49 ) ................51 UNCTION UICK ......................53 OUCH TouchPad Precautions ..................................... 54 ESETTING THE YSTEM ..................55 SING THE OUCH CREEN...
-
Page 8: Specification
Specification Intel® Celeron® Processor 847 (2M Cache, 1.10 GHz) Memory Single-channel DDR3 1066/1333MHz So-DIMM DRAM module Supports 1GB/2GB/4GB of system RAM Core Logic Intel® NM70 Express Chipset Audio Codec Realtek ALC269Q-VB6 Azalia integrated audio Analog 2.1 D3 mode support Card reader Support 2 in 1 SDHC/ MMC Memory Card. - Page 9 Half Mini-card form factor Wi-Fi 802.11 B/G/N 1x1 + Bluetooth 4.0 Wi-Fi 802.11 B/G/N 1x1 (optional) Wi-Fi 802.11 A/B/G/N 2x2 (optional) PCI-E interface Keyboard Integrated QWERTY keyboard W/ Hot key Spill-resistance keyboard Multi-languages Supported ...
- Page 10 Capacitive type 5 point touch Battery Pack 3 cell battery pack 10.8V/ 2600mAH, 3.6V/2600Mah GALLOPWIRE, EC10-3S2600-G1L5 SIMPLO, EC10-3S2600-S1L5 The battery will be 70 percent charged in about 75mins and fully charged in about 165mins 6 cell Li-ion battery pack ...
-
Page 11: Physical Outline
Manufacturer: Shenzhen Huntkey Electric Co., Ltd. Model: HKA03619021-8C (AC 2 Pin) Manufacturer: DELTA ELECTRONICS, INC. Model: ADP-40PH AB (AC 2 Pin) BIOS Support PnP & ACPI 2.0 Support external USB flash memory card boot up. Physical Outline Dimension: 269 (W) x 210.4 (D) x 24.6~34.2 (H) ... -
Page 12: Attention: Teachers, Parents And Adult Supervisors
Attention: Teachers, Parents and Adult Supervisors This product is an educational tool designed for school children, ages 6 and up. There must be supervision by an adult on school children under 10 when using this Intel-powered classmate Convertible. must to have thorough explanation to students on safe and proper handling... - Page 13 Students should report any damage or loose parts to their teacher, parent or adult supervisor, immediately. Do not leave the PC plugged in or “on” when enclosed in a non-vented container, such as a school backpack, as overheating may occur. It is recommended that students should take a 5 ...
-
Page 14: Safety Precautions
Safety Precautions The following are lists of precautionary measure the students must understand before using this computer inside the classroom or home environment: Do not place near the fire or other sources of heat. Do not expose to magnetic fields. Do not expose to direct sunlight. - Page 15 storage from -20to +60°C, humidity up to 95%, non- condensing.
-
Page 16: Caring For Your Computer
Caring for your Computer To reduce the risk of electric shock when connecting external peripherals such as printer, communication network, antenna, LAN, etc.,. Disconnect power from the computer by unplugging the power cord from the AC outlet (not by unplugging the power cord from the computer). Be sure not to clean the computer when it is ... -
Page 17: Agency Regulatory Notices
Agency Regulatory Notices Federal Communications Commission Notice You are cautioned that changes or modifications not expressly approved party responsible compliance could void your authority to operate the equipment. This device complies with Part 15 of the FCC Rules. Operation is subject to the following two conditions: (1) this device may not cause harmful interference and (2) this device must accept any interference received, including interference that may cause undesired... - Page 18 equipment does cause harmful interference to radio or television reception, which can be determined by turning the equipment off and on, the user is encouraged to try to correct the interference by one or more of the following measures: Reorient or relocate the receiving antenna. ...
-
Page 19: Modifications
This transmitter must not be co-located or operating in conjunction with any other antenna or transmitter. Modifications The FCC requires the user to be notified that any changes or modifications made to this device that is not expressly approved by the Manufacture may void the user’s authority to operate the equipment. -
Page 20: European Notice
operation. European Notice Products with the CE Marking comply with both the EMC Directive (2004/108/EC) and the Low Voltage Directive (2006/95/EC) R&TTE Directive (1999/5/EC) issued Commission European Community. Compliance with these directives implies conformity to the following European Norms: EN55022: 2010, CLASS B ... -
Page 21: Attachment Limitations Statement
limits for radio noise emissions from digital apparatus as set out in the radio interference regulations of the Canadian Department of Communications. Le present appareil numerique nemet pas de bruits radioelectriques depassant les limites applicables aux appareils numeriques de Classe B prescrites dans le reglement sur le brouillage radioelectrique edicte par le Ministere des Communications du Canada. -
Page 22: Power Cord Requirement
by a representative designated by the supplier. Any repairs or alterations made by the user to this equipment, or equipment malfunctions, may give the telecommunications company cause to request the user to disconnect the equipment. Users should ensure for their own protection that the electrical ground connections of the power utility, telephone lines and internal metallic water pipe system,... -
Page 23: U.s. And Canada
U.S. and Canada The cord set must be UL/ETL-Listed and CSA- Certified or UL/C-ETL Listed. The minimum specifications for the flexible cord are (1) No. 18 AWG, (2) Type SPT-2, and (3) 2- conductor. The cord set must have a rated current capacity of ... - Page 24 Model: HKA03619021-8C (AC 2 Pin) Manufacturer: DELTA ELECTRONICS, INC. Model: ADP-40PH AB (AC 2 Pin)
-
Page 25: Battery Pack Safety
Battery Pack Safety The battery pack is intended to use only with this notebook. Only qualified service technicians should replace the battery pack. Do not disassemble the pack. Do not dispose of the battery pack in fire or water. ... -
Page 26: Lithium Battery Warning / Bridge Battery Warning
Danger of explosion if battery is incorrectly replaced. Only qualified service technicians should replace and discard the battery pack. Replace only with same equivalent type recommended manufacturer. Discard used batteries according to the manufacturer’s instructions or local laws. Lithium battery warning / Bridge battery warning This computer contains a lithium battery to power the clock and calendar circuitry. -
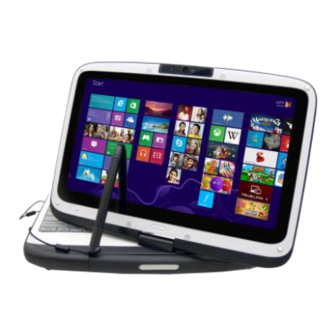
Page 27: Getting To Know The Basics
Getting To Know The Basics Welcome! Your Intel-powered classmate Convertible features the latest advances in portable computing technology. These procedures are intended for new PC users like school kids to help them get started. For a complete education solution designed for 1:1 eLearning and classrooms around the world. - Page 28 Never try to use this computer with the battery removed thus exposing the battery compartment which might cause hazardous accidents to kids if it is only powered by an AC adapter. The Intel-powered classmate PC - Convertible also features a rugged design that helps protect the computer from scratches and light falls.
-
Page 29: Front View
before you close the display panel. With the LCD screen open, you will see several features important for operating your Intel-powered classmate PC - Convertible. Front View Built-in Rotating Camera Use the Built-in rotating camera for video conference, photo and video shooting. Built-in Rotating Camera... - Page 30 The built-in rotating camera can rotate from -35 ~ +200 degrees. You can rotate the built-in rotating camera back and forth using on both sides of the display panel. The built-in rotating camera must be returned to its original position for the display panel to close properly.
- Page 31 Convertible. When a certain function is enabled, the LED will light up. The following section describes each indicator.
- Page 32 System and Power Status Indicators Indication Graphic Symbol Blue light indicates the numeric keypad is activated. Blue light indicates the cap-lock is activated. Blue light indicates the is reading/writing data. Blue light indicates the WLAN module is active. The battery LED reflects according to the following status: Blue light indicates the battery is fully charged and the AC Adapter is plugged...
-
Page 33: Left Views
audio/video conference with the other party. Power LED status indicator Blue light indicates the system is ON. Power/Suspend Button Press momentarily to turn on the system. Press the power/suspend button again to return from the suspend mode. Press this button once to enable and pop up the webcam application in full-screen mode. - Page 34 External Monitor Port Use this port to connect to an external monitor. HDMI Port Compact audio/video interface for transmitting uncompressed digital data. USB 2.0 Port This port conforms to the latest USB2.0 plug-and- play standards. Ventilation Opening The ventilation opening allows the computer to cool off and prevent overheating.
-
Page 35: Right View
Volume Up/Down Button Press the top of the volume button to increase the volume and the bottom of the button to decrease the volume. Screen Rotation Lock button Prevent the display from switching between portrait and landscape mode. Right View Stylus Pen Slot The stylus pen for the touch screen is stored here. -
Page 36: Rear View
Stereo Headphone Jack Use the headphone jack to connect an external headphone set. Microphone Jack Use the microphone jack to connect an external microphone. USB 2.0 Ports This port conforms to the latest USB2.0 plug-and- play standards. Ethernet / LAN Port When using a LAN, please use an EMI Shielding Cable to minimize an interference when transmitting. -
Page 37: Bottom View
Handle Use the handle to carry the computer. Name Field Place your name tag here. LCD Display Rotating Bar This bar is used to rotate the LCD display. Kensington Security Slot Attach a Kensington lock to this slot to secure your computer to a fixed location. -
Page 38: Spill-Resistances Precautionary Measures On Keyboard, Power Button, Touch Screen And Touch Pad Buttons
Battery Bay This compartment contains the battery pack for your system. Battery Release Latch/Lock Latch Slide this latch to release or lock the battery from the battery bay. Built-in Stereo Speakers The built-in speaker output the sound in stereo. Spill-Resistances Precautionary Measures on Keyboard, Power Button, Touch Screen and Touch pad Buttons... - Page 39 The Intel-powered classmate PC - Convertible features a spill-resistance function on keyboard, power button, touch screen and touch pad buttons to ensure greater protection against spills in the classroom or anywhere. These are the ways to avoid damage to your system: Save all important documents within 3-minutes.
-
Page 40: Getting Started
cause a severe damage to the system if the user uses the abnormal procedure and forcibly shut down the system. Getting Started Connecting to a Power Source Connecting the AC Adapter A universal AC adapter is provided to supply your computer with power and also charge the computer’s battery pack. - Page 41 Do not use inferior extension cords as this may result in damage to your Intel- powered classmate PC - Convertible. Intel-powered classmate PC - Convertible comes with its own AC adapter. Do not use a different adapter to power the computer and other electrical devices.
-
Page 42: Turning On Your Computer
Intel-powered classmate Convertible electrical circuitry. Turning On Your Computer Turn your Intel-powered classmate Convertible by pressing the power button. Hold the button down for a second or two and release. The Power-On Self Test (POST) runs automatically. After the POST is completed, the computer reads the operating system from the hard disk drive into computer memory (this is commonly referred to as... -
Page 43: The Battery Pack
The Battery Pack To Install the Battery Pack: Align the battery pack and insert into the battery bay. Slide the battery pack gently but firmly until it locks into place. Slide the battery lock into locked position. ... -
Page 44: To Remove The Battery Pack
To Remove the Battery Pack: Slide the battery lock switch left into unlocked position. The battery pack will pump up from the battery bay. - Page 45 Slide and hold the battery release latch then slide the battery pack up. Lift up the battery pack from the battery bay. ...
-
Page 46: Lithium-Ion Battery
Lithium-Ion Battery Your Intel-powered classmate PC - Convertible uses a Lithium-Ion battery pack that provides power when you don’t have access to an AC outlet. You must charge the battery pack for at least six hours before using it for the first time. -
Page 47: Charging The Battery And Charging Time
Do not expose battery packs to temperatures below 0 degree Celsius (32 degree F) or above 60 degree C (140 degree F). This may adversely affect the battery pack. Charging the Battery and Charging Time To charge the battery, plug the AC adapter into the Intel-powered classmate PC - Convertible and an electrical outlet. -
Page 48: Checking The Battery Level
when temperature exceeds 45C. Checking the Battery Level You can check the remaining battery power in Operating System battery status indicator. Prolonging the Battery’s Life and Usage Cycles There are ways you can prolong the use of battery. Use the AC adapter wherever AC wall outlet is ... -
Page 49: Using Power (Optional)
achieve optimal battery performance, need battery calibration at a 3-month interval. To do this: Fully charge the battery. Then discharge the battery by entering the BIOS setup screen. (Press F2 key as soon as you turn on the computer. And let it remain on the setup screen until the battery runs out. -
Page 50: Hibernate Suspend
dialog box. In Standby mode, hardware devices, such as display panel and hard disk, are turned off to conserve energy. Hibernate Suspend In this mode, all system data are saved in the hard disk before powering down. When this mode is activated, all system state and contents are saved to the hard disk drive after a period of inactivity defined by the user. -
Page 51: Using Intel Powered Classmate Pc - Convertible
Using Intel powered classmate PC - Convertible Adjusting the LCD Screen Display The LCD screen display can be adjusted by the following key combinations. Fn+ F6 key combination to change display mode: LCD-only, External Monitor-only, LCD/External Monitor simultaneously Fn+ F7 key combination to decrease the brightness ... - Page 52 on the surface and never spray cleaner directly onto the display. Do not press on, or store any objects on the cover when it is closed. Doing so may cause the LCD to break.
-
Page 53: Function Keys (Quick Keys)
Function Keys (Quick Keys) - WLAN/3G/BT on/off. - Enters the Suspend Mode. - Mute the system volume - Decreases the speaker volume. - Increases the speaker volume. - Changes Display Mode: LCD-only, External Monitor-only, LCD/External Monitor simultaneously - Decreases the brightness ... - Page 54 level of the screen. - Increases the brightness level of the screen.
-
Page 55: The Touchpad
The TouchPad touchpad rectangular electronic panel located just below your keyboard. You can use the static-sensitive panel of the touchpad and slit it to move the cursor. You can use the buttons below the touchpad as left and right mouse buttons. Move the tip of your finger across the touch pad to move the cursor on the screen. -
Page 56: Touchpad Precautions
and move your finger on the touch pad to the desired location. TouchPad Precautions The TouchPad is a pressure sensitive device. Please take note of the following precautions. Make sure the TouchPad does not come into contact with dirt, liquids or grease. Do not touch the TouchPad if your fingers are ... -
Page 57: Using The Touch Screen
Using the Touch Screen This model display panel also works as a touch screen. You can use the stylus pen to control system operations or as a pen for writing or illustration applications. When using the computer for the first time, power on and follow the on screen instructions to active the touch screen. -
Page 58: Rotating The Display Panel
Rotating the Display Panel Your computer can be rotated up to 180 degrees, clockwise or counterclockwise. Fold it down with the display facing up to use it as writing pad. You can rotate the screen horizontally or vertically to suit your needs. - Page 60 Do not try to turn the display panel more than 180 degrees. If you start to rotate the display panel in clockwise position. To return to its original position or vice versa, turn it in counterclockwise...
- Page 61 position.
-
Page 62: To Use The Display Panel As A Writing Pad
To use the display panel as a writing pad Make sure the display panel is rotated to 180 degrees. Hold the display panel upper corners and gently lower the display panel to close position. Hard Disk Protection The Hard-Disk Drive (HDD) Protection application protects the system’s HDD from damage caused by sudden harmful shocks. -
Page 63: Bios Setup And Security Feature
It monitors system movements that exceed the defined shock threshold. Once shock detected, the application instructs the HDD to temporarily park its heads which protects against potential damage the drive. BIOS Setup and Security Feature Setup Utility hardware configuration program built into your... -
Page 64: Leaving The Bios Setup Screen
activate the Setup Utility. You may need to press DEL key fairly quickly. Once system begins load operating system, you may have to retry by cycle- power on again Leaving the BIOS Setup Screen When you have finished modifying the BIOS settings, exit the BIOS. -
Page 65: Bios Action Keys
BIOS Action Keys Legend Alternate Function Displays the General Help window. It can be enabled from anywhere in the BIOS. Jumps to the Exit menu or returns to the Main menu from a submenu. Selects the menu item to the left. ... -
Page 66: Modifying The Bios Settings
Legend Alternate Function Sets the parameters for the current menu to their default values. Save and Exit. Will select a sub menu or show a Enter range of optional for a field. Modifying the BIOS Settings The BIOS setup main menu is subdivided into sub- menus. -
Page 67: Main Setup
Main Setup Under this menu, you may change time/date and view basic processor and system memory information. Due to various configurations on this model, your system may show different information. System Date: Type in the current date, in MM/DD/YY format. System Time: Type in the current time, in ... -
Page 68: Advanced Setup
Advanced Setup Security... -
Page 69: Boot Setup
Boot Setup... -
Page 70: Exit Setup
Exit Setup Exit Saving Changes: After you have completed the BIOS settings, select this item to save all settings, exit BIOS Setup utility, and reboot. New system settings will take effect on next power-up. F10 key can be used for this operation. Exit Discarding Changes: Discards changes done ... -
Page 71: Troubleshooting
Troubleshooting Your computer has been fully tested and complies with system specifications before shipping. However, incorrect operations and/or mishandling may cause problems. You may also encounter simple setup operating problems that solve considering the following suggestions. If the problem persists, contact your dealer for service. Check to see if the power cord is properly plugged ... - Page 72 properly installed, the speakers and microphone will not work. Some software programs, which have not gone through rigorous coding and testing, may cause problems during your routine use. Consult the software vendor for problem solving.
Need help?
Do you have a question about the EC10II2 and is the answer not in the manual?
Questions and answers