Microlife PF 100 Instruction Manual
Electronic asthma monitor
Hide thumbs
Also See for PF 100:
- Instruction manual (82 pages) ,
- Instruction manual (65 pages) ,
- Instruction manual (16 pages)
Table of Contents
Advertisement
Quick Links
Advertisement
Table of Contents

Related Manuals for Microlife PF 100


Summary of Contents for Microlife PF 100
- Page 1 PF 100 Electronic Asthma Monitor Instruction Manual (1-15) Moniteur d'asthme électronique Mode d'emploi (16-31) Monitor electrónico para el asma Manual de instrucciones (32-47) Elektronischer Asthma Monitor Gebrauchsanweisung (48-63)
- Page 2 Electronic Asthma Monitor Instruction Manual...
-
Page 3: Table Of Contents
7.1. Cleaning / Disinfecting the Mouthpiece 7.2. Cleaning / Disinfecting the Measuring Tube 7.3. Cleaning the Main Unit Memory Handling Printing Data with the Microlife Diagnostic Printer 10. Analysing Data using Computer Interface 11. Messages / Malfunctions / Errors 12. Battery Replacement 13. -
Page 4: Introduction
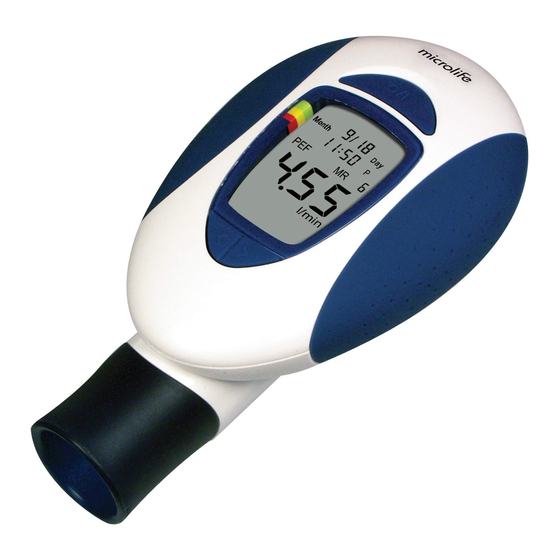
Introduction Your new Microlife Monitor is a high quality medical device that measures your maximum possible exhalation which is called «peak flow» (referred to in medical terms as PEF - Peak Expiratory Flow). Regular monitoring of your peak flow is extremely useful for controlling diseases of the airways such as asthma or chronic bronchitis. -
Page 5: Preparation For Your First Measurement
Preparation for your first Measurement Before your first use we recommend that you disinfect the mouthpiece as explained in this manual. 3.1. Inserting the Batteries Please open the Battery Compartment from underneath and insert the two batteries (1.5 V, size AAA). Please watch the polarity as indicated by symbols in the compartment. - Page 6 Using the two arrow keys on the front of the monitor you can decrease (left arrow button) or increase (right arrow button) the number. Release the arrow button when the correct number is reached. Press the time switch again to confirm the year setting and move to the month setting.
-
Page 7: Carrying Out A Measurement
In this case we also recommend that each user uses a new mouthpiece. Extra mouthpieces can be ordered through your Microlife dealer. Press the ON/OFF button to turn the monitor on. At first, the last result of the memory is shown («0»... - Page 8 Inhale completely and hold your breath for a moment. Cover the mouthpiece tightly with your lips. Blow into the measuring tube as hard and as fast as you can. A long beep confirms that the result is recorded. The peak flow value is displayed for about 3 seconds, then the FEV is shown.
- Page 9 10. Press the ON/OFF button again to switch the monitor off. Before the monitor switches off, the highest value and its related memory position «MR xx» is displayed. 11. Store the monitor in a clean and dust free place. Important Information for Measurement and Control of your values •...
-
Page 10: Self-Assessment With The Traffic Light Scheme
Self-Assessment with the Traffic Light Scheme The so-called «traffic light scheme» allows you to self-assess your measured values and the course of your illness. This leads to an independent assessment of your illness symptoms with adjustment of your medication. If you or your physician wish to make use of this scheme, an asthma control card is enclosed with the device, on which a green, a yellow, and a red area are marked. -
Page 11: Cleaning / Disinfecting The Measuring Tube
Afterwards, put the mouthpiece on a fresh paper towel and let it air dry. Reassemble the mouthpiece on the measuring tube. • Alternatively, you can disinfect the mouthpiece by putting it into commonly available disinfecting solutions. Please carefully follow the instructions for the disinfecting solution! Make sure that it is suitable for a mouthpiece. -
Page 12: Cleaning The Main Unit
Reconnect the mouthpiece to the measuring tube and reassemble it back to the main unit as shown. Make sure that the tube finally «clicks» into the fixed position. Please make sure that the mea- surement tube and the device stay together by confirming that the identification on tube and device is the same. -
Page 13: Printing Data With The Microlife Diagnostic Printer
3 seconds. To erase the last reading you need to press both buttons again while the screen is flashing. Print Data with the Microlife Diagnostic Printer The monitor can be connected with the Microlife diagnostic printer (available as an accessory) to print data from the memory. -
Page 14: Messages / Malfunctions / Errors
10. Analyse Data by Computer The monitor can be connected via a USB connection port with a computer and all memory data can be analysed by the MICROLIFE Asthma Monitor software program. Please contact your Microlife dealer. 11. Messages / Malfunctions / Errors If an error occurs one of the following listed error codes is displayed. -
Page 15: Battery Replacement
3. Discuss the values with your doctor. If you have any questions regarding the use of this device, please ask your dealer or pharmacist for the Microlife Service representative in your country. The Microlife service team will be happy to help you. 12. Battery Replacement... -
Page 16: Care And Safety Information
If the device received any knocks (dropping), you will recognise any malfunction or damages or you receive surprising results, it should be checked by the Microlife service representative in your country. 14. Guarantee This device is guaranteed for 2 years from date of purchase. This guarantee includes the main unit and the measuring tube. -
Page 17: Technical Specifications
ATS standard 1994 update System requirements: Windows 98 or later, CD Rom drive, 30 MB free hard disk space, 32 MB RAM Technical modifications reserved! 16. www.microlife.com Detailed user information about our products and services can be found at www.microlife.com... - Page 18 www.microlife.com...
Need help?
Do you have a question about the PF 100 and is the answer not in the manual?
Questions and answers