Table of Contents
Advertisement
Advertisement
Table of Contents

Related Manuals for Alinco DR-135 Mk III


Summary of Contents for Alinco DR-135 Mk III
- Page 1 2014 Packet Radio Users Guide Cupertino ARES/RACES...
-
Page 2: Table Of Contents
............15 ENDING A MESSAGE ............18 ENDING A SPREADSHEET CSV FILE ............19 ECEIVING A SPREADSHEET CSV FILE ALINCO DR-135 RADIO SETUP DETAILS ..........20 Quick Reference County Packet BBS Specifics Call Sign 2m Access 1.25m Access Location W1XSC-1 145.750 223.620... -
Page 3: Ham Radio Packet Overview
Ham Radio Packet Overview What is Ham Radio Packet? • Amateur packet radio is one of many digital modes that hams can use. • Packet Radio is used to transmit digital data by radio or other wireless communications links. • Packet radio can send to or retrieve “mail”... -
Page 4: Setting Up The Packet Station
Radio Microphone (backup for 2 meter voice traffic) c. Adaptor, PL-259/F to BNC/M 5. Manuals Bag a. Packet Radio Users Guide (this manual) b. Radio, Alinco, DR-135 2 meter transceiver c. West Mountain, RR/4004USB power distribution d. Powerwerx, SS-30V Power supply 2.2 PC Packet Kit Components 1. - Page 5 . Verify the On/Off switch illuminates. Turn on the TNC . Verify the TNC Power LED illuminates. Turn on the Radio Verify the Radio display comes on. See Section 5 Alinco Radio Setup for details. Packet Radio Kit, Front view 5/24...
- Page 6 2.5 Application Startup Start Outpost. Find the Outpost icon on the PC desktop, and double-click on it: The Station Identification Form will be the first window that you will see. Verify the Fields on this form are filled in as follows: User Call Sign: Contains this station’s <...
- Page 7 Setting up the TNC. From Outpost, select Setups > TNC Settings. On the Interface Type tab, set the Device Name as SCCO_KPC3+. On the TNC Comm Port tab, select the PC Comm Port to which the TNC is connected. Do not change any fields on any other tabs. Press OK to Save your settings.
- Page 8 Setting up the BBS. From Outpost, select Setups > BBS Settings. On the BBS Name tab, set the BBS Name as SCC BBS 1…. Confirm “BBS Type” is set to “Let Outpost determine… “ Press Set/Get TNC to reopen the TNC Settings form, and press OK from that form.
- Page 9 Other important Settings. There are several settings that can be made in Outpost. The following are important when operating with the SCC County BBS. Tools > Send/Receive Settings Option What to set Schedule a Send/Receive Session Automation Checked every [ 10 ] minutes. __ Send a message immediately when Unchecked it is complete...
- Page 10 Option What to set Add Message number to subject line Message Checked With hyphenation Numbering Use Global Message Numbers Checked Assign a local message number to inbound messages. Set default to private Replies / Checked Close original message on reply or Forwards Checked forward...
- Page 11 Tactical Call Report Settings Ark site Tactical ID 3 char TacID Tactical Text Monta Vista CUPMVA Monta Vista Ark Garden Gate School CUPGGA Garden Gate Ark Hyde School CUPHYA Hyde Ark Lawson School CUPLSA Lawson Ark DeAnza College CUPDZA DeAnza Ark Seven Springs CUPSSA Seven Springs Ark...
-
Page 12: Packet Message Addressing Basics
Packet message addressing basics Addressing a Packet message requires 2 types of addresses: 1. To what individual do you want to send the message? 2. What Packet station can deliver it to the individual? 1. Packet Address Header The packet address header gets the message to the correct packet station. -
Page 13: Creating Packet Messages
2. Recipient Address and Message To ensure the message gets to the right person, fill in the rest of the message. Subject: Fill in the rest of the subject line after the Message ID. Message Body From: Who is the message from? Include the ICS position or function. -
Page 14: Sending A Text File
The BBS: and From: fields are filled in with the BBS and Identifier that were previously defined. Fill in the To: field with the call sign or tactical call of the station to which this message is going. Complete the Subject: text. Add your text after the Message ID characters (SSA165: in the above example). -
Page 15: Sending A Pacform Message
Sending a PacFORM message INTRODUCTION PacFORMS are browser-based fill-in-the-blank message forms used within Santa Clara County RACES. To run the forms manually, look on your desktop for the PacFORMS folder, and double-click on the desired form. To open the forms from Outpost, go to the Forms Menu, and choose the desired form (Recommended method) Form name... - Page 16 After double-clicking on your PacFORM, you will get a message that essentially says that Scripts or ActiveX controls are restricted from running. • On Windows XP, click on the yellow banner at the top of the browser window. Select the option to “Allow Blocked Content”. •...
- Page 17 COMPLETING THE PacFORM All required fields are indicated with accompanying Text. When done, scroll to the bottom of the form, and press Submit Message Form to Outpost. The form will be transferred to Outpost and loaded in a message form. Fill in any remaining fields, and then press Send.
-
Page 18: Sending A Spreadsheet
Sending a spreadsheet .csv file Attempting to send a standard spreadsheet file will cause Outpost, the BBS, or both, to hang because of embedded binary content in the spreadsheet. However, most spreadsheet applications support a way to export spreadsheet data into one or more ASCII formats that are compatible with Outpost. This approach also works with other spreadsheet packages. -
Page 19: Receiving A Spreadsheet
Go back to Outpost. Open an Outpost message form. Press File->Open from the Outpost message menu. Change the “Files of Type” to “All files (*.*).” Change the directory to where the *.csv file is located, select the file, and press Open. The *.csv file is written on to the message form. -
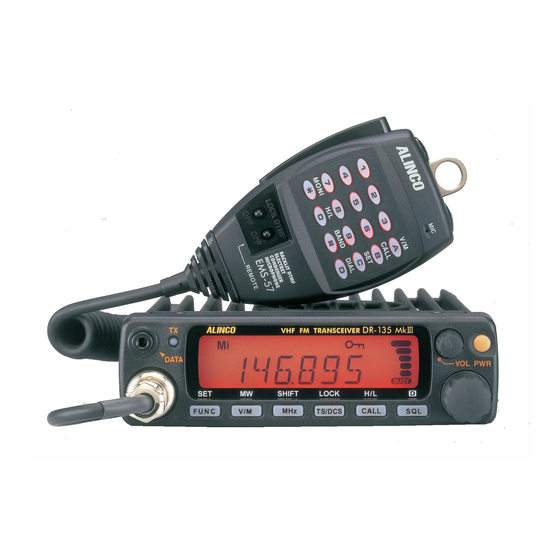
Page 20: Alinco Dr-135 Radio Setup Details
Alinco DR-135 Radio Setup Details Turn the radio on by pressing the PWR button Set the Squelch by pressing the SQL key . The SQL icon appears on the display and the squelch level will be shown. Turn the tuning knob to set the Squelch level to 2. - Page 21 21/24...
- Page 22 22/24...
- Page 23 23/24...
- Page 24 24/24...
Need help?
Do you have a question about the DR-135 Mk III and is the answer not in the manual?
Questions and answers