Table of Contents
Advertisement
Advertisement
Table of Contents

Related Manuals for Doro Magna 2005


Summary of Contents for Doro Magna 2005
- Page 1 Connevans.info Solutions to improve the quality of life This product may be purchased from Connevans Limited DeafEquipment.co.uk secure online store at www.DeafEquipment.co.uk...
- Page 2 Doro Magna 2005 English...
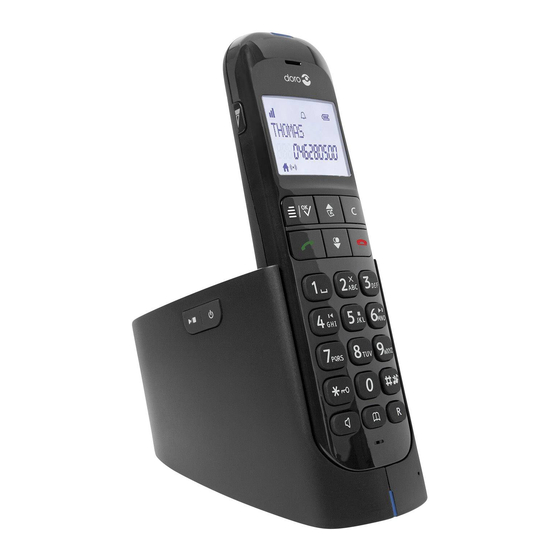
- Page 3 16 17 18 19 Ringer LED 13. Down/Redial Earpiece 14. End call Extra amplification 15. Right menu key/Back/In- (boost) ternal call Up/Call log 16. Answer machine: play- back/stop Left menu key/OK 17. Answer machine: on/off Call key 18. Speakerphone * /Keypad lock 19.
-
Page 4: Table Of Contents
English Contents Congratulations on your purchase ..........1 Installation ................... 1 Connection................1 Basic setup ................2 Operation ..................2 Calls..................2 Sound ................... 4 Handle the phone..............6 Phonebook................6 Call list (Caller ID) ..............8 Settings ..................10 Handset settings (HS SETTINGS) ........ -
Page 5: Congratulations On Your Purchase
English Congratulations on your purchase Doro Magna 2005 combines an exceptionally loud receiver, ringer and speakerphone with a stylish design and a built-in answer machine. The speakerphone base allows you to an- swer calls and dial your three favourite numbers without hav- ing to retrieve the handset, perfect for hands free conversations. -
Page 6: Basic Setup
English Basic setup Language setup Press w/0. Select (}/{) HS SETTINGSHS SETTINGS. Press w/0. Scroll to LANGUAGE. Press w/0. Scroll to ENGLISH. Press w/0. Press L to exit the menu. Date/Time setup Press w/0. Select (}/{) HS SETTINGS. Press w/0. Select DATE &... - Page 7 English Make a call Enter phone number. Delete with c. Press q to make the call. Press L to end the call. Base unit: Speed dial Once Speed dials have been saved you only need to press one button to make a call. Store speed dial Press w/0.
-
Page 8: Sound
English Press again to end the call. Redial Press . Scroll through the 10 most recently dialled numbers with }/{. If the number is already in the phonebook, the corresponding name will also be displayed. Press q to call the displayed entry, or press w/0 for the submenu, see Pho- nebook, p.6. - Page 9 English CAUTION Do not use extra sound amplification (boost) together with a hearing aid if not necessary. The handset volume can be turned up very loud. This telephone is hearing aid compatible. Select the T-mode on your hearing aid to use this feature. Hearing aid compatibil- ity is not a guarantee that a specific hearing aid will work with a specific telephone.
-
Page 10: Handle The Phone
English Handle the phone Keypad lock Press and hold * to activate/deactivate the keypad lock. When activated is displayed. Incoming calls can be an- swered by pressing q even if the keypad is locked. During the call, the keypad is unlocked. When the call is ended the keypad is locked again. - Page 11 English Select ADD. Press w/0. Enter name. Press w/0. Enter phone number. Delete with c. Press w/0. Select required MELODY. Press w/0. Dial from the phonebook Press b. Scroll }/{ between contacts. Quick search the phone- book by pressing the corresponding number button for the first letter.
-
Page 12: Call List (Caller Id)
English Scroll }/{ to PB STATUS and press w/0. Character table [Space] 1 @ _ # = < > ( ) & £ $ ¥ € [ ] { } ¤ A B C 2 Ä À Á Â Ã Å Ą Ă Æ Ç Ć Č D E F 3 Ď... - Page 13 English Or press w/0 and select CALL LIST. Select desired number with }/{. Press q to dial or press w/0 for options in the submenu: ADD TO PB Store number in Phonebook Delete this number from the call log (not from DELETE Phonebook) Delete all numbers from the call log (not from...
-
Page 14: Settings
English Settings Handset settings (HS SETTINGS) Press w/0. Select HS SETTINGS and press w/0. Select desired function e.g. ALARM and press w/0. Select desired setting and press w/0. Select ON/OFF to activate/deactivate the alarm. When the alarm is activated is displayed in standby. -
Page 15: Base Unit Settings (Bs Settings)
English AUTO The call is answered when the handset is lifted ANSWER from the base unit. Set date/time. The format of date/time can also DATE & be adjusted. See also Date/Time setup, p.2 TIME Set speed dial numbers for the base unit. See also DIRECT Base unit: Speed dial, p.3 MEM. -
Page 16: Reset To Default
English Change PIN Note! This PIN is not the same as used for remote access of answering machine, see Setup from handset, p.14 Press w/0. Scroll }/{ to BS SETTINGS and press w/ Scroll to CHANGE PIN and press w/0. Enter the old PIN code and press w/0. - Page 17 English Note! This model is GAP (Generic Access Profile) compatible, which means that the handset and the base unit can both be used with most other GAP compatible units irrespective of manufacturer. However the GAP protocol cannot guarantee that all functions may be accessed. Hold down J on the base unit until you hear a beep (around 6 seconds).
-
Page 18: Answering Machine
English For conference: press and hold * . Answering machine When the answering machine is switched on (displayed by a steady lit ) calls are answered after a set number of ring signals, your outgoing message is heard and the caller can leave a message. - Page 19 English Select after how many ring signals (2 RINGS – 8 RINGS or TIME SAVER) the call will be answered. Note! The Time Saver function answers calls after approximately 6 ring signals, until the first new message has been registered - then the answering machine switches to answering after ANSWER approximately 2 signals.
-
Page 20: Use From Handset
English Higher compression gives longer recording time COMPRES- but reduced sound quality, LOW = best sound SION quality but about the half memory capacity. Change remote access code (default code is 0000). Note! Using a PIN code can prevent other people from accessing your machine without permission. - Page 21 English On/Off When the answering machine is switched on it is displayed by a steady lit Press w/0. Select ANS. MACHINE. Press w/0. Select TAM ON/OFF. Press w/0. Select desired setting. Press w/0. Note! Even when answering machine is OFF it will still answer after 10 ring signals, see Remote access, p.19.
- Page 22 English Note! A pre-recorded message is used until you make your own recording. To restore the pre-recorded message, press c during playback of outgoing message. Delete all old messages Press w/0. Select ANS. MACHINE. Press w/0. Select DEL ALL OLD. Press w/0. Confirm with w/0.
-
Page 23: Use From Base Unit
English can be intercepted by pressing q or lifting the receiver of another phone connected to the same line. Use from base unit Switch the answering machine on/off. 9/� Start playback/Stop playback. Increase/decrease volume. Out of memory The memory has room for up to 59 messages including the outgoing message. -
Page 24: Other
English Delete current message Press once to repeat current message. Press twice to play previous message. Playback of messages. (During playback 5 is used to stop playback) Skip forward Turn the answering machine ON Turn the answering machine OFF Note! Using a PIN code can prevent other people from accessing your machine without permission. -
Page 25: Range
English display will flash as long as the handset is charging. In order to save the batteries, the display is very dark on standby, press L once to illumi- nate. To save power, speaker and the display light ceases to operate at low battery strength. -
Page 26: Care And Maintenance
English No number shown when receiving calls • This function requires a Caller ID subscription from your service provider. Not possible to make calls • The batteries may be running low (charge the handset). • The hand unit may be nearly out of range. Move closer to a base unit. Phone continues to ring •... -
Page 27: Warranty
English the unit gets wet, you should disconnect it, remove the battery and al- low the unit to dry completely before you replace it. • Do not use or keep the unit in dusty, dirty environments. The unit’s moving parts and electronic components can be damaged. •... -
Page 28: Specific Absorption Rate (Sar)
The maximum limit according to ICNIRP is 2.0 W/kg measured over 10 g tissue. Declaration of Conformity Doro hereby declares that Doro Magna 2005 conforms to the essential re- quirements and other relevant regulations contained in the Directives 1999/5/EC (R&TTE) and 2011/65/EC (RoHS). A copy of the Declaration of Conformity is available at www.doro.com/dofc... - Page 29 Doro Magna 2005 (1011) English Version 1.1 ©2014 Doro AB. All rights reserved. www.doro.com REV 13282 — STR 2014-10-17...
Need help?
Do you have a question about the Magna 2005 and is the answer not in the manual?
Questions and answers