Table of Contents
Advertisement
Advertisement
Table of Contents

Subscribe to Our Youtube Channel
Related Manuals for Sandstorm S6VDAB12


Summary of Contents for Sandstorm S6VDAB12
- Page 1 Instruction Manual DAB Radio S6VDAB12...
-
Page 2: Table Of Contents
Contents Safety Warnings ........................3 Unpacking ..........................4 Product Overview .........................5 Front View ...............................5 Rear View .................................5 Power Source ........................6 Mains Power ..............................6 Connections ..........................6 Using Earphones............................6 Basic Operation ........................7 Powering ON/OFF ............................7 Selecting Modes ............................7 Adjusting the Volume ..........................7 Setting the Clock ............................7 Setting the Alarm ............................7 Activating the Alarm Function ........................8 Automatic Alarm Repeat ...........................8... -
Page 3: Safety Warnings
Safety Warnings Mains Adapter • Read all the instructions carefully before using the unit and keep them for future reference. • The mains adapter will continue to draw electricity from • Retain the manual. If you pass the unit onto a third party the mains supply when plugged in the mains socket. -
Page 4: Unpacking
Thank you for purchasing your new Sandstrøm DAB Radio. We recommend that you spend some time reading this instruction manual in order that you fully understand all the operational features it off ers. You will also fi nd some hints and tips to help you resolve any issues. Read all the safety instructions carefully before use and keep this instruction manual for future reference. -
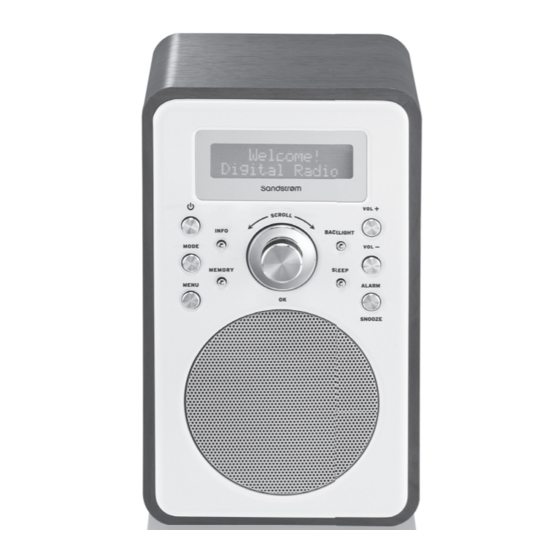
Page 5: Product Overview
Product Overview Front View Rear View VOL+ INFO BACKLIGHT MODE VOL- MEMORY SLEEP ALARM MENU SNOOZE DC IN LCD Display BACKLIGHT Button 10. VOLUME – Button Button INFO Button 11. SLEEP Button MODE Button 12. ALARM/SNOOZE Button MEMORY Button 13. Speaker MENU Button 14. -
Page 6: Power Source
Power Source Mains Power • This unit is designed to operate with an DC 12V 1.5A power supply. • Unwind the cable to its full length. Connect one end of the cable to the DC IN Socket at the rear of the unit then connect the mains adapter to the mains socket. -
Page 7: Basic Operation
Basic Operation Powering ON/OFF When you first connect the unit to the mains socket, the unit will be in STANDBY mode and the display will first show the greeting message and then finally the clock. • Press the button to switch the unit on. •... -
Page 8: Activating The Alarm Function
Activating the Alarm Function To activate the alarm function, repeatedly press the ALARM/SNOOZE button. The alarm wake-up modes will be displayed and change in the below sequence on every press: Alarm Off DAB Preset # FM Preset # Buzzer Tone # When the display shows your desired alarm wake-up mode, stop pressing the ALARM/ SNOOZE button. -
Page 9: Display Backlight
Display Backlight There are four backlight levels for you to select from when in the Standby and On modes. To set the backlight, press the BACKLIGHT button repeatedly and the brightness of the display will change in the below sequence on every press: Backlight off... -
Page 10: Dab Operation
DAB Operation If the unit is connected to the mains power and then switched on from standby for the fi rst time, the unit will automatically enter DAB mode and start automatically scanning. During the scan the LCD display will show “Scanning…”... -
Page 11: Secondary Services
Secondary Services You may see a “>” symbol after the name of the primary station whilst exploring the found stations by turning the SCROLL dial. This indicates that there are secondary services available to that station. These secondary services contain extra services that are related to the primary station. -
Page 12: Dab Display Modes
DAB Display Modes The station name will be displayed on the top line of the LCD display. Every time you press the INFO button, the bottom line of the display will cycle through the following display modes: Time/Date, Frequency, Audio Bit Rate, Signal Strength, DLS, Programme Type, Ensemble/Multiplex. -
Page 13: Fm Operation
FM Operation Switching from DAB to FM Mode To switch the unit from DAB to FM mode, press the MODE button once. The top line of the display will show FM and the frequency or the station name if a RDS station is tuned in. Auto Scan To search for an FM station, press and hold the OK dial to start the auto scan. -
Page 14: Fm Display Modes
Recalling a Preset Station Once you have saved a station, you can recall it by pressing the MEMORY button, and then turn the SCROLL dial to select your desired preset number, then press the OK dial to confirm. If you choose a preset that hasn’t been allocated a station, “Preset # empty“... -
Page 15: Maintenance
The unit will try to retune or perform a scan. If the unit is not working properly disconnect the power source and then reconnect it. Specifications Model S6VDAB12 Power Supply AC/DC Adapter Input: AC 100-240V ~ 50/60Hz Output: DC 12V 1.5A Output Power 5.0W... - Page 16 Visit Partmaster.co.uk today for the easiest way to buy electrical spares and accessories. With over 1 million spares and accessories available we can deliver direct to your door the very next day. Visit www.partmaster.co.uk or call 0844 800 3456 (UK customers only) Calls charged at National Rate.
Need help?
Do you have a question about the S6VDAB12 and is the answer not in the manual?
Questions and answers