Audiovox CarStream Installation Manual & User Manual
Bluetooth & satellite radio integration kit for selected volkswagen / audi vehicles using satellite radio emulation
Hide thumbs
Also See for CarStream:
- Installation manual & user manual (32 pages) ,
- User manual (33 pages) ,
- Installation manual & user manual (33 pages)

Related Manuals for Audiovox CarStream


Summary of Contents for Audiovox CarStream
- Page 1 CarStream BLUETOOTH & SATELLITE RADIO INTEGRATION KIT for selected Volkswagen / Audi vehicles using Satellite Radio emulation Installation Guide/User manual...
- Page 2 Copyrights and Trademarks Copyright 2015 VOXX Electronics Corporation All Trademarks and Logos are the property of their respective owners. All rights reserved.
-
Page 3: Table Of Contents
Table of Contents Warning and safety ............4 Operation ................19 Product registration ............5 Managing Multiple calls ............20 Kit contents ..............6 Music Control ..............21 ...............22 DIP switch settings ............7 Audio Streaming ............23 Vehicle Bus connector ............8 Auxiliary audio source Note to Installer ...............9 Optional remote controller ..........24... -
Page 4: Warning And Safety
Warning and safety! Please read these instructions carefully before proceeding. Failure to follow instructions may result in improper operation or injury. VOXX Electronics Corporation, its regional offices, distribuotrs or resellers won’t take any responsibility for any damage or injury as a result of using the integration kit. - Do not open, disassemble or alter the interface in any way. -
Page 5: Product Registration
Product registration and have unlimited access to our online support system. To register your Audiovox product, please complete the following steps: 1. Visit http://www.audiovoxoei.com 2. Look up and save the serial number of the product. -
Page 6: Kit Contents
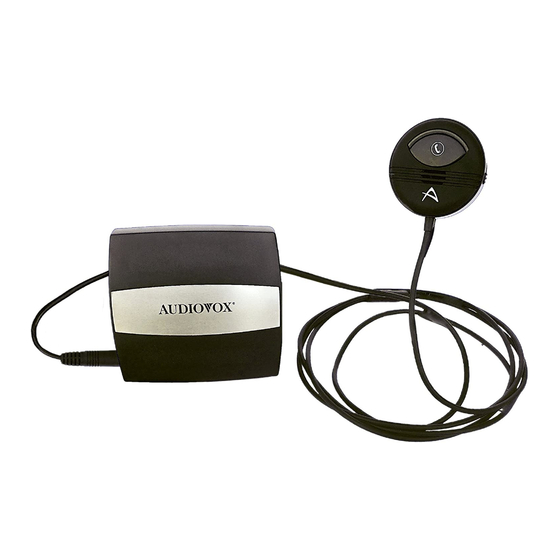
CarStream kit contents CarStream module Vehicle Interface BCS1M Bluetooth Clip and 2-sided mount Harness module Optional accessories (sold separately): For more accessories, visit www.audiovoxoei.com IR Receiver & Adapter cable for AUX connector Remote controller SXV200/300 tuner (AACC106AUX) (AACC613RCK) (AACCSATCBL) -
Page 7: Dip Switch Settings
DIP switch settings The following DIP switch settings are used to configure the CarStream module to interface with CarStream module the various radio systems. Before installation, set the DIP switch to the position shown for the corresponding radios and desired features. -
Page 8: Vehicle Bus Connector
(inside trunk panels, under passenger seat, etc). The harness provided with the kit is long enough to reach from these locations. If there is a factory satellite tuner, unplug its two connections. This CarStream kit does not support the retention of the factory satellite radio tuner at the time of printing this document. -
Page 9: Note To Installer
Attention installer! Please read the following! Audiovox strongly recommends that the unit be installed in an easily accessible location! DO NOT PLACE IT BEHIND THE RADIO AND DO NOT HIDE UNDER CARPET! Whether the unit is professionally or self installed, put the module where you, the end user can get to it easily in the future. -
Page 10: Connection Diagram - Bluetooth And Aux
Connection diagram - Bluetooth and AUX inputs Auxiliary device CarStream module (not included) CarStream module (back) Vehicle Inter- (front) face Cable Upgrade Port Bluetooth module USB to PC or MAC computer AUX cable (optional) * Do not connect the Bluetooth module under any circumstance to the SIRIUS module... -
Page 11: Connection Diagram - Bluetooth And Satellite
Connection diagram - Bluetooth and Satellite inputs CarStream Module CarStream Module (back) (front) Vehicle Connector Use Legacy SIRIUS SCC1 Tuner SiriusXM Vehicle Tuner (Not included) Upgrade Port Bluetooth Module USB to PC VEHICLE TUNER IR Receiver or MAC computer Adapter cable... -
Page 12: Installation
Installation 5. Route kit to glove box or other accessible location 1. Verify compatibility 2. Disconnect battery 6. Connect Bluetooth module 3. Locate factory Satellite Radio harness 4. Set DIP switches to match factory radio type and install car specific harness Continue on next page. - Page 13 7. Mount the microphone in a suitable location as per the illustration. Use the included 2-sided tape or the clip. Make sure the microphone is directly facing the drivier. 8. Complete install Optimal Stickey Mount Acceptable Stickey Mount Clip Mount Avoid...
-
Page 14: Controls And Indicators
Controls and Indicators 1. Light Ring Unlit - unit is off. Red - unit is disconnected. Blue - unit is connected. Alternating red and blue - unit is in pairing mode. 2. Multi-Function Button 3. Built-In Microphone 4. Off / On / (Bluetooth) Switch Slide down to OFF to turn the unit off. -
Page 15: Bluetooth / Aux Operation
Bluetooth / AUX operation: Much like the radio’s AM/FM tuner or CD player, CarStream is integrated to be part of the factory audio system. 1. Select SAT mode using the source selector button. The display will show ‘BCS1’. At this time the AUXILIARY INPUT PORT OF THE CARSTREAM MODULE is enabled. Phone call or Bluetooth music streaming will automatically take over the AUX input. -
Page 16: Satellite Radio Operation
While the factory Satellite radio retention is not supported with this model, it is possible to add a Sirius SCC1 or a SiriusXM SXV200 / SXV300 vehicle tuner to the CarStream kit. Here’s how to access satellite radio: Select the SAT input source. Use your radio as described below and also in its owner’s manual for Satellite Radio operation. -
Page 17: Note For Navigation Radios
Navigation units is not supproted at the time of printing. Only Bluetooth calling and music streaming will function on these Navigation units. If retention of the factory satellite radio tuner is desired, we recommend using the CarStream BT101AVW or BT102AVW kit. -
Page 18: Pairing Your Phone
Pairing Your Phone Your mobile phone can initiate a search for the BCS1M. Note: The following procedures are generic. Procedures for pairing mobile phones may vary. Please refer to the manual that came with your mobile phone. 1. Turn the BCS1M on and slide the button slider up to the (Bluetooth) position. -
Page 19: Operation
Operation Activating Voice Assistant (Siri / Google Voice / Voice Dial) To activate the Voice Assistant feature of the mobile phone (if available), press and hold the multi-function button for 2-3 seconds and then release it. Compatible Apple iPhone 4S or later model will trigger a Siri session. -
Page 20: Managing Multiple Calls
Managing Multiple Calls/Call-Waiting To answer a second incoming call: Tap the multi-function button three times to reject the call. Multi-Function button To switch between two calls: Double-tap the multi-function button. To end the call on hold: Tap the multi-function button three times. To end the second call: Double-tap the multi-function button. -
Page 21: Music Control
Music Controls To play music: Tap the multi-function button. Your phone will play whatever music was last playing. You may need to start the music application on the mobile device the first time. To change the music selection, use the controls on the phone. Note: Some phones may require you to tap the button to put the phone into music mode. -
Page 22: Audio Streaming
Online Audio Streaming Services If you use audio-streaming services or apps such as Pandora® or iHeart Radio®, you may be able to use the BCS1M to enjoy streaming audio through your car stereo. However, not all phones or audio- streaming services support this feature. If the sound comes out of your phone instead of the car speakers: 1. -
Page 23: Auxiliary Audio Source
Auxiliary audio source (only with optional AUX connector) The AUX cable (A-ACC-106-AUX) can be used to connect an auxiliary device, such as an MP3 player, DVD player or other audio source. The auxiliary audio source can be accessed in both CDC and SAT emulation modes. To access AUX audio source: - Plug the mini DIN connector of the AUX adapter cable into the SIRIUS receptacle and connect the 1/8”... -
Page 24: Optional Remote Controller
Optional Remote Kit: Operation with Satellite radio tuner Toggle the audio sources between iPod and SIRIUS/AUX Next Category Previous Category Next Channel Recall preset SIRIUS channel Previous Channel Save the current SIRIUS channel in the corresponding preset. Note: To display SIRIUS ID, go to channel 000. Note: Saving presets with the remote will be different from the presets saved by the radio. -
Page 25: Troubleshooting
Troubleshooting You can quickly solve most problems with your BCS1M by following the advice in this section. Problem Solution The audio is not Make sure both the car stereo and BCS1M are powered on. coming out of the Make sure the stereo volume is set to a confortable listening level. stereo speakers. - Page 26 AUX input is only accessible if the Sirius SCC1 / AUX firmware version No TUNER shown / AUX mode is is installed on the CarStream unit. This can be verified and changed with not available the Audiovox OEI firmware updater application.
- Page 27 (Mac OS illustrated) Step 1. Download the Audiovox OEI firmware updater Consumer version can be accessed at www.audiovoxoei.com/firmware Dealer updater can be accessed at www.voxxuniversity.com Consumer version of the firmware updater requires the interface module to be registered. Installers, please use the dealer updater located at www.voxxuniversity.com Step 2.
-
Page 28: Firmware Update
(Mac OS illustrated) Step 3. Follow the on-screen instructions for the update Audiovox Firmware Updater v3.0.0 Audiovox Firmware Updater v3.0.0 Silverline DUO Audiovox DUO AVW ABP 2.01 Audiovox Electronics Audiovox Electronics, Connect module via mini USB License Agreement (click Agree to proceed) http://secure.audiovox.net/audiovox/register/... -
Page 30: Warranty
12 MONTH LIMITED WARRANTY VOXX ELECTRONICS CORP. (the Company) warrants to the original retail purchaser of this product that should this product or any part thereof, under normal use and conditions, be proven defective in material or workmanship within 12 months from the date of original purchase, such defect(s) will be repaired or replaced with reconditioned product (at the Company’s option) without charge for parts and repair labor. -
Page 31: Fcc Compliance
Compliance Information FCC Statement This device complies with part 15 of the FCC Rules. Operation is subject to the following two conditions: (1) this device may not cause harmful interference, and (2) this device must accept any interference received, including interference that may cause undesired operation. - Page 32 www.voxxelectronics.com © 2015 VOXX Electronics Corporation, 150 Marcus Blvd. Hauppauge, NY 11788 rev 4-15 doc 128-9417...
Need help?
Do you have a question about the CarStream and is the answer not in the manual?
Questions and answers