Hyundai Santa Fe Owner's Manual
Hide thumbs
Also See for Santa Fe:
- Owner's manual (682 pages) ,
- User manual (192 pages) ,
- Quick reference manual (22 pages)

Subscribe to Our Youtube Channel
Related Manuals for Hyundai Santa Fe


Summary of Contents for Hyundai Santa Fe
- Page 1 ENGLISH Car Navigation System OWNER’S MANUAL Santa Fe Please read this manual carefully before operating your set and retain it for future reference. Designs and specifications are subject to change without prior notice.
-
Page 2: Table Of Contents
Table of contents General information 6-10 Safety notes Types of Playable Discs Handling discs NOTES ON COPYRIGHTS Disposal of your old appliances Name of each component 11-13 Control Panel Steering wheel remote control Basic operation 14-15 Start-up screen Turning the unit on/Turning the unit off Inserting a disc Adjusting the volume Ejecting a disc... - Page 3 Table of contents Setup 16-19 General operations of SETUP menu Bluetooth/System Audio Variable EQ/Display Map mode Bluetooth wireless technology 20-27 Understanding Bluetooth wireless technology 20-21 Connecting the unit and a device Viewing the connected device Disconnecting/Connecting the bluetooth phone Deleting a connected phone Changing the passkey Making a call by entering phone number Transfer a call...
- Page 4 Table of contents CD/MP3/WMA/USB/iPod operation 28-33 Playing an audio CD and MP3/WMA/USB/iPod files Skipping to the next track/file Skipping to the previous track/file Return to the beginning of the current track/file Search Intro scanning Repeat function Random function Playing files by classifying into folder/Album/Artist Browsing through folders/files using (the) "List"...
- Page 5 Table of contents Auxiliary device operation Using an AUX source Adjusting the video screen(Default : Center) Getting started with navigation What is GPS? About satellite signals Acquiring satellite signals Initial navigation screen Troubleshooting...
-
Page 6: General Information
General information Safety notes Always operate the vehicle in a safe When driving your vehicle, be sure to CAUTION manner Do not become distracted by keep the volume of the unit low enough RISK OF ELECTRIC SHOCK the vehicle while driving and always be to allow you to hear sounds coming DO NOT OPEN fully aware of all driving conditions Do... - Page 7 General information WARNING: • The navigation system does not take • Do not rely exclusively on the naviga- • Don't use a cellular phone when you the relative safety of the suggested tion system when attempting to locate are driving You must stop at a safe routes into consideration an emergency service (hospital, fire place to use a cellular phone...
-
Page 8: Types Of Playable Discs
General information Types of Playable Discs CAUTION: CAUTION: • Do not keep the navigation system This unit plays CD-R or CD-RW con- running with the engine stopped taining audio titles, MP3 or WMA files Doing so may discharge the vehicle •... -
Page 9: Handling Discs
General information Handling discs NOTES ON COPYRIGHTS • Clean the disc before playback It is forbidden by law to copy, broadcast, • A defective or soiled disc Wipe the disc from show, broadcast via cable, play in public, inserted into the unit can the center outward or rent copyrighted material without cause sound to drop during... -
Page 10: Disposal Of Your Old Appliances
General information Disposal of your old appliances iPod and iPhone is a trademark of Apple Inc , registered in the U S and other countries 1 When this crossed-out wheeled bin “Made for iPod” means that an elec- symbol is attached to a product, it tronic accessory has been designed to means the product is covered by the connect specifically to iPod and has... -
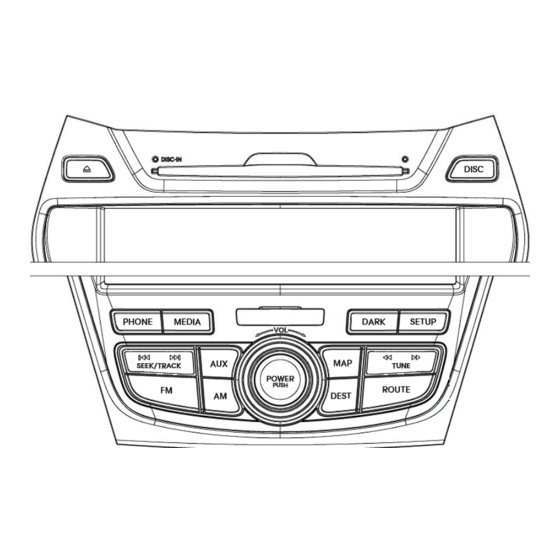
Page 11: Name Of Each Component
Name of each component Control Panel SETUP( • Press to access system settings. (Page 16) • Press and hold to check the device ID, the software version, the naviga- tion version, and the map version 1. Disc slot 4. LCD Touch to operate 2. - Page 12 Name of each component 8. ∧/∨ 17. Repeat voice guidance ( • Press to: Push to repeat the last guidance Press to acknowledge an item selec- - Automatic tuning: advice when guidance is active RADIO tion - Track up/down: iPod 18.
-
Page 13: Steering Wheel Remote Control
Name of each component Steering wheel remote control 1. ∧/∨ 3. MUTE • Press to: Mutes the volume Press to operate Bluetooth Hands- - Preset up/down: Free function RADIO 4. MODE - Track up/down: • Press to accept a call. iPod Press to select a source •... -
Page 14: Basic Operation
Basic operation Start-up screen ✽Note Turning the unit off If the ejected disc is not removed in The unit starts after ignition switch is in Press on the control panel when the approximately 10 seconds, the disc is ACC or ON position system is on automatically inserted again into the loading slot... -
Page 15: Selecting A Source On The Control Panel
Basic operation Rear view camera Selecting a source on the Selecting a source on the The rear view mode is displayed on the control panel screen unit when the gearshift is moved to Press MEDIA repeatedly to select a Select the source icon as shown in REVERSE (R) position source the figure... -
Page 16: Setup
Setup General operations of SETUP Bluetooth System This menu describes connection This menu describes system settings menu schemes of Bluetooth The navigation system allows configura- tion on the following menus: Bluetooth, System, Audio, Display Turn the unit on 2 Press on the control panel Language View Bluetooth device list... -
Page 17: Audio
Setup Clock Factory Settings Audio This allows you to set the time format and Allows you to set all of the settings This menu describes audio settings the summer time back to default • Time: displays the time received auto- - All: resets all the settings back to the SDVC (Speed Dependent Volume Control) matically from GPS... -
Page 18: Variable Eq/Display
Setup Sound (Default : Center) Variable EQ Display Sets the variable EQ This menu describes the display set- 1 Touch [Variable EQ] tings 2 Touch the desired EQ Balance/ Bass/ Fader Mid/Treble Brightness - Detail: for details, touch [Detail] Set the display brightness to Low, Mid ✽Note - Normal: natural sound, sound opti- (Middle), or High... -
Page 19: Map Mode
Setup Map mode Map colours combination can be changed to improve visibility at day and night - Auto: map is displayed by autolight or illumination signal Illumination Illumination Autolight Off Map: Day Map: Day (Day) Autolight On Map: Night Map: Night (Night) Autolight is Map: Night... -
Page 20: Bluetooth Wireless Technology
Bluetooth wireless technology Understanding Bluetooth Connecting the unit and a 4 Select the desired Bluetooth phone from the “Bluetooth Devices” screen wireless technology device Bluetooth wireless technology establish- es a wireless link between two devices ct using the unit settings (1) To conne supported with Bluetooth Press... - Page 21 4 After search is completed in your settings related with phones (Refer to ✽Note phone, select "Santa Fe" the [Factory settings] on the page 17 ) If the unit continues to fail to connect to your bluetooth phone, please reset all...
-
Page 22: Viewing The Connected Device
Bluetooth wireless technology Viewing the connected device Disconnecting the bluetooth Connecting the bluetooth 1 Touch [View Bluetooth device list] on phone phone the “Bluetooth” screen 1 Press [ ] > Select [Bluetooth] 1 Press [ ] > Select [Bluetooth] 2 Touch [View Bluetooth device list] on 2 Touch [View Bluetooth device list] on the “Bluetooth”... -
Page 23: Deleting A Connected Phone
Bluetooth wireless technology Deleting a connected phone Changing the passkey 3 To finish the call, select [Hang up] If you no longer need to use a phone, 1 Press [ ] > Select [Bluetooth] > you can delete it from [Bluetooth devic- [Change passkey] es] List 1 Press [... -
Page 24: Answering Calls
Bluetooth wireless technology Answering calls Using your Phone Book 2 Select the phone book entry you want to call The unit can download the phone book When you receive a call, your phone from phones supporting PBAP (Phone rings and the “Incoming Call” win- Book Access Profile) dow is displayed on the unit During every connection, the unit down-... -
Page 25: Using Your Calling List
Bluetooth wireless technology Using your Calling list The unit can download calling list from phones supporting PBAP (Phone Book Access Profile) During every connection, the unit down- loads the calling lists from your phone Missed Calls This process may take up to one minute 3 Select the contact you want to call Calling a number in the calling list Press... -
Page 26: Making A Call With Speed Dial Numbers
Bluetooth wireless technology Making a call with speed dial Calling a number from the speed 3 Select one of the categories (For example: Phone book) dial list numbers 1 Press on the control panel, then You can assign up to 12 speed dial select [Speed dial] numbers from phone book or calling lists... -
Page 27: Activating The Audio Streaming Mode
Bluetooth wireless technology Activating the audio stream- Pause Touch to pause playback Touch ing mode again to resume playback Connect the unit and your phone before activating the audio streaming mode (Pages 20 - 21) ✽Note This function may not be supported Press MEDIA repeatedly until "BT"... -
Page 28: Cd/Mp3/Wma/Usb/Ipod Operation
CD/MP3/WMA/USB/iPod operation Playing an audio CD and ✽Note iPod • You can play 12-cm audio CDs on your CD You can play an iPod device on the unit MP3/ WMA/ USB/ iPod files player We strongly recommend only play- by connecting the iPod to the USB port Disc ing 12-cm CDs Please do not play 8-cm by using the iPod cable... -
Page 29: Skipping To The Next Track/File
CD/MP3/WMA/USB/iPod operation Skipping to the next track/file Intro scanning Repeat function Disc - Audio CD The current selected tracks/files are Touch to select the next track/file Disc - MP3/WMA played repeatedly The first 10 seconds of each tracks/files are played Skipping to the previous track/file 1 Touch [Option] during playback Disc - Audio CD... -
Page 30: Random Function
CD/MP3/WMA/USB/iPod operation Random function Disc - MP3/WMA Disc - MP3/WMA • [Random off]: plays repeatedly all • [Random off]: cancels RANDOM files within the disc playback All tracks/files are played randomly or USB • [Random folder]: the unit plays • [Repeat track]: plays repeatedly the randomly within 1 Touch [Option] during playback current file... -
Page 31: Playing Files By Classifying Into Folder/Album/Artist
CD/MP3/WMA/USB/iPod operation Playing files by classifying Browsing through folders/files ✽Note • In case of MP3/WMA file, touch the into folder/Album/Artist using (the) "List" menu button to move to upper folder Disc - Audio CD • Touch the buttons to select Disc - MP3/WMA You can play files in a USB according to the list you want to view... -
Page 32: Setting Audio Book Play Speed
CD/MP3/WMA/USB/iPod operation Setting audio books playback • [Playlists]: Plays the songs in the • [Audiobook fast]: [Playlists] Plays the audio books with fast speed • [Artists]: Plays the songs in the speed iPod [Artists] • [Audiobook slow]: Setting the playback speed only affects •... -
Page 33: Usb Device Requirement/Compatible Usb Devices
CD/MP3/WMA/USB/iPod operation USB device requirement MP3/WMA file requirement iPod/iPhone device requirement • This unit supports only USB Flash rive • Sampling Frequency /16 - 48 kHz • Compatibility with your iPod may vary and USB External HDD with FAT16 or (MP3) 8 - 44 1 kHz (WMA) depending on the type of your iPod FAT32 format... -
Page 34: Radio Operation
Radio operation 3 Auto tuning: Listening to stations 4 Touch and hold one of the preset Touch on the screen Or buttons Press the “RADIO” button to select press ∧/∨ on the control panel The preset station information will be the radio - When a station is received, search- displayed... -
Page 35: As (Autostore)
Radio operation Scanning broadcast frequen- AS (Autostore) cies This is only available for AM reception This function lets you automatically The first 10 seconds of each broadcast store the strong broadcast frequencies frequency are played Select the band to AM Touch [Option] on the screen in AM/FM mode 2 Touch [Option] on the screen... -
Page 36: Auxiliary Device Operation
Auxiliary device operation ✽Note Adjusting the video screen Using an AUX source • Some auxiliary devices that do not (Default : Center) It is possible to use auxiliary equipment have the video source may not pro- with unit For safety reasons, the video screen duce output to the video screen cannot be viewed while your vehicle is in •... -
Page 37: Getting Started With Navigation
Getting started with navigation What is GPS? Acquiring satellite signals The Global Positioning System (GPS) Before the unit can determine your cur- is a satellite-based navigation system rent made up of a network of 24 satellites position and navigate a route, you placed into orbit by the U S must do the following steps: Department of Defense... -
Page 38: Troubleshooting
Troubleshooting Cannot identify the current location. There is a difference between the driv- • When driving through mountains or ing road and the road on the map in where the road is too curvy (GPS not receiving) • When the starting, passing and arriv- the product. - Page 39 Troubleshooting Symptom Cause Correction Power does not turn on The ignition switch is NOT turned ON Turn the ignition switch to ON The unit does not operate The ignition switch is NOT set to ACC Set the ignition switch to ACC The power of the unit is turned OFF Turn the unit on by pressing POWER on the control panel...
- Page 40 LIMITED WARRANTY ORIGINAL NAVIGATION HEAD UNIT SUPPLIED BY VEHICLE DEALER Product : Product No. : WHAT THIS WARRANTY COVERS 1. Vehicle Dealer Shop ("Dealer") warrants to you that the Hardware will be free from defects in workmanship and materials under Normal use ("Defects") from the original date of the registration of the motor vehicle ("Warranty Period").
- Page 41 HOW TO MAKE A WARRANTY CLAIM 3. In order to make a claim of a Defect, you must contact DEALER during the Warranty Period via support@cartronics.net.au to explain the Defect and to obtain an RMA number (Return Materials Authorization) if necessary. You must return the Hardware during the Warranty Period, along with the RMA number provided by DEALER and an explanation of the Defect, to the address provided to you by DEALER.
- Page 42 LIMITATION OF LIABILITY 9. Neither DEALER nor its suppliers shall be liable to you or to any third party for any damages either direct, indirect, incidental, consequential or otherwise (including in each case, but not limited to, damages for the inability to use the equipment or access data, loss of data, loss of business, loss of profits, business interruption or the like) arising out of the use of or inability to use the Hardware even if DEALER has been advised of the possibility of such damages.
- Page 43 SUPPORT - HOTLINE Cartronics Audio Services Pty Ltd 24/1488 Ferntree Gully Road Knoxfield, Victoria 3180 Australia Tel : +03 9213 8000 Fax : +03 9213 8099 e-mail : support@cartronics.net.au...
Need help?
Do you have a question about the Santa Fe and is the answer not in the manual?
Questions and answers