Advertisement
Advertisement
Table of Contents

Related Manuals for Dual XR4115


Summary of Contents for Dual XR4115
- Page 1 XR4115 INSTALLATION/OWNER'S MANUAL AM/FM/MP3/WMA Receiver with Detachable Face...
-
Page 2: Getting Started
XR4115 INSTALLATION Preparation Please read entire manual before installation. Before You Start • Disconnect negative battery terminal. Consult a qualified technician for instructions. • Avoid installing the unit where it would be subject to high temperatures, such as from direct sunlight, or where it would be subject to dust, dirt or excessive vibration. -
Page 3: Wiring Diagram
Left (White) Antenna Connector 10 AMP AGC Fuse FUSE When replacing the fuse, make sure new fuse is the correct type and amperage. Using an incorrect fuse could damage the radio. The XR4115 uses one 10 amp AGC fuse located in-line. -
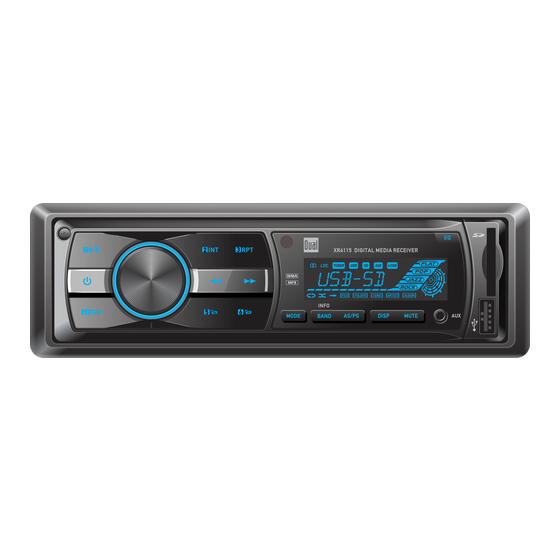
Page 4: Control Locations - Receiver
XR4115 OPERATION Control Locations - Receiver Release USB Port Preset 1 / Play / Pause Auxiliary Input Power Mute Volume Knob Display Preset 2 / Intro AS / PS Tune / Track Down Band / Info Preset 3 / Repeat Mode Tune / Track Up... -
Page 5: Control Locations - Remote
XR4115 OPERATION Control Locations - Remote Power Tune / Track Down Preset 6 / Folder Up Volume Up Mute Select Preset 4 / Random Volume Down Preset 5 / Folder Down Tune / Track Up Preset 1 / Play / Pause AS / PS... -
Page 6: General Operation
XR4115 OPERATION General Operation Faceplate Removal Press RELEASE and pull away from the left side to remove. To re-install, insert right side of faceplate first then push left side to secure. Power On/Off Press or any other button to turn the unit on. Press again to turn the unit off. - Page 7 XR4115 OPERATION General Operation Press the volume knob to select between Bass, Treble, Audio / Menu Balance, Fader, Loudness, Distance and Stereo. BASS TREBLE BALANCE FADER LOUDNESS DISTANCE STEREO Press the volume knob until BAS appears. Bass Rotate the volume knob left/right to adjust. (-7 minimum / +7 maximum) Press the volume knob until TRE appears.
-
Page 8: Tuner Operation
XR4115 OPERATION Tuner Operation Seek Tuning Press TUNE or TUNE for more than 2 seconds to seek the next strong station. Manual Tuning Press TUNE or TUNE momentarily to change one radio frequency at a time. Press and hold to advance quickly. Band Press BAND to select between FM1, FM2, FM3 and AM1, AM2 bands. - Page 9 To play MP3/WMA/WAV files from an SD card, insert an SD (sold separately) card into the XR4115's SD card slot with the label facing left. It will click into place when properly inserted. To remove the card, press in until it clicks, then pull to remove.
- Page 10 XR4115 OPERATION SD Card / USB Operation The following types of files are compatible: Media Compatibility • MP3 audio • WMA audio • WAV audio The following types of files are not compatible: • WMA files that are protected by DRM (Digital Rights Management) • WMA lossless format •...
- Page 11 XR4115 OPERATION SD Card / USB Operation Displaying Information When a file is accessed, the display will alternate between track number/elapsed time and available MP3/WMA information, including file name, song title, artist name, album name and folder number. File Icon This icon will illuminate when the file name is displayed.
-
Page 12: Troubleshooting
XR4115 WARRANTY Troubleshooting Problem Cause Action Yellow wire not connected or incorrect voltage Check connections for proper Red wire not connected or incorrect voltage voltage (11~16VDC) Unit will not turn on (no power) Black wire not connected Check connection to ground Fuse blown Replace fuse Speaker wires not connected Check connections at speakers Unit has power ... -
Page 13: Specifications
XR4115 OPERATION Specifications FM Tuner Tuning range: 87.5MHz-107.9MHz Usable sensitivity: 10dBf 50dB quieting sensitivity: 25dBu Stereo separation @ 1kHz: >30dB Frequency response: 30Hz-18kHz AM Tuner Tuning range: 530kHz-1710kHz Usable sensitivity: <42dBu Frequency response: 80Hz-2kHz General Speaker output impedance: 4~8 ohms Line output voltage: 1.5 Volts RMS Dimensions: 7" x 2" x 5" (178 x 50 x 130 mm) -
Page 14: Fcc Compliance
Increase the separation between the equipment and receiver. • Connect the equipment into an outlet on a circuit different from that to which the receiver is connected. • Consult the dealer or an experienced radio/TV technician for help. CAR AUDIO SYSTEMS DUAL CAR STEREOS...
Need help?
Do you have a question about the XR4115 and is the answer not in the manual?
Questions and answers
How do I change the display colour
To change the display color on the Dual XR4115, use the "Custom Colors" feature, which offers over 32,000 color variations. This allows you to adjust the LCD and button illumination to match your vehicle’s interior or personal preference.
This answer is automatically generated