Table of Contents
Advertisement
Advertisement
Table of Contents

Related Manuals for Asus RT-AC3200


Summary of Contents for Asus RT-AC3200
-
Page 1: User Guide
User Guide RT-AC3200 Wireless-AC 3200 Tri-Band Gigabit Router USB 3.0 WiFi... - Page 2 Product warranty or service will not be extended if: (1) the product is repaired, modified or altered, unless such repair, modification of alteration is authorized in writing by ASUS; or (2) the serial number of the product is defaced or missing.
-
Page 3: Table Of Contents
Table of contents Getting to know your wireless router Welcome! ..................7 Package contents .................7 Your wireless router ..............8 Positioning your router ............10 Setup Requirements ..............11 Router Setup ................12 1.6.1 Wired connection ..............12 1.6.2 Wireless connection .............13 Getting started Logging into the Web GUI ............. - Page 4 Table of contents Using the USB Application ............. 41 3.5.1 Using AiDisk ................41 3.5.2 Using Servers Center ............43 3.5.3 3G/4G ..................48 Using AiCloud 2.0 ..............49 3.6.1 Cloud Disk ................50 3.6.2 Smart Access ................52 3.6.3 Smart Sync ................53 Configuring the Advanced Settings Wireless ..................
- Page 5 Utilities Device Discovery ............... 93 Firmware Restoration .............. 94 Setting up your printer server ..........95 5.3.1 ASUS EZ Printer Sharing .............95 5.3.2 Using LPR to Share Printer ..........99 Download Master ..............104 5.4.1 Configuring Bit Torrent download settings ....105 5.4.2 NZB settings .................
- Page 6 Appendices Notices 120 ASUS Contact information ..............135 Networks Global Hotline Information..........136...
-
Page 7: Getting To Know Your Wireless Router
5GHz-2 triple bands for an unmatched concurrent wireless HD streaming; SMB server, UPnP AV server, and FTP server for 24/7 file sharing; a capability to handle 300,000 sessions; and the ASUS Green Network Technology, which provides up to 70% power- saving solution. -
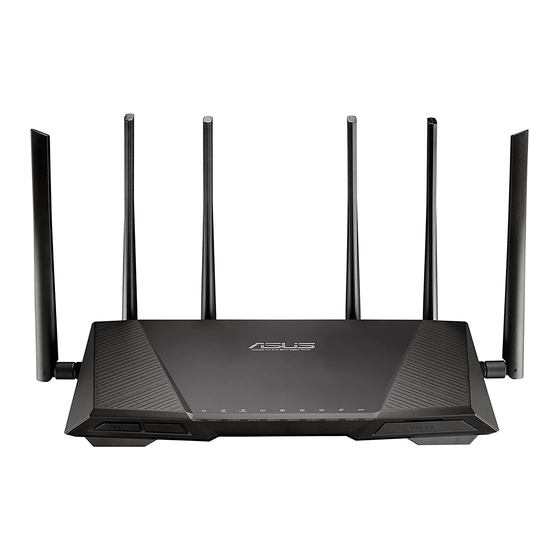
Page 8: Product View And Features
1.3 Your wireless router USB 3.0 WiFi LED On/Off button Press this button to turn on/off the backlight LED on the panel. Wi-Fi On/Off button Press this button to turn on /off the Wi-Fi connection. Power LED Off: No power. On: Device is ready. -
Page 9: Specifications
USB 2.0 port Insert USB 2.0 devices such as USB hard disks or USB flash drives into this port. WPS button This button launches the WPS Wizard. Reset button This button resets or restores the system to its factory default settings. WAN (Internet) port Connect a network cable into this port to establish WAN connection. -
Page 10: Positioning Your Router
• Always update to the latest firmware. Visit the ASUS website at http://www.asus.com to get the latest firmware updates. • To ensure the best wireless signal, orient the six detachable antennas as shown in the drawing below. 90 °... -
Page 11: Setup Requirements
1.5 Setup Requirements To set up your wireless network, you need a computer that meets the following system requirements: • Ethernet RJ-45 (LAN) port (10Base-T/100Base-TX/ 1000BaseTX) • IEEE 802.11a/b/g/n/ac wireless capability • An installed TCP/IP service • Web browser such as Internet Explorer, Firefox, Safari, or Google Chrome NOTES: • If your computer does not have built-in wireless capabilities, you may install an IEEE 802.11a/b/g/n/ac WLAN adapter to your computer to connect to the network. -
Page 12: Router Setup
1.6 Router Setup IMPORTANT! • Use a wired connection when setting up your wireless router to avoid possible setup problems. • Before setting up your ASUS wireless router, do the following: • If you are replacing an existing router, disconnect it from your network. • Disconnect the cables/wires from your existing modem setup. If your modem has a backup battery, remove it as well. • Reboot your cable modem and computer (recommended). 1.6.1 Wired connection NOTE: You can use either a straight-through cable or a crossover cable for wired connection. -
Page 13: Wireless Connection
1.6.2 Wireless connection Computer Wall Power Outlet RT-AC3200 Power To set up your wireless router via wireless connection: 1. Insert your wireless router’s AC adapter to the DC-IN port and plug it to a power outlet. - Page 14 3. Insert your modem’s AC adapter to the DC-IN port and plug it to a power outlet. 4. Install an IEEE 802.11a/b/g/n/ac WLAN adapter on your computer. NOTES: • For details on connecting to a wireless network, refer to the WLAN adapter’s user manual. • To set up the security settings for your network, refer to the section Setting up the wireless security settings in Chapter 3 of this user manual.
-
Page 15: Getting Started
Getting started 2.1 Logging into the Web GUI Your ASUS wireless router comes with an intuitive web graphical user interface (GUI) that allows you to easily configure its various features through a web browser such as Internet Explorer, Firefox, Safari, or Google Chrome. -
Page 16: Setting Up Your Router Using The Quick Internet Setup - Smart Connect Wizard
2. Launch your web browser such as Internet Explorer, Firefox, Google Chrome, or Safari. NOTE: If the QIS-Smart Connect Wizard does not launch automatically, enter http://192.168.1.1 or http://router.asus.com in the address bar and refresh the browser again. 3. The wireless router’s Quick Internet Setup (QIS) feature automatically detects if your ISP connection type is Dynamic IP, PPPoE, PPTP, L2TP, and Static IP. - Page 17 5. Click Next. Wait until your router redetects your Internet connection type and the Smart Connect screen appears. 6. Click Next to go to the setup page. 7. Select any of these two Smart Connect options: • T ri-band Smart Connect: Select this option if you want to enable Smart Connect for 2.4GHz, 5GHz-1, and 5GHz- 2 frequency bands at the same time, and automatically connect your devices in your network to the best band for...
-
Page 18: Connecting To Your Wireless Network
2.3 Connecting to your wireless network After setting up your wireless router via QIS, you can connect your computer or other smart devices to your wireless network. To connect to your network: 1. On your computer, click the network icon in the notification area to display the available wireless networks. -
Page 19: Configuring The General Settings
Configuring the General settings 3.1 Using the Network Map Network Map allows you to configure your network’s security settings, manage your network clients, and monitor your USB device. -
Page 20: Setting Up The Wireless Security Settings
3.1.1 Setting up the wireless security settings To protect your wireless network from unauthorized access, you need to configure its security settings. To set up the wireless security settings: 1. From the navigation panel, go to General > Network Map. 2. On the Network Map screen and under System status, you can configure the wireless security settings such as SSID, security level, and encryption settings. - Page 21 5GHz-2 security settings 3. On the Wireless name (SSID) field, key in a unique name for your wireless network. 4. From the Authentication Method dropdown list, select the authentication method for your wireless network. If you select WPA-Personal or WPA-2 Personal as the authentication method, key in the WPA-PSK key or security passkey.
-
Page 22: Managing Your Network Clients
3.1.2 Managing your network clients To manage your network clients: 1. From the navigation panel, go to General > Network Map tab. 2. On the Network Map screen, select the Clients icon to display your network client’s information. 3. To block a client’s access to your network, select the client and click the open lock icon. -
Page 23: Monitoring Your Usb Device
3.1.3 Monitoring your USB device The ASUS wireless router provides two USB ports for connecting USB devices or USB printer to allow you to share files and printer with clients in your network. NOTES: • To use this feature, you need to plug a USB storage device, such as a USB hard disk or USB flash drive, to the USB 3.0/2.0 ports on the rear panel of your wireless router. - Page 24 IMPORTANT! You first need to create a share account and its permission /access rights to allow other network clients to access the USB device via an FTP site/third-party FTP client utility, Servers Center, Samba, or AiCloud. For more details, refer to the section 3.5 Using the USB Application and 3.6 Using AiCloud in this user manual.
- Page 25 Safely removing the USB disk IMPORTANT: Incorrect removal of the USB disk may cause data corruption. To safely remove the USB disk: 1. From the navigation panel, go to General > Network Map. 2. In the upper right corner, click >...
-
Page 26: Creating A Guest Network
The Guest Network provides temporary visitors with Internet connectivity via access to separate SSIDs or networks without providing access to your private network. NOTE: RT-AC3200 supports up to six SSIDs (three 2.4GHz and three 5GHz SSIDs). To create a guest network: 1. - Page 27 4. To change a guest’s settings, click the guest settings you want to modify. Click Remove to delete the guest’s settings. 5. Assign a wireless name for your temporary network on the Network Name (SSID) field. 6. Select an Authentication Method. 7.
-
Page 28: Aiprotection
3.3 AiProtection AiProtection provides real-time monitoring that detects malware, spyware, and unwanted access. It also filters unwanted websites and apps and allows you to schedule a time that a connected device is able to access the Internet. -
Page 29: Network Protection
3.3.1 Network Protection Network Protection prevents network exploits and secures your network from unwanted access. Configuring Network Protection To configure Network Protection: 1. From the navigation panel, go to General > AiProtection. 2. From the AiProtection main page, click on Network Protection. - Page 30 IMPORTANT! Items marked as Yes on the Router Security Assessment page is considered to be at a safe status. Items marked as No, Weak, or Very Weak is highly recommended to be configured accordingly. 4. (Optional) From the Router Security Assessment page, manually configure the items marked as No, Weak, or Very .
- Page 31 Malicious Sites Blocking This feature restricts access to known malicious websites in the cloud database for an always-up-to-date protection. NOTE: This function is automatically enabled if you run the Router Weakness Scan. To enable Malicious Sites Blocking: 1. From the navigation panel, go to General > AiProtection. 2.
- Page 32 Infected Device Prevention and Blocking This feature prevents infected devices from communicating personal information or infected status to external parties. NOTE: This function is automatically enabled if you run the Router Weakness Scan. To enable Vulnerability protection: 1. From the navigation panel, go to General > AiProtection. 2.
-
Page 33: Setting Up Parental Controls
3.3.2 Setting up Parental Controls Parental Control allows you to control the Internet access time or set the time limit for a client’s network usage. To go to the Parental Controls main page: 1. From the navigation panel, go to General > AiProtection. 2. - Page 34 Web & Apps Filters Web & Apps Filters is a feature of Parental Controls that allows you to block access to unwanted web sites or applications. To configure Web & Apps Filters: 1. From the navigation panel, go to General > AiProtection. 2.
- Page 35 Time Scheduling Time Scheduling allows you to set the time limit for a client’s network usage. NOTE: Ensure that your system time is synchronized with the NTP server. To configure Time Scheduling: 1. From the navigation panel, go to General >AiProtection > Parental Controls >...
- Page 36 3. From the Clients Name column, select or key in the client’s name from the drop down list box. NOTE: You may also key in the client’s MAC address in the Client MAC Address column. Ensure that the client name does not contain special characters or spaces as these may cause the router to function abnormally.
-
Page 37: Adaptive Qos
3.4 Adaptive QoS 3.4.1 Bandwidth Monitor This feature allows you to monitor the bandwidth of WAN/LAN and displays the upload and download speed of your connection. Apps analysis To enable Apps analysis: From the Bandwidth Monitor tab, go to the Apps Analysis pane, click ON. -
Page 38: Qos
3.4.2 QoS This feature ensures bandwidth for prioritized tasks and applications. To enable the QoS function: 1. From the navigation panel, go to General > Adaptive QoS> QoS tab. 2. From the Enable Smart QoS pane, click ON. 3. Fill in the upload and download bandwidth fields. NOTE: Get the bandwidth information from your ISP. -
Page 39: Web History
3.4.3 Web History This feature displays the history and details of the sites or URLs that the client visited. To view the Web History: 1. From the navigation panel, go to General > Adaptive QoS> Web History tab. 2. (Optional) Click Refresh to clear the list. -
Page 40: Traffic Monitor
3.4.4 Traffic Monitor The traffic monitor feature allows you to access the bandwidth usage and speed of your Internet, wired, or wireless networks. It allows you to monitor network traffic in real-time or on a daily basis. It also offers an option to display the network traffic within the last 24 hours. -
Page 41: Using The Usb Application
USB hard disk or USB flash drive, in the USB 2.0 port on the rear panel of your wireless router. Ensure that the USB storage device is formatted and partitioned properly. Refer to the ASUS website at http://event.asus.com/2009/networks/disksupport/ for the file system support table. - Page 42 3. Select the access rights that you want to assign to the clients accessing your shared data. 4. Create your domain name via the ASUS DDNS services, read the Terms of Service and then select I will use the service and accept the Terms of service and key in your domain name.
-
Page 43: Using Servers Center
Servers Center. Using Media Server Your wireless router allows DLNA-supported devices to access multimedia files from the USB disk connected to your wireless router. NOTE: Before using the DLNA Media Server function, connect your device to the RT-AC3200’s network. - Page 44 To launch the Media Server setting page, go to General > USB application > Media Services and Servers > Media Servers tab. Refer to the following for the descriptions of the fields: • Enable iTunes Server?: Select ON/OFF to enable/disable the iTunes Server.
- Page 45 2. Follow the steps below to add, delete, or modify an account. To create a new account: a) Click to add new account. b) In the Account and Password fields, key in the name and password of your network client. Retype the password to confirm.
- Page 46 3. From the list of folders, select the type of access permission that you want to assign for specific folders: • R/W: Select this option to assign read/write access. • R: Select this option to assign read-only access. • No: Select this option if you do not want to share a specific file folder.
- Page 47 To use FTP Share service: Ensure that you have set up your FTP server through NOTE: AiDisk. For more details, refer to the section 3.5.1 Using AiDisk. 1. From the navigation panel, click General > USB application > Media Services and Servers > FTP Share tab. 2.
-
Page 48: G/4G
3.5.3 3G/4G 3G/4G USB modems can be connected to RT-AC3200 to allow Internet access. NOTE: For a list of verified USB modems, please visit: http://event.asus.com/2009/networks/3gsupport/ To set up 3G/4G internet access: 1. From the navigation panel, click General > USB application >... -
Page 49: Using Aicloud 2.0
To use AiCloud: 1. From Google Play Store or Apple Store, download and install the ASUS AiCloud app to your smart device. 2. Connect your smart device to your network. Follow the instructions to complete the AiCloud setup process. -
Page 50: Cloud Disk
1. Insert a USB storage device into the wireless router. 2. Turn on Cloud Disk. 3. Go to https://router.asus.com and enter the router login account and password. For better user experience, we recommend that you use Google Chrome or Firefox. - Page 51 4. You can now start accessing Cloud Disk files on devices connected to the network. NOTE: When accessing the devices that are connected to the network, you need to enter the device’s user name and password manually, which will not be saved by AiCloud for security reason.
-
Page 52: Smart Access
3.6.2 Smart Access The Smart Access function allows you to easily access your home network via your router’s domain name. NOTES: • You can create a domain name for your router with ASUS DDNS. For more details, refer to section 4.3.5 DDNS. • By default, AiCloud provides a secure HTTPS connection. Key in https://[yourASUSDDNSname].asuscomm.com for a very secure Cloud Disk and Smart Access usage. -
Page 53: Smart Sync
1. Launch AiCloud, click Smart Sync > Go. 2. Select ON to enable Smart Sync. 3. Click Add new account. 4. Enter your ASUS WebStorage account password and select the directory that you want to sync with WebStorage. 5. Click Apply. -
Page 54: Configuring The Advanced Settings
Configuring the Advanced Settings 4.1 Wireless 4.1.1 General The General tab allows you to configure the basic wireless settings. To configure the basic wireless settings: 1. From the navigation panel, go to Advanced Settings > Wireless > General tab. 2. Select 2.4GHz, 5GHz-1, or 5GHz-2 as the frequency band for your wireless network. - Page 55 4. Assign a unique name containing up to 32 characters for your SSID (Service Set Identifier) or network name to identify your wireless network. Wi-Fi devices can identify and connect to the wireless network via your assigned SSID. The SSIDs on the information banner are updated once new SSIDs are saved to the settings.
-
Page 56: Wps
4.1.2 WPS WPS (Wi-Fi Protected Setup) is a wireless security standard that allows you to easily connect devices to a wireless network. You can configure the WPS function via the PIN code or WPS button. NOTE: Ensure that the devices support WPS. To enable WPS on your wireless network: 1. - Page 57 NOTE: WPS supports authentication using Open System, WPA-Personal, and WPA2-Personal. WPS does not support a wireless network that uses a Shared Key, WPA-Enterprise, WPA2-Enterprise, and RADIUS encryption method. 3. In the WPS Method field, select Push Button or Client PIN code.
-
Page 58: Bridge
ASUS wireless router. It can also be considered as a wireless repeater where your ASUS wireless router communicates with another access point and other wireless devices. - Page 59 • HYBRID: Enables the Wireless Bridge feature and allows other wireless devices/stations to connect to the router. NOTE: In Hybrid mode, wireless devices connected to the ASUS wireless router will only receive half the connection speed of the Access Point.
-
Page 60: Wireless Mac Filter
4.1.4 Wireless MAC Filter Wireless MAC filter provides control over packets transmitted to a specified MAC (Media Access Control) address on your wireless network. To set up the Wireless MAC filter: 1. From the navigation panel, go to Advanced Settings > Wireless >... -
Page 61: Radius Setting
4.1.5 RADIUS Setting RADIUS (Remote Authentication Dial In User Service) Setting provides an extra layer of security when you choose WPA- Enterprise, WPA2-Enterprise, or Radius with 802.1x as your Authentication Mode. To set up wireless RADIUS settings: 1. Ensure that the wireless router’s authentication mode is set to WPA-Enterprise or WPA2-Enterprise. -
Page 62: Professional
4.1.6 Professional The Professional screen provides advanced configuration options. NOTE: We recommend that you use the default values on this page. In the Professional Settings screen, you can configure the following: • Frequency: Select the frequency band that the professional settings will be applied to. - Page 63 • Date to Enable Radio (weekend): You can specify which days of the weekend wireless networking is enabled. • Time of Day to Enable Radio: You can specify a time range when wireless networking is enabled during the weekend. • Set AP isolated: The Set AP isolated item prevents wireless devices on your network from communicating with each other.
-
Page 64: Lan
• Enable WMM APSD: Enable WMM APSD (Wi-Fi Multimedia Automatic Power Save Delivery) to improve power management between wireless devices. Select Disable to switch off WMM APSD. • TX Power adjustment: TX Power adjustment refers to the milliWatts (mW) needed to power the radio signal output of the wireless router. -
Page 65: Dhcp Server
4.2.2 DHCP Server Your wireless router uses DHCP to assign IP addresses automatically on your network. You can specify the IP address range and lease time for the clients on your network. To configure the DHCP server: 1. From the navigation panel, go to Advanced Settings > LAN >... -
Page 66: Dhcp Server
5. In the IP Pool Ending Address field, key in the ending IP address. 6. In the Lease Time field, specify in seconds when an assigned IP address will expire. Once it reaches this time limit, the DHCP server will then assign a new IP address. NOTES: • We recommend that you use an IP address format of 192.168.1.xxx (where xxx can be any number between 2 and 254) when specifying... -
Page 67: Route
4.2.3 Route If your network makes use of more than one wireless router, you can configure a routing table to share the same Internet service. NOTE: We recommend that you do not change the default route settings unless you have advanced knowledge of routing tables. To configure the LAN Routing table: 1. -
Page 68: Iptv
4.2.4 IPTV The wireless router supports connection to IPTV services through an ISP or a LAN. The IPTV tab provides the configuration settings needed to set up IPTV, VoIP, multicasting, and UDP for your service. Contact your ISP for specific information regarding your service. -
Page 69: Wan
4.3 WAN 4.3.1 Internet Connection The Internet Connection screen allows you to configure the settings of various WAN connection types. To configure the WAN connection settings: 1. From the navigation panel, go to Advanced Settings > WAN > Internet Connection tab. 2. - Page 70 • Enable NAT: NAT (Network Address Translation) is a system where one public IP (WAN IP) is used to provide Internet access to network clients with a private IP address in a LAN. The private IP address of each network client is saved in a NAT table and is used to route incoming data packets.
- Page 71 To avoid connection issues due to an unregistered MAC address, you can: • Contact your ISP and update the MAC address associated with your ISP service. • Clone or change the MAC address of the ASUS wireless router to match the MAC address of the previous networking device recognized by the ISP. • DHCP query frequency: Changes the DHCP Discovery...
-
Page 72: Dual Wan
4.3.2 Dual WAN Your ASUS wireless router provides dual WAN support. You can set the dual WAN feature to any of these two modes: • Failover Mode: Select this mode to use the secondary WAN as the backup network access. -
Page 73: Port Trigger
4.3.3 Port Trigger Port range triggering opens a predetermined incoming port for a limited period of time whenever a client on the local area network makes an outgoing connection to a specified port. Port triggering is used in the following scenarios: • More than one local client needs port forwarding for the same application at a different time. - Page 74 4. On the Trigger Port List table, key in the following information: • Description: Enter a short name or description for the service. • Trigger Port: Specify a trigger port to open the incoming port. • Protocol: Select the protocol, TCP, or UDP. •...
-
Page 75: Virtual Server/Port Forwarding
Forwarding on your router allows PCs outside the network to access specific services provided by a PC in your network. NOTE: When port forwarding is enabled, the ASUS router blocks unsolicited inbound traffic from the Internet and only allows replies from outbound requests from the LAN. - Page 76 3. On the Famous Server List field, select the type of service you want to access. 4. On the Famous Game List field, select the popular game that you want to access. This item lists the port required for your selected popular online game to work properly.
- Page 77 • You will need a client outside your LAN but has Internet access (referred to as “Internet client”). This client should not be connected to the ASUS router. • On the Internet client, use the router’s WAN IP to access the server.
-
Page 78: Dmz
4.3.4 DMZ Virtual DMZ exposes one client to the Internet, allowing this client to receive all inbound packets directed to your Local Area Network. Inbound traffic from the Internet is usually discarded and routed to a specific client only if port forwarding or a port trigger has been configured on the network. -
Page 79: Ddns
DNS name rather than WAN IP address. • Server and Host Name: Choose ASUS DDNS or other DDNS. If you want to use ASUS DDNS, fill in the Host Name in the format of xxx.asuscomm.com (xxx is your host name). -
Page 80: Nat Passthrough
• Enable wildcard: Enable wildcard if your DDNS service requires one. NOTES: DDNS service will not work under these conditions: • When the wireless router is using a private WAN IP address (192.168. x.x, 10.x.x.x, or 172.16.x.x), as indicated by a yellow text. • The router may be on a network that uses multiple NAT tables. 4.3.6 NAT Passthrough NAT Passthrough allows a Virtual Private Network (VPN) connection to pass through the router to the network clients. -
Page 81: Ipv6
4.4 IPv6 This wireless router supports IPv6 addressing, a system that supports more IP addresses. This standard is not yet widely available. Contact your ISP if your Internet service supports IPv6. To set up IPv6: 1. From the navigation panel, go to Advanced Settings > IPv6. 2. -
Page 82: Vpn Server
4.5 VPN Server VPN (Virtual Private Network) provides a secure communication to a remote computer or remote network using a public network such as the Internet. NOTE: Before setting up a VPN connection, you would need the IP address or domain name of the VPN server you are trying to access. To set up access to a VPN server: 1. -
Page 83: Firewall
4.6 Firewall The wireless router can serve as a hardware firewall for your network. NOTE: The Firewall feature is enabled by default. 4.6.1 General To set up basic Firewall settings: 1. From the navigation panel, go to Advanced Settings > Firewall >... -
Page 84: Keyword Filter
To set up a URL filter: 1. From the navigation panel, go to Advanced Settings > Firewall > URL Filter tab. 2. On the Enable URL Filter field, select Enabled. 3. Enter a URL and click the button. 4. Click Apply. 4.6.3 Keyword filter Keyword filter blocks access to webpages containing specified keywords. -
Page 85: Network Services Filter
3. Enter a word or phrase and click the Add button. 4. Click Apply. NOTES: • The Keyword Filter is based on a DNS query. If a network client has already accessed a website such as http://www.abcxxx.com, then the website will not be blocked (a DNS cache in the system stores previously visited websites). -
Page 86: Ipv6 Firewall
Destination IP, Port Range, and Protocol. Click the button. 6. Click Apply. 4.6.5 IPv6 Firewall By default, your ASUS wireless router blocks all unsolicited incoming traffic. The IPv6 Firewall function allows incoming traffic coming from specified services to go through your network. -
Page 87: Administration
4.7 Administration 4.7.1 Operation Mode The Operation Mode page allows you to select the appropriate mode for your network. To set up the operating mode: 1. From the navigation panel, go to Advanced Settings > Administration > Operation Mode tab. 2. -
Page 88: System
• Media Bridge: This setup requires two wireless routers. The second router serves as a media bridge where multiple devices such as Smart TVs and gaming consoles can be connected via ethernet. 3. Click Apply. NOTE: The router will reboot when you change the modes. 4.7.2 System The System page allows you to configure your wireless router settings. -
Page 89: Firmware Upgrade
Yes in the Only allow specific IP item. 3. Click Apply. 4.7.3 Firmware Upgrade NOTE: Download the latest firmware from the ASUS website at http://www.asus.com To upgrade the firmware: 1. From the navigation panel, go to Advanced Settings >... -
Page 90: Restore/Save/Upload Setting
4.7.4 Restore/Save/Upload Setting To restore/save/upload wireless router settings: 1. From the navigation panel, go to Advanced Settings > Administration > Restore/Save/Upload Setting tab. 2. Select the tasks that you want to do: • To restore to the default factory settings, click Restore, and click OK in the confirmation message. • To save the current system settings, click Save, navigate to the folder where you intend to save the file and click Save. -
Page 91: System Log
4.8 System Log System Log contains your recorded network activities. NOTE: System log resets when the router is rebooted or powered off. To view your system log: 1. From the navigation panel, go to Advanced Settings > System Log. 2. You can view your network activities in any of these tabs: • General Log • DHCP Leases • Wireless Log... -
Page 92: Utilities
ASUS/LiveUpdate/Release/Wireless/Rescue.zip • Windows Printer Utility v1.0.5.5 at http://dlcdnet.asus.com/pub/ ASUS/LiveUpdate/Release/Wireless/Printer.zip • The utilities are not supported on MAC OS. 5.1 Device Discovery Device Discovery is an ASUS WLAN utility that detects an ASUS wireless router device, and allows you to configure the wireless networking settings. To launch the Device Discovery utility: • From your computer’s desktop, click Start >... -
Page 93: Firmware Restoration
5.2 Firmware Restoration Firmware Restoration is used on an ASUS Wireless Router that failed during its firmware upgrading process. It uploads the firmware that you specify. The process takes about three to four minutes. IMPORTANT: Launch the rescue mode on the router before using the Firmware Restoration utility. -
Page 94: Setting Up Your Printer Server
5.3 Setting up your printer server 5.3.1 ASUS EZ Printer Sharing ASUS EZ Printing Sharing utility allows you to connect a USB printer to your wireless router’s USB port and set up the print server. This allows your network clients to print and scan files... - Page 95 NOTE: The print server function is supported on Windows® XP, Windows® Vista, and Windows® 7. To set up the EZ Printer sharing mode: 1. From the navigation panel, go to General > USB Application > Network Printer Server. 2. Click Download Now! to download the network printer utility.
- Page 96 4. Follow the onscreen instructions to set up your hardware, then click Next. 5. Wait a few minutes for the initial setup to finish. Click Next. 6. Click Finish to complete the installation.
- Page 97 7. Follow the Windows OS instructions to install the printer ® driver. 8. After the printer’s driver installation is complete, network clients can now use the printer.
-
Page 98: Using Lpr To Share Printer
5.3.2 Using LPR to Share Printer You can share your printer with computers running on Windows® and MAC operating system using LPR/LPD (Line Printer Remote/ Line Printer Daemon). Sharing your LPR printer To share your LPR printer: 1. From the Windows® desktop, click Start > Devices and Printers >... - Page 99 3. Select Create a new port then set Type of Port to Standard TCP/IP Port. Click New Port. 4. In the Hostname or IP address field, key in the IP address of the wireless router then click Next.
- Page 100 5. Select Custom then click Settings. 6. Set Protocol to LPR. In the Queue Name field, key in LPRServer then click OK to continue.
- Page 101 7. Click Next to finish setting up the standard TCP/IP port. 8. Install the printer driver from the vendor-model list. If your printer is not in the list, click Have Disk to manually install the printer drivers from a CD-ROM or file.
- Page 102 9. Click Next to accept the default name for the printer. 10. Click Finish to complete the installation.
-
Page 103: Download Master
5.4 Download Master Download Master is a utility that helps you download files even while your laptops or other devices are switched off. NOTE: You need a USB device connected to the wireless router to use Download Master. To use Download Master: 1. -
Page 104: Configuring Bit Torrent Download Settings
5. Use the navigation panel to configure the advanced settings. 5.4.1 Configuring Bit Torrent download settings To configure BitTorrent download settings: 1. From Download Master’s navigation panel, click Bit Torrent to launch the Bit Torrent Setting page. 2. Select a specific port for your download task. 3. -
Page 105: Nzb Settings
5.4.2 NZB settings You can set up a USENET server to download NZB files. After entering USENET settings, Apply. -
Page 106: Troubleshooting
1. Launch the Web GUI. Go to Advanced Settings > Administration > Firmware Upgrade tab. Click Check to verify if the latest firmware is available. 2. If the latest firmware is available, visit the ASUS global website at http://www.asus.com/Networks/Wireless_Routers/ RTAC87U/#download to download the latest firmware. - Page 107 SSID (wireless network name), encryption mehtod, and password are correct. Check if your network settings are correct. • Each client on the network should have a valid IP address. ASUS recommends that you use the wireless router’s DHCP server to assign IP addresses to computers on your network.
- Page 108 • Some cable modem service providers require you to use the MAC address of the computer initially registered on the account. You can view the MAC address in the web GUI, Network Map > Clients page, and hover the mouse pointer over your device in Client Status.
-
Page 109: Frequently Asked Questions (Faqs)
6.2 Frequently Asked Questions (FAQs) I cannot access the router GUI using a web browser • If your computer is wired, check the Ethernet cable connection and LED status as described in the previous section. • Ensure that you are using the correct login information. The default factory login name and password is “admin/admin”. Ensure that the Caps Lock key is disabled when you enter the login information. - Page 110 The client cannot establish a wireless connection with the router. NOTE: If you are having issues connecting to 5Ghz network, make sure that your wireless device supports 5Ghz or features dual band capabilities. • Out of Range: • Move the router closer to the wireless client. • T ry to adjust antennas of the router to the best direction as described in section 1.4 Positioning your router.
- Page 111 • SSID has been hidden. If your device can find SSIDs from other routers but cannot find your router’s SSID, go to Advanced Settings > Wireless > General, select No on Hide SSID, and select Auto on Control Channel. • If you are using a wireless LAN adapter, check if the wireless channel in use conforms to the channels available in your country/area.
- Page 112 Internet is not accessible. • Check if your router can connect to your ISP’s WAN IP address. To do this, launch the web GUI and go to General> Network Map, and check the Internet Status. • If your router cannot connect to your ISP’s WAN IP address, try restarting your network as described in the section Restart your network in following sequence under Basic Troubleshooting.
- Page 113 The following are the factory default settings: User Name: admin Password: admin Enable DHCP: Yes (if WAN cable is plugged in) IP address: 192.168.1.1 Domain Name: (Blank) Subnet Mask: 255.255.255.0 DNS Server 1: 192.168.1.1 DNS Server 2: (Blank) SSID (2.4GHz): ASUS SSID (5GHz): ASUS_5G...
- Page 114 Firmware upgrade failed. Launch the rescue mode and run the Firmware Restoration utility. Refer to section 5.2 Firmware Restoration on how to use the Firmware Restoration utility.
- Page 115 Cannot access Web GUI Before configuring your wireless router, do the steps described in this section for your host computer and network clients. Disable the proxy server, if enabled. Windows ® 1. Click Start > Internet Explorer to launch the browser.
- Page 116 MAC OS 1. From your Safari browser, click Safari > Preferences > Advanced > Change Settings... 2. From the Network screen, deselect FTP Proxy and Web Proxy (HTTP). 3. Cllick Apply Now when done. NOTE: Refer to your browser's help feature for details on disabling the proxy server.
- Page 117 3. To obtain the IPv4 IP settings automatically, tick Obtain an IP address automatically. To obtain the IPv6 IP settings automatically, tick Obtain an IPv6 address automatically. 4. Click OK when done. MAC OS 1. Click the Apple icon located on the top left of your screen.
- Page 118 Disable the dial-up connection, if enabled. Windows ® 1. Click Start > Internet Explorer to launch the browser. 2. Click Tools > Internet options > Connections tab. 3. Tick Never dial a connection. 4. Click OK when done. NOTE: Refer to your browser's help feature for details on disabling the dial-up connection.
-
Page 119: Notices
We believe in providing solutions for you to be able to responsibly recycle our products, batteries, other components, as well as the packaging materials. Please go to http://csr.asus. com/english/Takeback.htm for the detailed recycling information in different regions. - Page 120 This equipment generates, uses and can radiate radio frequency energy and, if not installed and used in accordance with the instructions, may cause harmful interference to radio communications. However, there is no guarantee that interference will not occur in a particular installation. If this equipment does cause harmful interference to radio or television reception, which can be determined by turning the equipment off and on, the user is encouraged to try to correct the interference by one or more of...
-
Page 121: Safety Information
Prohibition of Co-location This device and its antenna(s) must not be co-located or operating in conjunction with any other antenna or transmitter except in accordance with FCC multi-transmitter product procedures. Safety Information This equipment complies with FCC radiation exposure limits set forth for an uncontrolled environment. - Page 122 This equipment may be operated in AT, BE, CY, CZ, DK, EE, FI, FR, DE, GR, HU, IE, IT, LU, MT, NL, PL, PT, SK, SL, ES, SE, GB, IS, LI, NO, CH, BG, RO, RT. Canada, Industry Canada (IC) Notices This device complies with Industry Canada license-exempt RSS standard(s).
- Page 123 WARNING! • This radio transmitter (3568A-RT0M00) has been approved by Industry Canada to operate with the antenna types listed below with the maximum permissible gain and required antenna impedance for each antenna type indicated. Antenna types not included in this list, having a gain greater than the maximum gain indicated for that type, are strictly prohibited for use with this device.
- Page 124 Table for Filled Antenna Ant. Brand Model Name Antenna Connector Gain (dBi) Type 2.4GHz 5GHz 5GHz band 1 band4 RFDPA181300SBLB805 Dipole Reversed- 2.89 Antenna M.gear C660-510324-A Dipole Reversed- 3.33 Antenna M.gear C660-510331-A Dipole Reversed- 3.47 Antenna RFDPA181300SBLB805 Dipole Reversed- 2.89 Antenna M.gear C660-510324-A...
-
Page 125: Licensing Information
GNU General Public License Licensing information This product includes copyrighted third-party software licensed under the terms of the GNU General Public License. Please see The GNU General Public License for the exact terms and conditions of this license. We include a copy of the GPL with every CD shipped with our product. - Page 126 pieces of it in new free programs; and that you know you can do these things. To protect your rights, we need to make restrictions that forbid anyone to deny you these rights or to ask you to surrender the rights.
- Page 127 be distributed under the terms of this General Public License. The “Program”, below, refers to any such program or work, and a “work based on the Program” means either the Program or any derivative work under copyright law: that is to say, a work containing the Program or a portion of it, either verbatim or with modifications and/or translated into another language.
- Page 128 c) If the modified program normally reads commands interactively when run, you must cause it, when started running for such interactive use in the most ordinary way, to print or display an announcement including an appropriate copyright notice and a notice that there is no warranty (or else, saying that you provide a warranty) and that users may redistribute the program under these conditions, and telling the user how to view a copy of this License.
- Page 129 b) Accompany it with a written offer, valid for at least three years, to give any third party, for a charge no more than your cost of physically performing source distribution, a complete machine-readable copy of the corresponding source code, to be distributed under the terms of Sections 1 and 2 above on a medium customarily used for software interchange;...
- Page 130 modify or distribute the Program or its derivative works. These actions are prohibited by law if you do not accept this License. Therefore, by modifying or distributing the Program (or any work based on the Program), you indicate your acceptance of this License to do so, and all its terms and conditions for copying, distributing or modifying the Program or works based on it.
- Page 131 Many people have made generous contributions to the wide range of software distributed through that system in reliance on consistent application of that system; it is up to the author/ donor to decide if he or she is willing to distribute software through any other system and a licensee cannot impose that choice.
- Page 132 and reuse of software generally. NO WARRANTY 11 BECAUSE THE PROGRAM IS LICENSED FREE OF CHARGE, THERE IS NO WARRANTY FOR THE PROGRAM, TO THE EXTENT PERMITTED BY APPLICABLE LAW. EXCEPT WHEN OTHERWISE STATED IN WRITING THE COPYRIGHT HOLDERS AND/OR OTHER PARTIES PROVIDE THE PROGRAM “AS IS”...
- Page 133 For Turkey only Authorised distributors in Turkey: BOGAZICI BIL GISAYAR SAN. VE TIC. A.S. Tel. No.: +90 212 3311000 Address: AYAZAGA MAH. KEMERBURGAZ CAD. NO.10 AYAZAGA/ISTANBUL CIZGI Elektronik San. Tic. Ltd. Sti. Tel. No.: +90 212 3567070 Address: CEMAL SURURI CD. HALIM MERIC IS MERKEZI No: 15/C D:5-6 34394 MECIDIYEKOY/ ISTANBUL KOYUNCU ELEKTRONiK BiLGi iSLEM SiST.
-
Page 134: Asus Contact Information
Address 800 Corporate Way, Fremont, CA 94539, USA Telephone +15107393777 Fax +15106084555 Website usa.asus.com Online support support.asus.com ASUS COMPUTER GmbH (Germany and Austria) Address Harkort Str. 21-23, D-40880 Ratingen, Germany Support Fax +49-2102-959931 Website asus.com/de Online contact eu-rma.asus.com/sales Technical Support Telephone (Component) -
Page 135: Networks Global Hotline Information
Slovak Republic 00421-232162621 08:00-17:00 Mon-Fri Czech Republic 00420-596766888 08:00-17:00 Mon-Fri Switzerland-German 0041-848111010 09:00-18:00 Mon-Fri Switzerland-French 0041-848111014 09:00-18:00 Mon-Fri Switzerland-Italian 0041-848111012 09:00-18:00 Mon-Fri United Kingdom 0044-8448008340 09:00-17:00 Mon-Fri Ireland 0035-31890719918 09:00-17:00 Mon-Fri Russia and CIS 008-800-100-ASUS 09:00-18:00 Mon-Fri Ukraine 0038-0445457727 09:00-18:00 Mon-Fri... -
Page 136: Networks Global Hotline Information
Networks Global Hotline Information Region Country Hotline Numbers Service Hours Australia 1300-278788 09:00-18:00 Mon-Fri New Zealand 0800-278788 09:00-18:00 Mon-Fri Japan 09:00-18:00 Mon-Fri 0800-1232787 09:00-17:00 Sat-Sun 09:00-18:00 Mon-Fri 0081-570783886 ( Non-Toll Free ) 09:00-17:00 Sat-Sun Korea 0082-215666868 09:30-17:00 Mon-Fri Thailand 0066-24011717 09:00-18:00 Mon-Fri 1800-8525201 Singapore... - Page 137 00371-67408838 09:00-18:00 Mon-Fri Lithuania-Kaunas 00370-37329000 09:00-18:00 Mon-Fri Lithuania-Vilnius 00370-522101160 09:00-18:00 Mon-Fri NOTE: For more information, visit the ASUS support site at: http://support.asus.com ASUSTeK Computer Inc. Manufacturer: Tel: +886-2-2894-3447 Address: 4F, No. 150, LI-TE RD., PEITOU, TAIPEI 112, TAIWAN ASUS Computer GmbH...