
Related Manuals for Taurus TTA-11241


Summary of Contents for Taurus TTA-11241
- Page 1 375W BELT & DISC SANDER INSTRUCTION MANUAL MODEL NO.: TTA-11241 AFTER SALES SUPPORT: N 2 7 0 3 1300355255...
-
Page 3: Table Of Contents
Contents Warranty Know Your Product Technical Specifications Description of Symbols Contents of Carton General Safety Instructions Health Advice Additional Safety Instructions for Belt & Disc Sander Assembly Assembling Disc Guard Installing Sanding Disc Plate Assembling Sanding Disc to Disc Plate Installing Disc Guard with Dust Outlet Mounting the Worktable for use with the Disc Sander Mounting Belt Sanding Baffle... -
Page 4: Warranty
What your 1 year warranty means Great care has gone into the manufacture this Belt & Disc Sander and should therefore provide you with years of good service when used pr o per l y warranty period begins on the purchase date and is valid 1 year. -
Page 5: Know Your Product
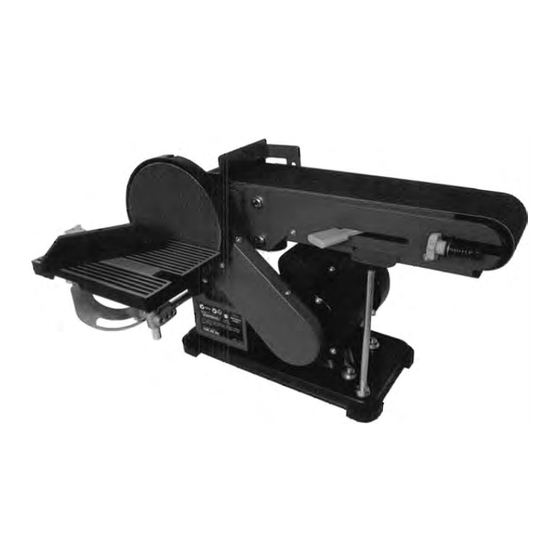
Know Your Product "ON" Switch Worktable "OFF" Switch 10. Mitre Gauge Upper Sanding Drum Guard 11. Bevel Gauge Belt Sanding Baffle 12. Table Tilting Lock Sanding Belt Knob Tracking Adjust Knob 13. Plastic Feet Belt Tension Lever 14. Dust Outlet Sanding Disc 15. -
Page 6: Technical Specifications
Technical Specifications Voltage: 230V - 50Hz Power Output: 3 7 5W Disc No Load Speed: 1,450 min-I Belt No Load Speed: 4.6m/s Disc Size: 150mm Table Size: 190x 125mm Belt Size: 100x914mm Worktable Tilt: 0- 45° Belt Tilt : 0- 90° Description of Symbols The rating plate on your tool may show symbols. -
Page 7: General Safety Instructions
General Safety Instructions WARNING! Read and u n der s tan d all i ns t u ct ion s Failure to follow all instructions listed below may result in electric shock, fire and/or serious injury. term "power tool" in all of the warnings below refers to your mains operated (corded) power tool or battery-operated (cordless) power tool. - Page 8 General Safety Instructions (Cont.) Personal Safety: Stay alert, watch what you are doing and use common sense when operating a · power tool. Do not use a power tool while you are tired or under the influence of drugs, alcohol or medication. A moment of inattention while operating power tools may result in serious pe r s nal injury.
-
Page 9: Health Advice
General Safety Instructions (Cont.) Power Tool Use and Care (Cont.): Maintain power tools. Check for misalignment or binding of moving parts, · breakage of parts and any other condition that may affect the power tool's operation. If damaged, have the power tool repaired before use. Many accidents are caused by poorly maintained power tools. -
Page 10: Additional Safety Instructions For Belt & Disc Sander
Additional Safety Instructions for Belt & Disc Sander operate your machine until it is completely assembled and installed • according to the instructions. If you are not thoroughly familiar with the operation of abrasive finishing machines, • obtain advice from your supervisor, instructor, or other qualified person. - Page 11 Replace missing, damaged or failed parts before resu ming operation. The use of attachments and accessories not recommended by Taurus may result in • the risk of injuries. WARNING: Some dust particles created by power sanding, sawing, grinding, ·...
-
Page 12: Assembly
Assembly Do not connect to power supply until assembly is complete. WARNING! Failure to comply could result in accidental starting and possible serious injury. Assembling Disc Guard (Fig. 1): Assemble disc guard • Fig.1 machine using three screws (b), and flat washers as shown. -
Page 13: Installing Disc Guard With Dust Outlet
Assembly (Cont.) Installing Disc Guard with Dust Fig.S Outlet (Fig. Position disc guard (i) against the • lower one-third of the disc, aligning four holes Ul as shown in Fig. 5. Using the four screws securely tighten • the disc guard into place. Mounting the Worktable for use with the Disc Sander (Fig. -
Page 14: Mounting Belt Sanding Baffle
Assembly (Cont.) Mounting Belt Sanding Baffle: Fig.8A Mount the washer as shown in Fig. • but do not fasten. Fix and tighten the screws on the • SB). upper sanding drum guard (Fig. Fasten the belt, lock washer and flat •... -
Page 15: Mounting The Worktable For Use With The Belt Sander
Assembly (Cont.) Mounting the Worktable for use Fig. lOA, with the Belt Sander (Fig Fig. lOB, Fig. 10C): To use the work table vertical • sanding: Disassemble the worktable: Loosen and remove the head screw • and the washer as shown in Fig. lOA. Loosen and remove the head screws •... -
Page 17: Adjustment
Adjustment WARNING! Before performing any adjustment, make sure the belt/disc sander is unplugged from the power supply and the switch is in the OFF position. Failure to note this warning could result in serious personal injury. Adjusting the Belt Tracking (Fig Fig.12 12):... -
Page 18: Adjusting The Worktable
Adjustment (Cont.) Adjusting the worktable (Fig. 14): You can adjust the height of the • worktable. Twist the screw with hex wrench as shown in Fig. 14. Operation Switch ON/OFF (Fig. 15): start machine, press • ON/OFF s itch to ON position "I"... -
Page 19: Mitre Sanding
Operation (Cont.) Mitre Sanding (Fig. 17): Fig.17 Use of a mitre gauge is recommended for sanding small end surfaces on the sanding disc. Set the desired mitre angle and keep it locked in position. Note: Always move the work piece '.. -
Page 20: Maintenance
Maintenance Remove the plug from socket before carrying adjustment, servicing or the supply maintenance. cord is damaged, it must be r e p l a c e d by available a special cord or assembly from manufacturer or its s e r v ic e a ge Replacing Sanding Belt: Pull the b e l t tension lever... - Page 21 Maintenance (Cont.) After using your tool, clean it completely and lubricate all sliding and moving parts. Apply a light coat of automotive type paste wax to the worktable to help keep the surfaces clean. Never use water or chemical cleaners to clean your power tool. Always store your power tool in a dry place.
-
Page 22: Notes
Notes After Sales Support Tel: 1300-355-255...
Need help?
Do you have a question about the TTA-11241 and is the answer not in the manual?
Questions and answers