Table of Contents
Advertisement
Quick Links
Advertisement
Table of Contents

Related Manuals for Craftex CT052


Summary of Contents for Craftex CT052
- Page 1 CT052 12” DOVETAIL JIG Manual...
-
Page 2: Table Of Contents
Table of Contents Introduction ..................3 Commentary ..................3 Important Safety Rules ................ 4 Features ....................5 Unpacking .................... 6 Assembly .................... 6 Hand Lever ..................6 Mounting ....................6 Capacities .................... 7 Preparation ..................7 Adjustment Locations ............... 8 Clamp Adjustment................ -
Page 3: Introduction
INTRODUCTION COMMENTARY Congratulations! You have purchased a jig Craftex is proud to offer the CT052 12" which will allow you to quickly and Dovetail Jig. It is suitable for production consistently produce one of the most runs as well as single use applications by recognized joints in woodworking -this sign enabling you to simultaneously cut 9/16"... -
Page 4: Important Safety Rules
Important Safety Instructions 1. KNOW YOUR POWER TOOL. Read the 10. WEAR PROPER APPAREL. Do not owner's manual carefully. Learn the tool's wear loose clothing, gloves. neckties, or applications and limitations, as well as its jewelry that might get caught in moving parts. -
Page 5: Features
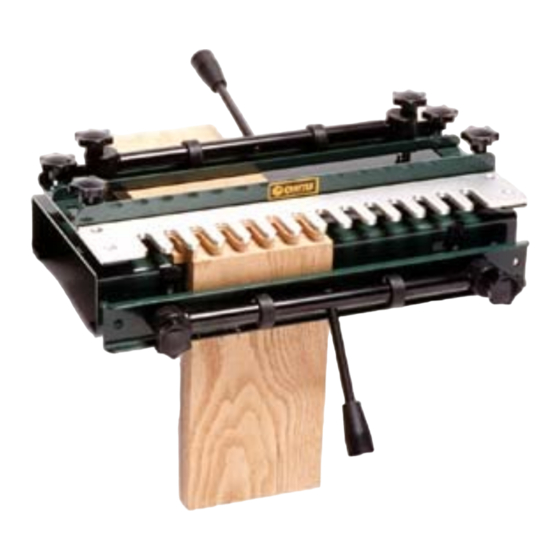
FEATURES MODEL CT052-12” Dovetail Jig As part of the growing line of Craftex woodworking equipment, we are proud to offer CT052- 12” Dovetail Jig. The Craftex name guarantees Craft Excellence. By following the instructions and procedures laid out in this owner’s manual, you will receive years of excellent service and satisfaction. -
Page 6: Unpacking
UNPACKING ASSEMBLY Carefully remove the items packed in the A. HAND LEVERS carton. It may be a good idea to save the carton and packing material in case it might be needed in the future. Upon removal of all The jig is shipped fully assembled except for items from the package, you should have: the two hand levers. -
Page 7: Capacities
CAPACITIES PREPARATION The CT052 is designed to produce half- It is important to plan your work before blind dovetail joints with a router. 7/16" starting. If joining multiple pieces for a guide bushing, and 14°, 1/2" dovetail router drawer or series of drawers, it is best to label bit. -
Page 8: Adjustment Locations
ADJUSTMENT LOCATIONS The CT052 Dovetail Jig has been designed The hand levers clamp your work-piece to accommodate various stock thicknesses place. and router base sizes. The jig can be used for production runs of similar parts after 2. The fence knobs hold the fence in setup is completed. -
Page 9: Clamp Adjustment
CLAMP ADJUSTING SIDE STOP SET UP The clamping pressure should be adjusted The side stops serve three purposes: 1) so the work-piece can be easily slid under they position each work-piece square to the bar when the hand lever is up. Push the each other, 2) they offset the two work hand lever down to hold the work-piece in pieces for proper alignment, and 3) they... - Page 10 4. Adjust the height so the end of the 12. Replace the front cam clamping system. vertical board overlaps the end of the horizontal board. It is not crucial that the pieces be flush, yet. NOTE: The dovetail jig is capable of processing two sets of joints at one time if 5.
-
Page 11: Template Adjustment
TEMPLATE ADJUSTMENT The template is adjustable from front to NOTE: Ensure that the front edge of the back so that the joint will be hidden when template is parallel to the edge of the the dovetails are complete. Adjustment is vertical work-piece. -
Page 12: Fence Adjustment
FENCE ADJUSTMENT Measure the distance from the edge of the The fence controls the depth of the dovetail router base to the edge of the guide pins by limiting the distance that the router bushing and add it to the distance you travels. -
Page 13: Operations
OPERATIONS A. REGULAR USE Your router base must accept a guide To use the dovetail Jig: bushing with a 7/16” outside diameter and an inside diameter large enough to 1. Start with joint 1 that you set up in accept 1/4”... - Page 14 OPERATIONS 3. The router base and bit must be secure Use care when the router bit exits the before plugging in your router. Hold the work-piece to reduce the risk of tear- router firmly with both hands and support it out.
-
Page 15: Rabbeted Drawer Fronts
OPERATIONS 3. Since the side piece is unsupported by B. RABBETED DRAWER FRONTS the front piece (the rabbet created a void behind the side piece), it is likely that the Drawer fronts that have been rabbeted router bit will cause tear out each time' the around the inside edge to create a lip to bit exits the side piece. -
Page 16: Troubleshooting
TROUBLESHOOTING TEAR-OUT INCOMPLETE FIT When cutting across the grain of the wood, An incomplete fit occurs when the side tear-out or splintering may occur when the piece protrudes from the end of the front or router bit exits the work-piece. To prevent back piece. -
Page 17: Offset Edges
TROUBLESHOOTING OFFSET EDGES UNEVEN FIT If the side piece edge is not aligned with the If the side piece fits either excessively or front or back piece edge, the edges are protrudes at on edge and not the other, the offset. -
Page 18: Parts Breakdown
CT052 Dovetail Jig Parts Breakdown... -
Page 19: Parts List
CT052 Dovetail Jig Parts List... -
Page 20: Warranty
This warranty shall not apply to consumable products such as blades, bits, belts, cutters, chisels, punches etceteras. Craftex shall in no event be liable for injuries, accidental or otherwise, death to persons or damage to property or for incidental contingent, special or consequential damages arising from the use of our products.
Need help?
Do you have a question about the CT052 and is the answer not in the manual?
Questions and answers