Logitech Harmony 1100 User Manual
Advanced universal remote
Hide thumbs
Also See for Harmony 1100:
- User manual (48 pages) ,
- User manual (31 pages) ,
- Remote repair (2 pages)
Table of Contents
Advertisement
Advertisement
Table of Contents

Subscribe to Our Youtube Channel
Related Manuals for Logitech Harmony 1100


Summary of Contents for Logitech Harmony 1100
- Page 1 User User Manual Manual Version 1.0 Version 1.0...
-
Page 2: Table Of Contents
Using the Help button ...11 Controlling your devices individually ...12 Charging your remote ...12 Setting up your Harmony 1100 for the fi rst time ...13 Overview of the setup process ...13 Creating your user account ...14 Connecting your Harmony 1100 to your computer ...14 Setting up the devices you want to control ...15... - Page 3 Changing the order of Activities on your Harmony 1100 screen ...22 Setting up your favorite channels ...22 Changing how buttons work in an Activity ...23 Adding custom-labeled buttons to an Activity ...23 Adding a slideshow to your Harmony 1100 screen ...24 Viewing a slideshow on your Harmony 1100 screen ...24...
- Page 4 Finding answers to questions ...41 Getting help with your online setup ...41 Using the On-Remote Help ...42 Logitech’s Harmony Remote user forums ...42 Appendix A - Device Information ...43 Appendix B - Glossary ...44 Appendix C - Product Specifi cation ...47...
-
Page 5: Introduction
Remote Software, you can configure the Harmony 1100 to control up to 15 devices. When you pair the Harmony 1100 with the optional RF Wireless Extender, you can control up to When you pair the Harmony 1100 with the optional RF Wireless Extender, you can control up to eight components that are out of sight, for example, in a cabinet or in another room. -
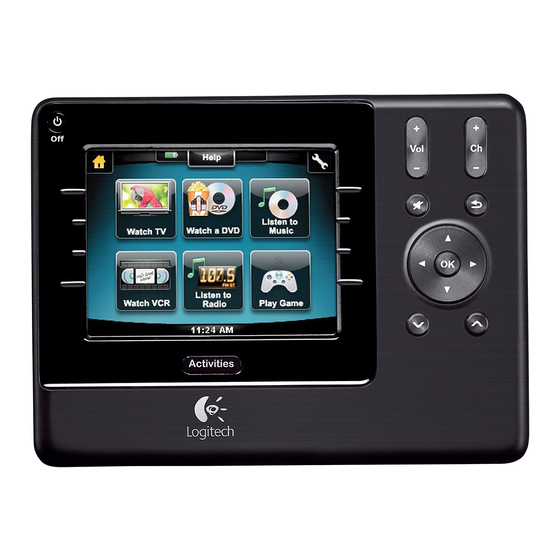
Page 6: The Buttons On Your Harmony 1100
The buttons on your Harmony 1100 The Harmony 1100 buttons can have different functions or control different devices, The Harmony 1100 buttons can have different functions or control different devices, depending on which Activity you’re in. For example, when you watch a DVD, the depending on which Activity you’re in. -
Page 7: Navigation Icons
Navigation icons The navigation icons are displayed in the corners of the LCD screen. Different icons are displayed, The navigation icons are displayed in the corners of the LCD screen. Different icons are displayed, depending on which screen you are in. Pressing the icon takes you to the desired screen. depending on which screen you are in. -
Page 8: What's On The Harmony 1100 Screen
Each channel can have its own custom icon to make it easier Each channel can have its own custom icon to make it easier to recognize. Just press the button and the Harmony 1100 will to recognize. Just press the button and the Harmony 1100 will change to the desired channel for you. - Page 9 Status icons Status icons The status indicator flashes whenever an IR command is being sent from your Harmony 1100. The status indicator flashes whenever an IR command is being sent from your Harmony 1100. The battery indicator shows the battery level or charging status. To ensure your Harmony The battery indicator shows the battery level or charging status.
-
Page 10: Using Your Harmony 1100
To select a new Activity, press the Activities button, and then select the Activity you want to enjoy. The Harmony 1100 takes care of powering on the needed devices, and powering off the ones not needed. Turning off your devices Press the system off button to power off all the devices used in an Activity. -
Page 11: Using The Help Button
Using the Help button When you start an Activity, the Harmony 1100 sends out commands to turn your devices on and sets them to the right input. However, if someone walks between your Harmony 1100 and the TV when you press Watch TV, or you’re too far away from the system when you start an Activity, or the remote isn’t aimed at your entertainment system, the... -
Page 12: Controlling Your Devices Individually
Once you’ve fi nished, return to Activities for optimal control of your entertainment system. Charging your remote Your Harmony 1100 comes with a charging station. The charging station plugs into a wall outlet and charges the battery every time you put the remote on it. -
Page 13: Setting Up Your Harmony 1100 For The Fi Rst Time
Setting up your Harmony 1100 for the fi rst time Overview of the setup process When you insert the Harmony remote CD in your computer, the guided online setup launches. Follow the easy setup instructions to install the Harmony Remote Software. For more information on installing the Harmony Remote Software, refer to the Installation Guide. -
Page 14: Creating Your User Account
Connecting your Harmony 1100 to your computer To connect your Harmony 1100 to your PC, use the USB cable provided. Remove your Harmony 1100 from the charging station. Connect the smaller end of the cable to the USB port on your remote. -
Page 15: Setting Up The Devices You Want To Control
Setting up the devices you want to control The guided online setup asks you to enter your device information. Enter the information for all the entertainment components you want to control with your Harmony 1100. You should use the Device Worksheet setup process. -
Page 16: Updating The Remote
After you enter your device and Activity information, the software saves your information. It also transfers the information to your Harmony 1100. After the software updates your remote, you’re ready to test your setup. For specifi c details about testing... -
Page 17: Testing Your Setup
Testing your setup Every time you update your Harmony 1100, you should test your remote to make sure it’s working the way you expect. This chapter gives you the information you need to test your remote. It also has some suggestions on what to check while you’re testing your setup. -
Page 18: Changing Your Setup
Whether you get a new device or want to change the behavior of some buttons, you may need to make changes to your Harmony 1100 setup. The following sections provide you with the information to help you with these tasks. -
Page 19: Adding An Extra Device (Passthrough) To An Activity
Adding an extra device (passthrough) to an Activity A passthrough device is a device that you add to your system that a signal passes through unaltered. For example, if you use your DVD recorder (or VCR) to record shows from your satellite or set top box, you may need to add your DVD recorder as a passthrough device. -
Page 20: Customizing The On-Remote Help
Follow the online instructions. Controlling the Remote Assistant The Harmony 1100 Remote Assistant guides you through starting Activities. It also gives you more information about the status of your remote and the Activity you selected. For example, when you select the Watch TV Activity, the Remote Assistant asks you if the TV is on and if the other devices in the Activity are confi... -
Page 22: Customizing Your Harmony 1100
Customizing your Harmony 1100 You can customize your Harmony 1100 to make the screen look and act the way you want. Renaming an Activity There may be times when you may want to rename an Activity to something that is more meaningful for you. -
Page 23: Changing How Buttons Work In An Activity
Adding custom-labeled buttons to an Activity If you want a button to do something specifi c, or if there’s a function on your device’s original remote that’s not on the Harmony 1100, you can create your own buttons that appear on the Harmony 1100 screen. -
Page 24: Adding A Slideshow To Your Harmony 1100 Screen
10 characters or less. Adding a slideshow to your Harmony 1100 screen You can use your own pictures or images to create a slideshow on your Harmony 1100. To add a slideshow to your Harmony 1100, from the Harmony Remote Software:... -
Page 25: Changing The Backlight Settings
Changing the backlight settings The Harmony 1100 senses when you pick it up, and lights up the display and buttons. To set the length of time the backlight stays on, change the color of the backlight, or change the brightness level of the backlight, from your Harmony remote screen:... -
Page 26: Adding Additional Features To Your Harmony 1100
Adding additional features to your Harmony 1100 It’s possible that a device’s commands are not recognized by your Harmony 1100. Maybe you have a very rare device? Or a new one? Although we update our device list regularly, there are always new devices in the market. To remedy this, you can teach your Harmony remote how to control this device by using the device’s original remote. -
Page 27: Types Of Delays Or Speed Settings
(for example, InputAux, InputVideo1, InputTape, InputDVD Types of delays or speed settings If your device doesn’t react to a command from the Harmony 1100, it may be because the delay setting needs to be adjusted. By default, different devices take different amounts of time to react to a command from a remote control. -
Page 28: Adjusting The Delay Between Ir Commands (Speed Settings)
TV, you can change the delay time for a device that is reacting too slowly. The Harmony 1100 uses several different delays to control your devices. For more information on which delay you need to adjust, see... -
Page 29: Maintaining Your Harmony 1100
After you fi nish making any changes to your Harmony 1100 confi guration, you should test the new setup to ensure everything is working the way you expect. This testing process is the same as the one you did when you set up your Harmony 1100 for the fi rst time. -
Page 30: Troubleshooting Problems With Your Harmony 1100
Activity is set up to use the correct input your TV needs to be set on to get a picture. Next, check that the inputs are in the correct order for the Harmony 1100 to know how to cycle through each input. If you’re still experiencing trouble, try raising the Device and Input Delays for your TV. - Page 31 The On Demand command isn’t on the Harmony 1100 for the Watch TV Activity. • You can map the command to any unused button on the Harmony 1100 or on the remote’s screen. The command is likely in our database, but wasn’t mapped to the Activity. If we’re missing the command, the Harmony 1100 can learn it from your original remote.
-
Page 32: Figuring Out Which Inputs Your System Uses
Figuring out which inputs your system uses One of the most important parts of creating Activities for your Harmony remote is determining which inputs your system uses for each device. This chapter gives you some suggestions on how to fi gure out which inputs your entertainment system uses if you’re not sure. -
Page 33: Step 1- Turn On All Your Devices
(Option 1). Step 1— Turn on all your devices To determine which devices are using which inputs, Logitech recommends you start by turning on all the devices in your entertainment system. If possible, you should even start playing something in your DVD player, CD player, VCR, etc. -
Page 34: Step 2 - Watch The Tv
Step 2 — Watch the TV In this step, you must use your TV’s original remote control to switch between inputs. Using your TV’s original remote, select each input one-at-a-time. For each input, note which device appears to be connected to that input. For example, if you switch to VIDEO 1 and see your DVD playing, you know your DVD player is connected to VIDEO 1. -
Page 35: Rf Wireless Extender
RF Wireless Extender The RF Wireless Extender extends the range of your Harmony remote so that you can control devices that are not in plain view. For example, you can put the components of your entertainment system inside a cabinet and close the door and still be able to turn them on and off, or you can turn on a component that is located in a different room. -
Page 36: Setting Up The Rf Wireless Extender
Extender. Click Next. Click Done. Note: Logitech recommends that you use the RF Wireless Extender to control a device whenever possible because it preserves the on/off state of the devices. Remote Settings tab. Remote Settings tab. Wireless Extender. “Now it’s time to test... -
Page 37: Controlling A Device With The Rf Wireless Extender
Controlling a device with the RF Wireless Extender If you set the RF Wireless Extender to control a device, the following events occur when you select an Activity: The remote sends radio frequency (RF) signals to the RF Wireless Extender. The RF Wireless Extender converts the RF signals to infrared (IR) signals. -
Page 38: Installing The Rf Wireless Extender
5 metres and have a direct line of sight with the RF Wireless Extender. Logitech recommends that you make sure all of your devices are working properly before installing the RF Wireless Extender. -
Page 39: Attaching The Emitters
Attaching the emitters To attach the emitters: Locate the area on the device where the signals are received. Attach an emitter directly to this area, or if you do not want to place the emitter on the device, attach it to a surface above, below, or in front of this area on the device. -
Page 40: Assigning A Device To A Specifi C Port On The Rf Wireless Extender
Assigning a device to a specifi c port on the RF Wireless Extender You can assign a device to a specifi c port on the RF Wireless Extender. This allows multiple identical devices to be controlled independently from just one RF Wireless Extender. -
Page 41: Getting Help With Your Harmony Remote
Provides instructional help to guide you through a series of Software question-and-answer steps to accomplish a task. FAQs (Frequently A searchable list of customer questions with answers provided by Asked Questions) the Harmony 1100 support center. More Help button Provides specifi c online help for the page you’re on. -
Page 42: Using The On-Remote Help
Harmony remote to re-synchronize it with your entertainment system. See Using the Help button. Logitech’s Harmony Remote user forums You can also access the user forums to see what other users like you’re discussing. Simply go to http://forums.logitech.com/. -
Page 43: Appendix A - Device Information
HDTV 10A, etc. Once you have gathered all of your information, take this worksheet to your computer and continue with the Setup software. © Copyright 2006 Logitech or its licensors. All rights reserved. Model Number Tip Center How to Find Model Numbers... -
Page 44: Appendix B - Glossary
Appendix B - Glossary Amplifi er Anamorphic views Aspect ratio A/V switch DLP® (Digital Light Processing) DVD recorder (DVR) HDTV (High Defi nition Television) Light controller Mini-system NTSC (National Television System(s) Committee) Output Device PAL (Phase Alternating Line) A stereo component that outputs to speakers, and increases the gain or level of an audio signal. - Page 45 Passthrough Personal Video Recorder (PVR) Pre-amplifi er Pre-amp Sound Processing Receiver RF (Radio Frequency) RF Wireless Extender SACD (Super Audio CD) Satellite Radio SDTV Standard Defi nition Television A device that routes video or audio from one device to another device.
- Page 46 Stereo receiver Tuner Power strip Also referred to as a tuner or a receiver. A stereo receiver is any component that receives or tunes, broadcast signals, or AM/FM radio. Typically refers to the single component that includes a preamplifi er, surround processor, multi-channel amplifi er, and AM/FM tuner.
-
Page 47: Appendix C - Product Specifi Cation
Appendix C - Product Specifi cation LCD Size LCD Resolution LCD Screen Touch Screen Technology Power Source Power Type Brands Supported Devices Supported Maximum number of devices per account Backlit keypad Backlight Color IR Learning IR Transmitters IR Transmission Range Weight Dimensions Supported Platforms... - Page 48 © 2008 Logitech Inc. All rights reserved. Logitech's trademarks are either registered trademarks or trademarks of Logitech in the US and other countries. All other trademarks are the property of their respective owners.
Need help?
Do you have a question about the Harmony 1100 and is the answer not in the manual?
Questions and answers