Table of Contents
Advertisement
Advertisement
Table of Contents

Related Manuals for Audix RAD-360


Summary of Contents for Audix RAD-360
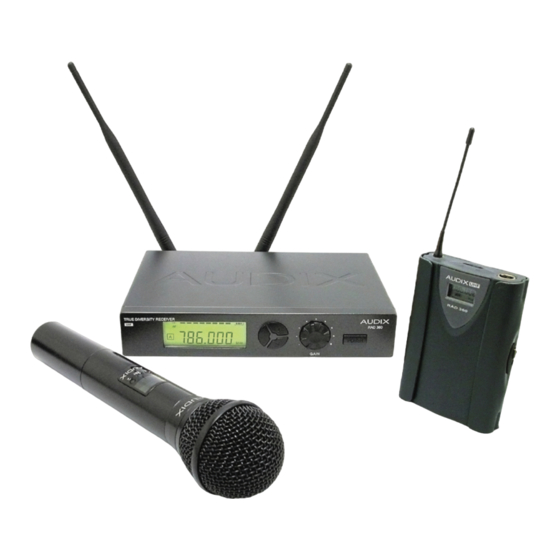
- Page 1 RAD-360 True Diversity Wireless Microphone System Thank you for choosing the Audix RAD-360! This product was designed to provide you with many years of reliable service. Please read this manual before using the system to familiarize yourself with its operation.
-
Page 2: Table Of Contents
Table of Contents Introduction........... .2 Types Of Transmitters . -
Page 3: Introduction
Bodypack. These include; a lavaliere (also known as a lapel mic), a headset mic, and a clip-on mic for saxophone or brass instruments. An adapting cable is available for use with guitar or bass. Audix has all of these options available. -
Page 4: Frequency Groupings
5. Do not expose the units to excessive moisture or submerge them in water 6. If it becomes necessary to clean your RAD-360 System, use a clean damp cloth for this purpose. Do not use cleaning agents or solvents. -
Page 5: Unpacking
6. (1) Padded carrying case 7. (1) 1/4" - 1/4" audio patch cable 8. (1) Screwdriver for changing settings on the Bodypack Once you have verified each of these components is present, you are ready to begin the installation of your RAD-360 System. -
Page 6: Description Of Receiver
Description of RAD-360 Receiver (front) Front Panel: 1. LCD Display Screen: Displays status of both Transmitter and Receiver including Channel, RF level, Audio Level, and Battery life. 2. SET button: This button is used to change and store settings. 3. UP button: Changes parameter “up” or increase 4. - Page 7 Description of RAD-360 Receiver (back) Back Panel: 7. STRAIN RELIEF for power cable: Prevents power cable from being pulled out. 8. POWER PLUG input: Always use included power supply. Use of any other power supply other than the one provided may damage your unit and void your warranty.
-
Page 8: Description Of Handheld Transmitter
Description of RAD-360 Handheld Transmitter 1. LCD Display Screen: Displays status of transmitter including Channel and Battery Life. 2. DOWN button: Changes parameter “down” or decrease. 3. SET button: This button is used to change and store settings. 4. UP button: Changes parameter “up” or increase. -
Page 9: Description Of Bodypack
Description of RAD-360 Bodypack Transmitter Back Front 1. Antenna Battery Compartment 2. Power switch 3. LCD Display Screen: Displays status of transmitter including Channel and Battery Life. 4. Mic or guitar cable connector 5. UP button: Changes parameter “up” or increase. -
Page 10: Setting Up The Receiver
Setting up the Receiver Connecting Power: Begin by looping POWER CABLE through STRAIN RELIEF (fig. 1). This will prevent cable from being pulled from socket during operation. Plug POWER CABLE into POWER SOCKET (fig. 2). Connect to power source. fig. 1 fig. -
Page 11: Connecting The Receiver
Connecting the Receiver: The Audix RAD 360 features balanced and unbalanced outputs to allow you to connect it to a wide variety of audio and instrument sound systems: P. A. Application: Connect the audio output of the RAD 360 Receiver to the audio input of your PA system using a balanced (XLR) or unbalanced (1/4") cable (not included). -
Page 12: Battery Installation
Battery Installation The RAD-360 transmitters require (2) AA batteries to operate. Please observe the polarity markings in the compartment to ensure proper operation. Always use batteries of the same make and age to prevent possible damage to the transmitters. Handheld battery installation: Unscrew base of hand- held and remove sleeve, exposing battery compartment. -
Page 13: Setting The Frequency On The Receiver
Setting the Frequency on the RAD-360 Receiver 1. Power the system up. From the startup screen, press and hold the SET button until you see the word “FREQUE”. 2. Use the UP and DOWN buttons to set the desired frequency. -
Page 14: Setting The Frequency On The Handheld Transmitter
Setting The Frequency on the RAD-360 Handheld Transmitter 1. From the startup screen, press and hold the SET button until you see the word “FREQUE”. Be patient as it will take approximately 2 seconds for this function to trigger. The “MHz” in the upper right hand corner of the display will start to blink. -
Page 15: Setting The Frequency On The Bodypack
Setting The Frequency on the RAD-360 Bodypack Transmitter 1. From the startup screen, press and hold the SET button until you see the word “FREQUE”. The “MHz” in the upper right hand corner of the display will start to blink. -
Page 16: Locking/Unlocking The Receiver
Locking/Unlocking RAD-360 Receiver Locking the receiver will prevent changes to the settings. 1. Press and hold the UP button until you see the words “LOC ON”. Once the unit is locked, you will not be able to change parameters or power down until the unit is unlocked. -
Page 17: Locking The Handheld Transmitter
Locking the RAD-360 Handheld Transmitter 1. From the startup screen, press and hold the SET button until you see the word “FREQUE”. 2. Press SET once again and you will see “SENSIT” on the display. 3. Press SET again to display “LOCOFF”. Press the Up button to set it to “LOCON”... -
Page 18: Unlocking The Handheld Transmitter
Unlocking the RAD-360 Handheld Transmitter 1. From the startup screen, press and hold the SET button until you see “LOCON”. 2. Press the Down button to change to “LOCOFF”. 3. Press SET to store. -
Page 19: Locking/Unlocking The Bodypack
Locking/Unlocking the RAD-360 Bodypack Transmitter 1. Press and hold the UP button until you see the words “LOC ON”. To unlock, press and hold the UP button until you see the words “LOC OFF”. -
Page 20: Adjusting Sensitivity On The Handheld Transmitter
Adjusting the Sensitivity on the RAD-360 Handheld Transmitter The RAD-360 Handheld features adjustable sensitivity to increase/decrease the output stage of the microphone. This helps to improve gain before feedback and to prevent overloading the mixer/preamp. 1. From the startup screen, press and hold the SET button until you see the word “FREQUE”. -
Page 21: Adjusting Sensitivity On The Bodypack
Audix supplies a miniature screwdriver for the purpose of changing the gain and pad settings. Please note that Audix ships the bodypack transmitter with the pad at “0” (zero) and the gain at the 12:00 o’clock position. -
Page 22: Using The Bodypack
3. Horn/sax microphone 4. Guitar/Bass Cable Audix uses a common mini 3-pin XLR(f) connector to connect the microphone cable to the Bodypack. The following information will instruct you on how to connect the microphone to the Bodypack and achieve the best performance from the microphone: 1. - Page 23 #1. Do not wrap the microphone cord around the Bodypack as this will eventually damage the wires and connectors. If you are not going to be using the Bodypack for a length of time, Audix recommends that the batteries should be removed from the unit.
-
Page 24: Using The Scan Feature On The Receiver
Using the Scan Feature on the RAD-360 Receiver To simplify setup, The RAD-360 is equipped to scan for working transmitters so that one person can easily setup the system, even at a distance. 1. From the startup screen, press and hold the SET button until you see the word “FREQUE”. -
Page 25: Battery Life Indicators
Battery Life Indicators The Audix RAD-360 wireless system features a battery indicator display on both the transmitter and receiver. The following guide will help you determine the length of time the system will operate until the batteries need replace- ment. This is only a guide as different batteries and conditions may cause variations. -
Page 26: Performance Tips
2) The Audix RAD-360 you have purchased is a true diversity system; inside the receiving unit there are separate receivers for each antenna. The system automatically silently switches back and forth between the two receivers to pick the one that has the best signal and sends that to the output jack. - Page 27 -6dB, -12dB, and -24dB. This is to give you the best gain before feedback, and also avoid overloading your amp or mixer. Audix ships the RAD 360 systems at a -12dB position. For a particularly strong vocalist or speaker, it may be necessary to "pad" the mic to -30 dB. This feature may also be useful in a particularly noisy environment.
-
Page 28: Troubleshooting
Either move the transmitter closer to the receiver or remote your antennas closer to the transmitter. As noted above, these are some common problems. If you find other questions regarding troubleshooting that are not answered here, please contact your Audix representative for assistance at 1-800-966-8261. -
Page 29: Specifications
specifications Frequency Range 614 MHz - 662 MHz (USA) 782 MHz - 814 MHz (EXPORT) Switchable Frequencies 193 (per system group of 24 MHz spaced .125 Hz apart) Freq Response 40 Hz–18 kHz (depending on capsule) Signal To Noise Ratio >110dB Compander System Pilot Tone... -
Page 30: Supplied Accessories
Supplied Accessories ANT1 3/4 Wave UHF whip antenna (2) PS-110R DC power supply (PS 230R 230v DC, 12V–350 milliamp) CASE-360A Zippered carrying case MC-360T Microphone clip for handheld transmitter Optional Accessories Rack mount kit for 1 -R360 Rack mount kit for 2 -R360 CBL-RM1 3' antenna extension cable with BNC connectors RAD-ADS4... - Page 31 Measurements Measurement in Millimeters...
- Page 32 CALL: 503-682-6933 • FAX: 503-682-7114 • www.audixusa.com Specifications subject to change without notice. Audix Corporation PO Box 4010, Wilsonville, OR 97070 . In Canada, Cabletek Electronics LTD, 604-942-1001 fax 604-942-1010 ®Audix Corporation 2010. All rights reserved. Audix and the Audix logo are trademarks of Audix Corporation.
Need help?
Do you have a question about the RAD-360 and is the answer not in the manual?
Questions and answers