Table of Contents
Advertisement
Quick Links
超音波研磨装置 / UltraSonic Polisher
取 扱 説 明 書 / OPERATION MANUAL
目 次
1 .
安全上の注意・表示について ・・・・・・・・・・・ P
2 .
仕 様 ・・・・・・・・・・・・・・・・・・・・・・・・・・・・・・・ P
3 .
各部の名称 ・・・・・・・・・・・・・・・・・・・・・・・・・・・ P
4 .
使用前の準備 ・・・・・・・・・・・・・・・・・・・・・・・・・ P
5 .
工具の交換方法 ・・・・・・・・・・・・・・・・・・・・・・・ P
6 .
操作方法 ・・・・・・・・・・・・・・・・・・・・・・・・・・・・・ P
7 .
保護回路について ・・・・・・・・・・・・・・・・・・・・・ P
8 . 超音波仕上げ作業の要点 ・・・・・・・・・・・・・・・ P 9
9 . ヒューズの交換方法 ・・・・・・・・・・・・・・・・・・・ P10
10. 操作パネルの設定方法 ・・・・・・・・・・・・・・・・・ P11
11. シンボル ・・・・・・・・・・・・・・・・・・・・・・・・・・・・・ P11
12. テストホーンを使用した簡易的な振動確認方法 ・・ P12
13. 故障の原因と対策 ・・・・・・・・・・・・・・・・・・・・・ P13
2
3
4
6
7
8
9
・・・・・・・・・・・・・・・・・・・・・・・・・・・ P
OM-K0517 001
CONTENTS
・・・ P
・・・・ P
・・・・・・・・・・・・・・・ P
・・・・・・・・ P
・・・・・・・・ P
・・・・・・・・・ P
・・・・・・・・・・・・・・ P
・・・ P
・・・・・・・・・・・・・・・・・・ P
・・・・ P
・・・・・・・・・・・・・・・・ P
16
18
18
22
23
24
24
25
26
27
27
・・ P
28
29
Advertisement
Table of Contents

Related Manuals for Nakanishi Sheenus neo

Summary of Contents for Nakanishi Sheenus neo
-
Page 1: Table Of Contents
超音波研磨装置 / UltraSonic Polisher 取 扱 説 明 書 / OPERATION MANUAL OM-K0517 001 目 次 CONTENTS 安全上の注意・表示について ・・・・・・・・・・・ P 1 . CAUTIONS FOR HANDLING AND OPERATION ・・・ P 仕 様 ・・・・・・・・・・・・・・・・・・・・・・・・・・・・・・・ P 2 . SPECIFICATIONS AND DIMENSIONS ・・・・ P 3 . COMPONANT NAMES 各部の名称... -
Page 2: Cautions For Handling And Operation
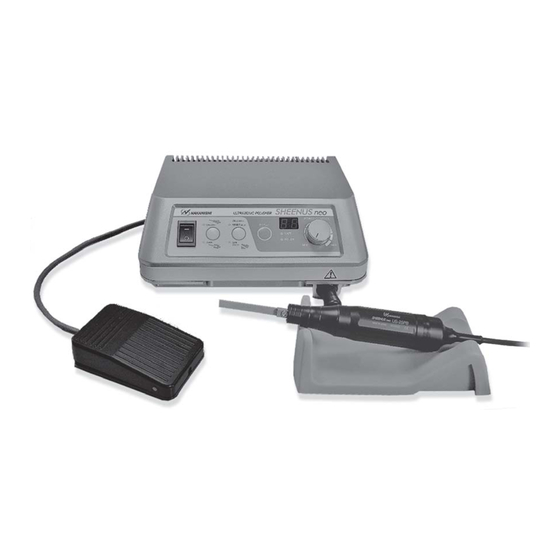
Thank you for purchasing the Ultrasonic Polisher SHEENUS neo. This product is designed for grinding, polishing, and mirror finishing on a wide range of materials from aluminum dies to cemented carbide dies. And has a wide variety of finishing tools such as diamond stone, diamond file, ceramic stone and wooden lapping tools. - Page 3 If the control unit is disassembled, electric shock may occur from high voltage areas on internal circuit boards. If the Control Unit is tampered with, warranties may be voided. Service must be performed by NSK NAKANISHI or an authorized service center.
-
Page 4: Specifications And Dimensions
Be sure to only use with Power Supply Cord of the standard accessories. Using a non-specified Power Supply Cord, the risk of fire by over-heating of the cord is possible. If damage to the Power Supply Cord, return to NAKANISHI dealer service for servicing / repair. ②... -
Page 5: Componant Names
2 - 2 Handpiece Model US-25PB Oscillator PZT piezoelectric type Cord length Weight 140g (excluding cord) 2 - 3 Standard Accessories Standard Accessories ・ Power Cord (2m)・・1pc. ・ Foot Switch (FC-24)・・1pc. ・ Wrench (10mm)・・2pc. ・ Allen Wrench (2.5mm)・・1pc. ・ Fuses ・... - Page 6 3 - 2 Front of Control Unit (NE240) ⑥ ON / OFF Switch ⑦ DISPLAY Switch ⑤ UNCLAMP / CLAMP Switch ⑧ Display ④ Main Power Switch ⑨ Power Control Knob ⑩ Receptacle for Connecting Handpiece Fig.2 ④ Main Power Switch ON / OFF Main Power Source.
- Page 7 3 - 3 Rear of Control Unit ⑪ Socket for ⑫ Inlet with Power Foot Switch Supply Fuses Fig. 3 ⑪ Socket for Foot Switch Connect the Plug of Foot Switch ③. ⑫ Inlet with Power Supply Fuses Insert the Power Cord here. Two Fuses are possible (for AC120V : T1.6AH, for AC230V…T1AH 250V).
-
Page 8: Preparation Before Use
4 . PREPARATION BEFORE USE The Test Horn ⑭ comes with the Handpiece ② . Remove the Protector Sleeve ⑬ and unscrew the Test Horn ⑭ using the two wrenches provided. ⑬ Protecter ⑭ Test Horn Sleeve Fig. 5 Insert the output plug of the Hand-piece into ④... -
Page 9: Attachment Of The Tool
5 . ATTACHMENT OF THE TOOL 5 - 1 Attachment of One-Piece Tools ⑯ , Tip Holders ⑮ and M4 Screw Joint Adapter ⑰ Attach the Tip Holders ⑮ or the M4 Screw Joint Adapter ⑰ to the Handpiece ② and clamp tightly using two provided Tighten wrenches. -
Page 10: Operating Procedures
6 . OPERATING PROCEDURES Turn ON the Main Power Switch ④ and make sure the Display ⑧ appears. Select UNCLAMP / CLAMP mode using the UNCLAMP / CLAMP Switch ⑤ . The UNCLAMP mode ( ) or CLAMP mode ( ) LED will illuminate green. -
Page 11: Finishing Operation By Ultrasonic Polisher
Fig. 12 SHEENUS neo tool length specifications Please refer to the following table as a guideline to find the proper tool length. The length listed in the chart is the length of the tool prior to mounting into the Tip Holders ⑮. Check to make sure that the tool is properly clamped in the holder and that the holder is tightly fastened to the ultrasonic horn prior to operating the system. -
Page 12: Changing Fuses
9 . CHANGING FUSES WARNING ・ Make sure to turn OFF the Main power switch ④ and remove the power cord from the Inlet with power supply fuses ⑫ before replacing the fuse. ・ Use intended fuse only. Recommended fuses : AC120V : T1.6AH 250V AC230V : T1AH 250V The Inlet with power supply fuses ⑫... -
Page 13: How To Set The Control Unit
10 . HOW TO SET THE CONTROL UNIT Changing Watt display (0W display ⇒ 0.0W display) ・Turn OFF the Main Power Switch ④ . ・Turn ON the Main Power Switch ④ while pressing the UNCLAMP / CLAMP Switch ⑤. ・The DISPLAY ⑧ shows WATT and 0.0 appears on the screen. ・Turn OFF the Main Power Switch ④... -
Page 14: Simple Test Method Using The Test Horn
In case oscillation is not output, or sufficient mist cannot be generated ), check if the Test Horn ⑭ is not tightly in the UNCLAMP mode ( mounted on the Handpiece ②. Retighten it and repeat above test. If the condition does not improve, return to NAKANISHI dealer service. -
Page 15: Troubleshooting
The Main Power Switch ④ is OFF. Turn on the Main Power Switch ④. . The Power Cord is broken. Replace the Power Cord. DISPLAY ⑧ not light The Main Power Switch ④ is Return to a NAKANISHI dealer defective. for service. Replace the fuse. If the replaced The fuse is blown. - Page 16 The Foot Switch ③ is defective. using the Foot Switch ③ . The output cord is broken. The ultrasonic oscillator or the Return to a NAKANISHI dealer Control Unit ① is broken. for service. ON LED or the The ultrasonic oscillator or the RESET LED lights Control Unit ①...
- Page 18 2013 . 07 . 20 003...
Need help?
Do you have a question about the Sheenus neo and is the answer not in the manual?
Questions and answers