Table of Contents
Advertisement
Advertisement
Table of Contents

Related Manuals for Sense SG-2440pfSense

Summary of Contents for Sense SG-2440pfSense
- Page 1 SG-2440 pfSense® SECURITY GATEWAY APPLIANCE Quick Start Guide...
-
Page 2: Table Of Contents
Table of Contents Introduction ......................................4 pfSense system ......................................4 pfSense SG-2440 System Specifications ..............................4 Overview ........................................5 Flexibility built in ....................................... 6 Software Features: ....................................6 Core features include:....................................7 Stateful firewall based on FreeBSD10.1 packet filter..........................7 Warranty and Support Information ................................. - Page 3 1. Read, follow, and keep these instructions............................23 2. Heed all warnings....................................23 3. Only use attachments/accessories specified by the manufacturer....................23 Electrical Safety Information .................................. 23 Limited Warranty ....................................24 FCC Compliance ...................................... 26 Industry Canada ...................................... 26 Australia and New Zealand..................................
-
Page 4: Introduction
Introduction Thank you for your purchase of the pfSense® SG-2440 Security Gateway Appliance with pfSense ® 2.2. X The hardware platform in combination with the popular open source pfSense software provides a powerful, reliable, cost-effective solution for your network security needs. This Quick Start Guide will assist with the basic configuration of the PfSense SG-2440 system. -
Page 5: Overview
Coreboot boot loader RTC coin cell backup battery 12 VDC Power Input Connector (Call for ATX availability and MOQ) AC/DC Auto-Ranging Switching Power Adapter Input Voltage: 90 ~ 264 VAC Output Voltage: 12 VDC ... -
Page 6: Flexibility Built In
pfSense SG-2440 System Board Flexibility built in The base price includes the pfSense SG- 2440 system board preloaded with pfSense software version 2.2.1. Enhance your system to suit your specific needs with: mSATA SSD Wireless cards, pigtails and antennas ... -
Page 7: Core Features Include
Multi-WAN – multiple Internet connections with failover and load balancing are supported. In combination with a VLAN capable switch, you can connect numerous Internet connections over a single physical interface on the firewall. Dynamic DNS – if your public IP is dynamic, you may want to sign up with a dynamic DNS provider and use the Dynamic DNS client to keep your hostname updated. -
Page 8: I/O Ports
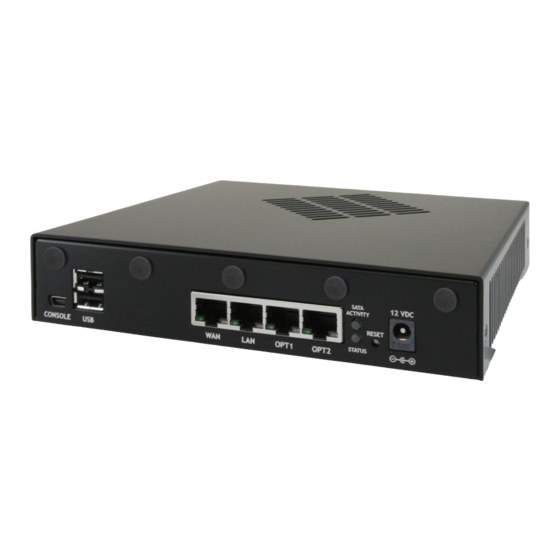
If eligible for support, you will receive a post card sized document with your device with instructions on activating support. For more information on per-incident support, please see the FAQ at https://www.pfsense.org/get-support/support-faq.html All Specifications subject to change without notice. I/O Ports 1 Mini-USB Serial Port 6 Opt2 - IGB2 2 USB0 (USB 2.0) -
Page 9: Dashboard
Figure 2 Login Procedure The login appears as depicted in Figure 3 Figure 3 Enter the following default username and password Username: admin Password: pfsense Select LOGIN to continue Dashboard Upon successful login, the following is displayed as shown in Figure 4... -
Page 10: Configuring Hostname, Domain Name And Dns Servers
Figure 4 Configuring Hostname, Domain Name and DNS Servers Figure 5 Hostname For hostname, you may enter anything as it does not affect functionality of the firewall. Assigning a hostname to the firewall will allow you to access the GUI console by hostname as well as IP address. For the purposes of this guide, we will use pfsense for the Hostname as shown in Figure 5 The default hostname, pfsense may be left unchanged. -
Page 11: Domain
Domain If you have an existing DNS domain in use within your network (such as a Microsoft Active Directory domain), use that domain here. This is the domain suffix assigned to DHCP clients, which you will want to match your internal network. For networks without any internal DNS domains, you can enter anything you want. -
Page 12: Configuring Wide Area Network (Wan) Type
Configuring Wide Area Network (WAN) Type The WAN interface type is the next to be configured. The IP address assigned to this section becomes the Public IP address that your network uses to communicate with the Internet. Figure 7 Figure 7 depicts the 4 possible WAN interface types. Static, DHCP, PPPoE and PPTP. You must select one from the drop-down list to proceed. -
Page 13: Configuring Mtu And Mss
Configuring MTU and MSS Figure 10 MTU or Maximum Transmission Unit determines the largest protocol data unit that can be passed onwards. A 1500-byte packet is the largest packet size allowed by Ethernet at the network layer. Leaving this field blank allows the system to default to 1500-byte packets. -
Page 14: Configuring Pppoe And Pptp Interfaces
Configuring PPPoE and PPTP Interfaces Figure 12 Information added in these sections are assigned by your ISP. Please populate these fields according to the information provided by your ISP. Block Private Networks and Bogons Figure 13 All private network traffic originating on the Internet is blocked by this rule Private addresses are reserved for use on internal LANS and blocked from outside traffic so these address ranges may be reused by all private networks. -
Page 15: Configuring Lan Ip Address & Subnet Mask
192.168.0.1 to 192.168.255.255 127.0.0.0/8 fc00::/7 Bogons are IP addresses that are reserved and should not be seen on the Internet. Check Block RFC1918 Private Networks and Block Bogon Networks. Select NEXT to continue Configuring LAN IP Address & Subnet Mask Figure 14 A static IP address of 192.168.1.1 and a subnet mask of /24 (255.255.255.0) was chosen for this installation. -
Page 16: Change Administrator Password
Change Administrator Password Figure 15 Figure 1 Select a new Administrator Password and enter it twice as shown in 5 and select NEXT to continue Save Changes Figure 16 Click RELOAD to save the configuration. -
Page 17: Basic Firewall Configuration Complete
Basic Firewall Configuration Complete Figure 17 To proceed to the webConfigurator, make the selection as highlighted in Figure 17. The Dashboard display will follow. -
Page 18: Backing Up And Restoring
Dashboard Figure 18 Backing up and restoring At this point, basic LAN and WAN interface configuration is complete. Before proceeding, you should backup your configuration. From Dashboard, browse to Diagnostics and select Backup/Restore. Figure 19... -
Page 19: Console Access By Serial Interface
Figure 20 Select Download Configuration and save a copy of your configuration. Figure 21 You can restore this configuration from the same screen by choosing your backup file under Restore configuration. Note: pfSense SG-2440 can be configured from iOS devices, however, the webConfigurator may not perform as described on an iPhone, iPad, or iPod Touch. -
Page 20: Mini Usb Serial Interface
Mini USB Serial Interface The pfSense SG-4680 has an integrated Silicon Labs' EFM32™ USB Microcontrollers that makes it simple to access the serial console without the requirement of a null modem cables. Serial Terminal Emulation Client A serial terminal emulation program is required to access the pfSense SG-2440 console through the mini USB serial interface. - Page 21 Open PuTTY and locate the Session display as shown in Figure 23. Set the COM Port to that which is displayed in Windows Device Manager and the Speed to 115200. Figure 23 Match the COM Port with what was reported in Windows Device Manager. We will use COM3 for this example.
-
Page 22: Additional Support
Figure 24 Additional Support Newly-purchased eligible firewall products come with one year of Per incident support by Netgate, the company behind the pfSense project. If eligible for support, you will receive a post card sized document with your device with instructions on activating support. The support provided by Netgate covers questions or problems you may experience with pfSense or the hardware appliance purchased from pfSense. -
Page 23: Other Support Options
Other Support Options https://www.pfsense.org/get-support/#community-support Additional Documentation This guide illustrates the basics for getting up and running with your SG-2440. There is much more that can be accomplished with pfSense software. The best source of information is the book pfSense 2.2.x: The Definitive Guide available to Gold pfSense subscribers at https://portal.pfsense.org. -
Page 24: Limited Warranty
c. Contact a qualified electrician or the manufacturer if there are questions about the installation prior to connecting the equipment. d. Protective grounding/earthing is provided by Listed AC adapter. Building installation shall provide appropriate short-circuit backup protection. e. Protective bonding must be installed in accordance with local national wiring rules and regulations. - Page 25 THERE IS NO JUDGE OR JURY IN ARBITRATION, AND COURT REVIEW OF AN ARBITRATION AWARD IS LIMITED. HOWEVER, AN ARBITRATOR CAN AWARD ON AN INDIVIDUAL BASIS THE SAME DAMAGES AND RELIEF AS A COURT (INCLUDING INJUNCTIVE AND DECLARATORY RELIEF OR STATUTORY DAMAGES), AND MUST FOLLOW THE TERMS OF THESE TERMS AND CONDITIONS OF USE AS A COURT WOULD.
-
Page 26: Fcc Compliance
MISCELLANEOUS If any provision of these terms and conditions of use, or our terms and conditions of sale, are held to be invalid, void or unenforceable, the invalid, void or unenforceable provision shall be modified to the minimum extent necessary in order to render it valid or enforceable and in keeping with the intent of these terms and conditions. -
Page 27: Ce Marking
CE Marking CE marking on this product represents the product is in compliance with all directives that are applicable to it. RoHS/WEEE Compliance Statement English European Directive 2002/96/EC requires that the equipment bearing this symbol on the product and/or its packaging must not be disposed of with unsorted municipal waste. The symbol indicates that this product should be disposed of separately from regular household waste streams. -
Page 28: Français
a través de los puntos de recogida que ponen a su disposición el gobierno y las autoridades locales. Al desechar y reciclar correctamente estos aparatos estará contribuyendo a evitar posibles consecuencias negativas para el medio ambiente y la salud de las personas. Si desea obtener información más detallada sobre la eliminación segura de su aparato usado, consulte a las autoridades locales, al servicio de recogida y eliminación de residuos de su zona o pregunte en la tienda donde adquirió... - Page 29 Eesti [Estonian] Käesolevaga kinnitab NETGATE seadme NETGATE device, vastavust direktiivi 1999/5/EÜ põhinõuetele ja nimetatud direktiivist tulenevatele teistele asjakohastele sätetele. Suomi [Finnish] NETGATE vakuuttaa täten että NETGATE device, tyyppinen laite on direktiivin 1999/5/EY oleellisten vaatimusten ja sitä koskevien direktiivin muiden ehtojen mukainen. Français [French] Par la présente NETGATE déclare que l’appareil Netgate, device est conforme aux exigences essentielles et aux autres dispositions pertinentes de la directive 1999/5/CE.
- Page 30 Português [Portuguese] NETGATE declara que este NETGATE device, está conforme com os requisitos essenciais e outras disposições da Directiva 1999/5/CE. Română *Romanian+ Prin prezenta, NETGATE declară că acest dispozitiv NETGATE este în conformitate cu cerințele esențiale și alte prevederi relevante ale Directivei 1999/5/CE. ©2015 NETGATE All rights reserved.
Need help?
Do you have a question about the SG-2440pfSense and is the answer not in the manual?
Questions and answers