
Subscribe to Our Youtube Channel
Summary of Contents for AIRTRONICS M12S SUPER
- Page 1 M12S SUPER Telemetry System with Sanwa Synchronized Link Support 2.4GHZ FH4T RADIO CONTROL SYSTEM USER'S GUIDE 101A31651A...
-
Page 2: Table Of Contents
Liability Statement: Airtronics shall not be liable for any damage resulting from the use of this product. As Airtronics has no control over the use, setup, modification or misuse of this product, no liability shall be assumed nor accepted for any resulting damage or injury. By the act of using this product, the user accepts all resulting liability. -
Page 3: Safety
RF Exposure Statement: This transmitter has been tested and meets the FCC RF exposure guidelines when used with the Airtronics accessories supplied or designated for this product, and provided at least 20cm separation between the antenna the user's body is maintained. Use of other accessories may not ensure compliance with FCC RF exposure guidelines. -
Page 4: Ghz Frequency Band Precautions
SERvO CONNECTORS GENERAL The receiver uses Airtronics 'Z' connectors, which are electronically compatible with the servos of other radio control system manufacturers. The connectors are rugged, but should be handled with care. - = Negative (Black) -
Page 5: System Features
GENERAL The following accessories are included with your M12S Super. If an accessory is missing or the radio system appears damaged in any way, please contact the Airtronics or Sanwa service center in your region. For more information, see the Service and Support section on page 3. -
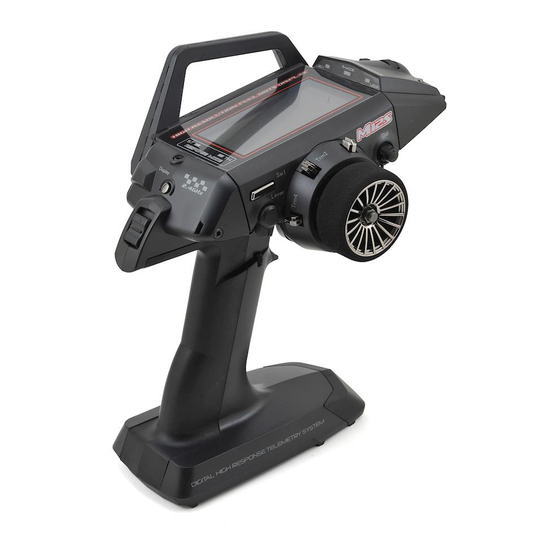
Page 6: Transmitter Overview Diagrams
M12S SUPER Telemetry System with Sanwa Synchronized Link Support 2.4GHZ FH4T RADIO CONTROL SYSTEM USER'S GUIDE TRANSMITTER OvERvIEw DIAGRAMS GENERAL Use the diagrams in this section to familiarize yourself with the layout of your transmitter. Descriptions of these features can be found in the Transmitter and Receiver Overview Diagram Descriptions section on pages 8 through 10. - Page 7 M12S SUPER Telemetry System with Sanwa Synchronized Link Support 2.4GHZ FH4T RADIO CONTROL SYSTEM USER'S GUIDE TRANSMITTER OvERvIEw DIAGRAMS GENERAL PC LINK Input (Under Cover) Earphone Jack Switch Trm5* Throttle Trigger Cover Retaining Screw Earphones (not included) can be plugged into...
-
Page 8: Transmitter And Receiver Overview Diagram Descriptions
Use the diagrams in this section to make receiver connections and to familiarize yourself with the RX-472 2.4GHz FH4T Super Response SSL receiver included with your M12S Super radio control system. Descriptions of the features can be found in the Transmitter and Receiver Features Descriptions section below and on the next two pages. - Page 9 LCD Screen: The heart of the programming and display features of the transmitter. All programming and transmitter display functions are shown on the LCD Screen. The M12S Super features a large, backlit LCD Screen with smooth scrolling. PC LINK Input: When used with an USB cable with a Mini USB connector (available separately), the PC LINK Input allows you to save Telemetry Data Logs, Model Programming Data and Model Templates to your PC.
-
Page 10: Transmitter Led Condition Indicators And Warning Alarms
GENERAL The M12S Super is equipped with several different Audible Warning Alarms to warn you of an abnormal transmitter condition. In addition, LED1, LED2 and the Response Mode LEDs and R-MODE LED are used to indicate various conditions at a glance. -
Page 11: Charging The Transmitter Battery Pack
• Do not use a 3S Li-Po or 3S Li-Fe battery pack or the transmitter will be damaged. • The M12S Super does not feature a charge jack. For the safety of both the Li-Fe battery pack and the transmitter itself, the battery pack must be removed from the transmitter during the charging process. -
Page 12: Steering Wheel And Throttle Trigger Tension Adjustment
M12S SUPER Telemetry System with Sanwa Synchronized Link Support 2.4GHZ FH4T RADIO CONTROL SYSTEM USER'S GUIDE STEERING wHEEL AND THROTTLE TRIGGER TENSION ADjUSTMENT GENERAL The spring tension of the Steering Wheel and Throttle Trigger can be adjusted to best suit the user. Some users may prefer the Throttle Trigger and/or Steering Wheel to feel firmer and some users may prefer them to feel softer. -
Page 13: Optional Steering Wheel Installation
M12S SUPER Telemetry System with Sanwa Synchronized Link Support 2.4GHZ FH4T RADIO CONTROL SYSTEM USER'S GUIDE OPTIONAL STEERING wHEEL INSTALLATION GENERAL An optional larger diameter Steering Wheel is included to best suit the user. Some user's feel that the larger diameter Steering Wheel makes the Steering operation seem finer. -
Page 14: Throttle Trigger Position Adjustment
M12S SUPER Telemetry System with Sanwa Synchronized Link Support 2.4GHZ FH4T RADIO CONTROL SYSTEM USER'S GUIDE THROTTLE TRIGGER POSITION ADjUSTMENT GENERAL The position of the Throttle Trigger can be adjusted forward or backward to change the feel of the Throttle Trigger during use. -
Page 15: Optional Steering Wheel Angle Plate Installation
M12S SUPER Telemetry System with Sanwa Synchronized Link Support 2.4GHZ FH4T RADIO CONTROL SYSTEM USER'S GUIDE OPTIONAL STEERING wHEEL ANGLE PLATE INSTALLATION GENERAL Two optional Steering Wheel Angle Plates (one Right and one Left) are included that changes the angle of the Steering Wheel and Trim Switch Ring. -
Page 16: Driving Position Adjustment
The position of the Steering Wheel can be switched from the Right side to the Left side to accommodate left-handed drivers. This makes the M12S Super much more comfortable for natural left-handed drivers to use. To change the driving position for left-handed use, follow the steps below: 1) Using a 2.5mm hex wrench, remove the three socket cap screws (A) that hold the... -
Page 17: Display Screens Overview
*BASIC Mode Must Be Turned OFF. DISPLAY SCREENS OvERvIEw GENERAL In the default configuration, when you turn the M12S Super ON, the transmitter will start-up and display the BOOT screen temporarily, then display the STATUS screen. STATUS Screen ( BASIC Mode OFF ) BOOT Screen BOOT Screen: The BOOT screen is displayed when the transmitter is turned ON. - Page 18 Airtronics or Sanwa retailer. Telemetry integration requires the use of an Airtronics or Sanwa 2.4GHz FH4T Telemetry-capable surface receiver or SSL-compatible ESC (e.g. Super Vortex series ESC). Steering and Throttle Output and Lap Times can still be viewed when used with non-Telemetry capable receivers.
-
Page 19: Menus Structure Overview
MENUS STRUCTURE OvERvIEw GENERAL The M12S Super features two Modes (BASIC Mode ON and BASIC Mode OFF) and various Programming Menus within those two Modes. With BASIC Mode ON (default), various general-use Programming Menus are accessible via the BASIC menu. With BASIC Mode OFF, you are able to access the SYSTEM menu, SETUP menu, RACING menu and the CUSTOM menu, which contain all of the M12S Super's various Programming Menus (including those in the BASIC menu). -
Page 20: Menus Overview
M12S SUPER Telemetry System with Sanwa Synchronized Link Support 2.4GHZ FH4T RADIO CONTROL SYSTEM USER'S GUIDE MENUS OvERvIEw GENERAL Each of the menus described in the previous section all share the same basic layout as illustrated below. Use this information to familiarize yourself with the layout and the information presented. -
Page 21: Telemetry Screen Overview
TELEMETRY pages, see the LOG SETUP Menu section on pages 56 through 66. Telemetry integration requires the use of an Airtronics or Sanwa 2.4GHz FH4T Telemetry-capable surface receiver or SSL-compatible ESC (e.g. Super Vortex series ESC). Steering and Throttle Output and Lap Times can still be viewed when used with non-Telemetry capable receivers. - Page 22 M12S SUPER Telemetry System with Sanwa Synchronized Link Support 2.4GHZ FH4T RADIO CONTROL SYSTEM USER'S GUIDE TELEMETRY SCREEN OvERvIEw GENERAL TELEMETRY Screen Overview Diagram Descriptions, Continued: Numerical Telemetry Data: Displays the Telemetry Data in a numerical format. Page Indicator: Indicates the current Page within the Telemetry Data Stream that Telemetry Data is currently being displayed on.
-
Page 23: Transmitter And Receiver Binding
The M12S Super features a Safety Link function that is used to program a unique code to each receiver/model pair, preventing the transmitter from controlling a model that it's not currently programmed for. The Safety Link function is compatible only with FH4 or FH4T receivers. - Page 24 M12S SUPER Telemetry System with Sanwa Synchronized Link Support 2.4GHZ FH4T RADIO CONTROL SYSTEM USER'S GUIDE THIS PAGE INTENTIONALLY LEFT BLANK...
-
Page 25: Basic Mode Menu Overview
2.4GHZ FH4T RADIO CONTROL SYSTEM USER'S GUIDE bASIC MODE MENU OvERvIEw bASIC The M12S Super features a BASIC Mode that simplifies transmitter use. The accompanying BASIC menu contains some of the more common, general-use Programming Menus that a user will require for basic programming. When BASIC... - Page 26 M12S SUPER Telemetry System with Sanwa Synchronized Link Support 2.4GHZ FH4T RADIO CONTROL SYSTEM USER'S GUIDE THIS PAGE INTENTIONALLY LEFT BLANK...
-
Page 27: System Menu Overview
LOG SETUP Program TELEMETRY Screen and Telemetry Recording Options PG. 56 USER NAME Change the Name Displayed Above the M12S Super Logo on the STATUS Screen PG. 66 PC LINK Save Telemetry Logs, Save and Load Model Programming and Update Firmware PG. - Page 28 M12S SUPER Telemetry System with Sanwa Synchronized Link Support 2.4GHZ FH4T RADIO CONTROL SYSTEM USER'S GUIDE TYPE MENU { CAR TYPE TEMPLATES } SYSTEM Choosing a Car Type, Continued: 2) Press the ENTER key to open the TYPE menu. The cursor will default to CAR TYPE >...
- Page 29 M12S SUPER Telemetry System with Sanwa Synchronized Link Support 2.4GHZ FH4T RADIO CONTROL SYSTEM USER'S GUIDE MODEL MENU { SELECT, NAME, COPY, CLEAR, SORT AND TEMPLATE } SYSTEM Selecting a Model, Continued: 2) Press the ENTER key to open the MODEL menu. The SELECT menu will be highlighted and the currently Selected Model will be displayed in brackets at the top of the Model Select List.
- Page 30 M12S SUPER Telemetry System with Sanwa Synchronized Link Support 2.4GHZ FH4T RADIO CONTROL SYSTEM USER'S GUIDE MODEL MENU { SELECT, NAME, COPY, CLEAR, SORT AND TEMPLATE } SYSTEM Entering a Model Name, Continued: 3) Press the ENTER key to open the NAME menu. The underscore will be positioned under the first character in the Model Name.
- Page 31 M12S SUPER Telemetry System with Sanwa Synchronized Link Support 2.4GHZ FH4T RADIO CONTROL SYSTEM USER'S GUIDE MODEL MENU { SELECT, NAME, COPY, CLEAR, SORT AND TEMPLATE } SYSTEM Copying Model Programming Data, Continued: 3) Press the ENTER key to open the COPY menu. The currently will be displayed in brackets above the Model Copy List.
- Page 32 M12S SUPER Telemetry System with Sanwa Synchronized Link Support 2.4GHZ FH4T RADIO CONTROL SYSTEM USER'S GUIDE MODEL MENU { SELECT, NAME, COPY, CLEAR, SORT AND TEMPLATE } SYSTEM Model Sort The Model Sort function allows you to change how your models are displayed in the Model Select List by allowing you to swap the currently Selected Model with other models.
- Page 33 M12S SUPER Telemetry System with Sanwa Synchronized Link Support 2.4GHZ FH4T RADIO CONTROL SYSTEM USER'S GUIDE MODEL MENU { SELECT, NAME, COPY, CLEAR, SORT AND TEMPLATE } SYSTEM Copying a Model Template: 1) From within the MODEL menu, scroll UP or DOWN to highlight the TEMPLATE menu.
- Page 34 The Modulation Type function allows you to choose the transmitter Modulation Type. The Modulation Type should be changed to match the receiver you're using. For example, if you use an Airtronics or Sanwa 2.4GHz FH3 surface receiver with your transmitter, you would need to change the Modulation Type to FH3.
- Page 35 M12S SUPER Telemetry System with Sanwa Synchronized Link Support 2.4GHZ FH4T RADIO CONTROL SYSTEM USER'S GUIDE bIND MENU { bINDING, MODULATION TYPE, SAFETY LINk AND RESPONSE MODE } SYSTEM Changing the Modulation Type, Continued: 1) From within the SYSTEM menu, scroll UP or DOWN to highlight the BIND menu.
- Page 36 WARNING: SHR and SSR Channel Response Modes should only be used with Digital servos. While the SHR Channel Response Mode can be used with any brand of Digital servo, the SSR Channel Response Mode should ONLY be used with Airtronics or Sanwa Super Response SRG Digital servos.
- Page 37 M12S SUPER Telemetry System with Sanwa Synchronized Link Support 2.4GHZ FH4T RADIO CONTROL SYSTEM USER'S GUIDE SERvO MENU { SERvO MONITOR } SYSTEM Using the Servo Monitor: 1) From within the SYSTEM menu, scroll UP or DOWN to highlight the SERVO menu.
- Page 38 M12S SUPER Telemetry System with Sanwa Synchronized Link Support 2.4GHZ FH4T RADIO CONTROL SYSTEM USER'S GUIDE ASSIGN MENU { SwITCH, DIAL, LEvER AND TELEMETRY FUNCTION ASSIGNMENTS } SYSTEM Changing the Push-Button Switch Function Assignments, Continued: 2) Press the ENTER key to open the ASSIGN menu. The SWITCH menu will be highlighted.
- Page 39 M12S SUPER Telemetry System with Sanwa Synchronized Link Support 2.4GHZ FH4T RADIO CONTROL SYSTEM USER'S GUIDE ASSIGN MENU { SwITCH, DIAL, LEvER AND TELEMETRY FUNCTION ASSIGNMENTS } SYSTEM Changing the Switch Mode: The ON and OFF behavior of each Push-Button Switch can be changed to suit the programmed function and your specific requirements.
- Page 40 M12S SUPER Telemetry System with Sanwa Synchronized Link Support 2.4GHZ FH4T RADIO CONTROL SYSTEM USER'S GUIDE ASSIGN MENU { SwITCH, DIAL, LEvER AND TELEMETRY FUNCTION ASSIGNMENTS } SYSTEM Changing the Trim Switch Function Assignments, Continued: 4) Scroll UP or DOWN to highlight the Trim Switch Number you would like to change.
- Page 41 M12S SUPER Telemetry System with Sanwa Synchronized Link Support 2.4GHZ FH4T RADIO CONTROL SYSTEM USER'S GUIDE ASSIGN MENU { SwITCH, DIAL, LEvER AND TELEMETRY FUNCTION ASSIGNMENTS } SYSTEM Changing the Trim Switch Direction of Travel, Continued: 2) Press the ENTER key, then scroll UP or DOWN to change the desired Trim Switch Reverse value.
- Page 42 M12S SUPER Telemetry System with Sanwa Synchronized Link Support 2.4GHZ FH4T RADIO CONTROL SYSTEM USER'S GUIDE ASSIGN MENU { SwITCH, DIAL, LEvER AND TELEMETRY FUNCTION ASSIGNMENTS } SYSTEM Changing the Auxiliary Dial Direction of Travel: The direction that the Auxiliary Dial moves the servo or function value can be changed from Normal to Reverse. In Normal mode, the Auxiliary Dial will move the servo toward the High Side or Increase a function value when the Auxiliary Dial is turned clockwise.
- Page 43 Telemetry Function Assignments The M12S Super allows the use of a remote external device (available separately) to control many transmitter functions. This allows a driver helper or a pit crew member to remotely control transmitter functions, allowing you to concentrate more on driving. The Telemetry Assign function allows you to program the transmitter to suit the programmed function and the specific requirements of your external device, whether it features a push-button switch, a trim switch or dial, or a lever.
- Page 44 M12S SUPER Telemetry System with Sanwa Synchronized Link Support 2.4GHZ FH4T RADIO CONTROL SYSTEM USER'S GUIDE ASSIGN MENU { SwITCH, DIAL, LEvER AND TELEMETRY FUNCTION ASSIGNMENTS } SYSTEM Changing the Telemetry Push-Button Switch Control Function and Mode Values: Follow the information in this section if you've programmed the Telemetry value to SW. If you've programmed the Telemetry value to TRIM or LEVER, please refer to those specific sections.
- Page 45 M12S SUPER Telemetry System with Sanwa Synchronized Link Support 2.4GHZ FH4T RADIO CONTROL SYSTEM USER'S GUIDE ASSIGN MENU { SwITCH, DIAL, LEvER AND TELEMETRY FUNCTION ASSIGNMENTS } SYSTEM Changing the Telemetry Trim Switch Control Function, Step and Reverse Values, Continued: A multitude of different functions can be Assigned to the Telemetry Trim Switch.
- Page 46 M12S SUPER Telemetry System with Sanwa Synchronized Link Support 2.4GHZ FH4T RADIO CONTROL SYSTEM USER'S GUIDE ASSIGN MENU { SwITCH, DIAL, LEvER AND TELEMETRY FUNCTION ASSIGNMENTS } SYSTEM Changing the Telemetry Lever Control Function and Tweak Values, Continued: For example, if you Assign AUX2 to the Telemetry Lever and adjust the Tweak values to +50 and -50, the Auxiliary 2 servo will be centered when the Lever on your external device is centered and will travel 50% in one direction when the Lever on your external device is moved Up and travel 50% in the other direction when the Lever on your external device is moved Down.
- Page 47 M12S SUPER Telemetry System with Sanwa Synchronized Link Support 2.4GHZ FH4T RADIO CONTROL SYSTEM USER'S GUIDE bUZZER MENU { AUDIbLE kEY TONES AND ALARMS } SYSTEM Changing the Audible Tones: 1) From within the SYSTEM menu, scroll UP or DOWN to highlight the BUZZER menu.
- Page 48 M12S SUPER Telemetry System with Sanwa Synchronized Link Support 2.4GHZ FH4T RADIO CONTROL SYSTEM USER'S GUIDE vIbRATOR MENU { vIbRATION ALERTS AND ALARMS } SYSTEM Adjusting the Vibration Level: 1) From within the SYSTEM menu, scroll UP or DOWN to highlight the VIBRATOR menu.
- Page 49 M12S SUPER Telemetry System with Sanwa Synchronized Link Support 2.4GHZ FH4T RADIO CONTROL SYSTEM USER'S GUIDE LCD MENU { DISPLAY OPTIONS } SYSTEM Changing the LCD Contrast: 1) From within the SYSTEM menu, scroll UP or DOWN to highlight the LCD menu.
- Page 50 M12S SUPER Telemetry System with Sanwa Synchronized Link Support 2.4GHZ FH4T RADIO CONTROL SYSTEM USER'S GUIDE AUx TYPE MENU { AUxILIARY CHANNEL OPERATING MODE } SYSTEM The Auxiliary Type function allows you choose the Operating Mode for Auxiliary 1 and Auxiliary 2, making it possible to change the way these two Auxiliary channels function.
- Page 51 M12S SUPER Telemetry System with Sanwa Synchronized Link Support 2.4GHZ FH4T RADIO CONTROL SYSTEM USER'S GUIDE TRIM TYPE MENU { SERvO TRIM TYPE } SYSTEM The Trim Type function allows you choose the way servo Trim and servo End Point Adjustments interact with each other. When you apply Trim to a servo, the Neutral Point of the servo shifts toward the High Side or the Low Side.
- Page 52 M12S SUPER Telemetry System with Sanwa Synchronized Link Support 2.4GHZ FH4T RADIO CONTROL SYSTEM USER'S GUIDE TH TYPE MENU { THROTTLE bIAS RATIO } SYSTEM Two Throttle Types are available: F70:B30 - When selected, the Throttle Neutral Point is shifted toward the Brake Side which provides more High Side servo travel (70%) and less Brake Side servo travel (30%).
- Page 53 M12S SUPER Telemetry System with Sanwa Synchronized Link Support 2.4GHZ FH4T RADIO CONTROL SYSTEM USER'S GUIDE CALIbRATION MENU { CONTROL CALIbRATION ADjUSTMENT } SYSTEM The steps required to calibrate the operation of the Steering Wheel, Throttle Trigger and Auxiliary Lever are the same. The example shown in this section details calibrating the Steering Wheel.
- Page 54 M12S SUPER Telemetry System with Sanwa Synchronized Link Support 2.4GHZ FH4T RADIO CONTROL SYSTEM USER'S GUIDE CALIbRATION MENU { CONTROL CALIbRATION ADjUSTMENT } SYSTEM Calibrating the Steering, Throttle and Auxiliary Lever Controls, Continued: 7) Slowly move the Steering Wheel (or Throttle Trigger or Auxiliary Lever) all the way in one direction.
- Page 55 M12S SUPER Telemetry System with Sanwa Synchronized Link Support 2.4GHZ FH4T RADIO CONTROL SYSTEM USER'S GUIDE bATT MENU { LOw vOLTAGE ALERT AND LIMIT ALARMS } SYSTEM Changing the Low Voltage Alert Alarm Value: The Low Voltage Alert alarm will sound to indicate the transmitter battery is getting low and should be recharged. We suggest stopping use as soon as safely possible and recharging the transmitter battery.
- Page 56 Telemetry 1 and Telemetry 2 Pop-Up messages. When only the DISPLAY is turned ON using the DISPLAY key, the M12S Super can be placed in Receiver Mode, allowing it to Bind with another Airtronics or Sanwa FH3 or FH4T transmitter and read Telemetry Data from it. For example, if using an FH4T...
- Page 57 M12S SUPER Telemetry System with Sanwa Synchronized Link Support 2.4GHZ FH4T RADIO CONTROL SYSTEM USER'S GUIDE LOG SETUP MENU { TELEMETRY DISPLAY AND RECORDING OPTIONS } SYSTEM Turning Telemetry Data Recording ON and OFF, Continued: 2) Press the ENTER key to open the LOG SETUP menu, then scroll UP or DOWN to highlight the REC menu.
- Page 58 M12S SUPER Telemetry System with Sanwa Synchronized Link Support 2.4GHZ FH4T RADIO CONTROL SYSTEM USER'S GUIDE LOG SETUP MENU { TELEMETRY DISPLAY AND RECORDING OPTIONS } SYSTEM Changing the Maximum Scale Value, Continued: 2) Press the ENTER key, then scroll UP or DOWN to change the Maximum Scale value.
- Page 59 M12S SUPER Telemetry System with Sanwa Synchronized Link Support 2.4GHZ FH4T RADIO CONTROL SYSTEM USER'S GUIDE LOG SETUP MENU { TELEMETRY DISPLAY AND LOGGING OPTIONS } SYSTEM Calibrating the RPM Sensor - Changing the 10Count Distance Value, Continued: 1) With your transmitter and receiver turned ON, and with an Active Telemetry connection, place your model on the ground.
- Page 60 M12S SUPER Telemetry System with Sanwa Synchronized Link Support 2.4GHZ FH4T RADIO CONTROL SYSTEM USER'S GUIDE LOG SETUP MENU { TELEMETRY DISPLAY AND LOGGING OPTIONS } SYSTEM 4) Press the ENTER key, then scroll UP or DOWN to choose the desired Maximum Voltage value.
- Page 61 M12S SUPER Telemetry System with Sanwa Synchronized Link Support 2.4GHZ FH4T RADIO CONTROL SYSTEM USER'S GUIDE LOG SETUP MENU { TELEMETRY DISPLAY AND LOGGING OPTIONS } SYSTEM Changing the Telemetry Name, Continued: 2) Press the ENTER key to open the LOG SETUP menu, then scroll UP or DOWN to highlight either the TLM1 or the TLM2 menu depending on which of the two Telemetry Ports you want to make changes to.
- Page 62 M12S SUPER Telemetry System with Sanwa Synchronized Link Support 2.4GHZ FH4T RADIO CONTROL SYSTEM USER'S GUIDE LOG SETUP MENU { TELEMETRY DISPLAY AND LOGGING OPTIONS } SYSTEM Changing the Rate and the Offset Values, Continued: The Rate and Offset values don't need to be changed if you're using a Temperature Sensor plugged into the TMP1 and/or TMP2 Telemetry Ports on the RX-461 or RX-462 receivers.
- Page 63 M12S SUPER Telemetry System with Sanwa Synchronized Link Support 2.4GHZ FH4T RADIO CONTROL SYSTEM USER'S GUIDE LOG SETUP MENU { TELEMETRY DISPLAY AND LOGGING OPTIONS } SYSTEM Changing the Minimum Value: The Minimum value determines the Minimum Telemetry Parameter Data value that will be displayed on the TELEMETRY screen TLM1 or TLM2 page and also calibrates the Low Side of the TLM1 or TLM2 Indicator scale on the TELEMETRY screen ALL page.
- Page 64 TELEMETRY screen. This capability allows the M12S Super to be used as a separate Telemetry Viewer and Recorder. To use this feature, first Bind your other transmitter to its receiver, then place the M12S Super in Receiver Mode and Bind it to your other transmitter.
- Page 65 4) Press the ENTER key. The ST POINT menu will be displayed and NEUTRAL POINT > 127 will be highlighted. 5) With your other transmitter turned ON and paired with the M12S Super, do the following: A) Center the other transmitter's Steering Wheel, then press the ENTER key on the M12S Super.
- Page 66 4) Press the ENTER key. The TH POINT menu will be displayed and NEUTRAL POINT > 127 will be highlighted. 5) With your other transmitter turned ON and paired with the M12S Super, do the following: A) Center the other transmitter's Throttle Trigger, then press the ENTER key on the M12S Super.
- Page 67 Data Log is Saved to your PC, the data can be read using a spreadsheet program, such as Microsoft Excel. In addition, you're able to Save Model Programming Data and Model Templates to your PC, Load saved Model Programming Data and Model Templates from your PC, and use your PC to update the M12S Super transmitter's Firmware version. Downloading the PC LINK Manager Software: To use the various PC LINK functions, a Mini USB cable (not included) and Sanwa PC LINK Manager version 3 software will be required.
- Page 68 M12S Super transmitter users. For example, you can Save your current model's Programming Data to your PC, then share the file with a friend or fellow driver. They can then upload that Programming Data to their M12S Super using the Load Model function.
- Page 69 The Save Template function allows you to Save any of the five Model Templates to your PC, either for archiving or for sharing with other M12S Super transmitter users. For example, you can Save a Model Template to your PC, then share the file with a friend or fellow driver.
- Page 70 8) Press the Start button on the PC LINK Manager 3 software and allow the Data Transfer to complete. Once completed, EXECUTED will be displayed momentarily on the M12S Super and The Operation Was Completed will be displayed on your PC.
- Page 71 Before proceeding, download and save the latest Firmware version to a convenient location on your PC. Updates (when available) can be downloaded from the M12S Super product page at http://www.airtronics.net. For users outside of North America, visit the web page of your Sanwa regional distributor or Sanwa directly at http://www.sanwa-denshi.com.
- Page 72 BOOT setting range is DEMO, RESUME and TOP. The default setting is DEMO. Turning BASIC Mode ON and OFF: The M12S Super features a BASIC Mode that simplifies transmitter use. The accompanying BASIC menu contains some of the more common, general-use Programming Menus that a user will require for basic programming.
-
Page 73: Setup Menu Overview
M12S SUPER Telemetry System with Sanwa Synchronized Link Support 2.4GHZ FH4T RADIO CONTROL SYSTEM USER'S GUIDE SETUP MENU OvERvIEw SETUP To access the various SETUP menu Programming Menus, turn the transmitter ON, press the SELECT switch to highlight the SETUP menu, then press the ENTER key to open the SETUP menu. - Page 74 M12S SUPER Telemetry System with Sanwa Synchronized Link Support 2.4GHZ FH4T RADIO CONTROL SYSTEM USER'S GUIDE EPA MENU { CHANNEL END POINT ADjUSTMENTS } SETUP Changing the Channel End Point Adjustment Percentage Values, Continued: 2) Press the ENTER key to open the EPA menu. The cursor will default to either ST >...
- Page 75 M12S SUPER Telemetry System with Sanwa Synchronized Link Support 2.4GHZ FH4T RADIO CONTROL SYSTEM USER'S GUIDE SUb TRIM MENU { SERvO CENTERING } SETUP Changing the Servo Sub-Trim Values, Continued: 2) From within the SETUP menu, scroll UP or DOWN to highlight the SUB TRIM menu.
- Page 76 M12S SUPER Telemetry System with Sanwa Synchronized Link Support 2.4GHZ FH4T RADIO CONTROL SYSTEM USER'S GUIDE REv MENU { SERvO REvERSING } SETUP 3) Scroll UP or DOWN to highlight the desired Servo Reversing value you would like to change.
- Page 77 M12S SUPER Telemetry System with Sanwa Synchronized Link Support 2.4GHZ FH4T RADIO CONTROL SYSTEM USER'S GUIDE POINT AUx2 MENU { AUxILIARY 2 POINT vALUES } SETUP The Point Auxiliary function allows you to program the Auxiliary 2 servo to move up to 6 different Points along its travel, then cycle through those Points using one of the Trim Switches or the Rotary Dial.
- Page 78 M12S SUPER Telemetry System with Sanwa Synchronized Link Support 2.4GHZ FH4T RADIO CONTROL SYSTEM USER'S GUIDE MOA MIx MENU { MOTOR ON AxLE MIxING } SETUP Choosing the Motor on Axle Power Distribution Values: You are able to program Dig and Burn functions by changing the Power Distribution between the two motors. When both Front and Rear values are balanced, Dig and Burn functions are Inhibited.
- Page 79 M12S SUPER Telemetry System with Sanwa Synchronized Link Support 2.4GHZ FH4T RADIO CONTROL SYSTEM USER'S GUIDE 4wS MIx MENU { FOUR wHEEL STEERING MIxING } SETUP The Four Wheel Steering Mixing function provides you with two Steering channels. It allows you to control either the Front or Rear Steering independently or Mix the Front and Rear Steering to have Parallel Four Wheel Steering (Crab) or Tandem Four Wheel Steering.
- Page 80 The Feeling function allows you to adjust the Response Time of the Steering and Throttle channels to fine-tune the sensitivity of these controls. The M12S Super has an extremely fast Response Time (low Latency), which results in the driver feeling extremely connected to their model.
- Page 81 M12S SUPER Telemetry System with Sanwa Synchronized Link Support 2.4GHZ FH4T RADIO CONTROL SYSTEM USER'S GUIDE F / S { FAIL SAFE } SETUP Choosing the Fail Safe Settings: 1) From within the SETUP menu, scroll UP or DOWN to highlight the F/S menu.
- Page 82 M12S SUPER Telemetry System with Sanwa Synchronized Link Support 2.4GHZ FH4T RADIO CONTROL SYSTEM USER'S GUIDE b - F / S { RECEIvER bATTERY vOLTAGE FAIL SAFE } SETUP Choosing the Receiver Battery Voltage Value, Continued: 2) Press the ENTER key to open the B-F/S menu. VOLT (RX) > OFF will be highlighted.
- Page 83 M12S SUPER Telemetry System with Sanwa Synchronized Link Support 2.4GHZ FH4T RADIO CONTROL SYSTEM USER'S GUIDE LAP TIMER MENU { vIEw LAP TIMES AND CHOOSE LAP TIMER OPTIONS } SETUP Setting the Goal Time: When the Lap Timer is counting Up, a long audible Tone will sound when the Goal Time is reached. For example, if you set the Goal Time value for 5 Minutes, a long audible Tone will sound when the Lap Timer reaches 5 minutes.
- Page 84 M12S SUPER Telemetry System with Sanwa Synchronized Link Support 2.4GHZ FH4T RADIO CONTROL SYSTEM USER'S GUIDE LAP TIMER MENU { vIEw LAP TIMES AND CHOOSE LAP TIMER OPTIONS } SETUP Stopping the Lap Timer: 1) To Stop the Lap Timer, press and HOLD the Lap Timer Switch for 3 seconds. An audible Double-Tone will sound and LAP [ STOPPED ] will be displayed momentarily in a pop-up window, indicating the Lap Timer is stopped.
- Page 85 M12S SUPER Telemetry System with Sanwa Synchronized Link Support 2.4GHZ FH4T RADIO CONTROL SYSTEM USER'S GUIDE INT1 AND INT2 MENU { INTERvAL 1 AND INTERvAL 2 TIMERS } SETUP Choosing the Optional Throttle Trigger Start, Continued: 1) From within the INT1 menu, scroll UP or DOWN to highlight START TRIGGER >...
- Page 86 M12S SUPER Telemetry System with Sanwa Synchronized Link Support 2.4GHZ FH4T RADIO CONTROL SYSTEM USER'S GUIDE DOwN MENU { COUNTDOwN TIMER } SETUP Setting the Finish Time, Continued: 2) Press the ENTER key to open the DOWN menu. FIN TIME > 60' will be highlighted.
-
Page 87: Racing Menu Overview
M12S SUPER Telemetry System with Sanwa Synchronized Link Support 2.4GHZ FH4T RADIO CONTROL SYSTEM USER'S GUIDE RACING MENU OvERvIEw RACING To access the various RACING Programming Menus, turn the transmitter ON, press the SELECT switch to highlight the RACING menu, then press the ENTER key to open the RACING menu. - Page 88 M12S SUPER Telemetry System with Sanwa Synchronized Link Support 2.4GHZ FH4T RADIO CONTROL SYSTEM USER'S GUIDE R-MODE MENU { RACING MODE } RACING In the default configuration, after Activating the Racing Mode function, you can switch between Racing Modes using the Racing Mode Switch (Trim Switch Trm4).
- Page 89 M12S SUPER Telemetry System with Sanwa Synchronized Link Support 2.4GHZ FH4T RADIO CONTROL SYSTEM USER'S GUIDE D / R MENU { DUAL RATES } RACING The Dual Rate function allows you to change the control authority of the Steering, Throttle High Side and Throttle Brake Side by changing the amount of servo travel relative to control input.
- Page 90 RACING The M12S Super features Digital Trim Memory. Any amount of Trim that you set during use using the Trim Switches or through the TRIM menu is automatically stored in memory for that specific channel and for that specific model. The Trim values for each model will automatically be loaded when the transmitter is turned ON.
- Page 91 M12S SUPER Telemetry System with Sanwa Synchronized Link Support 2.4GHZ FH4T RADIO CONTROL SYSTEM USER'S GUIDE CURvE MENU { ExPONENTIAL, ADjUSTAbLE RATE CONTROL AND CURvE } RACING Exponential Programming The Exponential function allows you to vary the amount of servo travel in relation to the movement of the Steering Wheel and Throttle Trigger (or in some cases, the Auxiliary Dial and/or the Auxiliary Lever) near the Neutral positions to change the way those functions react to control movement.
- Page 92 M12S SUPER Telemetry System with Sanwa Synchronized Link Support 2.4GHZ FH4T RADIO CONTROL SYSTEM USER'S GUIDE CURvE MENU { ExPONENTIAL, ADjUSTAbLE RATE CONTROL AND CURvE } RACING Changing the Rate Percentage Value, Continued: You are able to adjust the Rate percentage value for the Throttle High Side and the Throttle Brake Side separately.
- Page 93 M12S SUPER Telemetry System with Sanwa Synchronized Link Support 2.4GHZ FH4T RADIO CONTROL SYSTEM USER'S GUIDE CURvE MENU { ExPONENTIAL, ADjUSTAbLE RATE CONTROL AND CURvE } RACING Choosing the Channel and the Curve Type, Continued: 2) Press the ENTER key to open the CURVE menu. The < ST > channel will be selected.
- Page 94 M12S SUPER Telemetry System with Sanwa Synchronized Link Support 2.4GHZ FH4T RADIO CONTROL SYSTEM USER'S GUIDE CURvE MENU { ExPONENTIAL, ADjUSTAbLE RATE CONTROL AND CURvE } RACING 100% Point Curve percentage values can be adjusted from Mild through Linear to Quick to allow you to set the most effective control response for your model.
- Page 95 M12S SUPER Telemetry System with Sanwa Synchronized Link Support 2.4GHZ FH4T RADIO CONTROL SYSTEM USER'S GUIDE SPEED MENU { SERvO SPEED } RACING The Servo Speed function allows you to slow the transit speed of the Steering, Throttle, Auxiliary 1 and Auxiliary 2 channels. When driving your model, proper Steering and Throttle control are vital.
- Page 96 M12S SUPER Telemetry System with Sanwa Synchronized Link Support 2.4GHZ FH4T RADIO CONTROL SYSTEM USER'S GUIDE SPEED MENU { SERvO SPEED } RACING Changing the Point Percentage and IN and OUT Values: The Point percentage value determines where along either side of servo travel that the servo's transit speed will be changed. The IN and OUT values determine whether the change in servo transit speed occurs between the two points (IN) or outside the two Points (OUT).
- Page 97 M12S SUPER Telemetry System with Sanwa Synchronized Link Support 2.4GHZ FH4T RADIO CONTROL SYSTEM USER'S GUIDE ALb MENU { ANTI-LOCk bRAkING } RACING Changing the Stroke Percentage Value: The Stroke percentage value determines the amount of Brake that's applied automatically when the Anti-Lock Braking function is turned ON.
- Page 98 M12S SUPER Telemetry System with Sanwa Synchronized Link Support 2.4GHZ FH4T RADIO CONTROL SYSTEM USER'S GUIDE ALb MENU { ANTI-LOCk bRAkING } RACING Changing the Lag Value: The Lag value determines the amount of Delay before the Anti-Lock Braking function Activates after reaching the Point setting.
- Page 99 M12S SUPER Telemetry System with Sanwa Synchronized Link Support 2.4GHZ FH4T RADIO CONTROL SYSTEM USER'S GUIDE OFFSET MENU { THROTTLE OFFSET } RACING Changing the Brake Lock Percentage Value: When a Car Type that features a separate Brake channel (Car Type II, III, IV,VI or VII) is selected, the Brake Lock function can be programmed to apply Brake to keep your model from moving while the Throttle Offset Position is increased.
- Page 100 M12S SUPER Telemetry System with Sanwa Synchronized Link Support 2.4GHZ FH4T RADIO CONTROL SYSTEM USER'S GUIDE TH-HLD MENU { THROTTLE HOLD } RACING The Throttle Hold function moves the Throttle servo to a fixed position, either toward the High Side or the Brake Side, and is used primarily with glow- or gas-powered models.
- Page 101 M12S SUPER Telemetry System with Sanwa Synchronized Link Support 2.4GHZ FH4T RADIO CONTROL SYSTEM USER'S GUIDE TH-HLD MENU { THROTTLE HOLD } RACING Changing the Brake Lock-Out Value, Continued: If your Car Type features two separate Brake channels, such as Car Type IV, the Brake Lock-Out function will affect both Brake channels equally.
- Page 102 M12S SUPER Telemetry System with Sanwa Synchronized Link Support 2.4GHZ FH4T RADIO CONTROL SYSTEM USER'S GUIDE C-MIx1 AND C-MIx2 MENU { COMPENSATION MIxING 1 AND COMPENSATION MIxING 2 } RACING Available channels vary based on the Car Type currently chosen. The table below shows the available channels for each Car Type.
- Page 103 M12S SUPER Telemetry System with Sanwa Synchronized Link Support 2.4GHZ FH4T RADIO CONTROL SYSTEM USER'S GUIDE C-MIx1 AND C-MIx2 MENU { COMPENSATION MIxING 1 AND COMPENSATION MIxING 2 } RACING Changing the Master Channel, Continued: 2) Press the ENTER key to open the C-MIX1 menu. MASTER > ST will be highlighted.
- Page 104 M12S SUPER Telemetry System with Sanwa Synchronized Link Support 2.4GHZ FH4T RADIO CONTROL SYSTEM USER'S GUIDE C-MIx1 AND C-MIx2 MENU { COMPENSATION MIxING 1 AND COMPENSATION MIxING 2 } RACING Changing the Channel Offset Value, Continued: When the Auxiliary Dial is programmed to control Auxiliary 1 or Auxiliary 2 and you choose AUX1 or AUX2 (or...
- Page 105 M12S SUPER Telemetry System with Sanwa Synchronized Link Support 2.4GHZ FH4T RADIO CONTROL SYSTEM USER'S GUIDE T-MIx1 AND T-MIx2 MENU { TELEMETRY MIxING 1 AND TELEMETRY MIxING 2 } RACING Currently TMP1, TMP2, VOLT and RPM Master Telemetry Data options are available. As different types of Telemetry Sensors are developed, these will be added as Master Telemetry Data Options in future firmware updates.
- Page 106 M12S SUPER Telemetry System with Sanwa Synchronized Link Support 2.4GHZ FH4T RADIO CONTROL SYSTEM USER'S GUIDE T-MIx1 AND T-MIx2 MENU { TELEMETRY MIxING 1 AND TELEMETRY MIxING 2 } RACING Changing the Rate 1 and Rate 2 Percentage Values: The Rate percentage values determine the amount and direction of Slave channel servo travel. Use a Positive or Negative percentage value to change the amount and direction of travel.
- Page 107 M12S SUPER Telemetry System with Sanwa Synchronized Link Support 2.4GHZ FH4T RADIO CONTROL SYSTEM USER'S GUIDE ACkER MENU { ACkERMAN ANGLE ADjUSTMENT } RACING The Ackerman function allows you to change the Steering Angle of the front tires independently to prevent the tires from slipping during turns.
- Page 108 M12S SUPER Telemetry System with Sanwa Synchronized Link Support 2.4GHZ FH4T RADIO CONTROL SYSTEM USER'S GUIDE R-DLY MENU { RACING MODE DELAY } RACING The Racing Mode Delay function allows you to program a Delay for each of the four channels to help prevent drastic changes in channel function settings when switching between Racing Modes.
-
Page 109: Custom Menu Overview
M12S SUPER Telemetry System with Sanwa Synchronized Link Support 2.4GHZ FH4T RADIO CONTROL SYSTEM USER'S GUIDE CODEAx1 AND CODEAx2 MENU { CODE AUxILIARY 1 AND CODE AUxILIARY 2 } RACING This section covers both the Code Auxiliary 1 and Code Auxiliary 2 menus, since programming each of them is exactly the same. - Page 110 M12S SUPER Telemetry System with Sanwa Synchronized Link Support 2.4GHZ FH4T RADIO CONTROL SYSTEM USER'S GUIDE CUSTOM MENU OvERvIEw CUSTOM The following Programming Menus are available within the CUSTOM menu: MENU MENU DESCRIPTION PAGE # CH-SET Adjust Programming Values for Common Functions in One Convenient Location PG.
-
Page 111: Troubleshooting Guide
This troubleshooting guide below and on the next few pages can help you diagnose and solve some of the more common problems that you may encounter with your M12S Super radio control system. If you cannot solve the problem using this troubleshooting guide, please contact us directly using the information in the Service and Support section on page 3. - Page 112 M12S SUPER Telemetry System with Sanwa Synchronized Link Support 2.4GHZ FH4T RADIO CONTROL SYSTEM USER'S GUIDE PRObLEM CAUSE SOLUTION Receiver won't power ON Receiver batteries are dead Replace or recharge receiver batteries Receiver batteries not installed correctly Reinstall receiver batteries, observing correct polarity...
- Page 113 Turn Telemetry system ON External device not paired Pair external device to system External device not compatible Use compatible Airtronics or Sanwa external device Not using compatible receiver Use Airtronics or Sanwa 2.4GHz FH4T receiver Transmitter vibrates under certain conditions...
- Page 114 M12S SUPER Telemetry System with Sanwa Synchronized Link Support 2.4GHZ FH4T RADIO CONTROL SYSTEM USER'S GUIDE RACING MODE FUNCTIONS bY CAR TYPE REFERENCE TYPE TYP I TYP II TYP III TYP IV TYP V TYP VI TYP VII TYP VIII...
- Page 115 M12S SUPER Telemetry System with Sanwa Synchronized Link Support 2.4GHZ FH4T RADIO CONTROL SYSTEM USER'S GUIDE TRIM SwITCH, AUxILIARY DIAL AND AUxILIARY LEvER FUNCTIONS REFERENCE FUNCTION DESCRIPTION FUNCTION DESCRIPTION TRIM AUX Trim Auxiliary ALB LAG Antil-Lock Braking Lag TRIM AUX1...
-
Page 116: Glossary Of Terms
M12S SUPER Telemetry System with Sanwa Synchronized Link Support 2.4GHZ FH4T RADIO CONTROL SYSTEM USER'S GUIDE GLOSSARY OF TERMS REFERENCE Ackerman Angle: An engineered value that allows the inner tire to turn at a sharper angle than the outer tire to prevent the tires from slipping during turns. - Page 117 Some users may find that the Response Time is in some cases too fast, therefore, it's adjustable to suit the driver's driving style, Car Type and track conditions. FH3 Modulation: Frequency Hopping 3rd generation FHSS technology. FH3 Modulation is used in newer-generation Airtronics and Sanwa radio control systems, such as the M11X and MX-3X.
- Page 118 Best Lap Time and the Average Lap Time are all displayed. Lap Times are displayed in the following format: 00':00".00 (Minutes : Seconds : 1/100th of a Second). Latency: The Response Time between the transmitter and receiver. The M12S Super and RX-472 receiver combination offer an incredibly fast Response Time, making you feel more connected to your model than ever.
- Page 119 Do not use with Analog servos! SSR Channel Response Mode: When used with Airtronics or Sanwa Super Response SRG Digital servos, this will provide the fastest Response Time. This results in the ultimate feel and response, making you feel more in control of your model than ever.
- Page 120 M12S SUPER Telemetry System with Sanwa Synchronized Link Support 2.4GHZ FH4T RADIO CONTROL SYSTEM USER'S GUIDE GLOSSARY OF TERMS REFERENCE Status Screen: Displays information about the transmitter and is the base from which you access other Programming Menus. Steering Output Display: Displays on the TELEMETRY screen the current position of the Steering channel as a percentage of Steering Wheel travel.
-
Page 121: Index
Auxiliary Lever. User Name: Allows you to change the Name displayed above the M12S Super logo on the STATUS screen. Vibrator: Makes the transmitter vibrate like a cell phone to make you aware of different alerts and alarms that you might encounter during use. - Page 122 M12S SUPER Telemetry System with Sanwa Synchronized Link Support 2.4GHZ FH4T RADIO CONTROL SYSTEM USER'S GUIDE INDEx REFERENCE Assign Screen, Definition of 116 Assign Screen, Overview 18 Audible Key Tone, Definition of 116 See also Audible Tones Audible Tones, Changing the Volume 47...
- Page 123 M12S SUPER Telemetry System with Sanwa Synchronized Link Support 2.4GHZ FH4T RADIO CONTROL SYSTEM USER'S GUIDE INDEx REFERENCE Brake Side, Definition of 116 Burn, Adjusting and Controlling 78 Burn, Definition of 116 Buzzer Menu, Overview 46 Buzzer Menu. See Audible Tones...
- Page 124 M12S SUPER Telemetry System with Sanwa Synchronized Link Support 2.4GHZ FH4T RADIO CONTROL SYSTEM USER'S GUIDE INDEx REFERENCE Custom Menu, Programming Table 110 Custom Menu, Removing Programming Menus 111 Data Point Scale, Definition of 21, 117 Data Point Scale, Diagram of 21...
- Page 125 M12S SUPER Telemetry System with Sanwa Synchronized Link Support 2.4GHZ FH4T RADIO CONTROL SYSTEM USER'S GUIDE INDEx REFERENCE Firmware, Viewing Current Firmware Version 71 Four Wheel Steering, Controlling 79 Four Wheel Steering Mixing, Choosing Mixing Options 79 Four Wheel Steering Mixing, Definition of 117...
- Page 126 M12S SUPER Telemetry System with Sanwa Synchronized Link Support 2.4GHZ FH4T RADIO CONTROL SYSTEM USER'S GUIDE INDEx REFERENCE LED Condition Indicators, Table of Transmitter Conditions 10 Li-Fe Battery Pack, Charging Li-Fe Battery Pack, Installing 11 Log Setup, Overview 56 Log Setup. See Telemetry Display and Recording Options...
- Page 127 M12S SUPER Telemetry System with Sanwa Synchronized Link Support 2.4GHZ FH4T RADIO CONTROL SYSTEM USER'S GUIDE INDEx REFERENCE Next Programming Menus, Definition of 20 Next Programming Menus, Diagram of 20 Nominal Input Voltage, Receiver Specification 5 Nominal Input Voltage, Transmitter Specification 5 Normal Channel Response Mode.
- Page 128 M12S SUPER Telemetry System with Sanwa Synchronized Link Support 2.4GHZ FH4T RADIO CONTROL SYSTEM USER'S GUIDE INDEx REFERENCE Push-Button Switches, Definition of 9, 119 Push-Button Switches, Diagram of 6, 7 Push-Button Switches, Function Table 38 Push-Button Switches, Overview 37 Racing Menu, Programming Table 87...
- Page 129 M12S SUPER Telemetry System with Sanwa Synchronized Link Support 2.4GHZ FH4T RADIO CONTROL SYSTEM USER'S GUIDE INDEx REFERENCE Servo Monitor, Definition of 119 Servo Monitor, Overview 36 Servo Monitor, Using the Servo Monitor 37 Servo Reversing, Changing the Servo Reversing Values 75...
- Page 130 M12S SUPER Telemetry System with Sanwa Synchronized Link Support 2.4GHZ FH4T RADIO CONTROL SYSTEM USER'S GUIDE INDEx REFERENCE Telemetry Assign, Changing the Telemetry Push-Button Switch Control Function and Mode Values 44 Telemetry Assign, Changing the Telemetry Trim Switch Control Function, Step and Reverse Values 44...
- Page 131 M12S SUPER Telemetry System with Sanwa Synchronized Link Support 2.4GHZ FH4T RADIO CONTROL SYSTEM USER'S GUIDE INDEx REFERENCE Throttle Trigger Position, Changing 14 Throttle Trigger Spring Tension, Changing 12 Throttle Trigger, Using to Start the Countdown Timer 86 Throttle Trigger, Using to Start the Interval Timer 84...
- Page 132 M12S SUPER Telemetry System with Sanwa Synchronized Link Support 2.4GHZ FH4T RADIO CONTROL SYSTEM USER'S GUIDE Airtronics is Imported Exclusively in North America by: Global Hobby Distributors 18480 Bandilier Circle Fountain Valley, CA 92708 Telephone: (714) 963-0329 Fax: (714) 964-6236 Email: service@airtronics.net...
Need help?
Do you have a question about the M12S SUPER and is the answer not in the manual?
Questions and answers