
Related Manuals for Snowrex GW-6D


Summary of Contents for Snowrex GW-6D
-
Page 1: User Manual
GW Professional Weighing Scale User Manual SNOWREX INTERNATIONAL CO., LTD. SRGW 20100415... -
Page 2: Table Of Contents
Table of Contents Table of Contents ..................1 Specifications ......................2 Basic specification..................2 Series specification(EC TYPE/OIML APPROVED)........2 Series specification(NON-APPROVED)............2 Display and keypad ....................3 LCD Display....................3 Keypad......................4 Using the weighing scale..................6 Counting function................... 6 Percentage function ..................6 Operation of M+..................... -
Page 3: Specifications
Less than 85% Humidity DC9V / 500mA, AC adapter; Power Built in 6V Rechargeable Battery Interface RS-232C (optional) Series specification(EC TYPE/OIML APPROVED) Model GW-6D GW-15D GW-30D 3kg / 6kg 6kg / 15kg 15kg / 30kg / Max / Min 20g / 3kg... -
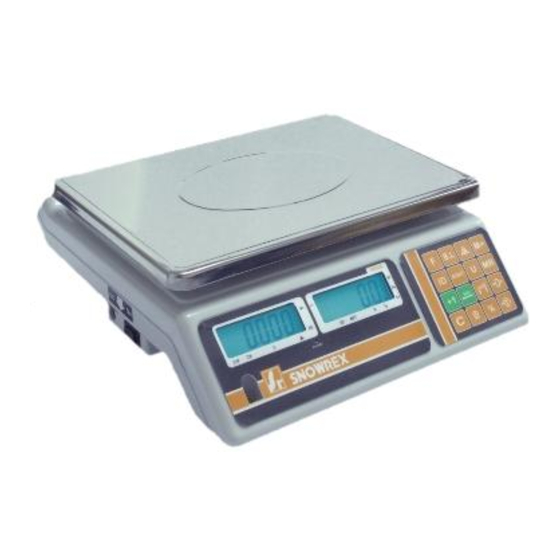
Page 4: Display And Keypad
Display and keypad LCD Display Numerical display to display weight, ID number Indicates the weight is stable. Indicates the weight is at zero. Indicates the total weights in memory Indicates the accumulation weights in memory. When ▼ is shown above the G.W. indicator, the Gross Weight is displayed. -
Page 5: Keypad
Keypad Key Icons Keypad Descriptions Zero key Press to absorb trivial weight on the pan and set the scale to zero. Tare key Press to perform tare operation. Number setting Press “+1” key to increase number and & keys press “shift” to shift the digit. Clear key Press to clear the input data. - Page 6 Unit key Press to switch between kg and lb. ID key Press to enter the ID mode. Use the numeric keypad to enter the user’s ID number. Gross/Net/Tare Press to toggle among Gross Weight, Net Weight, and Tare Weight on the display.
-
Page 7: Using The Weighing Scale
Using the weighing scale Counting function Put certain pieces of objects on to the scale pan. In weighing mode, press , and then use & keys to set the piece counts. Press to confirm. Now you are ready to perform parts counting for the specific samples. Percentage function Put certain pieces of objects on to the scale pan. -
Page 8: Alarm Function
Press to exit the MR mode without clearing the data in memory. Alarm function Press key to set the upper bound of the weight. The Hi is showing in the left window. Set up the weight upper bound with the &... -
Page 9: Settings And Calibration
Settings and Calibration 1. Press and hold any key while turning the scale ON. CAL 1 is shown on the LCD display. 2. Press key to toggle among the CAL 1, CAL 2, CAL 3, and CAL 4 menus. 3. Select CAL 1, press to enter General Settings menu. -
Page 10: Print Settings (Cal 2)
4. bbS - Go Beep Setting Display Explanation bbG_ 0 Disable Hi alarm sound. bbG_ 1 Set Hi alarm sound as continual short beeps. bbG_ 2 Set Hi alarm sound as continual long beeps. 5. bbL – Lo Beep Setting Display Explanation bbL_ 0 Disable Hi alarm sound. -
Page 11: Continuous Printing Weight Data. Usually Used For Sending
Press M+ to print single weighing result. Press C in MR P. ALL.2 mode to print accumulated weighing result and total accumulation. Print Net wt when the scale is stable and weight > 0. Continuous printing weight data. Usually used for sending P.Count weight data to PC. -
Page 12: Calibration Procedure (Cal 3)
Calibration Procedure (CAL 3) Please remove the JP3 jumper before you start the calibration process. In Calibration menu, press to toggle among the menu options. And press to confirm. 1. SEL maximum capacity Display Descriptions Set maximum capacity as 6 kg. LoAd Set maximum capacity as 15 kg. -
Page 13: Linearity Calibration Procedure (Cal 4)
Linearity Calibration Procedure (CAL 4) Note: This section can only be operated by engineers. Please have the jumper JP3 switch OFF before you start the calibration process. In Calibration menu, press to toggle among the menu options. And press to confirm. 1. -
Page 14: Rs232C Connection: Db-09 (Male)
RS232C Connection: DB-09 (Male) Pin setup: 2 (TXD) 3 (RXD) 5 (GND) others (NC) Bi-directional RS232C Setting This section is applicable only for models with RS-232C module. OUTPUT FORMAT STA SIGN W SPACE U ‘U’ (55h) indicates it’s an unstable weight. ‘S’...
Need help?
Do you have a question about the GW-6D and is the answer not in the manual?
Questions and answers