Table of Contents
Advertisement
Advertisement
Table of Contents

Related Manuals for Gryphon Pandora


Summary of Contents for Gryphon Pandora
- Page 1 Pandora Owner´s Manual...
-
Page 2: Table Of Contents
Table of Contents: Introduction....... The Gryphon....... The Man......Made in Denmark....Musical Objectives..... The Gryphon Master Tape Collection......Design Principles....Exterior Design....Manufacture and Assembly. Using Your Gryphon..AC Voltage......Burn-in and Warm-up..Balanced Connections..Choice of Cables....Care and Maintenance.. -
Page 3: Introduction
Gryphon Audio even in the loudest passages Designs of Denmark. Your new are also high priorities. To Gryphon unit has been painstak- achieve these objectives, ingly designed to re-create the Gryphon products offer excep-... -
Page 4: The Man
The Man Following the immediate suc- cess of the Gryphon brand, all Gryphon Audio Designs is the import business was phased out brainchild Flemming in 1993, so that Rasmussen Rasmussen and the fulfillment of could dedicate his efforts entire- a lifelong dream to allow the ly to Gryphon. -
Page 5: The Gryphon Master Tape Collection
Unlike conventional commercial them from contaminating the sig- releases, our master tapes cap- nal path. ture the dynamic contrasts and Gryphon is located in beautiful tranquil subtle inner harmonic structure surroundings. - Page 6 While the printed circuit boards All Gryphon designs are realized in more conventional audio prod- with an absolute minimum of ucts utilize conductor tracks a negative feedback, which when mere 35 um thick, Gryphon present in large amounts can employs at least 70 um traces of actually increase TIM distortion.
-
Page 7: Exterior Design
By lavishing attention on each of the Gryphon concept can only aspect of the circuit and fully Gryphon Audio Designs in the be fully understood and appreci-... -
Page 8: Manufacture And Assembly
Gryphon’s custom-developed every Gryphon product a distinc- transport simulator which simu- tive, luxuriant finish which arises lates the inevitable shaking that organically out of the audio cir- a product will encounter in tran- cuit design and the user inter- sit. -
Page 9: Balanced Connections
Metal surfaces may be cleaned with a damp cloth. Some product Choice of Cables made for treatment of vinyl inte- riors in cars may be useful. Test Because your Pandora is a high- the product on a non-visible sur- resolution Gryphon audio face, before using any fluids. -
Page 10: Installation
The following items are Rear panel con- enclosed: 1 Pandora preamplifier nections 1 Pandora power supply Make sure that the power sup- 1 AC power cables ply is turned off, before making 2 DC power supply cables any connections. -
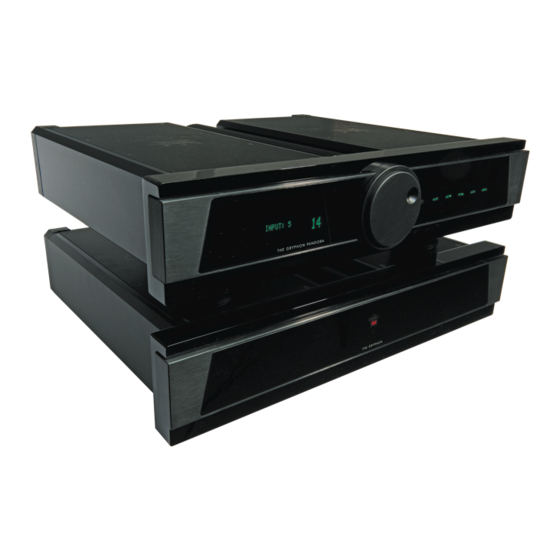
Page 11: Front Panel & Remote Functions
Link in is automatic switching Menu-activated the Pandora on/std when con- functions nected to a unit with same fea- ture and protecol. The Gryphon Pandora Link out is automatic switching incorporates several functions other compatible units on/std which are accessed via a Menu from the Pandora. -
Page 12: Naming Inputs
and NAME INPUT will appear in 1.a. If you have choosen custom the display. To exit the Menu, naming, the selected input num- press an Input button so that ber will appear in the second EXIT blinks in the display, then line, followed by a colon (:) and a press Monitor to return to normal cursor marking the first position... - Page 13 to the input, turn the volume selected maximum volume set- wheel through the standard ting is now stored in memory. name list in the following order: CHANGE LEVEL will appear in the display. Press CD – DVD – DSD – TUNER – Menu to select the next menu- TAPE –...
- Page 14 Dedicated AV you must choose the input that Connection you wish to adjust. This is done You can use the Pandora with a with the up/down function. stereoamplifier in a normal After you have selected your stereo set-up but using a sepa-...
- Page 15 Pandora. If you do wish to make Menu to select the next menu- a dedicated AV connection, controlled function. press Monitor. WARNING! NO ATTENUATION will blink in the Setting Display display for 5 seconds, after Brightness which you will be asked to con-...
-
Page 16: Ac Fuses
Brightness at 100% and sets Input 3 as a normal audio input. AC Fuses When RESTORE SETTINGS appears in the display, press The Pandora powersupply has Monitor. RESTORE? appears in 2 AC fuse holders, holding 2 the first line of the display. NO fuses. -
Page 17: Warranty
Warranty ing injuries to persons or proper- The Gryphon Pandora is war- To qualify, the enclosed warranty ranted against failures arising registration card must be filled through faulty workmanship and out and returned to the manufac- materials for a period of 5 year turer within 10 days of purchase.
Need help?
Do you have a question about the Pandora and is the answer not in the manual?
Questions and answers