Table of Contents
Advertisement
Advertisement
Table of Contents

Related Manuals for NextBase iN-CAR CAM 101 Go NBDVR101


Summary of Contents for NextBase iN-CAR CAM 101 Go NBDVR101
- Page 1 Instruction Manual...
-
Page 3: Table Of Contents
TABLE OF CONTENTS PRECAUTIONS ........................PRODUCT SPECIFICATION ....................PACKAGE CONTENTS ............................................PRODUCT FEATURES PARTS AND CONTROLS ......................INSTALLATION ..............................................INSTALLATION NOTES VIDEO MODE ..............................................VIDEO MODE SETTINGS ......................... PHOTO MODE ....................... PHOTO MODE SETTINGS ................... PLAYBACK MODE - VIDEO FILES .................. -
Page 4: Precautions
PRECAUTIONS Please read this manual carefully before operation and keep it for future reference. It will be useful should you encounter any operational problem. WARNING: Do not expose this product to rain, moisture or water under any circumstances, doing so may result in the risk of electric shock of fire. CAUTION: To reduce the risk of electric shock, do not perform servicing other than that contained in the instruction manual unless you are qualified to do so. -
Page 5: Product Specification
PRODUCT SPECIFICATION Model Number / Name NBDVR101 / NEXTBASE iN-CAR CAM 101 Go Power Requirements 5V / 150mA Power Supply 12-24Vdc Car Power Cable (supplied) Fuse Type: 20mm Glass Fast Blow 2A Sensor Resolution 1M Pixel (1,000,000 Pixel) Lens Type / Angle / Aperature 4G / 120°... -
Page 6: Package Contents
PACKAGE CONTENTS After unpacking please check the contents of your iN-CAR CAM product package, as listed below. iN-CAR CAM Mount Car Power Cable USB Cable Instruction Manual Quick Start Guide Instruction Manual The actual products might appear slightly different from the pictures shown above. -
Page 7: Product Features
PRODUCT FEATURES Thank you for purchasing this NEXTBASE iN-CAR CAM product, in this section we will outline some of the features available with this device. 2" 4:3 LCD Colour Screen Large screen for ease of use and viewing the playback of both videos and photos. -
Page 8: Parts And Controls
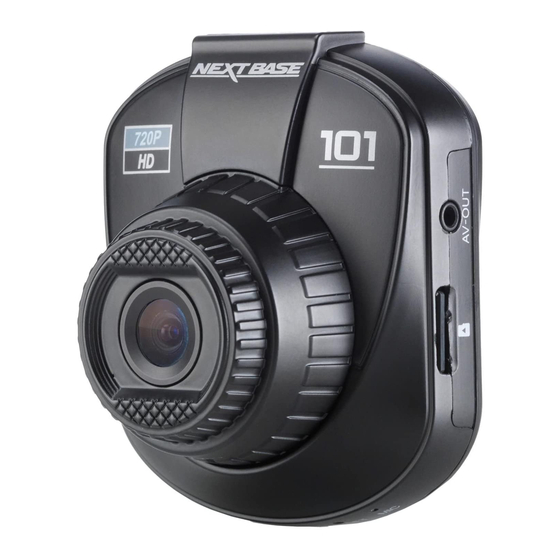
PARTS AND CONTROLS 10 9 8 7 RESET MIC 1. POWER / MODE 5. MEMORY CARD SLOT POWER: Insert MicroSD card here. Press and hold for 2 seconds to turn Compatible with SDHC <=32GB, Class 6-10. On / Off the iN-CAR CAM. 6. - Page 9 PARTS AND CONTROLS (CONTD.) 10 9 8 7 RESET MIC 10. MENU / SCREEN SAVER (contd.) 8. MICROPHONE / DOWN SCREEN SAVER: MICROPHONE: Press and hold for 2 seconds whilst recording Press whilst recording to turn off audio to turn on the screen saver function. recording, press again to turn back on.
-
Page 10: Installation
INSTALLATION The above diagram is for illustration purposes only. 1. Insert a suitable MicroSD card (Class 6 or higher), taking care that the gold contacts are facing the screen. Push the memory card until it clicks into place. 2. Attach the device to the supplied mount, taking care the locking tab has ‘clicked’ firmly into place. 3. -
Page 11: Installation Notes
INSTALLATION NOTES Please read and follow the notes below for safe operation of your iN-CAR CAM within your vehicle. As per the supplied installation instructions, it is advised to install the iN-CAR CAM so it does NOT obstruct the drivers view of the road, preferably on the passenger side of the vehicle and behind the rear view mirror. -
Page 12: Video Mode
VIDEO MODE The key below explains the various information displayed on the screen when your iN-CAR CAM is in Video mode, some icons will only be displayed once the relevant function has been selected within the Video menu, as described further down this page. 1. -
Page 13: Video Mode Settings
VIDEO MODE SETTINGS To access the Video Mode settings press the MENU (M) button, use the up and down buttons to select the required option and press OK to view available settings. The default settings within the iN-CAR CAM have been set to allow you to use the iN-CAR CAM without the need to change any of the settings, however it is recommended that you explore these settings to familiarise yourself with the product and it’s capabilities. -
Page 14: Photo Mode
PHOTO MODE The key below explains the various information displayed on the screen when your iN-CAR CAM is in Photo mode, some icons will only be displayed once the relevant function has been selected within the Photo menu, as described further down this page. 01410 1. -
Page 15: Photo Mode Settings
PHOTO MODE SETTINGS To access the Photo Mode settings press the MENU (M) button, use the up and down buttons to select the required option and press OK to view available settings. To change a setting select chosen option using the up and down buttons and press the OK button to confirm. -
Page 16: Playback Mode - Video Files
PLAYBACK MODE - VIDEO FILES The key below explains the information displayed on the iN-CAR CAM screen when a video is viewed within Playback Mode. 00:00:00 00:00:00 00:00:00 00:00:00 100-0001 100-0001 100-0001 100-0001 1. Video Icon: Indicates the iN-CAR CAM is viewing a video file. 2. -
Page 17: Playback Mode - Photo Files
PLAYBACK MODE - PHOTO FILES The key below explains the information displayed on the iN-CAR CAM screen when a photo is viewed within Playback Mode. 100-0001 1. Photo Icon: Indicates the iN-CAR CAM is veiwing a photo file. 2. Memory Card Icon: Shown on screen when a memory card is present. 3. -
Page 18: Setup Menu
SETUP MENU There is a Setup menu for the general settings, press the MENU (M) button twice on the rear of the device to access the menu. The options and settings available are described below. To change a setting select chosen option using the up and down buttons and press the OK button to confirm. - Page 19 SETUP MENU (CONTD.) 6. G Sensor Adjust the sensitivity of the G Sensor, it is the G Sensor that detects forces which will automatically protect the current recording in event of a collision. Settings: Off, Low, Medium or High Default: Medium 7.
-
Page 20: Pc Connection
(useful for when using your iN-CAR CAM as a rear facing camera while connected to another device for viewing). The controls upon the iN-CAR CAM operate normally during AV output. Please contact your local NEXTBASE dealer for accessory purchases. -
Page 21: Troubling Shooting
Check that the car adaptor LED indicator is illuminated (red), if is connected. not then inspect the car adaptor fuse. Replacement 2A 20mm fuses are available from your local Nextbase dealer. Video Image is blurred. Remove the protective lens cover, clean the lens. Clean the windscreen! Video recording is jumpy. - Page 22 TROUBLE SHOOTING (CONTD) The AV Out from my iN-CAR Ensure that the AV cable is correct. Use a stereo 2.5mm jack CAM just buzzes on my TV. plug where the tip is the video and the ring is the audio signal. I get the message “Card Error”...
- Page 24 NBDVR101-IM-ENG-A0...
Need help?
Do you have a question about the iN-CAR CAM 101 Go NBDVR101 and is the answer not in the manual?
Questions and answers