Table of Contents
Advertisement
Quick Links
Advertisement
Table of Contents

Subscribe to Our Youtube Channel
Related Manuals for Spectra MobileMapper 20

Summary of Contents for Spectra MobileMapper 20
- Page 1 MobileMapper ® Getting Started Guide...
- Page 2 Copyright Notice Product purchase price paid by you, at Spectra Pre- cision’s option, upon your return of the Product in ac- Copyright 2013 Trimble Navigation Limited. cordance with Spectra Precision’s product return All rights reserved. procedures then in effect. Trademarks...
- Page 3 REPLACED BY AN INCORRECT TYPE. DISPOSE OF THE MAXIMUM EXTENT PERMITTED BY APPLICA- USED BATTERIES ACCORDING TO THE INSTRUC- BLE LAW, IN NO EVENT SHALL SPECTRA PRECI- TIONS. SION OR ITS SUPPLIERS BE LIABLE FOR ANY INDIRECT, SPECIAL, INCIDENTAL, OR CONSE-...
-
Page 5: Table Of Contents
Table of Contents First-Time Use ..................1 Unpacking ..................1 Inserting the Battery Into the Receiver..........1 Turning the Receiver On..............2 Using the AC Adapter to Charge the Battery ........3 Using the Quick Toolbar ..............4 Switching the Receiver Manually to Suspend Mode......4 Adjusting Backlight Level and Idle Time ........... -
Page 7: First-Time Use
First-Time Use Unpacking Open the receiver box and unpack the following items: • Receiver • Battery • Universal AC adapter • USB cable • Hand strap • Lanyard • Stylus Inserting the Follow the instructions below: Battery Into the • Turn over the receiver. Receiver •... -
Page 8: Turning The Receiver On
Adjusting Backlight Level and Idle Time on page 4. • If it less, Spectra Precision recommends you first charge the battery as explained in Using the AC Adapter to Charge the Battery on page 3. -
Page 9: Using The Ac Adapter To Charge The Battery
Using the AC Follow the instructions below. Adapter to Charge • Prepare the AC adapter: the Battery – Remove the protective cover [1] by pushing the button then sliding the cover forward. – Choose the plug that fits your country’s AC outlet standard (see [2]) and slide it into the AC adapter [3]. -
Page 10: Using The Quick Toolbar
• To read the battery charging status using the Quick Toolbar, refer to the instructions in Turning the Receiver On on page 2 (see also Using the Quick Toolbar on page 4). Using the Quick Windows offers a quick toolbar allowing you to quickly access frequently used functions (zoom, Bluetooth, WiFi, Toolbar phone, sound volume, battery power and clock). -
Page 11: Power Management
Follow the instructions below to set these two parameters: • Press the Windows key and tap successively on Settings, System and Backlight. • Tap on the Battery Power tab. • Drag the cursor to the right or left to set the screen backlight to the desired level (between Dark and Bright). -
Page 12: Regional Settings
Regional Settings It’s a good idea to customize your receiver so that it complies with a number of local preferences, such as country’s currency, decimal point representation, time and date formats, etc. • Press the Windows key and tap successively on Settings, System and Regional Settings. -
Page 13: How To Hold The Receiver
How to Hold the Receiver Tracking satellites with your receiver requires that you use the receiver outdoor and hold it in an appropriate manner. The receiver will have the best view of the sky when you hold it at an angle of around 45 degrees from horizontal and not too close to your body. -
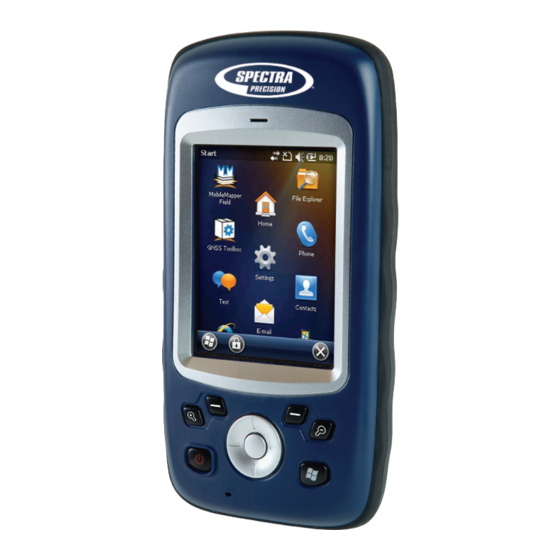
Page 14: Receiver Description
(e.g. Notifications, Contacts, Menu, Log, etc.). In Spectra Precision applications with a map screen displayed, use this button to zoom in. In Windows Embedded, displays the Start menu. -
Page 15: Rear View
[13] [14] GPS antenna is automatically disconnected from the receiver input. The antenna input connector is protected by a rubber flap. Spectra Precision recommends you keep the flap close when no external antenna is used. [15] [16] Loudspeaker The back of the receiver incorporates a high-quality loudspeaker [11]. -
Page 16: Bottom View
Battery Compartment The receiver makes use of a rechargeable Li-Ion battery pack. Loosen the quarter-turn screws [15] [16] using the stylus (or a coin) to access the battery compartment [17]. The two screws use opposite directions of rotation for opening and closing the trap door. -
Page 17: Gnss Toolbox
GNSS Toolbox GNSS Toolbox is used to control and monitor important functions in your receiver. These are listed and detailed below. • GNSS Settings: Constellations and frequencies used in the receiver. • GNSS Status: Views GNSS reception monitoring screens. • Reset: Resets the receiver. •... -
Page 18: Reset
Using the Reset function is recommended when only the GNSS Toolbox (and not other field software) is running on the platform. About This function provides the software version of GNSS Toolbox, followed by the Spectra Precision legal line. -
Page 19: Advanced Features
Advanced Features Power Modes The receiver has three power modes: • Shutdown: The receiver is off. • On: The receiver is fully powered • Suspend: In this mode, the screen content and backlight are turned off to save power and the use context is saved. When quitting the Suspend mode, the use context is restored instantly. - Page 20 With only about 5% of remaining power (red area), a new message will pop up: “Main Battery Very Low”. Tap Dismiss in the task bar to continue using the receiver. Spectra Precision however recommends that you turn off the receiver and replace the battery.
-
Page 21: Usb Connection
take longer to charge the battery from a computer’s USB port than from the AC adapter. You can ask the receiver not to allow the charging of the battery through the USB port when this port is connected to a computer. To do this: –... -
Page 22: Wireless Communication
system, install new applications directly from the computer, etc. If you want to make a different use of the receiver’s USB output, press the Windows key, go to Settings>Connections> USB to PC and change the settings accordingly. Wireless Communication The receiver incorporates three wireless communication devices: •... -
Page 23: Motion Sensor
• Tap on Search for Networks to turn on Wi-Fi and start searching for the networks that are available from your location. • Choose one, then follow the instructions until you are given access to the Internet. GSM/GPRS Module Provided the appropriate SIM card has previoulsy been inserted in the battery compartment, the GSM/GPRS modem allows you to: •... -
Page 24: Using The Camera
Scrolling through Your Picture Gallery By setting the motion sensor as a switch, you can easily go through all your pictures or audio files, just using the hand that holds the receiver, leaving your other hand free. After you have opened the MyPictures folder for example and tapped on the first picture to view it, you just need to shake the receiver briefly to view the next one, and so forth until all the pictures in the folder have been viewed. - Page 25 • Tap OK to turn off the camera and close the window. The picture you have taken is now visible in the “My Pictures” folder. Renaming a Picture • With the “My Pictures” folder open, tap on the desired picture. This opens a new window showing the picture. •...
-
Page 26: Making A Video
Deleting a Picture • With the “My Pictures” folder open, tap and hold the desired picture. • Select Delete in the context-sensitive menu. • Tap Yes to confirm file deletion. Changing Picture Settings • Press the Windows key and tap Pictures & Videos. This opens the “My Pictures”... - Page 27 Starting a Video • Tap Camera to turn on the camera. Wait a couple of seconds until the center of the window displays the viewfinder of the camera. • Tap anywhere on the screen to make the task bar visible at the bottom of the screen •...
- Page 28 Deleting a Video • With the “My Pictures” folder open, tap and hold the desired video file. • Select Delete in the context-sensitive menu. • Tap Yes to confirm file deletion.
-
Page 29: E-Compass Calibration
E-Compass Calibration • Press on the Windows key. • Scroll down until you see the Compass icon. • Tap on the Compass icon to open the Compass utility. • Tap on the Calibration tab. • Put the receiver down on a table to give it a horizontal position (see picture [1] below). -
Page 30: Platform Specifications
– Transcriber (handwriting recognition) Communication Cellular: • Built-in cell modem • Bands: Depending on MobileMapper 20 P/N and detected network: P/N 802168-00: 3.5G: 900 and 2100 MHz 2G: 850, 900 and 1800 MHz - P/N 802168-10: 3.5G: 850 and 900 MHz 2G: 850, 900, 1800 and 1900 MHz Bluetooth: 2.1 with EDR... -
Page 31: Physical Characteristics
WiFi disabled, screen backlight used at minimum Requirements level 20% of the time. • Charging time: 4 hours • Removable battery Multimedia & • 3-Megapixel camera Sensors • E-Compass • G-Sensor • Speaker • Microphone Software Options • Spectra Precision MobileMapper Field and Office software... -
Page 32: Standard Accessories
• Post-processing • ESRI ArcPad software bundle (USA only) Standard • Stylus Accessories • Hand strap • Universal AC adapter • USB cable. - Page 33 Index OPP (Object Push Profile) Accessories PDOP Adjusting backlight Play back video Alignment POGO cable Power modes Battery compartment Battery life Processor Battery status icon Bluetooth QVGA Burst Rename picture Rename video file Calibration (screen) Camera Reset Camera lens Resolution Camera settings SBAS Delete picture...
- Page 34 44474 Carquefou Cedex, FRANCE Singapore 449269, Singapore www.spectraprecision.com ©2013 Trimble Navigation Limited. All rights reserved. Spectra Precision is a Division of Trimble Navigation Limited. Spectra Precision and the Spectra Precision logo are trademarks of Trimble Navigation Limited or its subsidiaries. P/N 631675-01A.
Need help?
Do you have a question about the MobileMapper 20 and is the answer not in the manual?
Questions and answers