Table of Contents

Related Manuals for Sakar 87480


Summary of Contents for Sakar 87480
-
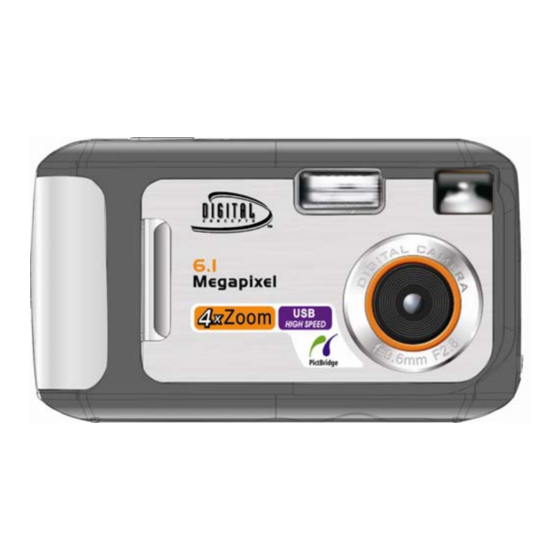
Page 1: Digital Camera
87480 Digital Camera Owner’s Manual © 2006 Sakar International, Inc. All rights reserved. Windows and the Windows logo are registered trademarks of Microsoft Corporation. All other trademarks are the property of their respective companies. -
Page 2: Table Of Contents
Table of Contents Key Features ....................3 What your camera includes: ................. 3 Computer System Requirements for windows:..........4 Computer System Requirements for Macintosh:..........4 A Quick Look at Your Camera ............... 5 Preparing Your Camera for Use..............10 Starting Your Camera................... 12 Camera Mode.................... -
Page 3: Key Features
Introduction Thank you for purchasing a 87480 digital camera. Everything you need to take quality digital photos is included with your camera. Please read this manual carefully FIRST in order to get the most out of your digital camera. Key Features ... -
Page 4: Computer System Requirements For Windows
Strap Computer System Requirements for windows: To be able to download photos to your PC you will need the following minimum configuration: Pentium processor or above with MS Windows ME, NT Service Pack 6, 2000, XP 128 MB RAM, 80 MB free disk space Available USB Interface CD-ROM Drive Recommended screen resolution 1024 X 768 pixels or greater... -
Page 5: A Quick Look At Your Camera
When you change batteries, all the data in the built-in memory will be deleted if no SD Memory Card has been inserted in the camera. DO NOT switch modes or rotate the Mode dial if your camera is connected to the printer when using PictBridge. -
Page 6: The Lcd Screen
The LCD Screen Icons on the LCD Screen The Mode Dial There are 4 modes on your DV camera. To select mode turn the dial so the correct icon is visible. - Page 7 Camera Mode: Take still photos Video Mode: Capture video Playback Mode: View, print and edit photos and view videos Setup Mode: Set date and time, exposure, white balance, sharpness, photo quality, frequency format and auto off time, format a memory card. Battery power level Mode Digital Zoom...
- Page 8 Self-timer Protect On Self-timer On...
- Page 9 The Main Buttons Down/ Self –Timer Power on/off: Turn your camera On/Off . Press the button Left/Date once to turn your camera on. Pressing it again will turn your camera off. Right/Delete Navigation buttons OK/Enter Display Menu The Navigation buttons are used to navigate and select functions.
-
Page 10: Preparing Your Camera For Use
Preparing Your Camera for Use Battery Installation Your camera requires two AA batteries. Insert the batteries into the camera: Slide the cover of the battery compartment open. Please make sure that the correct battery is inserted with the correct polarity facing up. Please refer to the diagram below for the correct insertion method Close battery door WARNING: Unless you are using an SD memory card, opening the battery compartment and/or... -
Page 11: Installing An Optional Memory Card
When the Low Battery icon is flashing, you need to replace your camera’s batteries. If you do not have an SD memory card in the camera, please download any photos you have on the camera before opening the battery compartment. Note: If you do not intend to use your camera for an extended period, remove the batteries to avoid battery leakage and corrosion. -
Page 12: Starting Your Camera
Starting Your Camera Press and hold the On/Off button to start the camera. The LCD screen will light up and the camera will sound a beep. This will confirm that your camera is on and ready for use. Camera Mode Set the mode dial to Camera Mode –... - Page 13 Digital Zoom You can magnify your subject up to 4 times using the digital zoom. Use the buttons to adjust the zoom. The icon will flash on your LCD screen. Push the button to zoom in on your subject. Push the button to zoom back out.
- Page 14 Press the button repeatedly. Select the icon shown on the LCD screen. This will activate the automatic flash. Press the button repeatedly until the icon appears. This will turn off the flash function. Self-Timer You can include yourself in a photo by using this feature to delay the time between your pressing the shutter and when the photo is actually taken.
- Page 15 Press the button to select DELETE. Press the OK/Enter button to confirm deletion. Press the button and select CANCEL if you do not wish to delete the image. Push OK/Enter to confirm your selection. If you do not press any navigation buttons within 10 seconds, the menu disappears. Image Size and Quality The image size and quality settings determine the number the number of photos and the amount of memory required for each photo.
- Page 16 NOTE: To increase the number of photos your camera can take and store, use an external SD compatible memory Card (not included). SD memory cards come in a variety of capacities. Please refer to the “Installing an Optional Memory Card” section of this manual for more information. To learn how to set photo quality please refer to the “Setup Mode”...
-
Page 17: Video Mode
Press OK/Enter to confirm your selection. The new image size will appear on the bottom left of the LCD screen. Video Mode Set the mode dial to Video mode. The icon will appear on the LCD screen. You can take 320 x 240 pixel digital video clips with your camera. Without an SD memory card, the internal 32MB of memory in your camera can record up to approx. -
Page 18: Playback Mode
NOTE: The video will be saved in AVI (Audio Video Interleave) format and can be played by either with Windows Media Player or Apple Quick Time. Shooting time varies depending on the available space in your camera's memory. Playback Mode Set the mode dial to Playback mode. - Page 19 Single image or video clip with icons. Thumbnails display. When a file is selected, the number of the file you have selected will be displayed out of a total number of files in memory (e.g. 0018/0025). Thumbnails Display: Press the Display button till you see your images displayed as thumbnails.
- Page 20 Press the Display button until you see the full screen display. Use the navigation arrows to browse the files in your camera. Rotate: Press the menu button Using the navigation buttons, select LEFT to rotate the photo 90 degrees to the left or RIGHT to rotate the photo 90 degrees to the right or CANCEL. Press the OK/Enter button to confirm your selection.
- Page 21 Press the navigation buttons until you have selected the Protect menu. Using the navigation buttons, select LOCK to protect the file or CANCEL to unlock it. Press the OK/Enter button to confirm your selection. A lock icon will appear on the LCD screen if you have selected to protect the file. (Note: Formatting a memory card will delete protected data too).
- Page 22 Press the navigation buttons until you have selected the Delete menu. Using the navigation buttons, select a function and press the OK/Enter button to confirm your selection. OK: Delete the image currently selected. The image displayed in the LCD monitor will be erased. You can use the repeat this procedure for each image you wish to erase ALL: Delete all unprotected still Images.
- Page 23 Press the navigation buttons until you have selected the Crop menu. Using the navigation buttons, select a function. ZOOM & PAN: Press to zoom in and press to zoom out. Press the navigation buttons to pan across the image. Panning allows you to move around the image you have zoomed in...
- Page 24 iii. Press the OK/Enter button to crop the image. In the Crop menu, select SAVE AS to save the image you have just cropped. Select ZOOM & PAN to return to Zoom and Pan mode. Select CANCEL to exit the menu without making changes. SAVE AS: This function is used to save a copy of an image after you have cropped it.
- Page 25 Press the navigation buttons until you have selected the PictBridge menu. Using the navigation buttons, select: ENTER to print using PictBridge and press the OK/Enter button to confirm your selection. Connect your camera to a PictBrigde compatible printer when you see the “Connect Printer Please”...
-
Page 26: Setup Mode
iii. Using the navigation buttons, select either PRINT to print the image or CANCEL exit the menu without printing. Press the OK/Enter button to confirm your selection. If you wish to print a different image, use the use the navigation buttons to scroll through your images. Press the menu button to return to the Print menu. - Page 27 Image Settings: This setting allows you to return your camera to its default settings. Select “Auto” to restore these settings. Press the navigation buttons until you have selected the Image Settings menu. Using the navigation buttons, select AUTO to restore the default settings or select CANCEL to exit the menu without making changes.
- Page 28 Press the navigation buttons until you have selected the Image Settings menu. Using the navigation buttons, select an exposure value. Press the navigation buttons up to increase the EV value or down to decrease the EV value. Select a positive value to increase brightness (make photos lighter), or a negative value to decrease brightness (make photos darker).
- Page 29 Press the navigation buttons until you have selected the White Balance menu. Using the navigation buttons, select the most appropriate light source: Outdoor/ Shade/ Incandescent/ Fluorescent. Press the OK/Enter button to confirm your selection. Sharpness: This setting allows you to adjust the sharpness of your images, making edges more or less distinct. Press the navigation buttons until you have selected the Sharpness menu.
- Page 30 The quality of your photos also affects the number of shots you can take. The HIGH setting means you can take fewer photos, but they will be of better quality. Press the navigation buttons until you have selected the Quality menu. Using the navigation buttons, select your Quality setting: Standard or High Press the OK/Enter button...
- Page 31 Press the navigation buttons until you have selected the Frequency menu. Using the navigation buttons, select your Frequency setting: 60Hz or 50Hz. Press the OK/Enter button to confirm your selection. Date and Time: The PhoTags Express software makes it possible for you to keep track of the dates of your photos. The date you shot the image is recorded by the camera and will appear automatically on the photo when you download it to your computer using the PhoTags Express software.
- Page 32 Press the navigation buttons until you have selected the Date menu. Using the navigation buttons, select your Date setting: On, Off or Set Date and then press the OK/Enter button to confirm your selection. ON: The date icon will appear on the LCD screen. The date and time of recording will be imprinted on the bottom right of the photo.
- Page 33 Use the buttons to select: Year, Month, Day, Hour, Minutes or Seconds. iii. Use the buttons to adjust these values. Press the OK/Enter button Use the buttons to select Yes to confirm your change of date and time or No exit the menu without making changes. Press the OK/Enter button Auto Off: The Auto Shut-Off is a special battery-saving feature which allows the camera to turn itself off...
- Page 34 Press the navigation buttons until you have selected the Auto Off menu. Using the navigation buttons, select the time period the camera will remain idle before automatically shutting off. Press the OK/Enter button to confirm your selection. Format Memory Card: This function reformats the memory card and will erase all files in memory including files that have been protected Press the...
-
Page 35: Installing Photags Express Software
No to exit the menu without formatting. Press the OK/Enter button to confirm your selection. CANCEL to exit the menu without making changes. Press the OK/Enter button to confirm your selection. Installing PhoTags Express Software Insert the Software CD that came with your camera into the CD-ROM drive. Make sure that your camera is NOT connected to the computer. - Page 36 On the “PhoTags Express" screen, click the “Next” button. Please review the license terms and click the “Agree” button to continue.
-
Page 37: Everything You Need To Get The Most From Your Photos
Let the “PhoTags Express” installer create the folder where the program will be installed, and then click “Install”. Click “Finish” to let the “PhoTags Express” installer finish the installation program. Once the program has finished installing please restart your computer. Congratulations!! You have successfully installed the “PhoTags Express”... - Page 38 Enhance your photos; Auto Enhance, Crop and Correct Red Eye. Add Active Captions- add Text Captions, Frames, Shapes, Keywords… and more that can be viewed or hidden at any time. Locate and Organize your photos and collections- Search by Captions, Category, Keyword or Date - directly from the operating system of your computer.
-
Page 39: Transferring Images To Your Pc
Transferring Images to your PC Transfer Images Using PhoTags Express: 1. Set your camera to PLAYBACK mode. 2. Connect your camera to your computer using the USB cable provided. 3. Make sure that your camera is connected and is turned ON. 4. - Page 40 8. On the next screen, select where to place your photos and click the “Finish” button to copy the photos to your computer. 7. Add Active Captions to your pictures. You can add a date, keywords, categories and more. Click “Next”...
- Page 41 Plug one end of the USB cable into the USB slot on your camera. Plug the other end of the USB cable into a USB port on your computer. Make sure that your camera is connected and turned ON. Double-click the “PhoTags Express” icon on your desktop to launch the “PhoTags Express”...
- Page 42 The “Device Selection” mode will appear. Both your camera and the memory card will each appear in the “Active Devices” list as a “Removable Disk”. Toggle between the two devices to select your pictures. Custom Copy: This mode is used to manually select the photos you wish to copy to your computer. Select "Custom Copy".
- Page 43 Select your photos and click "Next" to continue. Add Active Captions to your pictures. With this feature, you can add a date, keywords and categories. Click “Next” to continue.
- Page 44 On the next screen, choose where you wish to place your photos on your computer. Click on “Finish” to copy the photos to the location you selected. All of the pictures you imported will appear in the “Select photos” main window. Express Copy Method: Select this option if you wish to have all the images transferred to the PC without the option of selecting photos.
-
Page 45: Viewing Videos On Your Computer
FAQ’s at the website. Can’t find what you are looking for? Fill out an online ticket and one of our technical support team members will answer questions or call 877-397-8200 or 732-476-5098 to access our technical support information on the phone. For question on warranty information please email warranty@sakar.com Appendix A: Technical Specifications... -
Page 46: Appendix B: Troubleshooting
Product Type : Digital camera Functions: DSC/Mass Storage/Pictbridge Electronic Coupling Element : CMOS Sensor Image Resolutions 2720 x 2048 (6 MP), 2592 x 1944 (5 MP), 2304X1728(4 MP), 2048 x 1536 (3 MP) ,1600 x 1200 (2 MP), 640 x 480 (VGA). Lens : f =8.4mm, F2.8 Memory Device: Internal built-in 32MB (SDRAM) Picture format: (JPEG) - Page 47 will not work. More information about determining your computer's specifications can be found in the General Computer Information section. If you have determined that you have pictures in your camera and you meet the system requirements, follow the steps below to reinstall the software. Software Re-installation 1.
- Page 48 6. Restart your computer again. Your camera is now successfully installed. Q: How do I make sure I don't lose important pictures? Your camera uses flash memory which requires a constant electric current to store your photos. Should your camera lose power (for instance if the battery dies or is removed) all stored pictures will be lost. We recommend always downloading your photos to your computer as soon as possible to prevent unintentional data loss.
Need help?
Do you have a question about the 87480 and is the answer not in the manual?
Questions and answers