Sony PMW-100 Operating Instructions Manual
Solid-state memory camcorder
Hide thumbs
Also See for PMW-100:
- Operating instructions manual (142 pages) ,
- Brochure & specs (6 pages) ,
- Getting started (2 pages)
Table of Contents
Advertisement
Quick Links
Advertisement
Table of Contents

Related Manuals for Sony PMW-100


Summary of Contents for Sony PMW-100
-
Page 1: Operating Instructions
4-425-716-11(1) Solid-State Memory Camcorder PMW-100 AUTO MANU AUTO MANU Operating Instructions Before operating the unit, please read this manual and the more detailed manual on the CD-ROM and retain it for future reference. Printed in China © 2012 Sony Corporation... - Page 2 caution when moving the cart/apparatus WARNING combination to avoid injury from tip-over. To reduce the risk of fire or electric shock, • Unplug this apparatus during lightning do not expose this apparatus to rain or storms or when unused for long periods of moisture.
- Page 3 E3 (urban outdoors), E4 (controlled EMC environment, ex. TV studio). Bateria de Ion-Lítium Atenção: The manufacturer of this product is Sony Se a bateria não for manuseada Corporation, 1-7-1 Konan, Minato-ku, Tokyo, corretamente, ela poderá explodir, causar 108-0075 Japan.
- Page 4 (environnement EMC contrôlé, ex. studio de Afin d’écarter tout risque d’électrocution, télévision). garder le coffret fermé. Ne confier l’entretien de l’appareil qu’à un personnel Le fabricant de ce produit est Sony qualifié. Corporation, 1-7-1 Konan, Minato-ku, Tokyo, 108-0075 Japon. AVERTISSEMENT Le représentant autorisé...
- Page 5 Freien) und E4 (kontrollierter EMV-Bereich, WARNUNG z.B. Fernsehstudio). Um die Gefahr von Bränden oder elektrischen Schlägen zu verringern, darf Der Hersteller dieses Produkts ist Sony dieses Gerät nicht Regen oder Corporation, 1-7-1 Konan, Minato-ku, Tokyo, Feuchtigkeit ausgesetzt werden. 108-0075 Japan.
-
Page 6: Table Of Contents
Table of Contents Overview Part Identification ..............8 Camcorder ..............8 Preparations Power Supply ................12 Using a Battery Pack ............ 12 Using AC Power (DC IN Power) ......... 13 Turning the Power On/Off ........... 13 Setting the Clock ..............13 Adjusting the LCD Monitor and Viewfinder ....... - Page 7 Appendices Specifications ................25 General ................. 25 Lens ................26 Camera Block ............... 27 Inputs/Outputs .............. 27 Displays ................ 28 Internal Microphone ............. 28 Media Slot Block ............28 Package Configuration ..........28 Optional Accessories ............ 29 Table of Contents...
-
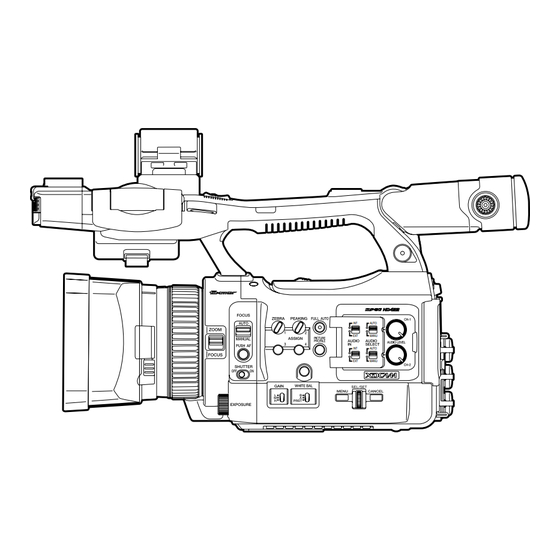
Page 8: Part Identification
Overview Part Identification For functions and use, see the operating instructions (PDF). Camcorder Operation panel on the handle Rear connector panel 11 10 9 Side operation panel Card slot block Lens hood Headphone connector (stereo mini jack) Rear IR remote control receptor Power switch BATT RELEASE button Eyepiece focusing knob... - Page 9 Controls on the grip Viewfinder Operation panel on the handle Rear accessory shoe External microphone holder LCD (Liquid Crystal Display) monitor Front accessory shoe Built-in microphone REC/TALLY lamp Front IR remote control receptor/ NightShot IR transmitter Built-in speaker AUDIO IN CH-1/CH-2 connectors (XLR) and input selection (LINE/MIC/ MIC+48V) switches Hooks for the shoulder strap...
- Page 10 On-handle ZOOM button GAIN switch Zoom speed switch WHITE BAL (white balance memory) switch F FWD (fast forward) button WHITE BAL (automatic white balance LCD BRIGHT (LCD brightness adjustment) button adjustment) button MENU (menu display on/off) button NEXT (clip directional jump) button SEL/SET dial (jog dial) DISPLAY button It functions accordingly when you turn it up or...
- Page 11 REC START (start/stop recording) Rear connector panel button Bottom Behind the cover USB connector (Mini B) i.LINK (HDV/DV) connector (4-pin, S400 conforming to IEEE1394) A/V OUT connector (audio/video multi Tripod receptacles output) Note HDMI OUT connector Check that the size of the hole matches the screw of SDI OUT connector (BNC type) the tripod.
-
Page 12: Power Supply
Checking battery charge remaining AC adaptor. When recording or playback is in progress on the For safety, use only the Sony battery packs and battery pack, an icon to show the current battery AC adaptor listed below: charge level and usage time remaining are... -
Page 13: Using Ac Power (Dc In Power)
Using AC Power (DC IN Power) Setting the Clock Connection example: when connecting BC-U1 When you turn the camcorder on for the first time after purchasing or replacing the backup battery (“Appendices” in operating instructions (PDF)), the Initial Setting display appears on the LCD monitor/viewfinder screen. -
Page 14: Adjusting The Lcd Monitor And Viewfinder
You can change the setting so that the EVF is always on regardless of the status in the LCD Adjusting the LCD monitor, using “EVF” (“Menu Configuration and Monitor and Viewfinder Detailed Settings” in operating instructions (PDF)) in the LCD/VF SET menu. Change the “Power”... -
Page 15: Using The Ir Remote Commander
ATTENTION Using the IR Remote Il y a danger d’explosion s’il y a remplacement Commander incorrect de la batterie. Remplacer uniquement avec une batterie du même type ou d’un type équivalent recommandé par le constructeur. Lorsque vous mettez la batterie au rebut, vous To use the IR Remote Commander devez respecter la législation en vigueur dans le For controlling the camcorder from the IR... -
Page 16: Using Sxs Memory Cards
Lights in Standby (ready for recording or green playback using the loaded SxS memory SxS, SxS PRO and SxS-1 are trademarks of Sony card) Corporation. • No SxS memory card is loaded. The ExpressCard word mark and logo are owned •... -
Page 17: Switching Between Sxs Memory Cards
Note Switching Between SxS Memory All the data, including recorded pictures and setup files, Cards are erased when a memory card is formatted. When SxS memory cards are loaded in both card Checking the Remaining Time slots A and B, press the SLOT SELECT button Available for Recording (page 10) to select the card you wish to use. - Page 18 To restore a card Select “Execute” by pressing the up/down/ left/right buttons or turning the jog dial, then push the SEL/SET button or the jog dial. During restoration, the in-progress message and status bar (%) are displayed, and the ACCESS lamp is lit in red.
-
Page 19: Basic Operation Procedure
Recording Basic Operation Procedure 6, 7 REC START/STOP REC REVIEW (on the grip) Power switch: ON (the " position) LCD monitor Battery pack insertion angle adjustment FULL AUTO SxS memory card slots Preparations Recording (Full Auto mode) Mount a fully charged battery pack. Press the FULL AUTO button so that the button indicator lights. - Page 20 To delete clips Note You can delete the last recorded clip by using the AF (Auto Focus) is not activated by setting the Last Clip DEL function (“Recording” in camcorder to Full Auto mode. operating instructions (PDF)). Use the All Clips For information of automatic focus adjustment, DEL function (“Recording”...
- Page 21 Note If copying is done using Explorer (Windows) or Finder (MAC), the continuity and relationships of recorded materials may not be maintained. Maximum duration of a clip The maximum clip length is 24 hours for FAT (MP4 or AVI) and 6 hours for UDF (MXF). If you exceed the maximum clip length, a new clip will be automatically created.
-
Page 22: Overview Of The Setup Menus
Menu Configuration and Detailed Settings Overview of the Setup Menus Press the MENU button to display setup menus Setup Menu Layers on the LCD monitor/EVF screen with settings necessary for recording and playback. (You can also display setup menus on an external monitor.) MENU Set items by selecting them from the following CAMERA SET... -
Page 23: Basic Menu Operations
LCD/VF SET Basic Menu Operations Peaking Marker Zebra Display On/Off Menu controls TC/UB SET Timecode MENU button (page 9) Users Bit To turn Menu mode to use Setup menus on/off. TC Format Up/Down/Left/Right buttons, SEL/SET button OTHERS All Reset (page 9) Camera Data When you press the up/down/left/right buttons, Time Zone... - Page 24 Setting the Setup menus Entering a character string Rotate the jog dial or press the up/down/left/right When you select an item for which a character buttons to set the cursor to the icon of the menu string, such as a time value or filename, is to be you wish to set, then push the jog dial or SEL/ specified, the input area for the character string is SET button to select that menu.
-
Page 25: Appendices
Storage temperature Appendices –20°C ~ +60°C Specifications Continuous operation time (While recording with LCD Off, EVF On and I/O Select Off) General With battery pack BP-U90: approx. 6 hours Mass With battery pack BP-U60: approx. 4 Camcorder only: approx. 1.5 kg hours (3 lb 4.9 oz) With battery pack BP-U30: approx. -
Page 26: Lens
1920 × 1080/59.94i, 50i, 29.97p, 25p, When using SBP-16 (16GB): Approx. 23.98p 45 minutes 1280 × 720/59.94p, 50p, 29.97p, 25p, DVCAM mode 23.98p When using SBP-64 / SBS-64G1A HD420 mode: MPEG-2 MP@HL, (64GB): Approx. 220 minutes 35Mbps / VBR When using SBP-32 / SBS-32G1A 1440 ×... -
Page 27: Camera Block
Focus area Inputs/Outputs Auto/manual switchable 10 mm to ∞ (wide end) Audio input 800 mm to ∞ (tele end) XLR type 3-pin (2), female, LINE/MIC/ MIC+48V switchable Iris LINE: +4 dBu Auto/manual switchable MIC: -70 dBu to -30 dBu F1.8 to F2.9 (Reference input level 0 dBu=0.775 Picture stabilizing function Vrms) -
Page 28: Displays
SxS memory cards, or if you want to connect the camcorder to your computer. • If you have lost or damaged the CD-ROM, you can Internal Microphone purchase a new one to replace it. Contact your Sony service representative. Internal microphone Operating instructions in PDF... -
Page 29: Optional Accessories
ANY TYPE. MEAD-MS01 (for “Memory Stick PRO-HG • Always verify that the unit is operating Duo” HX series) properly before use. SONY WILL NOT BE MEAD-SD01 (for SDHC cards) LIABLE FOR DAMAGES OF ANY KIND Electret condenser microphone INCLUDING, BUT NOT LIMITED TO,...
Need help?
Do you have a question about the PMW-100 and is the answer not in the manual?
Questions and answers