Alesis SR18 Quick Start Manual
Hide thumbs
Also See for SR18:
- Quick start manual ,
- Service manual (75 pages) ,
- Reference manual (60 pages)
Table of Contents
Advertisement
Quick Links
QUICKSTART GUIDE
BOX CONTENTS
Please make sure the following items can be located in the box:
SR18
Power Adapter (12V DC 500mA)
Quickstart Manual
READ THE SAFETY AND WARRANTY INFORMATION BOOKLET BEFORE USING THIS PRODUCT!
CONNECTION DIAGRAM
As you hook up the
SR18,
the
volume
control
on
your
power amp and the
SR18 should be all
the way down, and
power to both units
should be off.
1.
Plug ¼" TS cables from the MAIN OUTPUTS to an amplifier, mixer, or speaker system. For mono
sound, you can connect only one output.
2.
Alternatively, you can connect a pair of ¼" TRS headphones to the PHONES OUTPUT.
3.
Connect your instrument to the INSTRUMENT INPUT.
4.
If you have ¼" TS footswitches, connect them to the START / STOP and COUNT / A / B / FILL
jacks.
5.
Plug the included power adapter (12V DC 500mA) into the adapter jack and the adapter into a
power source. Alternatively, you may choose to power the unit by inserting 6 AA batteries into the
bottom compartment.
6.
Press the POWER switch to turn on the unit.
7.
Tap the pads to hear sounds. You can switch among the three different sound categories for the
pads by pressing the corresponding button (DRUMS, PERC, BASS).
8.
Adjust the volume control on the rear panel to a suitable listening level.
Reference Manual
Safety and Warranty Information
1
Advertisement
Table of Contents

Related Manuals for Alesis SR18


Summary of Contents for Alesis SR18
-
Page 1: Box Contents
SR18, volume control your power amp and the SR18 should be all the way down, and power to both units should be off. Plug ¼” TS cables from the MAIN OUTPUTS to an amplifier, mixer, or speaker system. For mono sound, you can connect only one output. - Page 2 8,16, or 32 beats long, and correspond to a verse, chorus, bridge, instrumental, intro, etc. Think of Patterns as the building blocks for your Songs. The SR18 holds 100 Preset (i.e., can't be edited) Patterns and 100 user-programmable Patterns, each of which can be from 1 to 128 beats long.
-
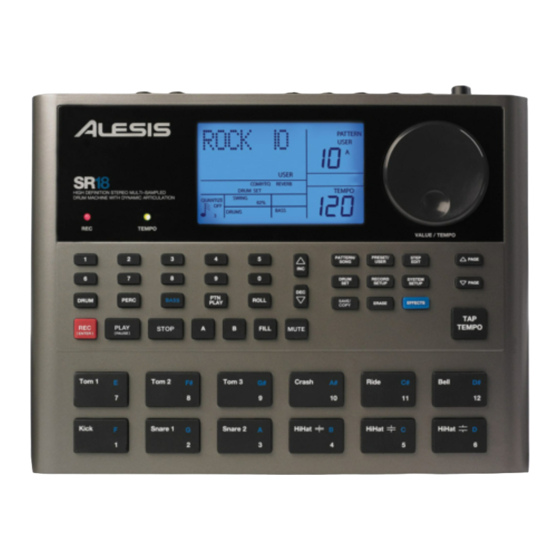
Page 3: Overview Of The Controls
OVERVIEW OF THE CONTROLS Now that we have introduced you to the infrastructure of the SR18, let’s dive in and take a closer look at some of the controls. GENERAL CONTROLS: LCD – The display helps you keep track of system parameters and settings as you use the SR18. -
Page 4: Navigation Buttons
TEMPO LED – This LED will blink at a rate equal to the tempo displayed on the screen’s bottom right corner. REC LED – This LED will light when the SR18 is recording. It will blink when you are required to confirm or cancel an action. -
Page 5: Mode Buttons
TRANSPORT CONTROL BUTTONS: PLAY – If the SR18 is stopped, pressing PLAY will play the sequence from the current position. If the SR18 is playing, pressing PLAY will pause the sequence. To go to the beginning of the current pattern (or current step if in Song Mode) press PAGE DOWN. -
Page 6: Playing Patterns
Pattern will begin playing as soon as the currently-selected Pattern reaches its end. STEP 3 You can call up a different Pattern number while the SR18 is playing. Press the INC / DEC buttons or use the VALUE dial to select a Pattern. You may also enter a Pattern number... - Page 7 This cancels the transition to the alternate pattern (in this example, the A pattern would continue playing). PLAYING PATTERNS WITH THE PADS The SR18 allows you to play sequences of Pattern by triggering Patterns with the pads. This mode is called Pattern Play Mode. STEP 1 Press the PTN PLAY button –...
- Page 8 RECORDING YOUR OWN PATTERNS STEP 1 If the display’s upper right window shows SONG, press the PATTERN / SONG button once to select Pattern Mode (PATTERN will be displayed). STEP 2 If the display’s upper right window does not show USER, press the PRESET / USER button once to select User Patterns (USER will be displayed in the upper right corner).
- Page 9 MUTING INSTRUMENT LAYERS The SR18 allows you to mute any of its three instrument layers (drums, percussion, bass) in real-time. For example, you can mute the drum track by holding down MUTE and then pressing DRUM.
- Page 10 LOADING AND CREATING DRUM SETS The SR18 has 100 Preset and 100 Editable Drum Sets (groups of sounds). After pressing the DRUM SET button, you can use the INC / DEC buttons, the VALUE dial, or the number buttons to select a different set (each set can have its own sounds, tuning, volume, panning, etc).
- Page 11 STEP 7 Note that Drums and Percussion sounds are grouped in each Drum Set. This means that changing the drum sounds to a different set on page 1 of the Drum Set menu will cause the Percussion sounds to change as well (although individual pad sounds may be replaced freely once a Drum Set has been loaded).
Need help?
Do you have a question about the SR18 and is the answer not in the manual?
Questions and answers