Table of Contents

Related Manuals for Alesis Nitro


Summary of Contents for Alesis Nitro
- Page 1 User Guide English ( 3 – 9 ) Guía del usuario Español ( 10 – 16 ) Guide d’utilisation Français ( 17 – 23 ) Guida per l’uso Italiano ( 24 – 30 ) Benutzerhandbuch Deutsch ( 31 – 37 ) Appendix English ( 38 )
-
Page 3: Quick Start / Connection Diagram
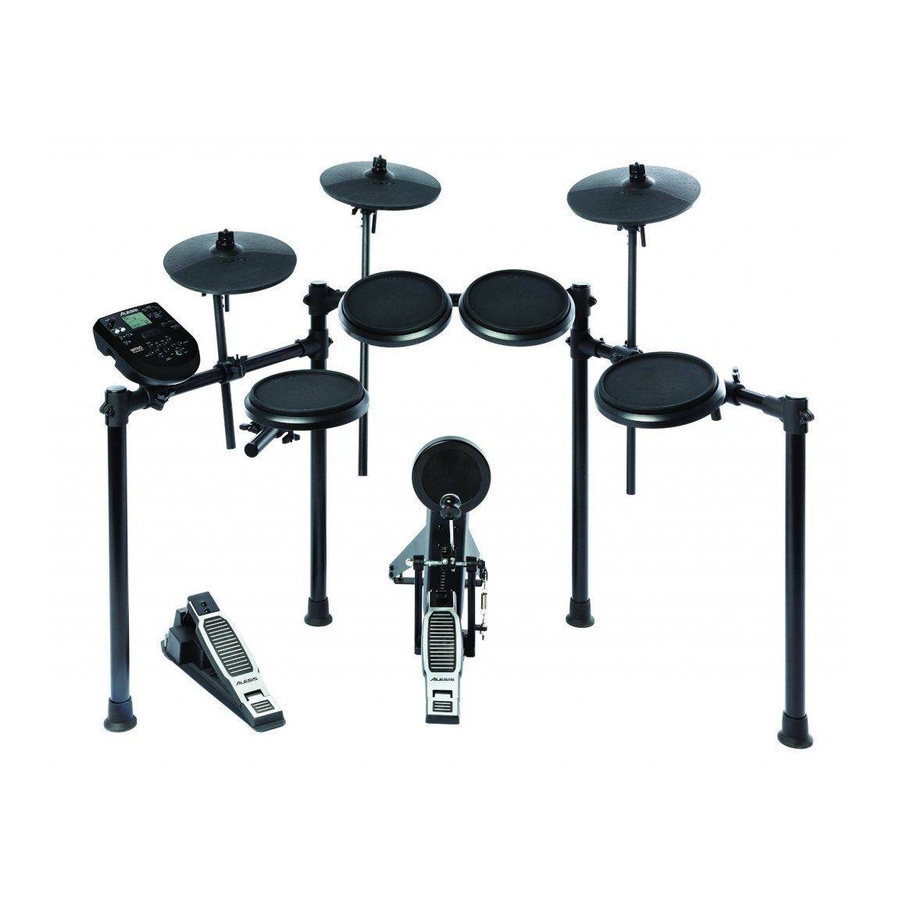
Introduction Support For the latest information about this product (system requirements, compatibility information, etc.) and product registration, visit alesis.com. For additional product support, visit alesis.com/support. Quick Start / Connection Diagram Setup and Playing Crash 2 Cymbal Pad* Tom 4 Drum Pad*... -
Page 4: Front Panel
Features Front Panel 1. Display: Shows the module's current settings and functions. 2. Song/Pattern: In Normal Mode, press this button to enter the Song Menu, where you can select a song or adjust song-related settings. In Learning Mode, press this button to enter the Pattern Menu, where you can select a pattern (full kit plus accompaniment) to play along to or adjust pattern-related settings. -
Page 5: Rear Panel
Rear Panel 1. Outputs: Use standard 1/4" TRS cables to connect these outputs to a speaker or amplifier system. The level of these outputs is controlled by the Volume knob. 2. Aux In: Use a standard 1/8" stereo cable to connect this input to an optional audio player (e.g,. -
Page 6: Editing And Saving Drum Kits
Basic Functions Editing and Saving Drum Kits Important: • To edit and save your kits, you must be in Normal Mode. If the LED above the Song/Pattern button is not lit, press and hold Page/Select until it is. • Remember to save your kits after you have entered the settings you want! First, press Kit until NUM appears in the display. -
Page 7: Playing Along With Songs
Playing Along With Songs Important: To play songs, you must be in Normal Mode. If the LED above the Song/Pattern button is not lit, press and hold Page/Select until it is. To select and play a song: 1. Press Song until NUM appears in the display. 2. -
Page 8: Adjusting Utility Settings/Metronome
Advanced Functions Adjusting Utility Settings The Utility settings let you further customize your pad settings and adjust the module's MIDI settings. To adjust the Utility settings: Hit the pad whose settings you want to adjust, or press its corresponding Pad Select button. Press Utility, then press Page/Select until the desired setting appears in the display: •... -
Page 9: Midi Settings
Stop recording on your sequencer. Your performance has been recorded. Notes: • Pressing Start/Stop to start/stop Song playback generates the MIDI message FA (start) or FC (stop). • When syncing the module with another MIDI device, the Nitro module can only be the master, not the slave. -
Page 10: Inicio Rápido Y Diagrama De Conexión
Introducción Soporte Para obtener la información más completa acerca de este product (los requisitos del sistema, compatibilidad, etc) y registro del producto, visite alesis.com. Para soporte adicional del producto, visite alesis.com/support. Inicio rápido y diagrama de conexión Cómo instalarlo y tocar... -
Page 11: Panel Frontal
Características Panel frontal Pantalla: Muestra los parámetros y funciones actuales del módulo. Tema/Patrón: En modo normal, pulse este botón para abrir el menú Song (Tema), en el que puede seleccionar un tema o ajustar parámetros relacionados con el tema. En modo de aprendizaje, pulse este botón para abrir el menú... -
Page 12: Panel Superior
Panel superior 1. Salidas: Use cables estándar TRS de 1/4 pulg. para conectar estas salidas a un altavoz o sistema de amplificador. El nivel de estas salidas se controla con la perilla Volume. 2. Entrada auxiliar: Use un cable estéreo estándar de 1/8 pulg. - Page 13 Funciones básicas Cómo editar y guardar los kits de batería Importante: • Para editar y guardar sus kits, debe estar en modo normal. Si el LED que está arriba del botón Song/Pattern no está encendido, mantenga pulsado Page/Select hasta que se encienda. •...
- Page 14 Cómo tocar con temas de acompañamiento Importante: Para reproducir temas, debe estar en modo normal. Si el LED que está arriba del botón Song/Pattern no está encendido, mantenga pulsado Page/Select hasta que se encienda. Para seleccionar y reproducir un tema: Pulse Song (Tema) hasta que aparezca NUM en la pantalla.
-
Page 15: Funciones Avanzadas
Funciones avanzadas Cómo ajustar los parámetros de la utilidad Los parámetros Utility (Utilidad) le permiten personalizar más aún los parámetros de sus pads y ajustar los parámetros MIDI. Para ajustar los parámetros de la utilidad: Toque el pad cuyos parámetros desea ajustar o pulse su botón Pad Select (Selección de pad) correspondiente. Pulse Utility y luego Page/Select hasta que aparezca el parámetro deseado en la pantalla: •... - Page 16 Al pulsar Start/Stop para iniciar/parar la reproducción del tema, se genera el mensaje MIDI FA (inicio) o FC (parada). • Cuando sincroniza el módulo con otro dispositivo MIDI, el módulo Nitro sólo puede ser el maestro y no el esclavo.
-
Page 17: Français
Introduction Assistance Pour les dernières informations concernant ce produit (la configuration système minimale requise, la compatibilité, etc) et l’enregistrement du produit, veuillez visitez le site alesis.com. Pour de plus amples informations, visitez alesis.com/support. Utilisation rapide / schéma de connexion Mise en route installation... -
Page 18: Caractéristiques
Caractéristiques Panneau avant Écran : Cet écran affiche tous les paramètres et les fonctions en cours du module. Touche Song/Pattern : En mode Normal, appuyez sur cette touche afin d’accéder au menu Song, d’où vous pouvez sélectionner une chanson, ou encore, modifier les paramètres de la chanson. -
Page 19: Panneau Supérieur
Panneau supérieur 1. Sorties : Utilisez des câbles TRS 1/4 po (6,35 mm) standards afin de brancher ces sorties à un haut-parleur ou à un système de sonorisation. Le niveau de ces sorties est commandé par le bouton Volume. 2. Entrée Aux : Utilisez un câble 1/8 po (3,5 mm) standard afin de brancher cette entrée à... -
Page 20: Fonctions De Base
Fonctions de base Modification et enregistrement des ensembles de sons de batterie Important : • Pour modifier et enregistrer vos ensembles, le module doit être en mode Normal. Si la DEL au-dessus de la touche Song/Pattern n’est pas allumée, enfoncez la touche Page/Select jusqu’à... - Page 21 Utilisation de chansons d’accompagnement Important : Pour faire jouer des chansons, le module doit être en mode Normal. Si la DEL au-dessus de la touche Song/Pattern n’est pas allumée, enfoncez la touche Page/Select jusqu’à ce qu’elle s’allume. Remarque : Pendant la lecture, les touches de sélection s'allumeront à indiquer lesquelles batteries sonnent.
-
Page 22: Fonctions Évoluées
Fonctions évoluées Réglage des paramètres utility Les paramètres Utility vous permettent de personnaliser encore plus les paramètres des pads et MIDI. Pour modifier les paramètres Utility : Frappez maintenant le pad pour lequel vous désirez modifier les paramètres ou appuyez sur la touche de sélection correspondante. - Page 23 Appuyez sur la touche Start/Stop afin de lancer/arrêter la lecture d’une chanson génère des messages MIDI FA (lancer) ou FC (arrêter). • Lors de la synchronisation du module à un autre appareil MIDI, le module Nitro est toujours le maître, il ne peut être l’esclave.
-
Page 24: Inizio Rapido/Schema Dei Collegamenti
Assistenza Per conoscere le ultime informazioni in merito a questo prodotto (i requisiti di sistema complete, compatibilità, ecc) e per la registrazione del prodotto, recarsi alla pagina alesis.com. Per ulteriore assistenza, recarsi alla pagina alesis.com/support. Inizio rapido / schema dei collegamenti... -
Page 25: Pannello Superiore
Caratteristiche Pannello superiore Display: Mostra le attuali impostazioni e formazioni del modulo. Song/Pattern: In modalità normale, premere questo tasto per entrare nel menu canzoni (Song), dove sarà possibile scegliere una canzone o regolare configurazioni relative alle canzoni. In modalità di apprendimento, premere questo tasto per entrare nel menù... -
Page 26: Pannello Anteriore
Pannello anteriore 1. Uscite: Servirsi di cavi TRS standard da 1/4" per collegare queste uscite ad un altoparlante impianto amplificatori. Il livello di queste uscite è controllato dalla manopola Volume. 2. Ingresso Aux: Servirsi di un cavo stereo standard da 1/8" per collegare questo ingresso ad un lettore audio opzionale (ad es. - Page 27 Funzioni base Modifica e salvataggio dei set batteria Importante: • Per modificare e salvare i set, bisogna essere in modalità normale. Se il LED al di sopra del tasto Song/Pattern non è acceso, tenere premuto Page/Select finché non si accende. •...
- Page 28 Suonare a tempo con le canzoni Importante: per suonare le canzoni, occorre essere in modalità normale. Se il LED al di sopra del tasto Song/Pattern non è acceso, tenere premuto Page/Select finché non si accende. Per selezionare e riprodurre una canzone: Premere Song fino a quando a display non compare NUM.
-
Page 29: Registrazione
Funzioni avanzate Regolazione delle impostazioni utilità Le impostazioni delle Utilità consentono di personalizzare ulteriormente le configurazioni dei pad e di regolare le impostazioni MIDI del modulo. Per regolare le configurazioni delle Utilità: Battere il pad le cui configurazioni si desidera regolare, oppure premere il tasto Pad Select corrispondente. Premere Utility, quindi premere Page/Select fino a quando la configurazione desiderata non compare a display: •... -
Page 30: Impostazioni Midi
La pressione di Start/Stop per avviare/interrompere la riproduzione della canzone genera il messaggio MIDI FA (avvio) o FC (stop). • Al momento di sincronizzare il modulo con un altro dispositivo MIDI, il modulo Nitro può solo essere il master, non lo slave. -
Page 31: Schnellstart / Anschlussdiagramm
Benutzerhandbuch (Deutsch) Einführung Kundendienst Die neuesten Informationen zu diesem Produkt (Systemanforderungen, Kompatibilitätsinformationen usw.) und die Registrierung Ihres Produkts finden Sie auf alesis.com. Für zusätzlichen Produkt-Support besuchen Sie alesis.com/support. Schnellstart / Anschlussdiagramm Einrichten und Spielen Crash 2 Becken-Pad Tom 4 Drum Pad separat erhältlich... - Page 32 Funktionen Vorderseite Display: Zeigt die aktuellen Einstellungen und Funktionen des Moduls an. Song/Vorlage: Drücken Sie diese Taste im Normal- Modus, um das Song-Menü aufzurufen, in dem Sie einen Song auswählen oder Song-Einstellungen anpassen können. Drücken Sie diese Taste im Lernmodus, um ins Vorlage-Menü...
- Page 33 Oberseite 1. Ausgänge: Verwenden Sie handelsübliche 1/4" TRS-Kabel, um diese Ausgänge an einen Lautsprecher oder Verstärkersystem anzuschließen. Lautstärke dieser Ausgänge steuern Sie über den Lautstärke- Regler. 2. Aux In: Verwenden Sie ein handelsübliches Miniklinke 1/8"-Stereokabel, um diesen Eingang mit einem optionalen Audio-Player zu verbinden (z.B. MP3-Player, CD-Player etc.).
- Page 34 Grundfunktionen Drum Kits Bearbeiten und Speichern Wichtig: • Um Ihre Kits zu bearbeiten und zu speichern müssen Sie sich im Normal-Modus befinden. Wenn oberhalb Song/Vorlage-Taste nicht leuchtet, halten Seite/Auswählen bis sie leuchtet. • Denken Sie daran Ihre Kits zu speichern, nachdem Sie die gewünschten Einstellungen eingegeben haben! Drücken Sie zuerst Kit bis NUM am Display erscheint.
- Page 35 Songs Begleiten Wichtig: Um Songs abzuspielen, müssen Sie sich im Normal-Modus befinden. Wenn die LED oberhalb der Song/Vorlage-Taste nicht leuchtet, halten Sie Seite/Auswählen gedrückt bis sie leuchtet. Hinweis: Während der Wiedergabe leuchten die Pad-Auswahltasten auf, um anzuzeigen, welche Drums spielen. Um diese Funktion zu deaktivieren bzw.
-
Page 36: Erweiterte Funktionen
Erweiterte Funktionen Anpassen der Optionen Mit den Optionen können Sie Ihre Pad-Einstellungen und die MIDI-Einstellungen des Moduls weiter anpassen. So passen Sie die Optionen an: Betätigen Sie das Pad, dessen Einstellungen Sie anpassen möchten oder drücken Sie die entsprechende Pad- Auswahltaste. - Page 37 Wenn Sie Start/Stopp drücken, um die Song-Wiedergabe zu starten/stoppen, wird eine MIDI-Nachricht FA (Start) oder FC (Stopp) erzeugt. • Bei der Synchronisierung des Moduls mit einem anderen MIDI-Gerät kann das Nitro Modul nur als Master und nicht als Slave verwendet werden.
-
Page 38: Velocity Curves
Appendix (English) Velocity Curves Curve 1 Curve 2 Curve 3 Volume Volume Volume Velocity (striking Velocity (striking Velocity (striking Curve 4 Curve 5 Curve 6 Volume Volume Volume Velocity (striking Velocity (striking Velocity (striking Pad MIDI Note Numbers Trigger MIDI Note Number Trigger MIDI Note Number Kick... -
Page 39: Technical Specifications
Specifications are subject to change without notice. Trademarks and Licenses Alesis is a trademark of inMusic Brands, Inc., registered in the U.S. and other countries. All other product or company names are trademarks or registered trademarks of their respective owners. - Page 40 Manual Version 1.0...
Need help?
Do you have a question about the Nitro and is the answer not in the manual?
Questions and answers