Listen LR-500 User Manual
Programmable display receiver
display receiver
Hide thumbs
Also See for LR-500:
- User manual (48 pages) ,
- Design manual & manual (84 pages) ,
- Manual (4 pages)
Table of Contents
Advertisement
Quick Links
User's Manual
LR-500 Programmable Display Receiver
LR-400 Display Receiver
LR-300 Receiver
Listen Technologies Corporation
D o n ' t m i s s a s i n g l e s o u n d . L i s t e n .
8535 South 700 West, Suite A
Sandy, Utah 84070-2515 USA
Telephone: +1.801.233.8992
Toll Free (North America): 1.800.330.0891
Fax: +1.801.233.8995
E-mail: info@ListenTech.com
Listen
®
and the Listen logo are registered trademarks of Listen Technologies Corporation
Advertisement
Chapters
Table of Contents

Related Manuals for Listen LR-500


Summary of Contents for Listen LR-500
- Page 1 D o n ’ t m i s s a s i n g l e s o u n d . L i s t e n . 8535 South 700 West, Suite A Sandy, Utah 84070-2515 USA Telephone: +1.801.233.8992 Toll Free (North America): 1.800.330.0891 Fax: +1.801.233.8995 E-mail: info@ListenTech.com Listen ® and the Listen logo are registered trademarks of Listen Technologies Corporation...
- Page 2 Should there be any problems with your Listen products, we are ready to help you in any way we can. Should you have any comments on how we might improve our products or our service, we’re here to listen.
- Page 3 LR-500 User’s Manual ........
- Page 4 this page intentionally left blank...
- Page 5 User’s Manual LR-500 Programmable Display Receiver D o n ’ t m i s s a s i n g l e s o u n d . L i s t e n . Listen Technologies Corporation 8535 South 700 West, Suite A Sandy, Utah 84070-2515 USA Telephone: +1.801.233.8992...
-
Page 6: Optional Accessories
LR-500 Package Contents Listen Part Number · LR-500 (72MHz or 216MHz) 72 MHz: LR-500-072 · Warranty Card 216 MHz: LR-500-216 · Receiver User Manual Optional Accessories See pages 70-71. -
Page 7: Table Of Contents
Listen SQ™ ........ -
Page 8: Architectural Specifications
The device shall incorporate an LCD display that indi- cates channel, channel lock or lock status, battery level, low battery, battery charging, and RF signal strength. The receiver shall incorporate automatic battery charging circuitry for recharging of NiMH batteries. The Listen LR-500 is specified. - Page 9 Power 2.3mm OD by 0.7mm ID, barrel type connector. 7.5VDC, center positive <250mA. Drop in Power Supply Connector contact points for use with Listen charging cases. UL Listed Compliance 3.0 in x 1.0 in x 5 in WxDxH (7.6cm x 2.5cm x 13.cm) Dimensions 3.9oz (111g)
-
Page 10: Quick Reference
ON/OFF & VOLUME control dial unit has power. A Listen earpiece or headset connects here. Look & Listen™ display shows receive level, channel, battery status, PROGRAM mode, whether a channel is locked, and whether a channel is locked out from Adjustable Squelch: selection (PROGRAM mode). - Page 11 Quick Reference LR-500 Inside Access Door LR-500 Top of Unit Battery Select SQ Switch Switch LED indicators · Steady Red: Normal operation · Slow Flashing: Battery is low · Slow Flashing while charging: Unit is charging Battery Select Switch - place in NiMH position ONLY if you ON/OFF and VOLUME control dial - 3.5mm Input Jack...
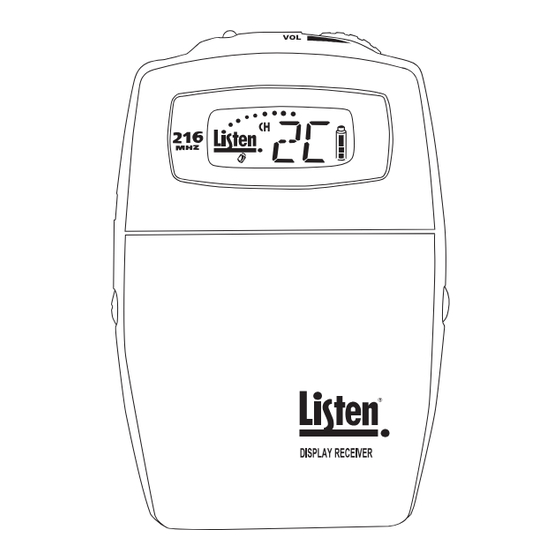
- Page 12 Quick Reference LR-500 Look & Listen™ Display Dots indicate the relative RF Indicates the currently signal strength. tuned channel Battery level indicator. The indi- cator flashes, along with the red LED on top of the unit, to alert you when the battery is low and needs to be charged or Indicates the unit is in PROGRAM mode.
-
Page 13: Setup Instructions
LR-500 Setup Instructions Remove the product Remove outer packaging and plastic cover. Inspect for physical damage. If damage is aparent, please contact Listen Technologies Corporation technical sup- port for assistance. See page 69 for contact information. Open the front access door If locked, use a pocketknife or small screwdriver to unlock the door locks on both sides of the unit. - Page 14 SELECT switch is in the correct position for the batteries you are using. (ALK should be selected for all battery types other than NiMH). NOTE: Listen uses 1800mAh (milli-Amp-hour) constant current NiMH (Nickel Metal Hydride) batteries. These may be purchased from your Listen dealer (ask for part number LA-362).
- Page 15 Connect an Earphone or Headset Your headset or earphone will connect to the jack on the top of the unit. Either mono or stereo connectors may be used with a Listen receiver. Make certain you push the plug all the way into the jack.
-
Page 16: Operation Instructions
Rotate the volume knob counterclockwise with an earphone or headset connected to the unit. Listen receivers use the cable of the earphone or headset as a receiving antenna. Be careful when turning the unit on - if you turn the knob too far you might get too much vol-... - Page 17 LR-500 Operation Instructions Find an audio transmission using SEEK Another way to find a channel on the LR-500 is to use the SEEK button. When you do this, the Listen receiver looks for the next active channel. Sometimes the unit will mistake interference for a real broadcast signal.
-
Page 18: Programming Instructions
LR-500 Programming Instructions The LR-500 Display Receiver has some special features not available in the other receivers: you may lock out unwanted channels, and you can adjust the squelch in the unit. Locking Out Unwanted Channels For applications where users are required to select a channel (such as language interpretation or classrooms), and you don’t want them to have to go through all 57 available channels to find... -
Page 19: Squelch Information
LR-500 Squelch Squelch The purpose of squelch is to mute the audio output of your receiver when the signal from the trans- mitter is turned off or is too weak to be received. Without squelch you would hear radio noise in your earphone. -
Page 20: Squelch Programming
Adjusting the squelch setting will keep your LR-500 receiver from picking up noise when the transmitter is not transmitting, or when you lose the signal by being out of range or if encountering interference. -
Page 21: Charging Batteries
IMPORTANT: In order to charge NiMH batteries, the BATTERY SELECT switch in your Listen product must be set to the NiMH setting. Use a pen or small screwdriver to move the switch (located in the battery compartment) to the proper position. - Page 22 13-hour charge cycle over again. When not using the LR-500, it is recommended to leave the unit on the charger. The charger provides a “maintenance” charge that keeps the battery at 100%. If the unit is not on the charger, the battery will lose up to 20% of its charge per month.
-
Page 23: Wall Transformer Operation
The LR-500 will operate normally when connected to a wall transformer. Use Listen part number LA-202, available from any Listen dealer. Connect the wall transformer to the jack on the side of the LR-500 marked “PWR/CHG” and plug the wall transformer into a grounded AC outlet. - Page 24 this page intentionally left blank...
- Page 25 LR-400 Display Receiver D o n ’ t m i s s a s i n g l e s o u n d . L i s t e n . Listen Technologies Corporation 8535 South 700 West, Suite A Sandy, Utah 84070-2515 USA Telephone: +1.801.233.8992...
- Page 26 LR-400 Package Contents Listen Part Number · LR-400 (72MHz or 216MHz) 72 MHz: LR-400-072 · Warranty Card 216 MHz: LR-400-216 · Receiver User Manual Optional Accessories See pages 70-71.
-
Page 27: Lr-400 Table Of Contents
Listen SQ™ ........ -
Page 28: Architectural Specifications
63Hz to 15KHz, ± 3dB at 72MHz, or of 63Hz to 10kHz, ± 3dB at 216MHz. The device will incorporate a stereo headset jack that allows the user to plug in either a mono or stereo headset and listen to the audio normally. - Page 29 Fully automatic, 14 hours Power 2.3mm OD by 0.7mm ID, barrel type connector. 7.5VDC, center positive <250mA. Power Supply Connector Drop in contact points for use with Listen charging/carrying cases. Compliance UL Listed Dimensions 3.0 in x 1.0 in x 5 in WxDxH (7.6cm x 2.5cm x 13.cm) Unit Weight 3.9oz (111g)
-
Page 30: Quick Reference
ON/OFF & VOLUME control dial · Slow Flashing: Battery is low unit has power. · Slow Flashing while charging: Unit is charging 3.5mm Input Jack A Listen earpiece or headset connects here. Look & Listen™ Display shows receive level, channel, battery status, and whether a channel is locked. - Page 31 Quick Reference LR-400 Inside Access Door Battery Select SEEK button Switch allows the user to change channels or to lock on a Use UP and DOWN buttons channel. to select a channel. Adjustable Squelch: The default factory preset for squelch is 03.(See page 37 for Squelch programming information) SQ Switch...
- Page 32 Quick Reference LR-400 Look & Listen™ Display Dots indicate the relative RF signal Indicates the currently strength. When there is a full signal tuned channel the unit will display all 8 dots. Battery level indicator. The indicator flashes, along with the red LED on top of the...
-
Page 33: Setup Instructions
LR-400 Setup Instructions Remove the product Remove outer packaging and plastic cover. Inspect for physical damage. If damage is aparent, please contact Listen Technologies Corporation technical support for assistance. See page 69 for contact information. Open the front access door If locked, use a pocketknife or small screwdriver to unlock the door locks on both sides of the unit. - Page 34 Connect an Earphone or Headset Your headset or earphone will connect to the jack on the top of the unit. Either mono or stereo connectors may be used with a Listen receiver. Make certain you push the plug all the way into the jack.
- Page 35 continued LR-400 Setup Instructions Turn the Unit On Receivers are turned on by rotating the volume dial counterclockwise. The red LED on top of the unit should activate and the LCD display should illuminate. If they do not, make sure you have installed the batteries correctly and that you are using fully charged batteries.
-
Page 36: Operation Instructions
Rotate the volume knob counterclockwise with an earphone or headset connected to the unit. Listen receivers use the cable of the earphone or headset as a receiving antenna. Be careful when turning the unit on - if you turn the knob too far you might get too much vol-... - Page 37 Another way to find a channel on the LR-400 is to use the SEEK button. When you do this, the Listen receiver looks for the next active channel. Sometimes the unit will mistake interference for a real broadcast signal. If you get interference, press the SEEK button again.
-
Page 38: Squelch Information
LR-400 Squelch Squelch The purpose of squelch is to mute the audio output of your receiver when the signal from the transmitter is turned off or is too weak to be received. Without squelch you would hear radio noise in your earphone. The squelch on your receiver can be adjusted so that it will mute the audio on different RF signal strengths. -
Page 39: Squelch Programming
Note: For squelch settings 1-3, the squelch function is slow which allows for maximum transmission range. For squelch settings 4-20 the squelch function is fast to ensure little radio noise is heard during the squelch function. (The Listen SQ feature is not squelch, please refer to page 58 for information on Listen SQ). -
Page 40: Charging Batteries
Other risks of charging non-NiMH batteries include destruction of property or fire. IMPORTANT: In order to charge NiMH batteries, the BATTERY SELECT switch in your Listen product must be set to the NiMH setting. Use a pen or small screwdriver to move the switch... - Page 41 LR-400 Charging Batteries continued During the charge cycle, the red LED on top of the Listen product will flash slowly. When charg- ing is completed, the LED will turn off. It is not necessary to unplug the charger; however, if you unplug the unit from the charger and then plug it back in, it will begin the 13-hour charge cycle over again.
-
Page 42: Wall Transformer Operation
The LR-400 will operate normally when connected to a wall transformer. Use Listen part number LA-202, available from any Listen dealer. Connect the wall transformer to the jack on the side of the LR-400 marked “PWR/CHG” and plug the wall transformer into a grounded AC outlet. - Page 43 LR-300 Receiver D o n ’ t m i s s a s i n g l e s o u n d . L i s t e n . Listen Technologies Corporation 8535 South 700 West, Suite A Sandy, Utah 84070-2515 USA Telephone: +1.801.233.8992...
- Page 44 LR-300 Package Contents Listen Part Number · LR-300-072 (72MHz) 72 MHz: LR-300-072 · Warranty Card · Receiver User Manual Optional Accessories See pages 70-71.
-
Page 45: Lr-300 Table Of Contents
Listen SQ™ ........ -
Page 46: Architectural Specifications
63Hz to 15KHz, ± 3dB at 72MHz. The device shall incorporate a stereo headset jack that allows the user to plug in either a mono or stereo headset and listen to audio normally. The receiver shall incorporate automatic battery charging circuitry for recharging of NiMH batteries. - Page 47 Flashes when charging. Flashes when locked and user attempts to seek to another channel. Battery Type Two AA batteries, alkaline or NiMH Battery Life (Listen batteries) 30 hours alkaline (LA-361), 15 hours NiMH rechargeable (LA-362) Battery Charging (NiMH only) Fully automatic, 14 hours Power 2.3mm OD by 0.7mm ID, barrel type connector.
-
Page 48: Quick Reference
Quick Reference LR-300 Front LED - when lit, indicates 3.5mm Input Jack ON/OFF & VOLUME CONTROL dial unit has power. A Listen earpiece or headset connects here. - Page 49 SQ Switch Battery Select Switch - place in NiMH position ONLY if you 3.5mm Input Jack are using Nickel Metal Hydride batteries, otherwise, leave it A Listen earpiece or in the Alkaline position. headset connects here. SQ Switch: shipped in the ON position, use a screwdriver or pen to slide to the OFF position if needed.
-
Page 50: Setup Instructions
LR-300 Setup Instructions Remove the product Remove outer packaging and plastic cover. Inspect for physical damage. If damage is aparent, please contact Listen Technologies Corporation technical sup- port for assistance. See page 69 for contact information. Open the front access door If locked, use a pocketknife or small screwdriver to unlock the door locks on both sides of the unit. - Page 51 Connect an Earphone or Headset Your headset or earphone will connect to the jack on the top of the unit. Either mono or stereo connectors may be used with a Listen receiver. Make certain you push the plug all the way into the jack.
-
Page 52: Operation Instructions
Find an audio transmission using SEEK To find a channel on the LR-300 use the SEEK button. When you do this, the Listen receiver looks for the next active channel. Sometimes the unit will mistake interference for a real broadcast signal. - Page 53 continued LR-300 Operation Instructions To Lock into Only One Channel Press and hold the SEEK button for 5 seconds to lock a receiver onto the currently tuned channel. Press and hold the button again to unlock. When locked the LED on top of the unit will flash when you press the SEEK button.
-
Page 54: Charging Batteries
Other risks of charging non-NiMH batteries include destruction of property or fire. IMPORTANT: In order to charge NiMH batteries, the BATTERY SELECT switch in your Listen product must be set to the NiMH setting. Use a pen or small screwdriver to move the switch... - Page 55 LR-300 Charging Batteries continued During the charge cycle, the red LED on top of the Listen product will flash slowly. When charg- ing is completed, the LED will turn off. It is not necessary to unplug the charger; however, if you unplug the unit from the charger and then plug it back in, it will begin the 13-hour charge cycle over again.
-
Page 56: Wall Transformer Operation
The LR-300 will operate normally when connected to a wall transformer. Use Listen part number LA-202, available from any Listen dealer. Connect the wall transformer to the jack on the side of the LR-300 marked “PWR/CHG” and plug the wall transformer into a grounded AC outlet. -
Page 57: Supplementary Information
Listen SQ™ ........ -
Page 58: Channel Selection
Before turning on the transmitter, listen to the wide band channels (lettered channels at 72MHz and channels that start with a “2” for 216MHz). Listen to the audio through the headphone or via the speaker. Choose a channel with the least amount of interface. Unless you are interfacing with an existing narrowband transmission system, always use a wide band channel. - Page 59 Channel Selection continued Notes in regard to using 72MHz and 216MHz systems i. 72MHz in a secondary frequency band. This means that other transmitters are licensed to use these frequencies. Thus, you may experience interference from paging transmitters and other type transmissions.
-
Page 60: Listen Sq
SQ is now available on new Listen systems, including the system you received · SQ is NOT compatible with other in this shipment. If you are planning to use this product with older Listen sys- manufacturers’ products tems or equipment not manufactured by Listen, you should disable SQ. -
Page 61: Rf Reception Maximization Strategies
RF Reception Maximization Strategies For proper and dependable operation, Listen receivers should receive a strong and consistent signal from the originating transmitter. The following strategies should be used maximize this signal: a. When designing and installing your system, keep in mind that the location of both the transmitter and receivers is critical to maximizing signal strength. -
Page 62: 72 Mhz Frequency Compatibility Table
72MHz Compatibility Chart Updated 03.16.04 *Parenthesis indicate T35 and T20 Frequency Phonic narrowband. Listen Comtek Phonak Williams* Gentner Telex Drake 72.0250 (11, 1) NOTE: Wideband frequencies in 72.0500 highlighted rows. 72.0750 (12, 3) 72.1000 A, (13, 4) 72.1 72.1250 (14, 5) 72.1500... - Page 63 72MHz Compatibility Chart continued *Parenthesis indicate T35 and T20 Frequency Phonic narrowband. Listen Comtek Phonak Williams* Gentner Telex Drake 75.5000 F, (48, 58) 75.5 75.5250 (49, 59) NOTE: Wideband frequencies in 75.5500 (60) highlighted rows. 75.5750 (50, 61) 75.6000 S, (62) 75.6...
-
Page 64: 216 Mhz Frequency Compatibility Table
216MHz Compatibility Chart Updated 03.16.04 Frequency Phonic Light Listen Comtek Phonak Williams Gentner Speed *Parenthesis indicate T35 216.0125 and T20 narrowband. 216.0250 NOTE: Wideband frequen- 216.0375 216.0625 cies in highlighted rows 216.0750 216.0875 216.1125 216.1250 216.1375 216.1625 216.1750 216.1875 216.2125 216.2250... - Page 65 216MHz Compatibility Chart continued Frequency Phonic Light Listen Comtek Phonak Williams Gentner Speed *Parenthesis indicate T35 216.5125 and T20 narrowband. 216.5250 216.5375 NOTE: Wideband frequen- 216.5625 cies in highlighted rows 216.5750 216.5875 216.6125 216.6250 216.6375 216.6625 216.6750 216.6875 216.7125 216.7250 216.7375...
-
Page 66: Troubleshooting
Receiver Troubleshooting - LR-300, LR-400, LR-500 The receiver has no power. Make sure the unit has either fully charged batteries or a Listen approved wall transformer con- nected. Make sure the VOLUME knob has been rotated to the ON position. If this does not work, try a different set of batteries. - Page 67 SEEK button for 5 seconds. When the channel is locked, the padlock icon will appear on the LR-400 and LR-500 displays. On the LR-300, the LED will flash when the channel is locked and seek is pressed. In addition, you can lock the access doors to the units.
- Page 68 The unit is locked. Press the SEEK button for 5 seconds to unlock. When I change channels, only certain channels are accessible. The unit has been programmed to tune to only certain channels (LR-500 only). You can change these channel lock-out selections by re-programming the unit (see page 16).
-
Page 69: Compliance Notice
Compliance Notice This device complies with part 15 of the FCC Rules. Operation is subject to the following two conditions: (1) These devices may not cause harmful interference, and (2) these devices must accept any interference received, including interference that may cause undesirable operation. -
Page 70: Fcc Statement
FCC Statement This equipment has been tested and found to comply with the limits for a class B digital device, pursuant to part 15 of the FCC Rules. These limits are designed to provide reasonable protection against harmful interference in a residential installation. This equipment generates, uses and can radiate radio frequency energy and if not installed and used in accordance with the instructions, may cause harmful interference to radio communications. -
Page 71: Warranty
Listen shall bear no responsibility or obligation with respect to the manner of use of any equipment sold by it. Listen specifically disclaims and negates any warranty of merchantability or fitness of use of such equipment including, without limitation, any warranty that the use of such equipment for any purpose will comply with applicable laws and regulations. -
Page 72: Optional Accessories
Optional Accessories Earphone Options Ear Speaker Ear Speaker Dual Ear Speaker LA-164 LA-161 LA-162 Stereo Headset Neckloop LA-165 LA-166... - Page 73 Optional Accessories Connector Options Professional Consumer Sacrificial Cable Camcorder Cable Camcorder Cable LA-275 LA-266 LA-265...
- Page 76 Listen Technologies Corporation 8535 South 700 West, Suite A Sandy, Utah 84070-2515 USA Telephone: +1.801.233.8992 Toll Free (North America): 1.800.330.0891 Fax: +1.801.233.8995 E-mail: info@ListenTech.com...
Need help?
Do you have a question about the LR-500 and is the answer not in the manual?
Questions and answers