Table of Contents
Advertisement
Quick Links
Advertisement
Table of Contents

Related Manuals for Chrysler MEDIA CENTER 730N RHR


Summary of Contents for Chrysler MEDIA CENTER 730N RHR
- Page 1 USER’S MANUAL USER’S MANUAL MEDIA CENTER 730N (RHR) MEDIA CENTER 730N (RHR)
- Page 2 USER AGREEMENT NOTICE: This Class B digital apparatus complies with Canadian ICES-003. Cet appareil numérique de la classe B est conforme à la norme NMB-003 du Canada.
- Page 3 NOTICE: Modifications not expressly approved by the radio manufacturer could void the user’s authority to operate This device complies with Part 15 of the FCC Rules [and the equipment. with RSS-210 of Industry Canada]. NOTE: This equipment has been tested and found to Operation is subject to the following two conditions: this comply with the limits for a Class B digital device, device may not cause harmful interference, and this...
- Page 4 following measures: - Increase the separation between the use of wireless radios may be restricted in some the equipment and receiver. - Consult the dealer or an situations or environments, such as aboard airplanes. If experienced radio technician for help. you are unsure of restrictions, you are encouraged to ask for authorization before turning on the wireless radio.
- Page 5 USER LICENSE AGREEMENT (”AGREEMENT”). IF LICENSE GRANT YOU DO NOT AGREE TO THE TERMS OF THIS NAVTEQ grants you a non-exclusive license to use the AGREEMENT, PROMPTLY RETURN THE DATABASE, Database for your personal use or, if applicable, for use in ALONG WITH ALL OTHER ACCOMPANYING ITEMS, your business’...
- Page 6 opportunity to provide said information on reasonable your request. If the Database does not perform in accor- terms, including costs, to be determined by NAVTEQ. dance with this limited warranty, NAVTEQ will use reasonable efforts to repair or replace your nonconform- TRANSFER OF LICENSE ing copy of the Database.
- Page 7 does not affect or prejudice any statutory legal rights that revenue, data, or use, incurred by you or any third party you may have under the legal warranty against hidden arising out of your use of the Database, whether in an defects.
- Page 8 information on - inter alia - neighborhood safety; law relating to this Agreement, without prejudice to enforcement; emergency assistance; construction work; NAVTEQ’s right to bring claims at your then current road or lane closures; vehicle or speed restrictions; road place of residence. slope or grade;...
- Page 9 You agree that you will use Gracenote Data, the You agree that Gracenote, Inc. may enforce its rights Gracenote Software, and Gracenote Servers for your own under this Agreement against you directly in its own personal noncommercial use only. You agree not to name.
- Page 10 Gracenote Servers are error-free or that functioning of CD and music-related data from Gracenote, Inc., copy- Gracenote Software or Gracenote Servers will be uninter- right © 2000-2007 Gracenote. Gracenote Software, copy- rupted. Gracenote is not obligated to provide you with right ©...
- Page 12 MEDIA CENTER 730N (RHR) CONTENTS ▫ Steering Wheel Mounted Controls Safety Guidelines ..... . . 4 (If Equipped) ......13 Introduction .
-
Page 13: Table Of Contents
▫ Store Radio Presets ....18 Uconnect™ Multimedia (Remote Devices) ..90 ▫ Connect Bluetooth Devices ....20 ▫... -
Page 14: Table Of Contents
▫ Navigation Main Menu ....126 ▫ User Data Backup ....194 ▫... - Page 15 • Glance at the screen only when necessary and safe to SAFETY GUIDELINES Ensure that all persons read this manual carefully before do so. If prolonged viewing of the screen is necessary, using the navigation system. It contains instructions on pull over at a safe location.
- Page 16 • Make certain that the volume level of the system is set • The law in some states prohibits the Front Seat DVD to a level that still allows you to hear outside traffic Viewer even while in park. As a result, it may be and emergency vehicles.
- Page 17 If you have any questions, Both navigation data and Gracenote data are software please contact the vehicle manufacturer. updatable. Visit www.chrysler.com, www.jeep.com, ww- w.dodge.com, www.ramtrucks.com or contact your au- thorized dealer for the latest available software.
- Page 18 Safe Usage of the Radio Navigation System Keep drinks, rain, and other sources of moisture away Read all instructions in this manual carefully before from your radio. Besides damage to your radio, moisture using your radio system to ensure proper usage. can cause electric shocks with any electronic device.
- Page 19 NOTE: It is possible to use a plastic stylus for press Do not insert anything other than the supported CD/ screen enabled devices such as PDA and Pocket PCs. DVD formats. See Disc Mode section for information on supported CD/DVD formats. Do not spray any liquid or caustic chemicals directly on the screen.
- Page 20 Larger luggage items should be placed as far from the antenna as possible. Do not place items directly on or above the antenna. Other Electronic Devices You may bring other electronic devices into your vehicle (e.g., PDA, iPod, laptop computer, CB Radios, etc.). Some of these devices may cause electromagnetic interference with the GPS.
-
Page 21: General Handling
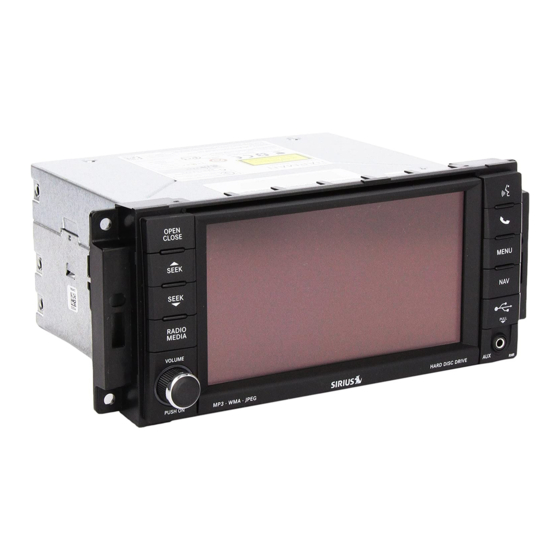
GENERAL HANDLING Soft-Keys Soft-keys are accessible on the touch screen. User Interface Elements Hard-Keys Hard-keys are on the left and right side of the radio faceplate. (1) OPEN/CLOSE To open or close the display, press the OPEN CLOSE hard-key (1). After opening the display, it takes a few seconds to eject a CD/DVD, if one was in the slot. - Page 22 • If a CD or DVD will not eject from the player when the (3) RADIO/MEDIA OPEN/CLOSE hard-key is pressed, the user can per- Press the RADIO/MEDIA hard-key (3) to toggle between form the following eject override procedure: RADIO and MEDIA mode. 1.
- Page 23 (5) Voice Command (7) MENU Press the Voice Command hard-key (5) Press the MENU hard-key (7) to access the system settings menu. and wait for the confirmation beep before you say a voice command. NOTE: Press the MENU hard-key in an active mode in order to change mode specific settings.
- Page 24 (10) Auxiliary Jack 1. The VOLUME rocker switch, located on the right, Connect an external audio device into the AUX Input (10) controls the volume of the sound system. Pressing the top (e.g., MP3 player, video-game), to play the device audio of the rocker switch will increase the volume and press- through the car audio system.
- Page 25 The following describes the operation of the SCROLL SIRIUS Backseat TV™ Operation switch in each mode: If equipped with a SIRIUS Backseat TV™, this control will function the same way as in SIRIUS Satellite Radio AM/FM/SAT Operation mode. Pressing the top of the rocker switch will seek up for the next available station and pressing the bottom of the Audio Settings rocker switch will seek down for the next available...
- Page 26 Use either the arrow soft-keys or the cross-hair on the Press the Equalizer soft-key and use either the arrow screen to change Balance and Fade. The CENTER soft- soft-keys or the sliders on the screen to adjust BASS, key resets the settings. MID, and/or TREBLE.
- Page 27 GETTING STARTED Disclaimer for Navigation Radio NOTE: The ignition switch must be in the ON or ACC position to operate the navigation radio. If the unit is off, switch it on using the ON/OFF Volume rotary knob. Soft-keys The BACK soft-key always takes you to the previous screen.
-
Page 28: Change The Language
Change the Language The navigation radio will conform to the vehicle lan- guage set in the Electronic Vehicle Information Center (EVIC), if equipped. If you change the language in the navigation radio, the system will change the language for all display informa- tion. -
Page 29: Store Radio Presets
It is possible to set the time manually (ahead or behind actual GPS time), by pressing the USER CLOCK soft-key. Store Radio Presets 1. Press the Radio Media hard-key until AM FM SAT is displayed in the upper left corner of the screen. The time is automatically set by the GPS system for the time zone selected. - Page 30 2. Select the radio band by touching either the AM, FM To turn the preset list off. or SAT soft-key. 3. Either press the SEEK up/down hard-keys, or touch the SCAN soft-key, DIRECT TUNE soft-key, or the left and right arrows to change the currently playing station. To turn the preset artist list on.
-
Page 31: Connect Bluetooth Devices
Long preset names are displayed in fullscreen mode. Connect Bluetooth Devices NOTE: Visit www.chrysler.com, www.jeep.com, www- .dodge.com or www.ramtrucks.com for a list of compat- ible phones/devices. This menu lists all paired Bluetooth devices. 1. Press the MENU hard-key on the right side of the radio. - Page 32 5. Enter any 4 Digit Security PIN and touch the PAIR 7. You will then be asked to set a priority for the paired soft-key again. phone. If there is more than one paired phone available, the navigation radio will try to connect to the phone with 6.
-
Page 33: Set Default Country And/Or State
will be automatically copied to the radio. Contacts will be 3. Touch the NAV Settings soft-key. downloaded from your SIM card first and then copied from your phones default phone book. Set Default Country and/or State 1. Press the NAV hard-key on the right side of the radio. 2. -
Page 34: Enter Home Address
Enter Home Address 1. Press the NAV hard-key on the right side of the radio. If the radio does not display the NAV - Main Menu, press the NAV hard-key again, or touch the MAIN MENU soft-key on the display. If no home address has been set, touch YES to access the Enter Home Address menu. - Page 35 4. Touch the soft-key with your state’s name and enter NOTE: Read more about destination input and the your street name into the speller. predictive speller in the Navigation section of this manual.
- Page 36 5. Once the street name has been input, touch continue to confirm. 6. Enter the house number into the next screen. If more than one city has this address, you will then need to select your city from a list. Once the address is entered completely, the system shows a map of your home address area.
-
Page 37: Change Home Address
Change Home Address This procedure will allow you to change your Home Address if one has already been entered. 1. Press the MENU hard-key. 3. Touch the My Address Book soft-key. 2. Touch the My Files soft-key. - Page 38 4. Touch the Home soft-key. 7. Touch the soft-key with your state’s name and enter your street name into the speller. 5. Touch the Edit Contact soft-key. NOTE: 6. Touch the Change Address soft-key. • If the State or Country needs to be changed, touch the appropriate soft-key to edit the setting.
- Page 39 • There may be instances when entering a city first prior 9. Enter the house number into the next screen. If more to the address will locate the correct address more than one city has this address, you will then need to accurately.
-
Page 40: Voice Command Tutorial
After you have changed your home address, the system Uconnect™ Phone Tutorial will start a route guidance to your home every time you When you press the Uconnect™ Phone hard-key, you press the Guide Me Home soft-key. will hear a beep. The beep is your signal to give a command. -
Page 41: Uconnect™ Multimedia (Radio)
Uconnect™ Multimedia (RADIO) Satellite Radio Mode In order to receive satellite radio, the vehicle needs to be Radio Mode outside with a clear view to the sky. If the screen shows Overview Acquiring Signal, you might have to change the vehicle The RHR navigation radio (NTG4 Refresh) is equipped position in order to receive a signal. - Page 42 Change a Channel or Frequency Replay Mode Press the SEEK up or the SEEK down hard-key to play Select the REPLAY soft-key for a replay of the currently the next available station or channel. playing satellite radio station. Select DIRECT TUNE to enter a frequency or a channel number, and confirm your selection by pressing the GO soft-key.
- Page 43 It is also possible to use the PAUSE/PLAY soft-key to pause the playback for up to an hour. Select the LIVE soft-key to receive the currently playing satellite radio station. SIRIUS Satellite Radio Channel List Touch the SEARCH/BROWSE soft-key. Select the View All Channels soft-key in the SAT Browse screen.
- Page 44 To sort the list by artist. To sort the list by song. To sort the list by SIRIUS channel name. Touch the soft-key with the desired channel name to select the channel. You may use the LIST soft-key to toggle between: Station Presets There are 12 station presets available for storing the radio stations in each tuner range.
- Page 45 In order to store the desired station, touch and hold one of the station preset soft-keys for two seconds and you will see the highlighted soft-key change from green to beige. You will also see the radio station stored in the highlighted soft-key, and you will hear a confirmation beep when the station is saved.
- Page 46 The favorite star indicates that a favorite song Display SAT Favorites List or artist is currently playing on one of the Touch the SEARCH/BROWSE soft-key and SIRIUS satellite radio channels. select Favorites from the SAT Browse screen. Example: If an Artist Alert is active, the radio displays a In this example the favorite song “Suddenly”...
- Page 47 Touch the desired favorites soft-key to switch the SAT Touch the SETUP soft-key to manage the SAT Favorites tuner to the corresponding channel. settings. You may use the LIST soft-key to toggle between: Manage SAT Favorites Touch the SEARCH/BROWSE soft-key, select To show a list of currently playing Favorites from the SAT Browse screen.
- Page 48 The checkmarks in the Song Alerts and Game Alerts Select the SONGS soft-key to display the favorite songs, soft-key indicate active alerts. Touch the corresponding and select the ARTISTS soft-key to show the favorite Alert soft-key to disable either all Song Alerts or all Game artists.
- Page 49 Radio Text Information Personality, Public, Religious Music, Religious Talk, Select the INFO soft-key to display additional Rhythm and Blues, Rock, Soft, Soft Rhythm and Blues, radio text information in the right half of the Soft Rock, Sports, Talk, Top 40, Weather screen.
- Page 50 Scan by Genre Touch the SEARCH/BROWSE soft-key, select View Genres from the SAT Browse screen. The radio displays all available station in this category. Touch a soft-key with the corresponding artist, or song to switch to play the desired channel. Example: Select the Rock category by touching the Rock soft-key.
- Page 51 Scan by Music Type Game Zone Touch the SEARCH/BROWSE soft-key, select Touch the SEARCH/BROWSE soft-key, select Type Scan from the SAT Browse screen. Game Zone from the SAT Browse screen.
- Page 52 SIRIUS Satellite Travel Link Select Forecast to display current and forecasted weather. Press the MENU hard-key and then the Travel Link Select Fuel Prices to check local gas and diesel prices. soft-key. Select Movie Listings to check local movie theaters and NOTE: Travel Link not available for Canadian market.
- Page 53 Save a Favorite You may save 1 weather station, 1 ski resort, 1 gas station, 1 movie theater, and 8 sport teams. On the Travel Link screen select Favorites to display the list of your SIRIUS Favorites. You may use the LIST soft-key to toggle between: To sort the list by price.
- Page 54 To sort the list by distance to the current vehicle location. To sort the list by alphabet. Touch the FUEL soft-key to select the desired fuel grade used in the list view. Touch the favorite gas station soft-key to save Touch the soft-key with the desired gas station to display this gas station as favorite.
- Page 55 You may now touch the ROUTE soft-key to enter the Changing a SIRIUS Travel Link Favorite address as a destination. For example: Touch the Forecast soft-key in the Travel Once a favorite was selected, the name and the selected Link screen. fuel price is displayed in the SIRIUS Favorites screen.
- Page 56 Deleting a SIRIUS Travel Link Favorite Sports Team Touch the favorite weather station soft-key to make the current weather station a favorite. The new favorite weather station replaced the old favorite weather station. For example: Touch the Charlotte Bobcats soft-key in the Favorites screen.
-
Page 57: Radio Settings
Radio Settings AM / FM MENU There are no specific settings for this mode. SAT MENU While in SAT mode press the MENU hard-key to display the SAT Menu. Favorites Select Favorites to manage the SAT Favorites. (see Satel- lite Radio Mode for more information). Travel Link Touch the FAV soft-key to remove the Select Travel Link to access Sirius Travel Link services. - Page 58 Re-Subscribe to SIRIUS Satellite Radio New vehicle purchasers or lessees will receive a free limited time subscription to SIRIUS Satellite Radio and Realtime Traffic Service with your navigation radio. Following expiration of the free services, it will be necessary to access the information on the Subscription Information screen in order to re-subscribe.
- Page 59 Touch the Subscription soft-key to access the Subscrip- tion Information screen. Re-Subscribe to SIRIUS Backseat TV™ New vehicle purchasers or lessees will receive a free limited time subscription to SIRIUS Backseat TV™ with Write down the SIRIUS ID numbers for your receiver. To your radio.
- Page 60 Display Settings Select the Nighttime Colors soft-key to switch to manual Press the MENU hard-key and touch the Display Settings nighttime mode and to adjust the brightness of the soft-key to access the Display Settings menu. display using nighttime colors. Select the Auto Color Mode soft-key to switch to auto- matic daytime/nighttime mode and to control the bright- ness of the display using the dimmer switch of the...
- Page 61 View Settings Touch the Picture View soft-key to enable the picture Press the MENU hard-key to display a radio menu. view mode, where a picture can be displayed on the right half of the radio screen. Refer to the Hard Disk Drive section of this manual for a detailed example.
- Page 62 ParkView™ Rear Backup Camera (if equipped) When equipped with ParkView™, the radio display shows the rear view camera picture as soon as the shifter is in the REVERSE position for vehicles with automatic transmission. In vehicles with manual transmission the REVERSE gear must be engaged.
-
Page 63: Uconnect™ Multimedia (Media)
Uconnect™ Multimedia (MEDIA) Toggle between the media and the radio menus by pressing the RADIO/MEDIA hard-key. The different Disc Mode media modes can be selected via the tabs in the radio Overview screen. The navigation radio is equipped with a CD/DVD Disc Requirements player. - Page 64 High definition content and media (e.g., HD-DVD, Blu- A complete list of supported CD/DVD formats is avail- Ray) is not supported. able at www.chrysler.com, www.jeep.com, www.dodge- If the user does not remove an ejected CD within .com or www.ramtrucks.com. approximately 10 seconds, the CD will reload.
- Page 65 • Recording your own CD on a home computer at a Selecting Disc Mode lower write speed will result in a more consistent Toggle between the media and the radio menus by quality. pressing the RADIO/MEDIA hard-key. The disc mode can be selected by touching the Disc tab soft-key.
- Page 66 Next Track Rewind Track Press the SEEK up hard-key. The next track on the disc is Touch and hold the Fast Reverse soft-key. The audio played. Once the last track has been reached in the will be heard at a reduced level while going forward direction, the unit will loop back to the first through the track in this mode.
- Page 67 Disc Info Gracenote Music Recognition Technology Select INFO to display title and album artwork in the right half of the screen. Select INFO again to display title, artist, album and genre information in the right half of the screen. Select INFO again to hide the information. This navigation radio is equipped with the Gracenote Music Recognition Service, with an embedded database to look up album, song title, genre and artist information.
- Page 68 Music recognition technology and related data are pro- vided by Gracenote . Gracenote is the industry stan- dard in music recognition technology and related content delivery. For more information visit www.gracenote.com. NOTE: Visit www.chrysler.com, www.jeep.com, www- .dodge.com www.ramtrucks.com update information.
- Page 69 Disc Menu While in disc mode with audio disc inserted, press the MENU hard-key to access the Disc Menu. Select Random to play the titles on the disc in random order. Select Random again to turn Random off. Select Rpt. TRK to repeat the currently playing title. Touch the Rpt.
- Page 70 Playing a MP3/WMA Disc 1. Press the OPEN/CLOSE hard-key once. 2. With the printed side upwards, insert the disc into the disc slot of the radio. The radio pulls the disc in auto- matically and closes the flip screen. The radio selects the appropriate mode after the disc is recognized, and starts playing the first track.
- Page 71 stopped, and the shifter must be in the PARK position for vehicles with automatic transmission. In vehicles with manual transmission the parking brake must be engaged also. Insert a video DVD first. Touch the UP soft-key to go up one folder. Playing a Video DVD NOTE: Viewing a DVD video on the radio screen is not The playback starts automatically after the DVD video is...
- Page 72 Touch the CHAPTERS soft-key to display a list of avail- able chapters or tracks. Touch a chapter or track soft-key in the list to start playback from the selected section. Touch the VIDEO soft-key to view the video on the screen.
- Page 73 Touch the CLOSE CONTROLS soft-key to close the Touch the STOP soft-key to stop playback. DVD Menu Controls. Touch the REVERSE soft-key during playback to DVD Playback Controls fast reverse playback. In video playback mode, touch anywhere on the screen to show the DVD playback controls.
- Page 74 DVD Video Menu In the DVD Setup menu you may select Menu Language, While in disc mode with a DVD inserted, press the Audio Language, Subtitle, Camera Angle, Aspect Ratio, MENU hard-key to access the DVD Video Menu. and Brightness settings by pressing the corresponding soft-key.
-
Page 75: Hard Disk Drive Mode (Hdd)
Hard Disk Drive Mode (HDD) The HDD mode gives you access to the audio files on the internal hard disk drive. It functions similar to a CD player, with the exception that the internal HDD can hold more tracks. It can hold approximately 3,000 four-minute CD-quality songs. - Page 76 4. Select My Music. 6. Touch the From DISC soft-key in the next screen to copy music tracks of the inserted disc to the hard disk 5. Touch the Add Music Files to HDD soft-key. drive. During the copy process, the disc player cannot play audio.
- Page 77 Copy WMA/MP3 Files to Hard-Drive You can copy MP3 and WMA formatted compressed audio files from a disc or via USB (e.g., USB stick). It is recommended to sort music files into folders. The copy progress is shown in the display. It is possible to listen to radio modes during this process.
- Page 78 • Song 3.mp3 (Third song in Playlist 2) Songs located in the root level (top level) of the disc or USB device are displayed in a folder named Disc (or the Selective Song Copying from Disc physical disc name) for disc media or USB or USB sticks. You can select specific songs on a WMA/MP3 disc using Once the songs are copied, the playlist will be named the following procedure:...
- Page 79 2. Touch the My Files soft-key. 3. Select My Music.
- Page 80 4. Touch the Add Music Files soft-key. 6. Select the folders or titles you would like to copy, by touching the checkbox. 5. Touch the From DISC soft-key in the next screen. A red check mark indicates the selected songs and/or folders.
- Page 81 NOTE: You may touch a folder icon, to open the folder and select specific songs inside the folder. 7. Touch the SAVE soft-key to start the copy process. The copy process is shown on the display. It is possible to listen to radio modes during this process.
- Page 82 4. Touch the SAVE soft-key to start the copy process. 3. Select the folders or titles you would like to copy. The copy process is shown on the display. It is possible to A red check mark indicates the selected songs and/or listen to radio modes during this process.
- Page 83 USB port (if equipped, typically located in the glove box or center console). The radio will find the music files and starts playing automatically. NOTE: Refer to www.chrysler.com, www.jeep.com, www.dodge.com or www.ramtrucks.com for device compatibility list and functionality support. Playing Audio Files from the Hard Disk Drive...
- Page 84 1. For this example, touch the Albums soft-key. 2. Touch a soft-key with the desired playlist name to play a playlist. Touch the PLAY ALL PLAYLISTS soft-key to play all available playlists.
- Page 85 Next Track Rewind Track Press the SEEK up hard-key. The next track of the current Touch and hold the Fast Reverse soft-key. The audio playlist is played. Once the last track has been reached in will be heard at a reduced level while going the forward direction, the unit will loop back to the first through the track in this mode.
- Page 86 Repeat Track The repeat track function repeats the currently played track. Touch the Rpt. TRK soft-key to switch the repeat track function on or off. A red check mark indicates the repeat track function is active. Favorite Playlists on the Hard Disk Drive You may save links to favorite playlists/folders in the Favorite list.
- Page 87 1. Touch the Favorites soft-key to display a list of favorite 2. Touch one of the ADD FAVORITE soft-keys. playlists.
- Page 88 3. You may favor an artist, an album, a genre, or a 4. Select the desired album. You may use the A to Z playlist (folder). For this example select the Albums soft-key to navigate faster through very long lists. category.
- Page 89 NOTE: The link to the favorite playlist will be removed after a playlist was removed from the My Playlists menu. Refer to Editing Playlists on the Hard Disk Drive in this manual. You may now edit the list by touching the EDIT soft-key, or exit the list by touching the EXIT soft-key.
- Page 90 1. While in the HDD mode, touch the EDIT INFO soft-key. 3. For this example scroll down to the last entry and touch the CHANGE soft-key for the folder name. 2. The song information is displayed and can be edited. You may change the artist, the name, the album, the track order, the genre, and the folder.
- Page 91 4. Touch the NEW soft-key to create a new folder. 5. Name the folder and touch the SAVE soft-key.
- Page 92 Managing Playlists on the Hard Disk Drive (Folders) 1. While in the HDD mode, press the MENU hard-key to access the HDD Menu. 6. The song is now assigned to the new folder. Touch the EXIT soft-key to switch back to the HDD screen. 2.
- Page 93 3. Select My Music. You may now add music files, delete music files, or rename folders on the HDD.
- Page 94 Deleting All Playlists from the Hard Disk Drive 1. Press the MENU hard-key on the right side of the radio. 2. Touch the System Setup soft-key to access the System Setup menu. 3. Touch the Manage HDD soft-key to access the Manage HDD menu.
- Page 95 In the default mode, the vehicle brand logo is displayed WARNING! in the right half of the screen. Press the Menu hard-key on the right side of the radio to access one of the Setting It is not possible to copy pictures from a USB device menus.
- Page 96 2. Touch the My Files soft-key to go to the Manage My 3. Touch the My Pictures soft-key to get an overview of Files screen. the currently stored images.
- Page 97 4. Press one of the ADD soft-key. 5. Select the type of media inserted. NOTE: Only JPEG format will be recognized. 6. Use the PAGE soft-keys to page through a list of pictures and press the picture you would like to import.
- Page 98 7. Confirm your selection by touching the SAVE soft-key. The imported picture is now available in the Manage My Pictures screen. 8. In order to display the imported picture in the radio screen, touch the desired picture soft-key.
- Page 99 Touch the DELETE soft-key to delete the picture from the hard disk drive. 9. Select this picture by pressing the Picture View soft- key. A check mark indicates the currently used picture. 10. Press the MENU hard-key twice and then touch the Use the PREV or NEXT soft-key to step through the list of Picture View soft-key to enable the picture view.
- Page 100 The picture is now displayed on the right half of the screen.
-
Page 101: Uconnect™ Multimedia (Remote Devices)
• It is recommended that you use the latest available software for your digital device. See device manufac- turer website for updates. • Visit www.chrysler.com, www.jeep.com, www.dodge- .com or www.ramtrucks.com for a list of compatible Touch the TRACKS soft-key to display a list view. - Page 102 Touch the HIDE TRACKS soft-key to hide the list. Touch the SEARCH/BROWSE soft-key to browse by categories. NOTE: • Depending on the amount of songs and on the perfor- mance of the digital player device, it may take some time before the SEARCH/BROWSE soft-key is dis- played.
- Page 103 Please refer to the following websites for a listing of supported devices and device specific supported fea- tures: www.chrysler.com, www.jeep.com, www.dodge- .com or www.ramtrucks.com. Touch a soft-key with the desired artist’s name to play songs from this artist.
- Page 104 List Jump If you encounter a very long list, it may be helpful to touch the A to Z soft-key to go to the List Jump menu. Touch a soft-key with the desired artist’s name to play songs from this artist. For this example we entered the first letter of the desired artist.
- Page 105 Previous Track Press the SEEK down hard-key. The previous track of the current folder is played. If the first track has been reached in the backward direction, the unit will switch from the first track to the last track. If a track has been playing for more than 10 seconds when the SEEK down hard-key is pressed, the unit will skip back to the beginning of the current track.
- Page 106 Pause Track Info Touch the PAUSE soft-key to pause the playback. Touch the INFO soft-key. Play Information on the currently playing track, if available, Touch the PLAY soft-key to start the playback. will be displayed on the right half of the screen. Displaying the Elapsed Title Time If additional information is available, the NEXT soft-key The elapsed title time of the currently playing track is...
- Page 107 iPod Menu Random Playback While in iPod mode, press the MENU hard-key to The random playback function plays random tracks from access the iPod mode Menu. the iPod device. Touch the Shuffle soft-key to switch the random play function on or off. NOTE: For shuffle/repeat, settings will reflect current setting of device being accessed but can be changed A red check mark indicates the random play function is...
-
Page 108: Bluetooth Audio Streaming Mode
Bluetooth device to ported devices and device specific supported features: the radio. (See Connecting Bluetooth Devices chapter.) www.chrysler.com, www.jeep.com, www.dodge.com NOTE: or www.ramtrucks.com. • The files will not be stored on the internal hard disk... - Page 109 Playing Audio Files from the iPod Device You can play songs directly from the iPod device. Select the desired device. The Bluetooth logo indicates a Bluetooth device. For this example touch the myPhone soft-key. The Bluetooth logo indicates a connected Bluetooth device.
-
Page 110: Sirius Backseat Tv™ (If Equipped)
SIRIUS Backseat TV™ (if equipped) SIRIUS Backseat TV™ Mode NOTE: SIRIUS Backseat TV™ is not available in Canada, Hawaii or Alaska. PAUSE Touch the PAUSE soft-key to pause the Bluetooth audio stream. PLAY Touch the PLAY soft-key to start the Bluetooth audio stream. -
Page 111: Video Entertainment System (Ves)
Press the RADIO/MEDIA hard-key repeatedly until AM be in PARK for vehicles with automatic transmission. In FM SAT TV is display at the top of the screen. Touch the vehicles with manual transmission the parking brake TV soft-key tab to access SIRIUS Backseat TV™. must be engaged. - Page 112 Receiving Audio/Video from the VES™ The VES tab becomes available after the VES™ system is You can play audio from the VES™ through the vehicle’s turned on. Touch the VES MODES soft-key to select the speaker system. If you have a VES™ with a video player, VES™...
-
Page 113: Usb Connector
Availability of the DVD Player soft-key, the Rear AUX 1 USB Connector soft-key, and the Rear AUX 2 is based on the type of It is possible to transfer audio files or pictures files to the VES™ in the vehicle. navigation radio. - Page 114 MP4 format, which cannot be played in this radio. Some copy protected music (e.g., downloads from the internet) cannot be played on this radio. Compatible Devices Please see your authorized dealer or visit www.chrysler- .com, www.jeep.com, www.dodge.com w.ramtrucks.com for supported devices.
- Page 115 How to Close the Cover 2. Pull forward. 1. Using your thumb and index finger, grasp the flap. NOTE: The flap is attached and should not be removed! Notice the hooks (1), which must first be inserted into the Do not pull the flap off of the frame. Do not use a tool frame.
- Page 116 2. Hook the top hooks (1) into the frame first. 3. Then push on the bottom of the flap to secure in place.
-
Page 117: Aux Mode
CAUTION! Never force any connector into the ports of your radio. Make sure your connectors are the identical shape and size before you connect. AUX Mode The AUX connector allows you to connect the headset output of an audio device (e.g., MP3 player) to the navigation radio. - Page 118 The display will switch automatically to the AUX mode The control of the external device (e.g., selecting playlists, when a 3.5 mm stereo mini-jack cable has been connected. play, fast forward, etc.) cannot be provided by the radio; The radio screen will revert back to the last tuner mode use the device controls instead.
-
Page 119: Voice Command
VOICE COMMAND When you press the Voice Command hard-key, you will hear a beep. The beep is Voice Command Operation your signal to give a command. Voice Command allows you to control your AM and FM radio, satellite radio, disc player, navigation system, hard NOTE: If you do not say a command within a few disk drive storage, AUX mode devices (digital music seconds, the system will present you with a list of... - Page 120 These commands are universal and can be used from any At any point, if the system does not recognize one of your menu or screen. commands, you will be prompted to repeat it. All other commands can be used depending upon the NOTE: At any time you can say the words CANCEL, active application.
- Page 121 Display Menu Commands In addition to audible help, the navigation radio is able to The Voice Command understands two types of com- display the most important available commands on the mands. Universal commands are available at all times. screen. Local commands are available if the supported radio mode is active.
- Page 122 Main Menu Radio Menu Start a dialogue by pressing the Voice Command You may say RADIO to switch to AM, FM, or SAT. hard-key. Say RADIO MENU. You may say MAIN MENU to switch to the main menu. • In this mode you may say the following commands: •...
- Page 123 • PREVIOUS STATION (to select the previous station) Satellite Radio To switch to satellite radio mode say SAT or SATELLITE • RADIO MENU (to switch to the radio menu) RADIO. In this mode you may say the following com- • MAIN MENU (to switch to the main menu) mands: •...
- Page 124 • TRACK (1-250) (to change the track) SIRIUS Backseat TV™ To switch to SIRIUS Backseat TV™ mode say SATELLITE • NEXT TRACK (to play the next track) VIDEO. In this mode you may say the following com- • PREVIOUS TRACK (to play the previous track) mands: •...
- Page 125 • VES REMOTE LOCK (to lock the VES™ remote) AUX Mode To switch to the AUX mode say AUX. In this mode you Memo may say the following commands: To switch to the voice recorder mode say MEMO. • TRACK (1-250) (to change the track) In this mode you may say the following commands: •...
- Page 126 • DESTINATION ENTRY − REPEAT (to repeat a memo) − NEXT (to play the next memo) − GUIDE ME TO A NAME − PREVIOUS (to play the previous memo) − STREET ADDRESS • INPUT COUNTRY − DELETE (to delete a memo) •...
- Page 127 • INPUT PHONE NUMBER − CHANGE METHOD • SELECT POI ICONS • FASTER ROUTE • FIND POI (Say POI name if known) • SHORTER ROUTE • TRAVEL INFO − ADVANCED INPUT • INPUT ZIP CODE • MAP OPTIONS • INTERSECTION •...
- Page 128 System Setup Voice Training To switch to the system setup say SETUP. For users experiencing difficulty with the system recog- nizing their voice commands or numbers, the Uconnect™ You can say: Phone system Voice Training feature may be used. • LANGUAGE 1.
- Page 129 • Touch the Start Voice Training soft-key to train the If the system does not understand the words VOICE TRAINING: Voice Command system. • Touch the Listen to Tutorial soft-key to hear instruc- 1. Press the MENU hard-key. tions on voice training. 2.
-
Page 130: Uconnect™ Phone
Uconnect™ Phone The Uconnect™ system is fully integrated with the Uconnect™ Phone is a voice-activated, hands-free, in vehicle’s audio system. The radio display will be used for vehicle communications system. visual prompts from the Uconnect™ system such as phone battery status, signal strength, caller ID, and call type. -
Page 131: Phone System Setup – Pairing
Phone System Setup – Pairing 2. Then touch the System Setup soft-key to get to the System Setup menu. 1. Press the MENU hard-key on the right side of the radio. - Page 132 3. Touch the Device Pairing soft-key to access the This menu lists all paired Bluetooth devices. Bluetooth Devices menu. 4. Press the PAIR soft-key to start a new pairing.
- Page 133 5. You can use the BACK soft-key to switch to the 7. The pairing procedure starts. Refer to the user’s previous menu. manual of your Bluetooth phone to complete the proce- dure on your phone. During this process you need to 6.
- Page 134 8. You will then be asked to set a priority for the paired 9. You may now change the device name. phone. If there is more than one paired phone available, NOTE: Note: You can enter up to 20 characters. the navigation radio will try to connect to the phone with the highest priority setting.
- Page 135 12. Touch the phonebook update soft-key to download the phone book into the radio. NOTE: If the phone book download feature is sup- ported by your cell phone, only the first 1000 contacts will be automatically copied to the radio. Contacts will be downloaded from your SIM card first and then copied from your phones default phone book.
-
Page 136: Uconnect™ Gps Navigation
Uconnect™ GPS Navigation Navigation Software This navigation radio requires digital data from a navi- General Notes gation database. The data in the navigation database is System Overview licensed from Navigation Technologies . Not all roads Your navigation system receives GPS signals from up to are digitized. -
Page 137: Navigation Main Menu
System Limitations 2. Press the NAV hard-key to switch to the navigation The map data that is included with your system is the menu and toggle between Map Viewer and Navigation most recent available at the time of production. Because Main Menu. - Page 138 You may list fire stations, police stations, • Guide Me Home hospitals and Chrysler dealerships. (See the Emer- Touch this soft-key when you want to route to your gency Info section for details).
- Page 139 • MAP It is possible to spell only names contained in the database. Unavailable letters are in a lighter color and are Touch this soft-key when you want to display a map of not selectable. If the desired street name is shown com- your current position.
-
Page 140: Destination Input By Poi
WARNING! For your own safety and the safety of others, it is not possible to use the speller while the vehicle is in motion. Destination Input by POI The Point of Interest database allows you to select a destination from a list of locations and public places, or points of interest (POI). - Page 141 POI Local Area 2. Touch the NEARBY POI soft-key. For this example we will continue by entering a gas station close to the vehicle location. Nearest POI can also be found by simply NOTE: selecting “Point of Interest” instead of the “Where Am I 1.
- Page 142 3. Select one of the Gas Stations from the list and confirm your route by touching the GO soft-key in the confirma- tion screen. POI Nearby Destination For this example we will continue by entering a gas station close to the currently entered destination. NOTE: Some categories may be disabled while the vehicle is in motion.
- Page 143 1. While the system is in guidance mode, touch the OPTIONS soft-key. 3. Touch the Find POI Near destination soft-key and select a category. Pick a gas station from the list and confirm the destination. This is the same process as 2.
- Page 144 POI in Map Area POI by Type To select a POI from anywhere on the navigation data- To select a POI by type, select Point of Interest in the NAV base map area, select Point of Interest in the NAV – Main –...
- Page 145 The Favorite POIs screen shows the available categories. 1. Touch the Favorite POIs soft-key in the NAV – Main 2. You may select ADD to add more categories. Menu screen. You may select EDIT LIST to either clear all, clear selected, or move POI categories in the list.
- Page 146 Destination Input Press the NAV hard-key to access the NAV Main Menu. Select CLEAR ALL to delete all categories from the list. Edit a category soft-key by touching the soft-key with the Touch the New Destination soft-key to get to the Desti- category you would like to edit.
- Page 147 Overview Destination Entry Screen Point on Map allows quick and easy selection of a destination directly from the Map screen. By selecting a street segment or icon, you can quickly enter a destina- tion without the need to input the city name or street. Use Saved Trail to access previously saved trails.
- Page 148 Geo Coordinates A geo coordinate is a coordinate used in geography. You can determine a geo coordinate with the help of a handheld GPS receiver, a map, or the navigation system. Destination Input by Street Address For this example we will continue by entering the follow- ing address 2101 CONSTITUTION AVE NW, WASHING- TON D.C., DC 20037, U.S.A.
- Page 149 You can change the state/province and/or country tem- porarily for the current destination input by touching the STATE, PROVINCE, or COUNTRY soft-key in this menu. NOTE: • A pop-up will appear asking whether or not you would like the new state, province, or country to be the default.
- Page 150 soft-key in the first row of the Street Address screen. This 4. Touch the LIST soft-key to display a list of possible will allow you to input the street name in Washington street names. Select CONSTITUTION AVE NW from the D.C.
- Page 151 If you touch the CONTINUE soft-key without entering a NOTE: • If the displayed address is not the desired address, you number, the navigation system will guide you to a section of the entered street which is the closest to your can either touch the BACK soft-key in the upper left current location.
- Page 152 Destination Input by Intersection NOTE: If Kentucky is not your default state refer to the For this example we will continue by entering the follow- change state/province and/or country section to learn ing intersection: Kaufman Ln and Bridwell Dr, in Louis- how to change state/province and/or country.
- Page 153 3. Touch the Enter Name of Street 1 soft-key to enter the first street. 4. Enter “Kaufman Ln” into the speller and confirm the name. 6. Select “Bridwell Dr” for this example. 5. Touch the Enter Name of Street 2 soft-key to enter the second street.
- Page 154 NOTE: If the first street of the intersection was not entered accurately, the second street may not be found. Destination Input by Geo Coordinate Touch the Geo Coordinate soft-key in the Destination Entry screen. If you wish to change your mind and prefer to select a different cross street, you can touch the soft-key with the cross street name to select another cross street.
- Page 155 Destination Input by Favorite Places Touch the Favorite Places soft-key in the Destination Entry Menu. NOTE: The Favorite Places soft-key is disabled if the favorite places memory is empty. To fill the favorite places memory, you must save a location as a Favorite Place from the Where Am I Now? Menu or by saving current destination in the NAV options screen in after a destination has already been entered.
- Page 156 Favorite Places menu touch the EXIT soft-key. To go back Select a folder or touch SEARCH to search for the desired to the Main Menu touch the back soft-key in the upper contact to enter the destination (see the Address Book left corner of the screen.
- Page 157 Destination Input by Saved Trails Touch the Saved Trails soft-key in the Destination Entry menu. NOTE: The Saved Trails soft-key is disabled if the trails memory is empty. To fill the trails memory, you must save a trail. After touching the map on the screen, a set of arrows appears.
- Page 158 See the Record New Trail section in this manual for more Touch the EDIT LIST soft-key to delete either all or single information. entries off the recent destination list. To exit the Edit Recent Destinations menu touch the EXIT soft-key. To go Destination Input by Recent Places back to the Main Menu touch the Back soft-key in the Touch the Recent Places soft-key in the NAV Main Menu.
- Page 159 The radio will respond: “for Michigan. Please say the 7. Wait for the beep and say NO. name of the street.” The radio will respond: “Now, do you want to start route 3. Wait for the beep and say, LOLLY POP STREET guidance?”...
- Page 160 See the Getting Started and Address Book section in this manual for information on how to save, clear, or edit the home address. Where Am I Now? The Where Am I Now? menu displays location informa- tion for the current vehicle position. Touch the NEARBY POI soft-key to search for a local POI.
- Page 161 1. Touch the Emergency Information soft-key in the NAV Touch the CALL 911 soft-key to dial 911 with a cellular - Main Menu. phone connected via Uconnect™ Phone. See the Uconnect™ Phone section in this manual for more infor- 2. Select hospitals, police stations, fire departments or mation on Uconnect™...
- Page 162 NOTE: The Start/Stop Trail button is not visible during and shortly after a route guidance announcement (inter- section zoom) and the map view settings are set to Turn by Turn. The Record Trail soft-key will switch to the Stop Trail soft-key and the trail appears as a yellow line on the map screen while you drive along a route.
- Page 163 3. Touch the Stop Trail soft-key to stop the trail record- 4. Touch Stop and Save Current Trail. ing. The trail will be named with time and date of the • Touch Discard Current Trail to discard the trail and recording.
- Page 164 6. Touch the EXIT soft-key to save the trail recording Route Guidance to a Recorded Trail without changing the name. The Saved Trails Memory is accessible in the Destination Entry menu. The route guidance will allow you a choice The trail recording is now saved in the Saved Trails to route to the start or end of the pre-recorded trail.
- Page 165 Touch the Saved Trails soft-key. You may touch the EDIT soft-key to change the trail name or to delete trails from the My Saved Trails list. Select the desired trail.
- Page 166 Touch the trail point soft-key to toggle Once you arrive at the destination (green dot, destination between the start-point and the end- icon), the route guidance will end. point of a trail. Touch the GO soft-key to start the route guidance to the selected destination.
-
Page 167: Route Guidance
Route Guidance After starting route guidance, the system calculates the route and announces: “Follow the arrows on the display.” You will receive navigation recommendations by voice messages and screen displays. Touch the Full Map soft-key to display a full map during route guidance. - Page 168 NOTE: Touch the Map View soft-key in any Radio Menu screen to enable the map view mode, where the navigation map or turn-by-turn navigation can be dis- played on the right half of the radio screen (see Display Settings for more information). Map Items Press the Map Items soft-key in the NAV Menu to access the Display Items on Map menu.
- Page 169 • Touch the Current Road Info soft-key to show or hide POI Icons on the Map the NOW ON soft-key and the current road informa- The navigation radio is able to display available points of tion bar. interest on the map. Touch the Select POI Icons soft-key to show a list of point of interest icons.
- Page 171 Touch the icon soft-key to show or hide an icon on the Repeat Navigation Announcement map. Touch the RPT soft-key in the upper right corner of the navigation screen to hear the current navigation announcement.
- Page 172 Automatic Re-Routing In the left half of the screen, the current position and the If you miss a turn while navigating, the navigation radio current routing method are displayed. will automatically adjust your route. The Take Detour soft-key will allow you to calculate a Route Options different route.
- Page 173 Canceling Route Guidance Unverified Navigation Database Area The current route guidance can be aborted at any time by Unverified areas are roads that are included in the pressing the STOP ROUTING soft-key in the NAV-Main database but have not been verified. Menu.
- Page 174 WARNING! Danger of Accident! DO NOT IGNORE TRAFFIC LAWS. If a driving recommendation contradicts the traffic laws, the laws ALWAYS take precedence! “Make a U-turn if possible.” - You are driving in the wrong direction and should turn around at the earliest legal opportunity.
- Page 175 “Please take a left in 500 feet.” - The red arrow points in “Follow the road.” - You should continue driving on the the direction you should turn. The dot indicates a ma- current road for the distance shown. neuver point. “Prepare to take a left”...
- Page 176 to make any lane changes needed to safely make the turn. NOTE: At intersections and traffic circles, only the ends As always, road safety must be observed when making a of the roads to be passed are displayed. lane change. “Keep right in half a mile.”...
-
Page 177: Navigation Options
“You have reached your destination.” - The specified destination has been reached and route guidance is terminated. The display will switch back after few seconds. Navigation Options Options Before Activating the Route Guidance Before confirming the route with the GO soft-key, it is possible to select options different from the default route settings. - Page 178 Press Simulate Route to simulate the route. Touch the Destination Info soft-key in the NAV Options View Turn List to see a list of turns on the route. menu to find a map of the destination area, the complete address or coordinates of your destination.
- Page 179 Use the page soft-keys to scroll through the list of turns. Touch the Avoid This Road soft-key to avoid the selected The turn soft-keys display the length of the route seg- turn in the list. The route will be re-calculated, if an ment, direction of turn, and the name of the street.
- Page 180 Touch the Find POI Near Destination soft-key to ex- change the destination with a POI near to the desired destination. Read more about POI in the POI section of this manual. The turn will be displayed in the center of the map. Touch the NEXT TURN soft-key to show a map of the area close to the next turn in the turn list, touch the PREV TURN soft-key to show a map of the area close to the previous...
- Page 181 Options During Route Guidance During active route guidance the View Route Choices and Simulate Route soft-keys are replaced by the Take Detour and Find Nearby POI soft-keys. After you touch one of the method soft-keys in this menu, the CHANGE soft-key will appear for confirma- tion of the method change.
-
Page 182: Navigation Default Settings
Navigation Default Settings Touch the NAV Settings soft-key in the Navigation - Main Menu to select the preferred measurement, set default routing method, view GPS information, and adjust guid- ance prompt volume. Set Measurement Metric/US Select a distance and touch the GO soft-key to confirm. The navigation will avoid the roads in the turn list for the selected distance and calculate an alternate route. - Page 183 From the Navigation Main Menu touch NAV Settings NOTE: Avoiding freeways, toll roads, tunnels or ferries and then select either mi/ft or km/m. may result in very long routes. Set Default Routing Method GPS Information Mark or unmark route parameters and then touch the The GPS Information menu displays Current Location, SAVE soft-key (not shown) to confirm the changes.
-
Page 184: Map Viewer
Press the NAV hard-key to exit to the NAV - Main Menu. Touch the SAMPLE VOL soft-key to listen to the current volume setting. Guidance Prompts Once satisfied with the volume, touch the SAVE soft-key to save the settings. Touch the CANCEL soft-key to exit the menu without saving the settings. - Page 185 Map Zoom Level Press the Zoom soft-key to change the zoom level. The tip of the arrow in the circle in the center shows your vehicle’s position on the map. The square soft-keys on the left show the map zoom factor, the map orientation, Touch the slider or the IN and OUT soft-keys to change the display mode, and the current location soft-key.
-
Page 186: Stop Over
Map Orientation Suggested routes are displayed as bright green lines on Touch the soft-key with the compass arrow to toggle top of the road map when the route guidance is active. between a map oriented to the North, or oriented parallel NOTE: Suggested routes (green) have a higher priority to the vehicle heading. -
Page 187: Trip Planner
When the route guidance is active, press the Add Stop Trip Planner Over soft-key to add multiple destinations. After you If you are traveling to multiple destinations, the My Trip confirm a stop over, you may either go to the entered stop function will allow you to calculate and save the route to over first, or add it to a destination list. - Page 188 3. Name the trip and touch the SAVE soft-key. 4. Touch ADD DESTINATION. 5. Enter a destination (see section Destination Input in this manual).
- Page 189 In the Confirm Destination screen: NOTE: You can add up to eight destinations to a trip. 6. Touch the SAVE soft-key to add the destination to the The display shows the Itinerary is FULL message in the list. status line if all eight destinations are used. 7.
- Page 190 8. You may now either PLAN NEW TRIP, DELETE ALL 9. Touch a destination soft-key to get the destination your trips, or select your trip by touching the soft-key information, or touch the START THIS TRIP soft-key to with the desired trip name. start the trip.
- Page 191 In the Edit Trip menu you may rename, delete, or edit the You may now Change Name or Change Address. details of this trip. Touch a destination in the list. Touch the EXIT soft-key to confirm your changes. From the Edit Trip menu touch the desired destination Touch the Modify Input Order soft-key in the Edit you would like to edit.
-
Page 192: Realtime Traffic By Sirius Satellite Radio
Realtime Traffic by SIRIUS Satellite Radio The SIRIUS Realtime Traffic feature is a specific applica- tion of the radio receiver used for receiving real-time traffic. The navigation radio receives traffic messages with the satellite radio receiver. You must have a subscription with SIRIUS to receive this service. - Page 193 • A transparent red line indicates an average driving speed is less than or equal to 20% of the speed as given by the digital map. Display Traffic Messages 1. Press the MENU hard-key on the right side of the radio.
- Page 194 2. Touch the SIRIUS Traffic soft-key to display the avail- information is transferred to the Realtime Traffic Infor- able traffic messages. mation service provider, who then generates the Realtime Traffic messages that are sent by SIRIUS to the vehicle. 3. Touch one of the soft-keys with a message to view details.
- Page 195 Touch Map to see the location of a message on a map. Touch PREVIOUS or NEXT to step through the list of available messages. Touch the back soft-key in the upper left corner of the screen to exit the Traffic Message Detail screen. Switching SIRIUS Realtime Traffic On or Off 1.
- Page 196 Warning Prompts NOTE: It can take between 15 and 30 minutes for a Touch the Warning Prompts soft-key to enable warning message to reach the system. prompts. Once you change settings, touch the SAVE soft-key to confirm your changes. View All Messages You can view either all received messages for the area you have a subscription, or only the messages on your route within the same area.
-
Page 197: Address Book
Address Book The address book is organized in folders. • The HOME folder contains only your home address. Overview The address book provides a way to organize and store Touch this folder soft-key to edit your home address. frequently used addresses. You may route to this address by touching the Guide Me Home soft-key in the NAV - Main Menu. - Page 198 • The Voice Command Created Entries folder contains Entering/Editing/Deleting an Address contacts which were created with the help of the Voice 1. Touch Menu to access one of the menus. Command System. Touch the Voice Command Cre- ated Entries folder soft-key to add, edit, delete, and route to your contacts.
- Page 199 3. Touch My Address Book soft-key to get to the Address The Address Book screen appears. Book menu. 4. To select an address from the Default folder, touch the Default Folder soft-key.
- Page 200 To select an address from another folder, touch one of the You may now create a new contact or copy a contact from folder soft-keys. another folder. 5. Touch the ADD soft-key to add a new contact. Touch 6. Touch Create New Contact to go to the next screen. CLEAR ALL to delete all contacts in this folder, touch EXIT to go back to the Address Book menu, or touch a soft-key with a contact name to view, edit, or change the...
- Page 201 7. Enter a name for your new contact. You may now edit the contact information. Add a voice tag for the voice recognition or touch the Edit Contact 8. Press the SAVE soft-key to display the Contact Infor- soft-key to add more information to the entry. mation menu.
- Page 202 10. Once the destination is entered, touch the SAVE In this example, we need to add an address to the contact. soft-key to confirm the address. 9. Press Add Address and enter a destination (refer to Destination Input section in this manual).
- Page 203 Search a Contact in the Address Book 1. Touch the SEARCH soft-key in the Address Book menu. In addition, you may enter a phone number by pressing the Add Phone # soft-key. 11. Touch the EXIT soft-key after all available informa- 2.
- Page 204 4. Touch the B. Jeffries soft-key from the results list to 5. Once the contact information is displayed, touch the select the contact. Route To soft-key to start route guidance to the contacts address, or touch Call Contact if a valid phone was entered and a telephone is connected to the navigation radio.
-
Page 205: System Information
SYSTEM INFORMATION User Data Backup Press the MENU hard-key on the right side of the radio Contact your local authorized dealer for information on and touch the System Setup soft-key to access the System how to backup or transfer your user data, such as address Setup menu. -
Page 206: Troubleshooting
A.: Yes. Copy to WMA or MP3 files to the USB storage cannot be displayed. Contact an authorized dealer or partition on your iPod. Connect the iPod to the USB website www.chrysler.com, www.jeep.com, www.dodge- connector on the radio and copy the files to the HDD. .com or www.ramtrucks.com for available updates. -
Page 207: Navigation
Book, press the HOME soft-key. Press Edit Contact to edit A.: Refer to the compatibility device list located on the the entry. Refer to the Getting Started section for more following brand websites: www.chrysler.com, www.jeep- details. .com, www.dodge.com or www.ramtrucks.com. -
Page 208: Glossary Of Terms
GLOSSARY OF TERMS Gracenote Media Data- base, Gracenote Media Autostore Recognition Service (ww- Compact Disc w.gracenote.com) Compact Disc Changer Global Positioning System CDDB A technology company Greenwich Mean Time founded in 1995 as Hard-Disk Drive CDDB, Inc. The company has been renamed to Hands-Free Module Gracenote, Inc. - Page 209 The.M4A format is actu- RBDS Radio Broadcast Data Sys- ally the audio layer of (non-video) MPEG 4 Satellite Radio movies. SAT-V Satellite Backseat TV™ The.M4P format is an au- Speech Dialog System dio file purchased from Traffic Message Channel Apple’s Music Store VES™...
- Page 210 Chrysler Group LLC 11RHR-526-AB First Edition Printed in U.S.A.
Need help?
Do you have a question about the MEDIA CENTER 730N RHR and is the answer not in the manual?
Questions and answers
How do you erase a file from the HDD?